manuals.online logo
Brands
  1. Home
  2. •
  3. Brands
  4. •
  5. Panasonic
  6. •
  7. Controllers
  8. •
  9. Panasonic EYFLA7AR Operating instructions

Panasonic EYFLA7AR Operating instructions

Two-Way Quick Programming Guide
Two-Way communicationcapable Tool Models:
EYFLA7AR, EYFLA8PR/CR/AR, EYFLA9PR/CR,EYFMA2PR/CR, EYFNA1PRT/CRT/,JRT,& EYFPA1JRT
(Pleaserefer to the Owner's Manualfor further instruction beyond this Quick Guide)
These models can operate in both One-Way mode or Two-Way mode.
•One-Way communication mode –The Remote controlis used to change tool settings.
•Two-Way communication mode –The Qualifier will changetool features and will override any settings made by the remote control.
Programming the tool with the remote control
1. Cycle Power –Remove then re-installthe batteryon the tool.
2. Enter Program Mode –On the tool,
•press and hold down the “Light Button” while pulling and releasing the tool’s “Trigger/Switch” youcan then release both
buttons.
•The display starts blinking, the tool is now in programmode.
•If the display is solid, returnto step one.
3. Edit ProgrammableFeatures–While the displayis flashing, use the remotecontrolto changefeature settingsaccordingto the charton
page 2.
Each press of the A,B,C or D buttons on the remote control will cycle through the sub-menus.
The + and –buttons change the sub menu feature values
The blue button is the Save button. Press this button after features are selected to save changes.
Two-Way Quick Programming Guide
How to set Programmable Features
Button Number
ofPush Setting Mode Tool display Description
A
0 Torquesetting 1~40: Shut-off
F: Non shut-off Select stage with +/-button. Initial setting is 「F」.
1 time Flush(Snugtorque)detectionmode
setting L1: Stage1
~L7: Stage7
Select stage with +/-button. Initial setting is 「L1」.
L1: For applications with light load bef ore snug point
~L7: For applications with heavy loads or v arying joint rate before snug point
2 times Buzzer setting b0: No buzzer
b1: Buzzer withOK
b2: Buzzer w ithNOK Select stage with +/-button. Initial setting is 「b0」.
3 times Flush(Snugtorque)detectiondelay J0: OFF
01~30: 0.1~3.0sec.
Select stage with +/-button. Initial setting is 「J0」.
The tool doesn’t activ ate Snug Torque Detection mode and ignores load during rundown for
a selected time period.
B
1 time LED light d1: by LED button (for 5min)
d2: by trigger switch Select stage with +/-button. Initial setting is 「d1」.
2 times Rundownerrordetecting 0~30: 0~3.0sec. Select stage with +/-button. Initial setting is 「0」.
If the clutch is activ ated before the programmable minimum runtime,
the tool alerts the operator to a NOK fastening. (0.1sec. per stage)
3 times Variablespeedcontrol P0: Variablespeed (ON)
P1: Single speed(OFF) Select stage with +/-button. Initial setting is 「P0」.
Speed can be controlled by use of thetrigger.
C
1 time Resetsettings FAll settings return to initial setting.
2 times Maintenanceinterval alarm 0~99: 0-99Rundowns Select stage with +/-button. Initial setting is 「0」
When total f astening times are within 1 hour of preset maintenance interv al, tool’s display
blinks notifying the operator.
Once tool reaches the preset interval, the tool is looked out from further use.
3 times Out of rangedisablefunction C0: OFF
C1: ON
Select stage with +/-button. Initial setting is 「C0」
In the event that wireless communication cannot be completed between the tool and the
qualifier, the tool will be disabled and cannot be operated.
4 times CommunicationMode 90: 1-way
91: 2-way
Only available on models equipped with 2-way communication
Toggle communication mode between 1-way & 2-
way
D
1 time Cross threadreduction R0: OFF
R1: 360°reverce(ON)
Select stage with +/-button. Initial setting is 「R0」
Tool first reverses 360degree, aligning the threads, greatly reducing the possibility of cross
threads.
2 times Retighteningprevention U-U9: 0~3.0sec. Select stage with +/-button. Initial setting is 「U」
Tool prevented from operating during a selected time period after shut-of f.
3 times Socket extension mode h0: Normal
h1: for 150mm socket
h2: for 250mm socket
Select stage with +/-button. Initial setting is 「h0」
RPM during impacts is adjusted depending on socket extensionlength tostabilize torque.
Note: The Default setting for the models listed on page 1 is One-Way communication mode.
Important: The communicationmode must be changed with the remote before learning the tool to
the qualifier to initiate Two-Way communication. (See below instructions)
Two-Way Quick Programming Guide
To change the tool communication mode from the default “90” (one way) to “91” (two-way)
1. Put the tool into program mode
2. Press “C” button on the remote 4 times
3. Press the + button on the remote to select “91” (two-way)
4. Press the Blue set button to save the changes
Sleep Mode
•If the tool is in “sleep mode” (timed out from no operation and no display) Default is 20 min. the tool will not communicate
•Tool sleep time can be changed in the qualifier settings under Qualifier setting page 2 (select next) then select “Tool on time”. Sleep
time range is 20 -720 min.
•Pulling the tool trigger will “wake” the tool and initiate communication.
In the event the qualifier is powered down or loses power while the tool is in sleep mode, you must power up the
qualifier firstbefore waking the tool from sleep to initiate two-way communication. Otherwise you will need to pull
and reinstallthe battery on the tool
Two-Way Quick Programming Guide
Learning tools to the Qualifier
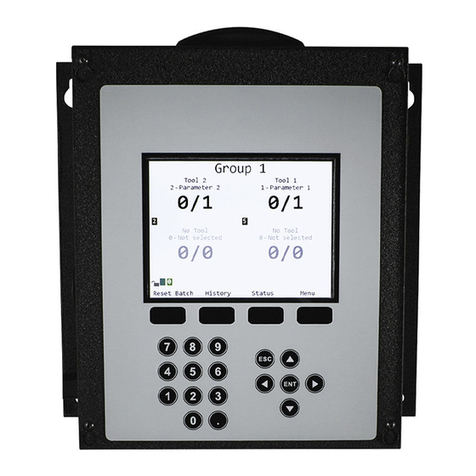
1. Power up the qualifier. Press the button below, ‘Menu’.
2. Enter the password 1011 (default) using the numeric
keypad and press ENT when completed.
3. In the menu, right arrow to “Tools” and press ENT.
4. Press the button below, “Learn” to begin the learn process
5. Follow the directions on screen to learn the tool.
6. The unit will return to the Tools screen with the learned tool,
named “Tool 1” instead of “No Tool”.
7. You can now repeatthe learning process for the next tool or
8. return to the menu by pressing ESC or the button below Exit.
1. 3.
4. 5.
6.
Learning tools to the Qualifier continued
To the right, is an example of 2 tools learned to the Qualifier.
•One tool is in One-Way mode “90”
•The other tool is in Two-Way mode “91”
Note the difference in illustration1
•Tool 1 is in Two-Way and displays the (Model number)
•Tool 2 is in One-Way mode and displays(OK/NOK)
Switching from One-Way mode to Two-Way mode
If you learn a tool in One-Way mode “90” and want to relearn it
to Two-way mode “91”, you must “forget” the tool first.
1. Change the “Communication Mode’ in the tool from “90 to
“91”with the remote (page 3).
2. Go to the Tool tab, “edit’ then “Forget”.
3. Then learn the tool to the qualifier (page 4)
Two-Way Quick Programming Guide
1
Parameters/Features
1. Name the Parameter
2. Socket Tray
3. Set the Batch count
4. Select lock on batch if required
5. Torque Settings: 1-40. Default–1
6. Flush Detection: 1-7. Default –1
7. Buzzer settings: Off, OK, NOK. Default - Off
8. Flush Detect Delay: .1 –3 sec. Default–0
9. LED light: Trigger switchor LED button. Default –LED Button
10. Cross thread/Rehit: 0-3 sec. Default –0
11. Variable speed: Variable Speed or Single. Default –Variable
12. Cross Thread reduction: 540˚ reverse or OFF. Default – OFF
13. Retightening Prevention: 0-3sec. Default- 0
14. Socket ext. mode: 150mm. 250mm, None. Default - None
Two-Way Quick Programming Guide
Editing the Parameters for each tool
•Tools can only be learned to Parameters 1-16.
•Parameters 17-100 areassignableto any of the tools 1-16.
1. Go to “Parameters”, from the main menu.
2. Select the parameter location you want then press “edit”
*Two-Way communication mode –The Qualifier will change tool features and will override any settings made by the remote control.
(Assembly Manager softwareis available on our Website and can also be used
to make parameter changes, createjobs, groups, etc.)
Programingmultiple Parameters to a single tool
1. Go to parameters tab (page 4)
2. Select 17 and above parameters
3. Go down to “tools:” to assign the tool.
4. Enter the number on the keypad
5. Select “Save”
6. Repeat to 18 and so on.
Creating a Job for a sequence of events
1. Go to the Jobs tab
2. Select the Job you want
3. Select “edit”
4. Select “Steps”
5. Assign the parameters or groups as shown to the right
6. Exit and “save”
Two-Way Quick Programming Guide
Tools in two-way mode that are in a job sequence will flash orange on the
rear LED panel when that tools parameter is active so the operatorknows
which tool to use.

This manual suits for next models

16

Other Panasonic Controllers manuals

Panasonic FV-WCCS1-W User manual

Panasonic

Panasonic FV-WCCS1-W User manual

Panasonic FP-E Owner's manual

Panasonic

Panasonic FP-E Owner's manual

Panasonic FP7 Series User manual

Panasonic

Panasonic FP7 Series User manual
Panasonic FP7 Series User manual

Panasonic

Panasonic FP7 Series User manual

Panasonic AG-A850 User manual

Panasonic

Panasonic AG-A850 User manual

Panasonic ACXF60-03410 User manual

Panasonic

Panasonic ACXF60-03410 User manual

Panasonic CZ-RD516C-1 User manual

Panasonic

Panasonic CZ-RD516C-1 User manual

Panasonic minas a series User manual

Panasonic

Panasonic minas a series User manual

Panasonic AKHRP900P - CAMERA CONTROLLER HC User manual
Panasonic

Panasonic AKHRP900P - CAMERA CONTROLLER HC User manual

Panasonic WVCU161C - SYSTEM CONTROLLER User manual

Panasonic

Panasonic WVCU161C - SYSTEM CONTROLLER User manual

Panasonic FP7 Series User manual

Panasonic

Panasonic FP7 Series User manual

Panasonic FP Series Owner's manual

Panasonic

Panasonic FP Series Owner's manual

Panasonic AW-RP60G User manual

Panasonic

Panasonic AW-RP60G User manual

Panasonic CZ-RD517C User manual

Panasonic

Panasonic CZ-RD517C User manual

Panasonic PT-F100 User manual

Panasonic

Panasonic PT-F100 User manual

Panasonic FP7 Series User manual

Panasonic

Panasonic FP7 Series User manual

Panasonic AFPX-COM5 User manual

Panasonic

Panasonic AFPX-COM5 User manual

Panasonic FP7 Series User manual

Panasonic

Panasonic FP7 Series User manual

Panasonic AAD03011 User manual

Panasonic

Panasonic AAD03011 User manual

Panasonic CZ-64ESMC2 User manual

Panasonic

Panasonic CZ-64ESMC2 User manual

Panasonic MGSDB2 Series User manual

Panasonic

Panasonic MGSDB2 Series User manual

Panasonic PAW-PACR3 User manual

Panasonic

Panasonic PAW-PACR3 User manual

Panasonic FP3 User manual

Panasonic

Panasonic FP3 User manual

Panasonic AWRP605 - CCU & PAN/TILT CONTR User manual

Panasonic

Panasonic AWRP605 - CCU & PAN/TILT CONTR User manual

Popular Controllers manuals by other brands

TVC Ethos Two user guide

TVC

TVC Ethos Two user guide

RMG DFAWLC-044 installation manual

RMG

RMG DFAWLC-044 installation manual

COMEX ESC-SR Manual of use and installation

COMEX

COMEX ESC-SR Manual of use and installation

Mitsubishi Electric ANS-Q-LARGE-U user manual

Mitsubishi Electric

Mitsubishi Electric ANS-Q-LARGE-U user manual

AB Quality GuardPLC 1600 installation instructions

AB Quality

AB Quality GuardPLC 1600 installation instructions

Flycolor X-Tower F4-40A user manual

Flycolor

Flycolor X-Tower F4-40A user manual

gefran SIEIDrive ADV100 Quick start up guide

gefran

gefran SIEIDrive ADV100 Quick start up guide

AirTurn PEDpro operating manual

AirTurn

AirTurn PEDpro operating manual

STERWINS EDWC-3 manual

STERWINS

STERWINS EDWC-3 manual

JVC RX-ES9SL Service manual

JVC

JVC RX-ES9SL Service manual

MORITEX MLEK-A120W2LRD instruction manual

MORITEX

MORITEX MLEK-A120W2LRD instruction manual

FlowCon FN.1.4 Installation and operation instruction

FlowCon

FlowCon FN.1.4 Installation and operation instruction

EMC Connectrix B Series Hardware reference manual

EMC

EMC Connectrix B Series Hardware reference manual

Elby Designs ASM301-ADSR DIAGRAMS

Elby Designs

Elby Designs ASM301-ADSR DIAGRAMS

Lamtec FA1 operating instructions

Lamtec

Lamtec FA1 operating instructions

Siemens SIMATIC S7-200 manual

Siemens

Siemens SIMATIC S7-200 manual

Advanced Control VersiStart II Series Assembly and commissioning instructions

Advanced Control

Advanced Control VersiStart II Series Assembly and commissioning instructions

Electro-Voice PWS-4 Technical specifications

Electro-Voice

Electro-Voice PWS-4 Technical specifications

manuals.online logo
manuals.online logoBrands
  • About & Mission
  • Contact us
  • Privacy Policy
  • Terms and Conditions

Copyright 2025 Manuals.Online. All Rights Reserved.