manuals.online logo
Brands
  1. Home
  2. •
  3. Brands
  4. •
  5. Panduit
  6. •
  7. Power Tools
  8. •
  9. Panduit CT-400 User manual

Panduit CT-400 User manual

CT-400: PA24435A01_04 Page: 1 of 4 6-2018
CT-400
PA24435A01
Rev. 046-2018
© Panduit Corp. 2018
NEW TOOLS – BEFORE PLACING INTO SERVICE
1. VISUALLY INSPECT TOOL
FOR DAMAGE.
All Panduit crimping tools are calibrated and inspected before they are shipped from
the factory. There is, however, a possibility of damage in shipment. All new tools
should therefore be inspected before being used.
2. CHECK DIE CLOSURE
3. CLEAN EXCESS OIL FROM
CRIMP DIES AND USE.
New tools are shipped factory lubricated. They do not require extensive cleaning.
After inspection, simply clean any excess oil from the crimping dies and place into
service.
CAUTION: Verify power is “OFF”
before working on wiring with this tool.
The plastic grips are for the user’s
comfort—and are not intended to
insulate against shock while working
on live electrical circuits.
WARNING: Controlled cycle device prevents tool from opening before cycle is
completed. Keep hands and other objects clear of pinch areas before closing.
ATTENTION: TO DISENGAGE CONTROLLED CYCLE DEVICE:
Turn the ratchet release screw counterclockwise and open handles.
The controlled cycle device will automatically reset after screw is released.
Email:
techsupport@panduit.com
EU Website:
www.panduit.com/emea
EU Email:
emeatoolservicecenter
@panduit.com
www.panduit.com
Technical Support:
1-800-777-3300
Panduit Europe • EMEA Headquarters
Tel: +31 (0) 546 580 452
Fax: +31 (0) 546 580 441
Ratchet Release
Screw
Notch
Lock Screw
BACK
VIEW
(FIG. 1)
FRONT
VIEW
(FIG. 2)
Adjustment
Pin
Locator Retention
Screws
Locator
CRIMP DIES for
Pan-Term
insulated terminals,
splices and wire joints.
© Panduit Corp. 2018 OPERATION INSTRUCTIONS CT-400
CT-400: PA24435A01_04 Page: 2 of 4 6-2018
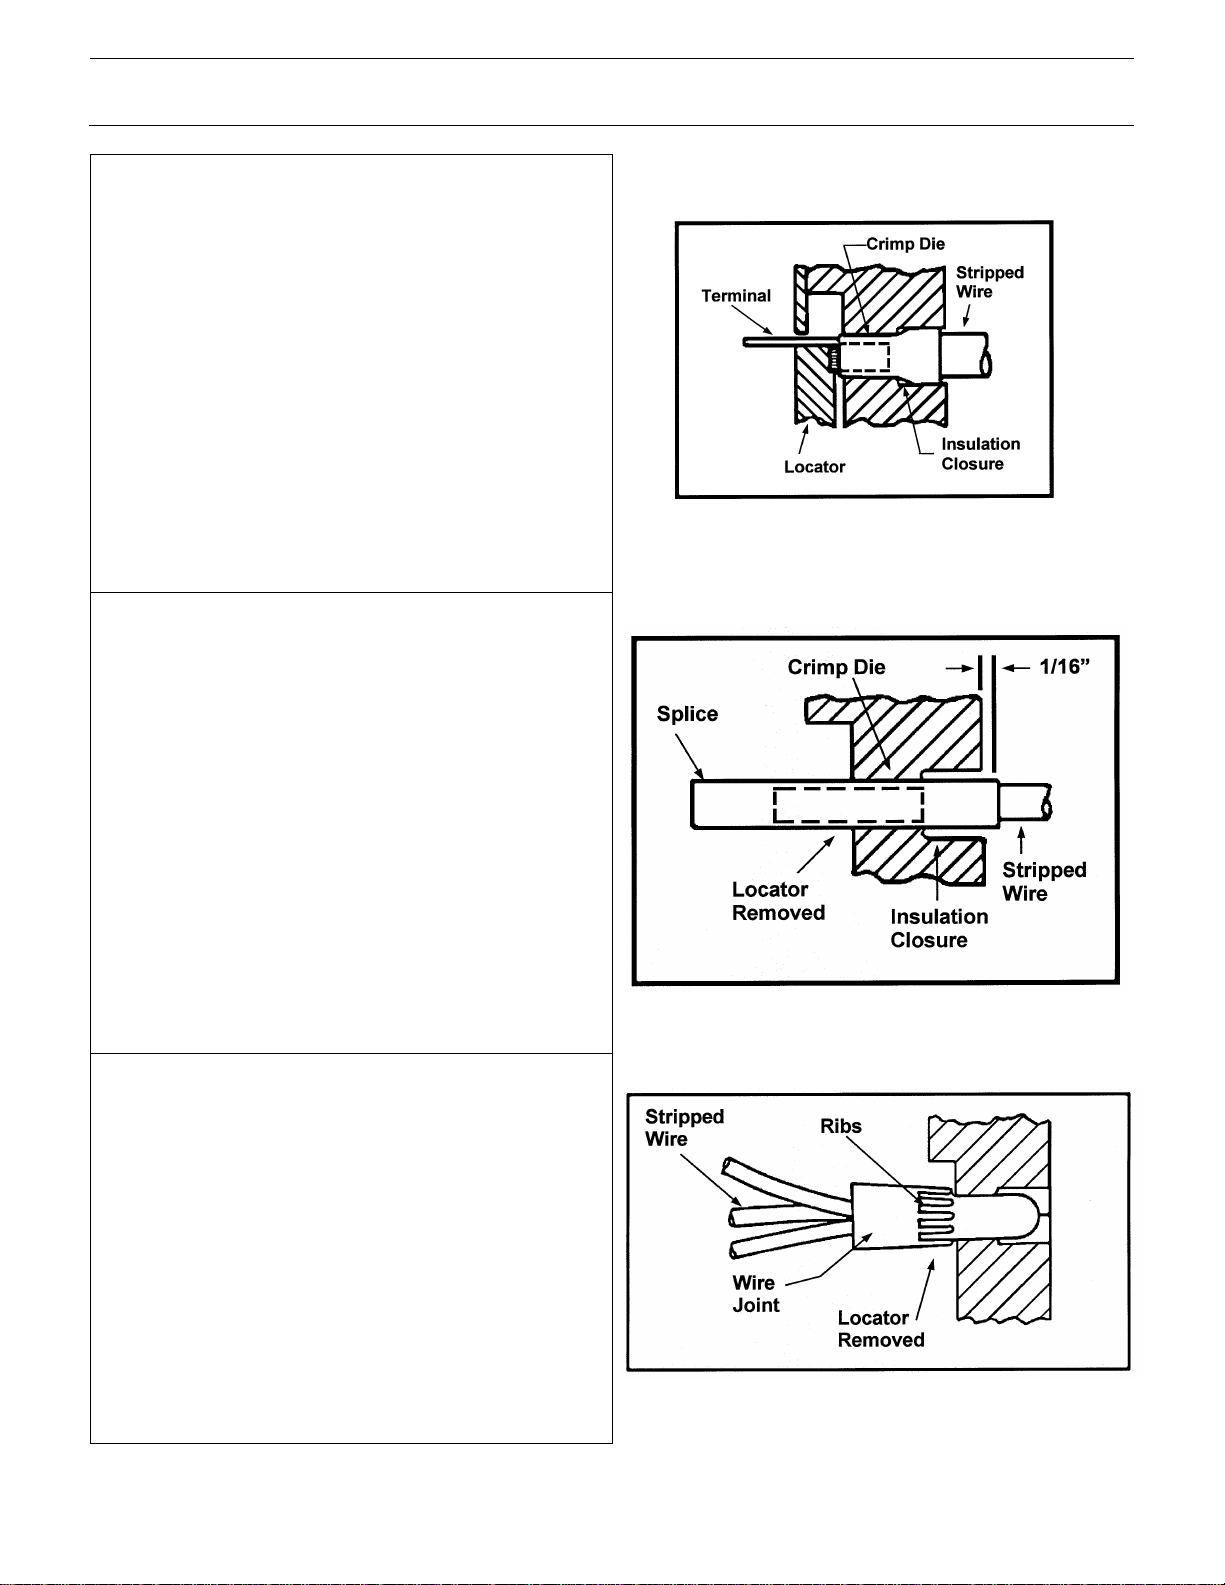
INSULATED TERMINAL INSTRUCTIONS
1. With handles in open position, insert terminal in
proper size die so that tongue slides into locator
slot. See product packaging for proper crimping
pockets.
2. Position terminal against locator and close handles
until barrel is held snugly in place -- do not deform
barrel.
3.
Insert stripped wire into terminal until conductor
extends beyond barrel. See product packaging for
wire strip length.
4.
Crimp by closing handles until controlled cycle
device releases. Handles will open automatically,
and crimped terminal may be removed.
FIG. 3
INSULATED SPLICE INSTRUCTIONS
1. Remove locator using a 2mm Allen wrench on the
locator retention screws [see FIG. 1]. (The 2.5mm
wrench may be used simultaneously to secure
screws on opposite side.)
2.
With locator removed and handles opened, insert
splice in proper size die so that barrel extends 1/16"
beyond insulation closures.
3. Close handles until barrel is held snugly in position -
- do not deform barrel.
4. Insert stripped wire into splice and crimp by closing
handles until controlled cycle device releases.
5.
Remove splice and repeat operation for crimping
other half of barrel.
FIG. 4
INSULATED WIRE JOINT INSTRUCTIONS
1. Remove locator using a 2mm Allen wrench on the
locator retention screws [see FIG. 1].
(The 2.5mm
wrench may be used simultaneously to secure
screws on opposite side.)
2.
With terminal locator removed, insert wire joint in
proper size die so that ribs of molded insulator are
positioned against face of tool.
3. Twist ends of stripped wire together, trim and insert
into wire joint.
4. Crimp by closing handles until controlled cycle
device releases. Handles will open automatically,
and crimped joint may be removed.
FIG. 5
© Panduit Corp. 2018 OPERATION INSTRUCTIONS CT-400
CT-400: PA24435A01_04 Page: 3 of 4 6-2018
IN-SERVICE TOOLS – AFTER TOOLS HAVE BEEN IN SERVICE
1. CLEAN AND VISUALLY
INSPECT FOR DAMAGE
ONCE A MONTH.
In-service tools should be cleaned and inspected at least ONCE A MONTH.
To clean---immerse in a commercial degreasing compound and wipe clean
with a lint free cloth. If a degreasing compound is not available, wipe with a
clean cloth.
2. CHECK DIE CLOSURE
After cleaning, inspect the crimping dies for proper die closure. See FIG. 6
for plug gaging instructions.
3. LUBRICATE TOOL ONCE A
WEEK.
4. CLEAN EXCESS OIL FROM
CRIMP DIES AND USE.
In-service tools should be lubricated ONCE A WEEK, and after every
cleaning. Lubricate all pins, pivots and bearing surfaces with a good grade
S.A.E. 20 or equivalent motor oil. Be sure to clean any excess oil from
crimping dies before using.
VISUAL INSPECTION
1. Visually inspect tool for missing or loose pins; then close the tool and note the return action of the handles.
2. Remove the terminal locator and visually inspect the crimping dies for worn, chipped or broken surfaces.
Damaged crimping dies are objectionable and may go undetected when gaging the die closure.
3. If parts are missing, defective or damaged; contact your local Panduit Sales Office for information on repair
or replacement of tools; or contact Technical Support at 1-800-777-3300.
DIE CLOSURE INSPECTION: CT-400
Die Closure inspection is made by using the GO/NO-GO gaging dimensions listed in FIG. 6.
TO PERFORM DIE CLOSURE INSPECTION
1. Clean die and plug gage surfaces.
2. Close tool handles until crimping jaws are bottomed and handles are fully closed.
3. Using the proper gage member, insert the GO side into the die – it must pass completely through the
closure.
4. Reverse the gage and try to insert the NO-GO side into the die closure (Do Not use excessive force).
The NO-GO side may partially enter the die closure but must not pass completely through.
5. Perform the above procedure for both the crimp die closure and the insulation die closure, as listed in
FIG. 6.
© Panduit Corp. 2018 OPERATION INSTRUCTIONS CT-400
CT-400: PA24435A01_04 Page: 4 of 4 6-2018
6. If both the GO and NO-GO conditions are met; the tool is dimensionally correct – if either condition fails,
adjust the DIE CLOSURE as follows:
1. Remove lock screw with small wrench [see FIG. 2].
2. With adjustment wrench provided, turn adjustment pin one notch – each notch produces approximately
.002” of adjustment. A clockwise turn increases the die closure and a counter-clockwise turn decreases
the die closure.
3. Close the tool and plug gage the die closure as instructed above. If the GO/NO-GO conditions are not
met, repeat Step (2) in one-notch increments until the tool is gages to be dimensionally correct.
Replace and tighten both lock screws after final adjustment.
7. If the above procedure fails to satisfy all GO and NO-GO conditions, contact your local Panduit Sales Office;
or contact Technical Support at 1-800-777-3300.
FIG. 6
POCKET
SIZE
CRIMP DIE CLOSURE
GAGING GAGE ELEMENT
DIAMETERS
GO NO-GO GO NO-GO
22-18 RED 0.096 0.106 0.0960 - 0.0963 0.1057 - 0.1060
16-14 BLUE 0.114 0.124 0.1140 - 0.1143 0.1237 - 0.1240
POCKET
SIZE
INSULATION DIE CLOSURE
GAGING GAGE ELEMENT
DIAMETERS
GO NO-GO GO NO-GO
22-18 RED 0.100 0.116 0.1000 - 0.1003 0.1157 - 0.1160
16-14 BLUE 0.142 0.158 0.1420- 0.1423 0.1577 - 0.1580

Other Panduit Power Tools manuals

Panduit CT-2940 Series User manual

Panduit

Panduit CT-2940 Series User manual

Panduit PTS User manual

Panduit

Panduit PTS User manual

Panduit GS2B User manual

Panduit

Panduit GS2B User manual

Panduit PBTMT User manual

Panduit

Panduit PBTMT User manual

Panduit RT2HT User manual

Panduit

Panduit RT2HT User manual

Panduit BlackFin CT-2920 CCP Series User manual

Panduit

Panduit BlackFin CT-2920 CCP Series User manual

Panduit ST2MT User manual

Panduit

Panduit ST2MT User manual

Panduit CTFP-40 User manual

Panduit

Panduit CTFP-40 User manual

Panduit CA-800EZ User manual

Panduit

Panduit CA-800EZ User manual

Panduit CP-881/E User manual

Panduit

Panduit CP-881/E User manual

Panduit CT-1700 User manual

Panduit

Panduit CT-1700 User manual

Panduit GS4EH User manual

Panduit

Panduit GS4EH User manual

Panduit CP-881 User manual

Panduit

Panduit CP-881 User manual

Panduit CT-2930/L User manual

Panduit

Panduit CT-2930/L User manual

Panduit CT-260 User manual

Panduit

Panduit CT-260 User manual

Panduit GTH User manual

Panduit

Panduit GTH User manual

Panduit BlackFin CT-2980 User manual

Panduit

Panduit BlackFin CT-2980 User manual

Panduit ST-100 User manual

Panduit

Panduit ST-100 User manual

Panduit CP-991 User manual

Panduit

Panduit CP-991 User manual

Panduit CT-1701 User manual

Panduit

Panduit CT-1701 User manual

Panduit PN433 User manual

Panduit

Panduit PN433 User manual

Panduit CT-1525 User manual

Panduit

Panduit CT-1525 User manual

Panduit CT-720 User manual

Panduit

Panduit CT-720 User manual

Panduit CT-2980/L User manual

Panduit

Panduit CT-2980/L User manual

Popular Power Tools manuals by other brands

Ingersoll-Rand 121 instruction manual

Ingersoll-Rand

Ingersoll-Rand 121 instruction manual

Ferm PRM1018 Original instructions

Ferm

Ferm PRM1018 Original instructions

paratech PAKHAMMER Operation and maintenance manual

paratech

paratech PAKHAMMER Operation and maintenance manual

Yamato AC-100 instruction manual

Yamato

Yamato AC-100 instruction manual

Craftsman 351.240930 Operator's manual

Craftsman

Craftsman 351.240930 Operator's manual

SW Stahl PROFI Tools 26132L instruction manual

SW Stahl PROFI Tools

SW Stahl PROFI Tools 26132L instruction manual

Ryobi EDP2521L Owner's operation manual

Ryobi

Ryobi EDP2521L Owner's operation manual

ABB AMVAC Installation and operation manual

ABB

ABB AMVAC Installation and operation manual

morse 4560BSS-P Operator's manual

morse

morse 4560BSS-P Operator's manual

Skil 3440 Original instructions

Skil

Skil 3440 Original instructions

Stanley 07530 Instruction and service manual

Stanley

Stanley 07530 Instruction and service manual

Power Craft 69370 instruction manual

Power Craft

Power Craft 69370 instruction manual

RAMMER RSS05R Operator's manual

RAMMER

RAMMER RSS05R Operator's manual

Mountz HF-Series operation instruction

Mountz

Mountz HF-Series operation instruction

Strend Pro BP6 instruction manual

Strend Pro

Strend Pro BP6 instruction manual

Ravaglioli RAV TD8060TWS instruction manual

Ravaglioli

Ravaglioli RAV TD8060TWS instruction manual

Matco Tools MT2738 manual

Matco Tools

Matco Tools MT2738 manual

Kärcher EDI 4 manual

Kärcher

Kärcher EDI 4 manual

manuals.online logo
manuals.online logoBrands
  • About & Mission
  • Contact us
  • Privacy Policy
  • Terms and Conditions

Copyright 2025 Manuals.Online. All Rights Reserved.