manuals.online logo
Brands
  1. Home
  2. •
  3. Brands
  4. •
  5. Paradox
  6. •
  7. Remote Control
  8. •
  9. Paradox Magellan REM101 User manual

Paradox Magellan REM101 User manual

What’s New in V1.1
• A “Low Battery Signal” is sent to the control panel when battery is low. Upon power-up, a “Low
Battery Restore Signal” is sent to the control panel when the battery voltage level has reached
an acceptable level for normal operation. Compatible with MG5000, MG5050 (V4.9), SP4000,
SP65 (V5.1), K32LX (V1.1), RTX3 (V5.16), and MG6250 (V1.5x).
• The REM101 now complies with EN 50131 standards.
Overview
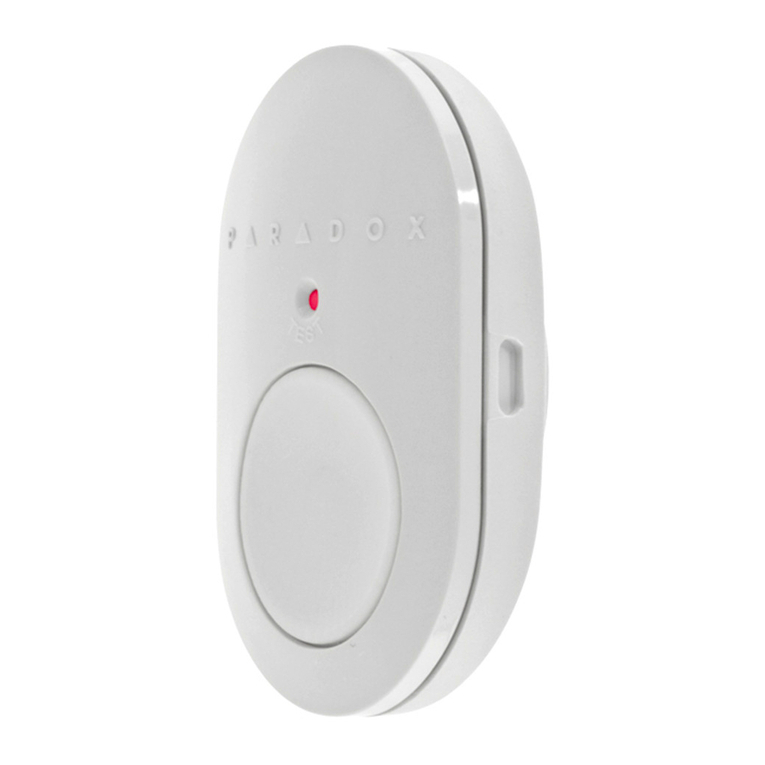
The REM101 is a single-button remote control, with easy panic functionality and battery test
button. It is available in both 433 or 868 MHz versions.
Compatibility and Technical Specifications
• Magellan All-in-one Wireless Console (MG6250)
• 32-Zone Wireless Transceiver Control Panels (MG5000 / MG5050)
• Magellan Wireless Expansion Module (RTX3)
• Wireless Receiver (RX1)
• LCD Keypads with Built-in Transceivers (K32LX / K641LX)
• EN 50131-3 Grade 2 Class II (portable type B; certification body = Intertek)
• Consumption: standby = 2uA (11mA during transmission)
• Battery: One 3V lithium battery (CR2032)
• Temperature range: -10 to +55°C (14 to 131° F) / Humidity: 5-90%
• Weight: 16 grams (0.5 oz)
• Dimensions: 32 x 51 x 13 mm (1.2 x 2.0 x 0.5 in)
Wireless Range
• 30 m (100 ft.) with Magellan All-in-one Wireless Console (MG6250) and RX1
• 45 m (150 ft.) with the MG5000 / MG5050, RTX3, K32LX, and K641LX
Battery
One 3V lithium battery (CR2032) is included with the remote. Refer to Testing the Battery for details
on when to replace the battery, and Replacing the Battery for instructions on how to replace it.
Accessories
The following carrying accessories are available for your REM101: Lanyard attachment to wear
around neck (standard), Belt clip (optional), Wrist strap (optional).
Using Your Remote Control
You can use the REM101 to perform the following actions:
• Arm your system (no disarming) / Activate PGMs / Activate panic alarms (police, medical, fire)
NOTE: Since the REM101 is a single-button remote control, it can only perform one of the above-
mentioned actions at a single time. Refer to your control panel’s respective programming guide
for details on programming your remote according to the user’s needs.
PARADOX.COM
Printed in Canada - 08/2019
REM101-EU05
REM101: Single-button Remote Control with EZ Panic
User Guide V1.1
Battery Test Button/LED
Action Button
Lanyard slot
Belt clip slot Battery cover/wrist
strap slot
The Action Button
To use your REM101 to arm your system, or activate a PGM or panic alarm, press and hold the
action button for one second until the LED flashes. The LED emits rapid flashes during a four-
second period, confirming your action.
Testing the Battery
To test the battery strength, press and hold the Test button for two seconds. One of the following
two scenarios will occur:
• The LED illuminates for three seconds. This indicates that the battery is charged and does not
need to be replaced.
• The LED emits seven slow flashes. This indicates that the battery strength is low and the battery
should be replaced. Refer to Replacing the Battery for details.
NOTE: Ensure that the battery is properly installed when testing its strength. A “Low Battery
Signal” is sent to the control panel when battery is below 2.3Vdc. Upon power-up, a “Low Battery
Restore Signal” is sent to the control panel when the battery voltage level has reached 2.3Vdc or
higher.
Replacing the Battery
Replace the battery as follows:
1. Using a suitably-sized straight edge (e.g., screwdriver),
turn the battery cover in the counterclockwise direction,
until the unlocked marking on the cover ( ) is aligned
with the arrow marking (V) on the remote’s rear casing.
2. Pry the battery from its cover and replace with the same
or equivalent type (3V CR2032). Make sure to observe
the correct polarity when replacing the battery.
3. Secure the battery cover in place by turning it in the
clockwise direction, until the locked marking on the
cover ( ) is aligned with the arrow marking (V) on the remote’s rear casing.
WARNING: When replacing the battery, use only the same or equivalent type of battery
recommended by the manufacturer. Danger of explosion exists if the wrong lithium battery
is used, or if it’s replaced incorrectly. In addition, recycle or dispose of used batteries in
accordance with the manufacturer's instructions.
LED Feedback
When pressing the action button:
The LED emits rapid, action-confirming flashes during a four-second period, regardless of whether
the REM101 is programmed to arm your system, or activate a PGM or panic alarm.
When pressing the Test button:
• The LED illuminates for three seconds when the battery is charged.
• The LED emits seven slow flashes when the battery strength is low. Refer to Replacing the
Battery for instructions on how to replace the battery.
Programming the REM101
To modify the action button, enter the control panel’s respective remote control sections, and
then access the fourth programming category (case 4). For programming details, as well as
instructions on how to assign a REM101 to your security system, refer to the control panel’s
respective programming guide.
NOTE: The programming sequence for the REM101 is the same for MG/SP, EVO, and MG6250.
Battery Cover
Arrow
Marking
Battery (CR2032) Warranty
Patents: One or more of the following US patents may apply: 7046142, 6215399, 6111256, 6104319, 5920259, 5886632,
5721542, 5287111, and RE39406. Other pending patents, as well as Canadian and international patents may also apply.
Trademarks: Magellan is a trademark of Paradox Security Systems (Bahamas) Ltd. or its affiliates in Canada, the United
States and/or other countries.
Certification: For the latest information on products approvals, such as UL and CE, please visit paradox.com.
Warranty: For complete warranty information on this product please refer to the Limited Warranty Statement found on
the website paradox.com/terms. Your use of the Paradox product signifies your acceptance of all warranty
terms and conditions.
© 2019 Paradox Security Systems (Bahamas) Ltd. All rights reserved. Specifications may change without
prior notice.
Other manuals for Magellan REM101

3

Other Paradox Remote Control manuals

Paradox PRK-315 User manual

Paradox

Paradox PRK-315 User manual

Paradox Magellan REM101 User manual

Paradox

Paradox Magellan REM101 User manual

Paradox Magellan MG-RAC1 User manual

Paradox

Paradox Magellan MG-RAC1 User manual

Paradox MAGELLAN MG-REM1 Installation and operating instructions

Paradox

Paradox MAGELLAN MG-REM1 Installation and operating instructions

Paradox Magellan REM2 Service manual

Paradox

Paradox Magellan REM2 Service manual

Paradox Magellan REM101 User manual

Paradox

Paradox Magellan REM101 User manual

Paradox Magellan REM101 User manual

Paradox

Paradox Magellan REM101 User manual

Paradox Magellan REM2 User manual

Paradox

Paradox Magellan REM2 User manual

Paradox Two-Way Remote Control V2.1 User manual

Paradox

Paradox Two-Way Remote Control V2.1 User manual

Paradox Magellan REM1 User manual

Paradox

Paradox Magellan REM1 User manual

Paradox Magellan RAC1 User manual

Paradox

Paradox Magellan RAC1 User manual

Paradox Magellan REM15 User manual

Paradox

Paradox Magellan REM15 User manual

Paradox REM3 User manual

Paradox

Paradox REM3 User manual

Paradox Magellan REM2 User manual

Paradox

Paradox Magellan REM2 User manual

Paradox Magellan REM15 User manual

Paradox

Paradox Magellan REM15 User manual

Paradox PARAKEY Assembly instructions

Paradox

Paradox PARAKEY Assembly instructions

Paradox MAGELLAN REM1 User manual

Paradox

Paradox MAGELLAN REM1 User manual

Paradox Magellan MG-REM2 User manual

Paradox

Paradox Magellan MG-REM2 User manual

Paradox REM25 User manual

Paradox

Paradox REM25 User manual

Paradox Magellan REM15 User manual

Paradox

Paradox Magellan REM15 User manual

Paradox REM3 User manual

Paradox

Paradox REM3 User manual

Paradox Magellan MG-REM1 User manual

Paradox

Paradox Magellan MG-REM1 User manual

Popular Remote Control manuals by other brands

Miboxer B8 quick guide

Miboxer

Miboxer B8 quick guide

Philips Perfect replacement SRC2063WM/17 quick start guide

Philips

Philips Perfect replacement SRC2063WM/17 quick start guide

Reely GT6 EVO Important Informations

Reely

Reely GT6 EVO Important Informations

ASI EZFILL 0390-R Installation and maintenance guide

ASI

ASI EZFILL 0390-R Installation and maintenance guide

Satel APT-200 manual

Satel

Satel APT-200 manual

Impecca IPA2-1244-C operating guide

Impecca

Impecca IPA2-1244-C operating guide

SICE Qzero Operation manual

SICE

SICE Qzero Operation manual

Wozart Universal IR installation guide

Wozart

Wozart Universal IR installation guide

Philips TSU9600/93 Starter Guide

Philips

Philips TSU9600/93 Starter Guide

Ruwido Easytip 1 user manual

Ruwido

Ruwido Easytip 1 user manual

SISTEMATICA Classic EASY user manual

SISTEMATICA

SISTEMATICA Classic EASY user manual

FUTABA T6L SPORT instruction manual

FUTABA

FUTABA T6L SPORT instruction manual

PR Lighting RC-7 Installation & operation instructions

PR Lighting

PR Lighting RC-7 Installation & operation instructions

Scanreco G5 Pocket System instruction manual

Scanreco

Scanreco G5 Pocket System instruction manual

GV Racing RC/GT2 instruction manual

GV Racing

GV Racing RC/GT2 instruction manual

Philips SBCRU610/00 user manual

Philips

Philips SBCRU610/00 user manual

KVH Industries TracVision R6 DX quick start guide

KVH Industries

KVH Industries TracVision R6 DX quick start guide

Velleman VRC1001 user manual

Velleman

Velleman VRC1001 user manual

manuals.online logo
manuals.online logoBrands
  • About & Mission
  • Contact us
  • Privacy Policy
  • Terms and Conditions

Copyright 2025 Manuals.Online. All Rights Reserved.