5115 Hadley Ave. N., St. Paul, MN 55128 (USA) www.parktool.com
PARK TOOL CO.
100-3C / 100-5C
Adjustable Linkage Shop Clamp
Clamping Bike
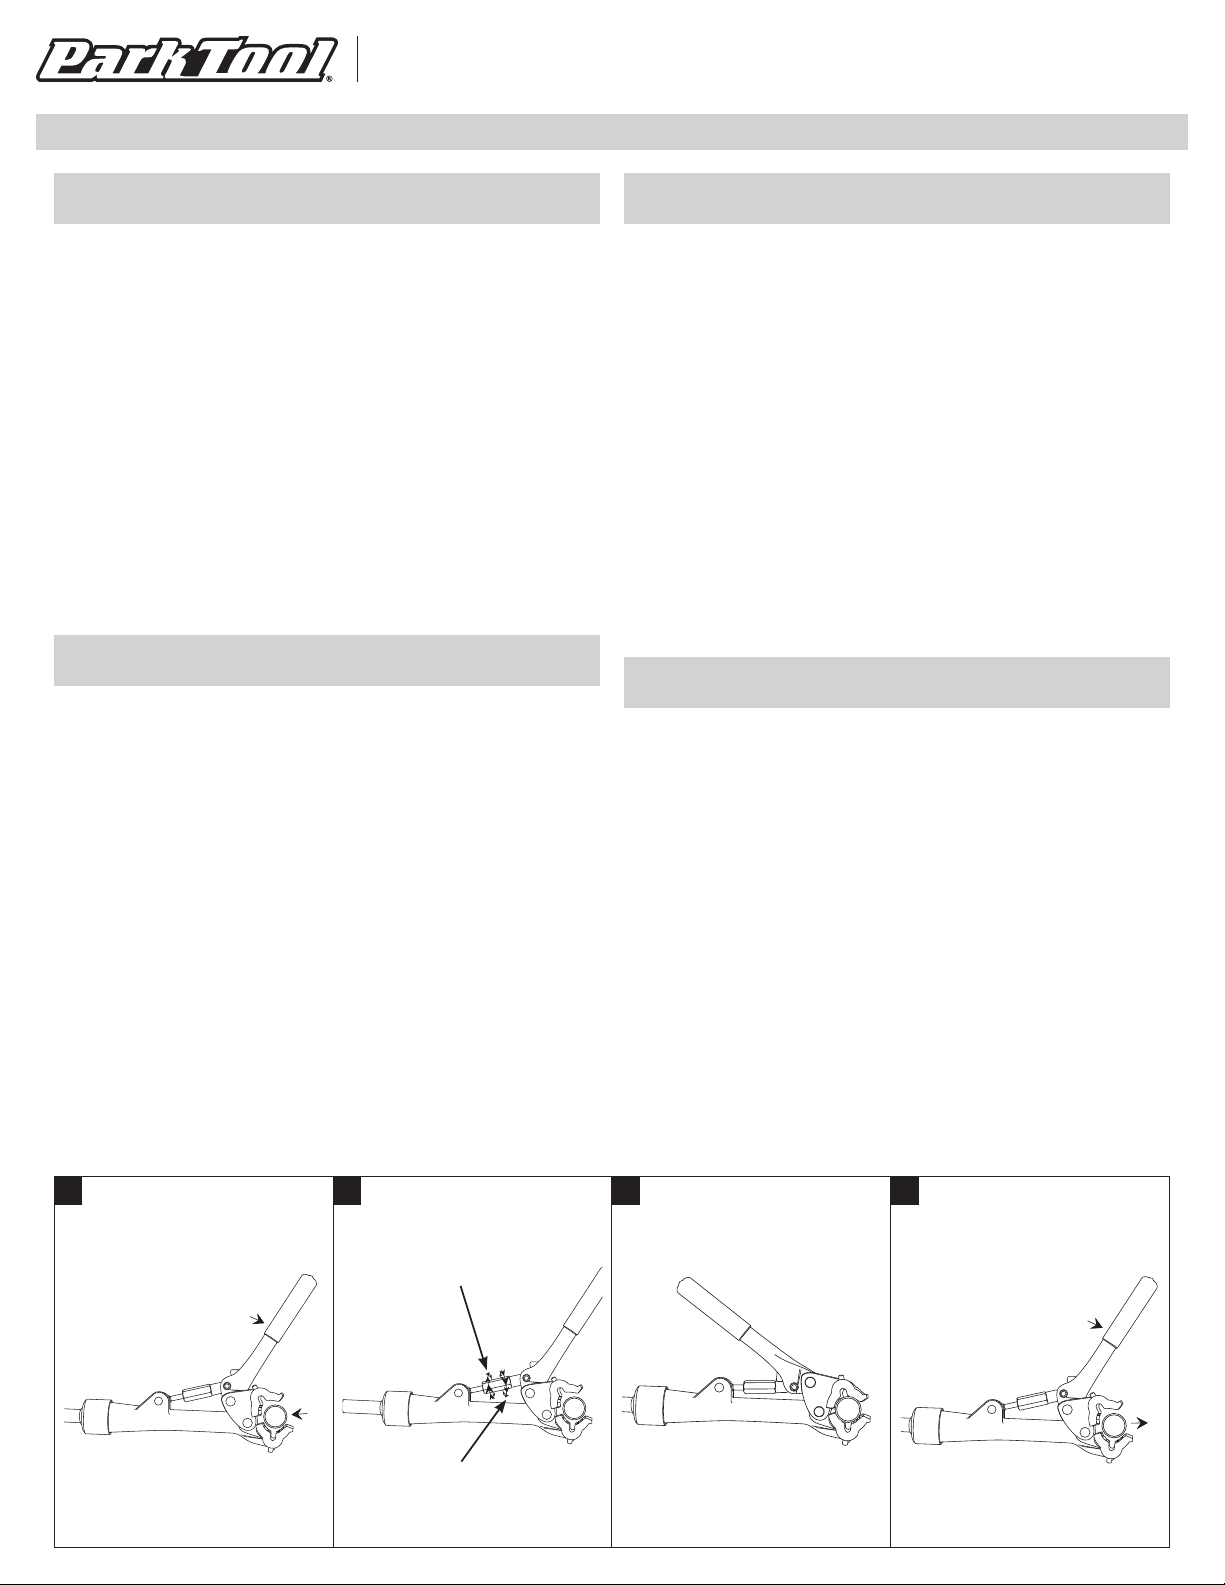
1. Pull handle to open clamp jaws. Position frame tube or seat post in jaws
(Figure 1).
2. Turn adjusting barrel as needed (Figure 2) until tube can be clamped
by applying light hand pressure to the handle (Figure 3). Clockwise
decreases clamping pressure, counterclockwise increases clamping
pressure. Do not force handle. Excessive clamping pressure can
damage tube.
Releasing Bike
1. Pull handle to quickly open clamp jaws and release tube (Figure 4).
Notes:
• Some bike manufacturers recommend not clamping thin-walled or carbon
fiber frames. Consult manufacturer for suggested clamping location.
• To avoid damage to finish, clean tube before clamping.
• The two clamping jaws each have a recess to provide clearance for
cables. Be sure any brake or shift cables are in one of the recesses
before clamping.
100-3C / 100-5C
Justierbare Hebel-Halteklaue
Fahrrad Fixieren
1. Ziehen Sie den Griffhebel zum Öffnen der Klemmbacken. Platzieren Sie ein
Rahmenrohr oder die Sattelstütze zwischen den Klemmbacken (Abb. 1).
2. Drehen Sie bei Bedarf die Justierhülse (Abb. 2) bis das Rohr durch
leichten Druck auf den Griffhebel fixiert wird (Abb. 3). Drehen der Hülse
im Uhrzeigersinn erweitert den Klemmbackenabstand, gegen den
Uhrzeigersinn verringert ihn. Griffhebel NICHT mit Krafteinsatz bedienen.
Starker Klemmdruck kann das Rohr beschädigen.
Fahrrad Entnehmen
1. Ziehen Sie einfach den Griffhebel zum Öffnen der Klemmbacken und
entnehmen Sie das Fahrrad.
Hinweise:
• Einige Rahmenhersteller warnen vor dem Klemmen dünnwandiger oder
aus Carbonfasern bestehender Rahmen. Klären Sie mit dem Hersteller
geeignete Klemmbereiche.
• Reinigen Sie den Rahmen vorher im Klemmbereich zur Vermeidung
von Lackschäden.
• Beide Klemmbacken verfügen über Aussparungen für Züge. Beachten
Sie die Lage der Züge vor dem Schließen der Halteklaue.
100-3C / 100-5C
Pince à Ouverture Réglable
Pour Tenir le Vélo
1. Utiliser la poignée pour ouvrir les mâchoires. Positionner le tube de selle
ou la tige de selle dans la pince (Figure 1).
2. Ajuster avec le barillet de serrage (Figure 2) de façon à ce qu’un simple
mouvement de la main suffise à bloquer la pince (Figure 3). Pour
desserrer tourner dans le sens des aiguilles d’une montre. Pour serrer,
tourner dans le sens contraire des aiguilles d’une montre. Ne pas forcer
avec la poignée. Il est possible d’endommager le tube en serrant trop fort.
Pour Dégager le Vélo
1. Tirer sur la poignée d’un coup sec pour ouvrir les mâchoires puis sortir le
cadre (Figure 4).
Noter:
• Certains fabricants déconseillent l’utilisation d’une pince avec des tubes
étirés ou en carbone. Contacter le fabricant pour définir le meilleur
endroit où saisir le cadre.
• Pour éviter de rayer le cadre bien essuyer le tube avant de le saisir.
• Les deux garnitures de remplacement ont des encoches pour le passage
des câbles. Bien positionner les câbles avant de serrer la pince.
100-3C / 100-5C
Mordaza Ajustable
Colocación de la Bicicleta en la Mordaza
1. Jale el mango para abrir las mandíbulas de la mordaza. Coloque el tubo
del cuadro o el poste de asiento en las mandibulas (Figura 1).
2. Gire el ajustador conforme sea necesario (Figura 2) hasta que el tubo
pueda ser sostenido aplicando una ligera presión en el mango (Figura
3). Gire en sentido contrario de las manecillas del reloj para disminuir
la presión de la mordaza. Girando en sentido de las manecillas del reloj
se incrementa la presión de la mordaza. No forcé el mango. La presión
excesiva en la mordaza puede dañar el tubo.
Retirando la Bicicleta de la Mordaza
1. Jale el mango para abrir las mandíbulas de la mordaza (Figura 4).
Notas:
• Algunos fabricantes de bicicletas no recomiendan colocar tubos de
paredes delgadas o de fibra de carbono. Consulte al fabricante para que
le sugiera un lugar donde se coloque.
• Para evitar daños en el terminado, limpie el tubo antes de colocarlo.
• Las dos mandíbulas de la mordaza tienen un canal para los cables.
Asegúrese que los forros de frenos y cables estén dentro de estos
canales antes de colocarlo.
100-3C/5C Instructions/Instructions/Anleitung/Instrucciones
Decreases clamping pressure
Klemmbackenabstand erweitern
Réduit la force de serrage de la pince
Disminuyendo la presión de la mordaza
Increases clamping pressure
Klemmbackenabstand verringern
Augmente la force de serrage de la pince
Aumentando la presión de la mordaza
1 3 42


