Paser UNICO DUAL PLUS User manual

Release date: 21.11.17 rev 1.0 17
1 / 4
UNICO DUAL PLUS
CANBUS-KBUS-RESISTIVE
INSTALLATION MANUAL
30 m
DESCRIPTION
UNIVERSAL adapter for the OEM steering wheel commands connecon.
Its compability extends to a wide range of vehicles having CAN BUS - KBUS and Resisve protocols and to the radio models with listed in the radios table aached.
The funcons are totally managed by a microprocessor able to self-recognize the steering wheel commands protocol.
The CAN BUS - KBUS protocol seng is managed in SELF-SELECTION.
The Resisve seng is made by following a simple procedure that assign to the unit the funcons of the buons available on the steering wheel.
The present unit allows the integraons in those vehicles in which are available dierent communicaon systems; for example, when the car has the steering wheel commands
Resisve and the services, such as lights, power ignion, odometer etc, in CAN BUS protocol.
SET THE DIP SWITCHES WITH UNICO DUAL NOT POWERED
DIP SWITCHES
UNICO DUAL has 4 dip switches. Dips 1 and 2 must be set before the installaon. Dips 3 and 4 are necessary only to manage special funcons for some cars. It’s important to
make the right dip switches seng in order that the unit works properly.
RESISTIVE PROTOCOL DIP 1 ON
CAN BUS / K-BUS PROTOCOL DIP 1 OFF
HYBRID PROFILE:
RESISTIVE STEERING WHEEL COMMANDS CANBUS SERVICES OUTPUTS
DIP 1 and 2 ON
OPTIONS MANAGEMENT DIP 3 ON
UNIT SOFTWARE UPGRADING DIP 4 ON
ATTENTION! YOU ALWAYS MUST TO SET DIP 3 AND 4
IN POSITION “OFF” ONCE THE SETTING IS DONE
POS. COLOUR FUNCTION
1RED 12V
2BLACK GND
3ORANGE LIGHTS OUTPUT
4PINK RESISTIVE INPUT
5BLUE REVERSE OUTPUT
6GREY AUX 1 (WITH RESISTANCE 1.5k IN SERIES)
7VIOLET RADIO RESISTIVE OUTPUT
8GREEN/BLACK AUX 3 (WITH RESIST. 560 ohm TO THE GND)
9LIGHT BLUE AUX 4 (WITH RESIST. 3.3 k TO THE GND)
10 PINK/WHITE AUX 5 (WITH RESIST. 1 k TO THE GND)
11 YELLOW/WHITE HANDBRAKE OUTPUT
12 INFRARED CATHODE
13 INFRARED ANHODE
14 YELLOW/BLACK AUX 6 (WITH RESIST. 4,7 k TO THE GND)
15 RED/BLUE AUX 7 (WITH RESIST. 220 ohm TO GND)
16 BROWN RADIO CODE OUTPUT
17 GREY/BLACK GND
18 VIOLET/BLACK K-BUS
19 GREEN CAN H
20 WHITE CAN L
21 BLUE/YELLOW STK OUT
22 RED/GREY ODOMETER
CABLE WIRES DESCRIPTION 18 17 16 15 14 13 121922 21 20
7654321811 10 9
The informaon in this guide are purely for informaon purposes, therefore, are subject to change without noce.
At the me of publicaon the informaon is correct and reliable. However Paser can not be held responsible for any consequences resulng from errors or omissions in this manual.
Paser reserves the right to improve / change the product or manual without obligaon to nofy users.
ATTENTION!
In case of radio Pioneer,
phone buttons are NOT managed!

Release date: 21.11.17 rev 1.0 17
2 / 4
LED LED
WARNING
IF YOU NEED TO INSTAL THE SAME IN A NEW CAR (EVEN IF IN A SAME GROUP MODEL) IT IS NECESSARY TO RESET THE MODULE.
RESET:
1. WITH THE UNIT POWERED, PRESS AND KEEP PRESSED THE UNICAN BUTTON TILL THE LED SWITCH OFF.
2. WITH THE LED SWITCHED OFF RELEASE THE BUTTON, THE RESET IS DONE.
UNICO DUAL PLUS
CANBUS-KBUS-RESISTIVE
INSTALLATION MANUAL
30 m
CANBUS-KBUS CONFIGURATION
Selecon of the CAN BUS - KBUS protocol is carried out in SELF-LEARNING; Once the connecons are done, by powering the unit, in a few seconds the synchronizaon is coming,
operaon shown by short RED blinking of the module’s LED. As soon as the vehicle is recognized, the LED will light GREEN. This indicates that the unit selected the car protocol.
Once selected the radio, plug the REMOTE adapter back the radio. The unit is ready to work.
For the connecons follow the table CANBUS KBUS CONNECTIONS.
In case of troubles reset the unit.
RESISTIVE PROTOCOL CONFIGURATION
Management of resisve protocols is done through a programming procedure; Once done the connecons, turn on the ignion to supply power to UNICO DUAL ; the LED will ash
RED quickly, indicang that the condion “no buon pressed” is memorized.
Now follow the steps below.
Assign desired funcons to each of the buons/levers of the vehicle’s steering wheel command. The allocaon of funcons follows the sequenal logic described in FUNCTIONS TAB
below. The rst funcon available is VOLUME —.
Each me you press a steering wheel buon/lever, UNICO DUAL LED emits a short RED ash to indicate the successful storage of the funcon.
To skip a funcon simply press quickly the buon UNICO DUAL.
It’s possible to memorize maximum 8 buons/levers. If buons/levers are less than 8, it is necessary to exit the procedure.
LED
LED
To exit the procedure, you must press and keep pressed one of the memorized buons ll the LED light YELLOW. As soon as you release the buon, LED will light GREEN.
Once selected the radio, plug the REMOTE adapter back the radio, unit is ready to work.
Unit is ready to work when LED light GREEN, now if you press any buon memorized, LED will light YELLOW.
In case of anomaly, do the procedure of RESET

Release date: 21.11.17 rev 1.0 17
3 / 4
UNICO DUAL PLUS
CANBUS-KBUS-RESISTIVE
INSTALLATION MANUAL
30 m
DETAILS
UNICO DUAL was born principally to recover the steering wheel commands funcons dedicated to the car radio.
This module allows you to control a wide range of aermarket car radio directly by OEM steering wheel commands.
UNICO DUAL has others funconality that are important for the integraon of the aermarket systems in the car.
AMPLI WAKE UP
This feature permits to control of the OEM amplier so to recover all the funcons of the system without bypassing the OEM device.
This funcon is acve by default; see the table of compabilies to know the car compable models.
PARKING SENSORS RECOVER
This funcon permits to recover the OEM parking sensors. Many cars with parking sensors lose the funcon if the OEM car radio is substuted with an aermarket one. This trouble
is due because the parking sensor’s beeps are managed by the OEM car radio.
By seng the opon 2 as parking sensors output and by connecng a buzzer to the related wire, the funcon is completely recovered.
This funcon isn’t acve by default; see the table of compabilies to know the car compable models.
SETTINGS MANAGING
Some vehicles have some regulaons, like: hour seng, date seng, power ignion seng etc, that you can set trough the OEM car radio. By changing the OEM car radio with an
aermarket one, this funcon is lost.
UNICO DUAL permits to recover this funcon.
Read the secon named SETTINGS to know the car models on which is possible to do this operaon and how to do it.
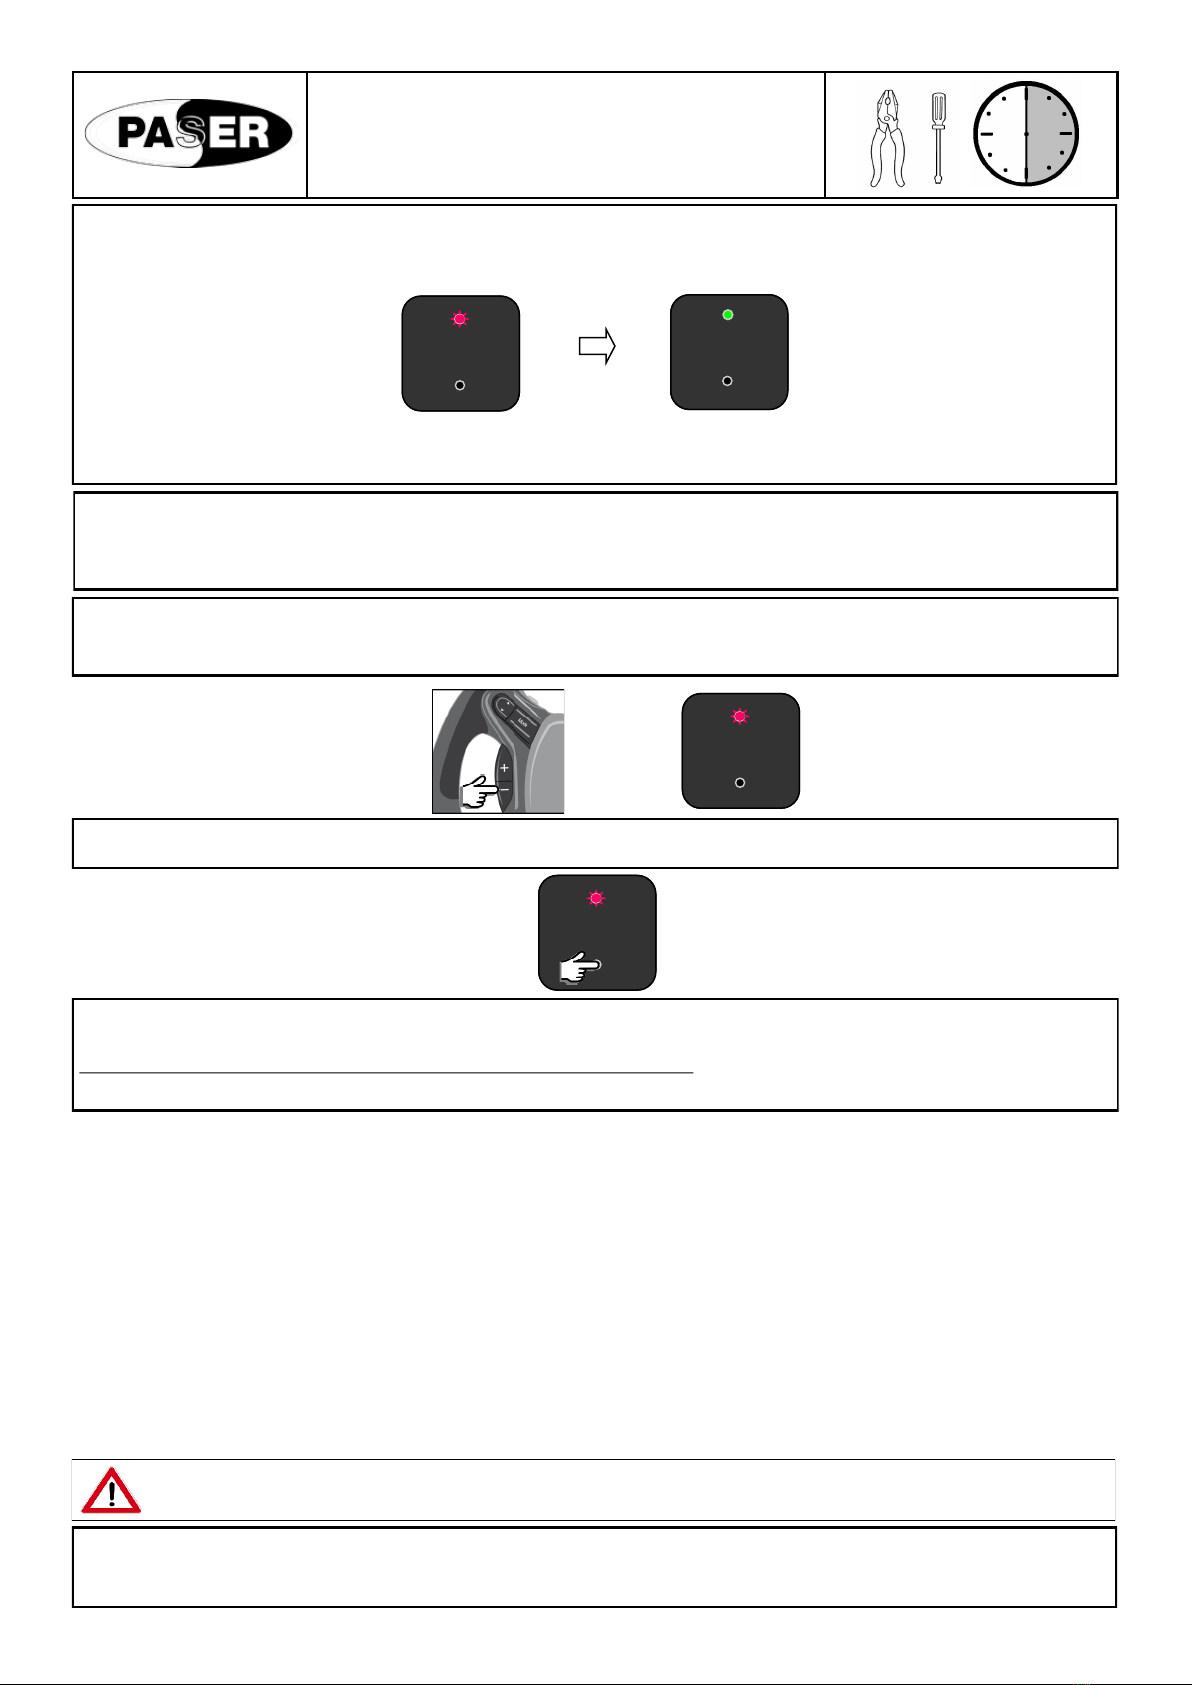
HOW TO SET THE RADIO PROFILE
On default the unit oers the rst prole available that is the CLARION, the GREEN LED makes one ash.
With the aached table select the radio needed so verify how many ashes it must to do the LED related to the radio of interest.
If the radio we want to set it’s the rst one just press SEEK + to conrm the selecon, the LED will light on GREEN.
To select a dierent radio press VOLUME + on the steering wheel to increase the number of ashings of the LED or VOLUME - to decrease.
Once the radio desired is selected to conrm the choice press SEEK + on the steering wheel. the LED will light on GREEN as conrmaon.
The logic of the ashes of the LED follows this behaviour:
LED GREEN ash meaning= units
LED RED ash meaning= tens
For example 5 GREEN ashes of LED , indicate the radio in the 5th posion.
2 RED ashes of the LED, indicate the radio in posion 20.
1 RED ash of the LED followed by 2 GREEN ashes of the LED indicate the radio in posion 12.
Once the radio of interest is selected to conrm the choice press SEEK + on the steering wheel.
The led of the unit will light GREEN
TECHNICAL CHARACTERISTICS
POWER SUPPLY 10/16 VDC
ABSORPTION AT REST 0,001 A
ABSORPTION WHEN WORKING 0,040 A
MAX CHARGE IGNITION OUTPUT 2,000 A
MAX CHARGE SIDELIGHTS / HANDBRAKE / REVERSE GEAR OUTPUT / ODOMETRIC SIGNAL 0,040 A
TROUBLESHOOTING
The unit doesn’t work and the LED is o.
Check the connecons of the power supply.
The unit which is correctly powered,doesn’t work and the LED is o.
Check the CANBUS connecons.
The unit which is correctly powered,doesn’t work and the LED is o.
Check that the dip switches are correctly set.
The unit is connected correctly and the RED LED ashes quickly.
The unit hasn’t been synchronized with the CANBUS, contact Paser.
The unit is connected correctly and the RED LED ashes in an irregular way.
Check the CANBUS connecons.
The unit is connected correctly and the RED LED is on.
The unit has undertaken the synchronizaon with the CANBUS but hasn’t been able to individuate the vehicle, contact Paser.
The unit is connected correctly but can’t handle the K-BUS protocol.
Check that the dip switches are correctly set.
The unit is connected correctly, the GREEN LED is on but doesn’t control the radio.
Check that the module’s PLUG is connected to the radio’s REMOTE input or contact Paser.
The unit is set resisve but buons make wrong funcons.
Reset the module and repeat the programming resisve procedure.

Release date: 21.11.17 rev 1.0 17
4 / 4
UNICO DUAL PLUS
CANBUS-KBUS-RESISTIVE
INSTALLATION MANUAL
30 m
WARRANY
THIS PRODUCT IS COVERED BY TWO-YEAR GUARANTEE FOR ANY MANUFACTURING TROUBLES.
THE WARRANTY IS VALID IF ACCOMPAINED BY THE INVOICE OF PURCHASE
For CANBUS connections, please consult the appropriate technical sheets on the paser website: http: /
automotive.paser.it/technical_tables.php.
To connect the Unico Dual Plus module, first connect the purple wire of the module to the Key A (or SW 1) of the
radio. Then connect the grey-black wire of the module to the Key GND (or SW GND) of the radio.
CONNECTION
CONFIGURATION
Connection and configuration procedure
of the Unico Dual Plus module (from FWP 50)
on vehicles with steering wheel controls without long keys pressing system
(as FIAT GROUP) and with RESISTIVE LEARNING Radio
(as Macrom, Phonocar, Hardstone).
WARNING!
For the correct working of the system, you ALWAYS need to configure the PIONEER radio protocol
(radio profile # 4), regardless of the brand of resistive learning radio installed.
X. Turn on the panel, the Unico Dual Plus led starts blinking once GREEN and then pauses, which means
that the module is ready to receive the radio profile setting.
Press the VOLUME + button 3 times on the steering wheel commands, check that the interface LED flashes 4 times
GREEN and then pauses.
Confirm by pressing the SEEK + key shortly from the steering wheel commands: the LED will become FIXED
GREEN.
Press the RESET button 5 times on Unico Dual Plus, the interface will start to flash RED and GREEN (to simulate
the long press procedure on the steering wheel commands).
Enter the radio's resistive learning menu and memorize the steering wheel commands according to the radio docu-
mentation.
Wait at least 5 seconds during the pairing of one button to the other, the maximum number of keys recovered is 6,
excluding the phone keys not recovered.
Save the memorization of the keys following the saving mode of the installed radio.
Switch the panel on and off, the Unico Dual Plus LED will return to FIXED GREEN (this will deactivate the simulation
of the long press system on the steering wheel commands).
Finally, you can test steering wheel commands working towards the radio.
WARNING!
In case of an already configured module (starting with FIXED GREEN LED), it is necessary to RESET it, by
proceeding as follows:
press the RESET button for 10 seconds then release the button.
at this point, the module is reset, the LED will become BLINKING GREEN and it will be possible to follow
the procedure indicated at point X.
Table of contents
Other Paser Automobile Accessories manuals

Paser
Paser UNICOM CF0012UNPI21 User manual

Paser
Paser UNICOM SONY User manual

Paser
Paser UNICOM EVO JVC User manual

Paser
Paser UNICOM/HUMMER H2 User manual

Paser
Paser UNICOM EVO PLUS User manual

Paser
Paser CONVERSO DISPLAY Reference manual

Paser
Paser KIT052USSU12 User manual

Paser
Paser SLIMKEY OBD User manual

Paser
Paser uDAB User manual

Paser
Paser UNICOM CF0012UNKE21 User manual