Peg-Perego prima pappa best User manual

prima pappa best
U.S.A./CANADA/AUSTRALIA
EN Instructions for use
ES Instrucciones de uso
FR Notice d’emploi

1 2
34
5 6

1
2
87
910
11 12

1
2
B
A
A
B
A
B
A
A
B
15 16
13 14
17 18

A
B
A
B
23 24
21 22
19 20

26
29 Accessory
25
27 28

1
2
3
4
56
7
8
10
11
12
13
15
16
17
18
19
9
14
7
1 SPST6215BM
2 TMPPBE00--RETE
3 SPST5025JJD•
SPST5025JJS•
4 SPST5024DBM
SPST5024SBM
5 SPST5459GR
6 SPST5458BM
7 SPST5728BM
8 SAPI5934TBM
9 SPST5942KBM
10 SPST5942JBM
11 SAPU5730•
12 SAPI5934BM
13 SAPI5171BMGR
14 SPST6218•
15 SPST6219BM
16 EMPPBENA•
17 SAPU5298JJBM•
18 SPST5298XBMPEG
19 MUCI5P17•
EN• Spare parts available in different colours to be specified when ordering.
ES• Repuestos disponibles en otros colores que se especificarán en el pedido.
FR• Pièces de rechange disponibles en plusieurs couleurs à spécifier dans la demande.
prima pappa best

EN_English
Thank you for choosing a
Peg-Pérego product.
WARNING
• IMPORTANT: READ THESE
INSTRUCTIONS CAREFULLY
AND KEEP THEM FOR FUTURE
REFERENCE. FAILURE TO FOLLOW
THESE INSTRUCTIONS COULD PUT
THE CHILD’S SAFETY AT RISK.
• ALL ASSEMBLY AND OPERATING
PROCEDURES SHOULD BE PERFORMED
BY AN ADULT; DO NOT USE THE
PRODUCT IF IT HAS BROKEN OR
MISSING PARTS.
• PREVENT SERIOUS INJURY OR DEATH
FROM FALLS OR SLIDING OUT; ALWAYS
USE COMPLETE 5 POINT SEATBELT;
THE CHILD SHOULD BE SECURED IN
THE HIGH CHAIR AT ALL TIMES, EITHER
IN THE RECLINED OR IN THE UPRIGHT
POSITION.
• ALWAYS USE THE CROTCH STRAP.
• NEVER LEAVE THE CHILD
UNATTENDED; ALWAYS KEEP CHILD IN
VIEW WHILE IN THE HIGHCHAIR.
• TRAY AND ACCESSORY TRAYS ARE NOT
DESIGNED TO SUPPORT THE CHILD’S
WEIGHT; TRAY IS NOT DESIGNED TO
HOLD THE CHILD IN THE CHAIR.
• ALWAYS USE THE HIGHCHAIR ON A
FLAT, HORIZONTAL SURFACE.
• IT IS RECOMMENDED THAT THE HIGH
CHAIR BE USED IN THE UPRIGHT
POSITION ONLY BY CHILDREN CAPABLE
OF SITTING UPRIGHT.
• BE CAREFUL OF WHERE YOU PLACE
THE PRODUCT. AVOID PLACING THE
CHILD NEAR SAFETY HAZARDS SUCH
AS ELECTRICAL CORDS, SOURCES OF
HEAT, OR FLAMES.
• DO NOT PUT FINGERS IN THE
MECHANISM. MAKE SURE YOUR
CHILD’S ARMS AND LEGS ARE CLEAR
OF THE MOVING PARTS DURING
ADJUSTMENT.
• USING ACCESSORIES THAT HAVE
NOT BEEN APPROVED BY THE
MANUFACTURER MAY BE HAZARDOUS.
• DO NOT USE THE PRODUCT NEAR
STAIRS OR STEPS.
• BE CAREFUL NOT TO PLACE THE
PRODUCT NEAR SOURCES OF HEAT
OR FLAMES, SUCH AS GAS STOVES,
ELECTRIC HEATERS, ETC.
• MAKE SURE THE BELT IS ATTACHED
PROPERLY.
• DO NOT USE THE HIGH CHAIR UNLESS
ALL OF THE PARTS ARE PROPERLY
FITTED AND ADJUSTED.
• NOTICE: THIS ARTICLE MEETS OR
EXCEEDS ALL REQUIREMENTS
COVERED IN ASTM F833 STANDARD
AND LATEST REVISIONS.
instructions for use
ASSEMBLING THE HIGH CHAIR
1• Attach the wheels, making sure to insert the
ones with the brakes on the back part of the
high chair.
2• Attach the two front wheels, pressing in the
direction shown by the arrow.
3• When it comes out of the packaging, the
high chair is not in a correct position for use
(packing position). To use the high chair, lift
it to one of the seven possible heights as
shown in the figure. To place the high chair
in the correct position for use, see directions
below.
TO OPEN THE HIGH CHAIR
4• To open the high chair, push the little red
levers on the sides downwards as in the figure,
pressing down on the back supports.
5• Before using the high chair, remove the spacers
as shown in the figure.
6• Lower the footrest, as shown in the figure.
BRAKE
7• The high chair has four swivel wheels, with
brakes on two of them. To brake the high chair,
lower the little brake levers on the rear wheels.
To release the brakes, lift the levers. For your
convenience, always make sure the brakes are
set before carrying out any other operation on
the high chair.
ADJUSTABLE FOOTREST
8• The adjustable footrest can be set at three
different heights. To extend it, press the buttons
on the side and pull the footrest down until the
buttons click into the next position, as shown in
the figure.
T R A Y
9• To attach the tray, pull the lever under it

towards you while slipping the tray onto the
armrests. Push all the way in, as shown in the
figure.
10• The high chair tray can be adjusted to
three different positions. The third position
(marked with red notches)is not meant for
use with the tray; it is used for folding up
the tray.
• To extend the tray, pull the lever under it
towards you as you pull the tray out to the first
position. Repeat the operation to set the tray in
the second position.
• To remove the tray, pull the lever as you pull
the tray towards you.
11• The high chair comes with two trays. The child
can play on the lower tray and eat on the upper
one, which is easy to wash and can be kept
perfectly clean.
• To remove the meal tray, unhook it from the
lower tray by lifting as shown in the figure.
12• To put the tray back on the rear uprights of the
high chair, align it with the connections and
attach it, as shown in the figure.
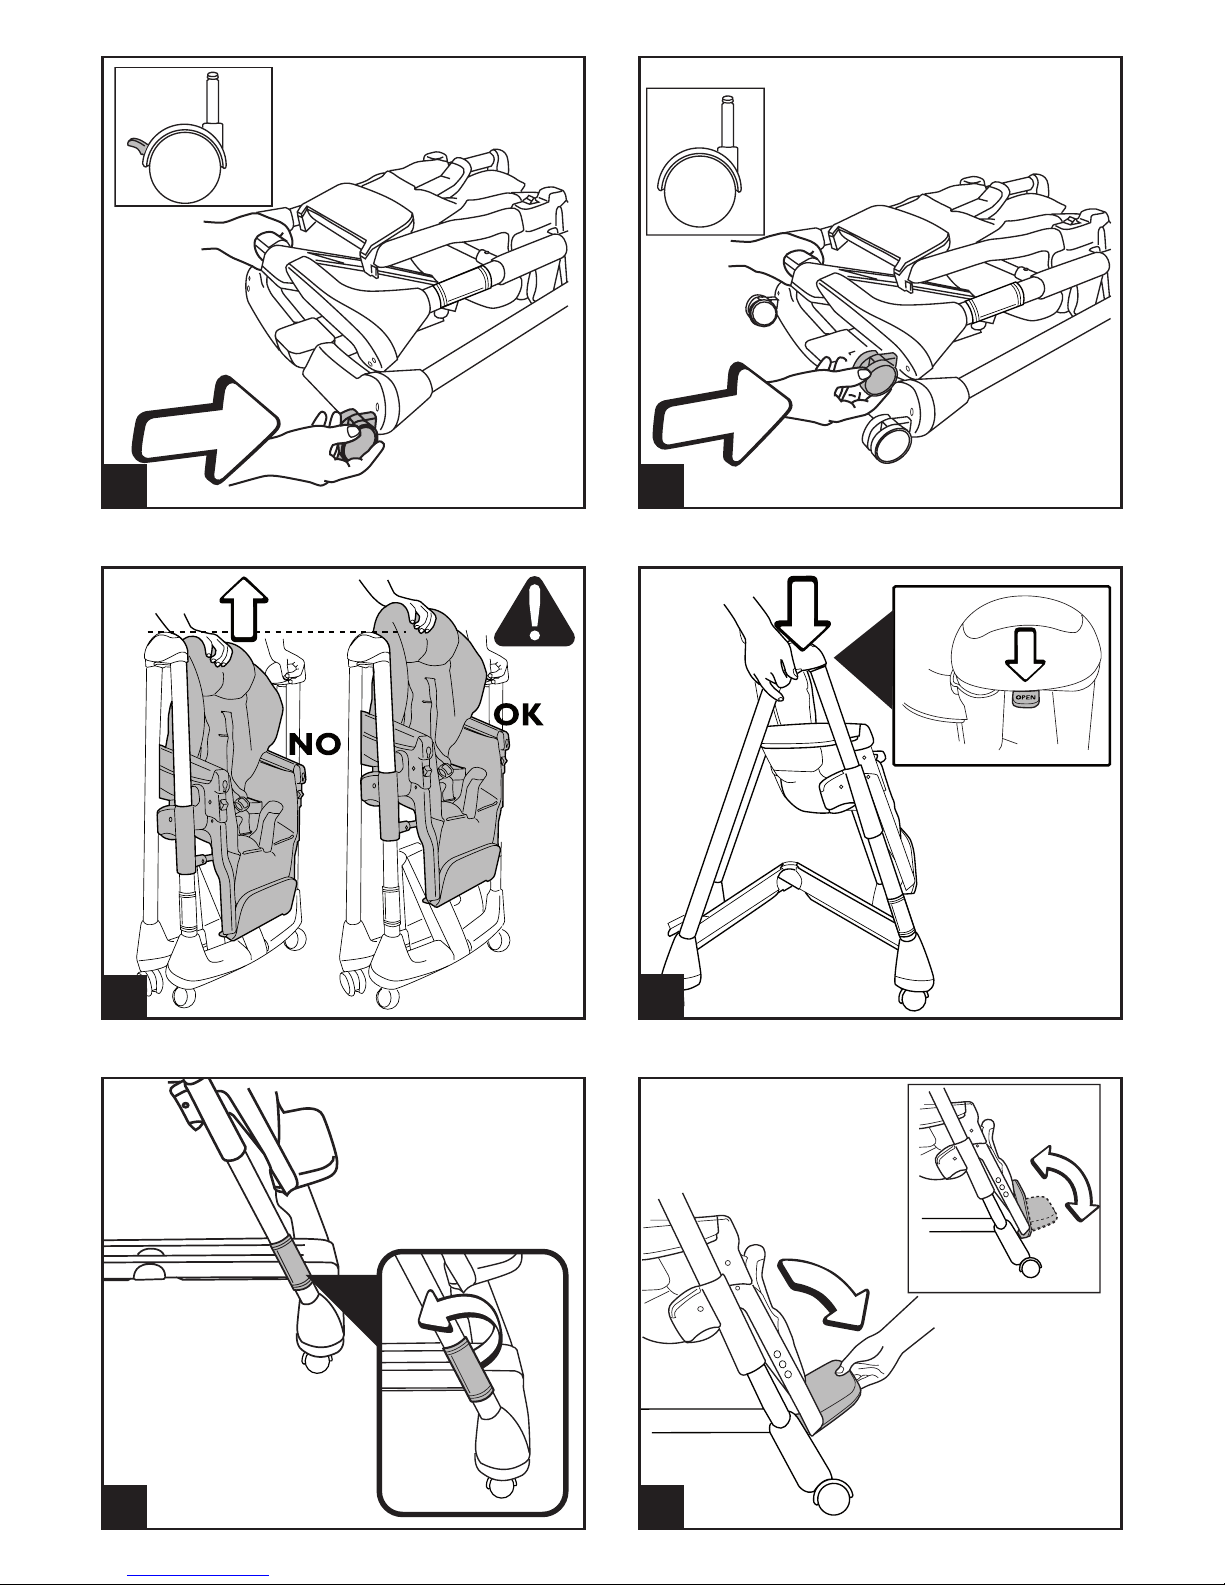
• When the high chair is closed, the tray cannot
be attached to the rear uprights.
SAFETY BELT
13• Make sure that the shoulder strap is correctly
inserted, by pressing on it, as shown in figure A.
Fasten the lap belt as shown in figure B.
14• To unfasten the safety belt, press the sides of
the buckle (fig. A) while pulling the lap belt
outwards (fig. B).
15• The shoulder straps can be adjusted to two
different heights. Unfasten the safety belt from
behind the backrest by pushing the buckle
downwards (fig. A). Slip the safety belt out of
the sack (fig. B).
16• Next, slip the safety belt buckle through the
other opening in the backrest (fig. A), and
fasten the buckle to the peg, pulling the safety
belt until it clicks into place (fig. B).
7 HEIGHTS
The high chair adjusts to 7 different heights.
17• To lift the high chair, hold it under the tray and
pull upwards.
18• To lower the high chair, simultaneously press
the two side buttons, stopping at the desired
height.
These operations can be carried out with the
child in the high chair.
RECLINING HIGH CHAIR
19• The high chair reclines, and adjusts to four
different positions: for mealtime, playtime,
relaxing, or napping. To adjust it, lift the handle
behind the backrest and set the high chair to
the desired position. This operation can be
carried out with the child in the high chair.
CLOSING AND OPENING THE TRAY
20• To close the tray, pull it out to the third position
marked with the red notches shown by the
arrows in the figure.
21• Press button No. 1.
22• Press button No. 2, while lifting the tray
upwards until it clicks into place.
• To open the tray again, press button No. 2 and
lower the tray to the first or second position.
FOLDING UP THE HIGH CHAIR
• Before folding up the high chair:
- Close the tray.
- Return the backrest to the upright position.
- Lower the high chair to the lowest position.
- Close the footrest.
23• Unlock safety device A, by turning it in the
direction shown by the arrow, then press pedal
B.
24• Hold the high chair as shown in the figure
while unlocking the safety device and pressing
the pedal, and pull upwards.
• The high chair stands upright when it is closed.
REMOVING THE HIGH CHAIR COVER
25• To remove the high chair cover, remove the
safety belt from under the chair and the
backrest.
26• Lower the high chair completely, and unbutton
the cover from the sides of the backrest. Slip
the cover off the top of the high chair.
FOLDING THE HIGH CHAIR BACK UP INTO ITS
PACKING POSITION
• To fold the high chair back up into its “packing
position” (for transporting it or storing it in its
box):
- Remove the tray.
- Return the backrest to the upright position.
- Lower the high chair to the lowest position.
- Close the footrest.
27• A small screwdriver is necessary for this step.
Press the side button while slipping the
screwdriver into the slit. Push to the right.
28• Repeat the same operation, pushing the
screwdriver to the left and lowering the high
chair to the lowest position (the position in
which it cannot be used).
• Fold the high chair up and place it in its box.
accessory line
.29• Centro Gioco: to attach the Centro Gioco, place
it as shown in the figure, and attach. Do not
attach the toy to the meal tray.
cleaning & maintenance
Your product requires only minimal
maintenance. Cleaning and maintenance
operations must be performed only by adults.
• Be sure to keep all moving parts clean,
lubricating them with light oil if necessary.
• Dry off metal parts to prevent rusting.
• Regularly clean the plastic parts with a damp
cloth. Do not use solvents or similar products.

• Remove any dust and sand from the wheels.
• Protect the product against smog, water, rain
and snow. Continued and extended exposure
to sunlight can change the colours of many
materials.
• Store the product in a dry area.
• To wash the lining, carry out the following
instructions.
assistance service
If parts of the model are accidentally lost or
damaged, use only original Peg Perego spare
parts. Contact the Peg Perego Customer Service
for all repair work, replacements, information
about products, and sale of original spare parts
and accessories, at the following:
USA:
tel.: 800.671.1701
fax: 260.471.6332
Call us toll free: 1.800.671.1701
www.pegperego.com
Peg-Perego reserves the right to make any
necessary changes or improvements to the
products shown at any time without notice.
ES_Español
Le agradecemos haber
elegido un producto Peg-
Pérego.
CUIDADO!!
• IMPORTANTE: LEER ATENTAMENTE
ESTAS INSTRUCCIONES Y
CONSERVARLAS PARA UNA FUTURA
UTILIZACIÓN. SI NO SE SIGUEN
ESTAS INSTRUCCIONES, SE PODRÍA
ARRIESGAR LA SEGURIDAD DEL
NIÑO.
• LAS OPERACIONES DE MONTAJE Y
DE REGULACIÓN DEL PRODUCTO
TIENEN QUE SER REALIZADAS
POR UN ADULTO; NO UTILIZAR EL
PRODUCTO SI EL MONTAJE NO HA
SIDO COMPLETADO Y SI EL PRODUCTO
PRESENTA ROTURAS O FALTAN PIEZAS.
• PREVENIR HERIDAS SERIAS O LA
MUERTE DEL NIÑO CAUSADAS POR
LA CAÍDA O EL RESBALAMIENTO
DEL MISMO; UTILIZAR SIEMPRE
LOS CINTURONES DE SEGURIDAD
DE CINCO PUNTOS; UTILIZAR LOS
CINTURONES TANTO EN POSICIÓN
RECLINADA COMO EN POSICIÓN
ERECTA.
• UTILIZAR SIEMPRE LA TIRA
ENTREPIERNAS.
• NO DEJAR NUNCA AL NIÑO SIN
VIGILANCIA; NO PERDER NUNCA DE
VISTA AL NIÑO.
• LA BANDEJA Y SUS ACCESORIOS
NO HAN SIDO CONCEBIDOS PARA
SOPORTAR EL PESO DEL NIÑO; LA
BANDEJA NO HA SIDO DISEÑADA
PARA SUJETAR AL NIÑO EN EL ASIENTO
Y NO SIRVE COMO CINTURÓN DE
SEGURIDAD.
• ASEGURARSE DE QUE EL PRODUCTO
ESTÉ SOBRE UNA SUPERFICIE
HORIZONTAL.
• UTILIZAR EL PRODUCTO EN POSICIÓN
ERECTA SOLO CUANDO EL NIÑO SEA
CAPAZ DE ESTAR SENTADO SOLO.
• PONER EL PRODUCTO DE MANERA
QUE EL NIÑO ESTÉ LEJOS DE POSIBLES

PELIGROS COMO CABLES ELÉCTRICOS,
FUENTES DE CALOR O LLAMAS.
• NO INTRODUCIR LOS DEDOS EN
LOS MECANISMOS Y PRESTAR
ATENCIÓN A LA POSICIÓN DE LAS
EXTREMIDADES DEL NIÑO DURANTE
LAS OPERACIONES DE REGULACIÓN.
• PUEDE SER PELIGROSO UTILIZAR
ACCESORIOS NO HOMOLOGADOS POR
EL FABRICANTE.
• NO UTILIZAR EL PRODUCTO CERCA DE
ESCALERAS O ESCALONES.
• PRESTAR ATENCIÓN A NO PONER EL
PRODUCTO CERCA DE FUENTES DE
CALOR O FUEGO COMO HORNILLOS
DE GAS, ESTUFAS ELÉCTRICAS, ETC.
• ASEGURARSE DE QUE SE FIJE
CORRECTAMENTE EL CHASIS.
• USAR LA SILLA ALTA ÚNICAMENTE
SI TODOS LOS ELEMENTOS SE HAN
FIJADO Y AJUSTADO DE MODO
ADECUADO.
• AVISO: ESTE PRODUCTO CUMPLE
SUFICIENTEMENTE CON TODOS LOS
REQUISITOS ESTABLECIDOS POR LA
NORMA ASTM F833 Y ULTERIORES
REVISIONES.
instrucciones de uso
PARA MONTAR LA SILLA
1• Poner las ruedas colocando las que llevan
frenos en la parte posterior de la silla.
2• Poner las dos ruedas delanteras presionando
como indica el sentido de la flecha.
3• Cuando se quita del embalaje, la silla está
en una posición incorrecta para ser utilizada
(posición embalaje). Para utilizarla, levantar
la silla como indica la figura hasta oír clic,
poniéndola en una de las siete alturas
posibles de la silla. Para volver a poner la silla
en la posición que se utiliza exclusivamente
en el embalaje véanse las indicaciones más
adelante.
PARA ABRIR LA SILLA
4• Para abrir la silla, empujar hacia abajo las
palanquitas rojas laterales como indica la figura,
haciendo presión en los bastidores posteriores.
5• Antes de utilizar la trona, quite los separadores
tal y como se indica en la imagen.
6• Bajar el peldaño reposapiés, como indica la
figura.
FRENO
7• La silla tiene cuatro ruedas giratorias, dos de las
cuales se pueden bloquear con los frenos. Para
frenarlas, bajar las palanquitas del freno de las
ruedas traseras; para desbloquear los frenos,
hacer la operación en el sentido contrario.
Por motivos de comodidad, antes de hacer
cualquier operación, asegurarse de que la
silla esté frenada.
REPOSAPIÉ REGULABLE
8• El reposapié se regula en altura en tres
posiciones. Para alargarlo, pulsar los botones
laterales y tirar del reposapié hacia abajo
soltando los botones en la posición sucesiva, tal
y como muestra la imagen.
BANDEJA
9• Para aplicar la bandeja, tirar hacia sí la palanca
que está debajo de la bandeja y al mismo
tiempo meterla en los brazos empujando hasta
el fondo como indica la figura.
10• La bandeja de la silla se alarga en
tres posiciones, la tercera posición (la
identificada con referencias rojas) no tiene
que utilizarse pues sirve para volver a cerrar
la bandeja.
• Para alargar la bandeja, tirar de la palanquita
que está debajo de la misma y tirar la bandeja
hacia sí hasta la primera posición y repetir la
operación para poner la bandeja en la segunda
posición.
• Para extraer la bandeja, tirar de la palanquita y
al mismo tiempo empujar hacia sí la bandeja
hasta extraerla.
11• La silla lleva una bandeja doble, en la de abajo
se puede jugar y en la de arriba se puede
comer con la máxima higiene pues se lava
fácilmente.
• Para quitar la bandeja de la comida, hay
que desengancharla de la bandeja de abajo
levantándola como indica la figura.
12• Para volver a colocar la bandeja sobre los
acopladores posteriores de la trona alinearla
con respecto a los enganches y encajarla tal y
como muestra la imagen.
• La bandeja no puede quedar enganchada a los
acopladores posteriores cuando la trona esté
plegada.
CINTURÓN DE SEGURIDAD
13• Asegurarse de que el tirante esté metido
correctamente, empujando como indica la
figura A. Enganchar la correa de la cintura como
indica la figura B.
14• Para desenganchar el cinturón, presionar a los
lados de la hebilla (fig. A) y al mismo tiempo
tirar hacia fuera la correa de la cintura (fig. B).
15• La altura de los tirantes de la correa puede
regularse en dos posiciones; desenganchar el
cinturón por detrás del respaldo, empujando la
hebilla hacia abajo (fig. A). Sacar el cinturón por
la funda (fig. B).
16• Luego meter la hebilla del cinturón en la otra
ranura del respaldo (fig. A) y enganchar la

hebilla a la espiga, tirando del cinturón hasta el
clic de enganche (fig. B).
7 ALTURAS
La altura del asiento se puede regular en 7
posiciones.
17• Para levantar el asiento coger por debajo la
bandeja y tirar hacia arriba.
18• Para bajar el asiento, presionar al mismo tiempo
los dos botones laterales, parándose en la
posición deseada.
Estas operaciones pueden ser realizadas
también con el niño en la silla.
ASIENTO RECLINABLE
19• El asiento se puede reclinar hasta cuatro
posiciones: para comer, jugar, descansar o
dormir. Para regularlo subir el asa que está
detrás del respaldo y bloquearlo en la posición
deseada. Esta operación puede ser realizada
también con el niño en la silla.
PARA VOLVER A CERRAR Y A ABRIR LA BANDEJA
20• Para volver a cerrar la bandeja, alargar la
bandeja hasta la tercera posición identificada
con las referencias rojas indicadas por las
flechas de la figura.
21• Bajar el botón identificado con el número 1.
22• Bajar el botón identificado con el número
2 y al mismo tiempo subir la bandeja hasta
bloquearla arriba.
• Para volver a abrir la bandeja hay que bajar
el botón identificado con el número 2, bajar
la bandeja y ponerla en la primera o en la
segunda posición.
PARA CERRAR LA SILLA
• Antes de cerrar la silla:
- Volver a cerrar la bandeja.
- Poner el respaldo en la posición erecta.
- Bajar el asiento en la última posición.
- Volver a cerrar el peldaño reposapiés.
23• Desbloquear el dispositivo de seguridad
A, girándolo en el sentido de la flecha y
sucesivamente presionar el pedal B.
24• Simultáneamente a las operaciones A y B, coger
la silla como indica la figura y cerrarla, tirando
hacia arriba.
• La silla cuando está cerrada se sostiene en pie
sola.
POSIBILIDAD DE QUITAR LA FUNDA
25• Para quitar la funda de la silla, sacar el cinturón
que hay debajo del asiento y del respaldo.
26• Reclinar completamente la silla para
desabrochar la funda por los lados del respaldo
y sacar la funda por arriba.
PARA VOLVER A PONER LA SILLA EN LA
“POSICIÓN DE EMBALAJE”
• Para volver a poner la silla en la “posición
embalaje”(por exigencias de transporte o para
volver a meterla en la caja), hay que:
- Quitar la bandeja.
- Poner el respaldo en la posición erecta.
- Bajar el asiento en la última posición.
- Volver a cerrar el peldaño reposapiés.
27• Coger un destornillador pequeño. Presionar
el botón lateral y al mismo tiempo meter el
destornillador en la ranura empujando hacia la
derecha.
28• Repetir la misma operación, empujando el
destornillador hacia la izquierda y bajar hasta el
fondo el asiento (en la posición no utilizable).
• Luego volver a cerrar la silla y meterla en su
caja.
línea de accesorios
29• Bandeja de juegos: para enganchar la Bandeja
de juegos hay que ponerla y engancharla como
indica la figura. No enganchar la bandeja de
juegos a la bandeja para comer.
limpieza & mantenimiento
Su producto necesita un mínimo
mantenimiento. Las operaciones delimpieza y
mantenimiento tiene que ser efectuadas sólo
por adultos.
• Se aconseja mantener limpias las partes en
movimiento y si hiciera falta, lubricarlas con
aceite ligero.
• Secar las partes de metal del producto para
evitar que se oxiden.
• Limpiar periódicamente las partes de plástico
con un paño húmedo, no usar disolventes ni
otros productos parecidos.
• Mantener limpias las ruedas quitando polvo y
arena.
• Proteger el producto contra los agentes
atmosféricos, agua, lluvia o nieve; la exposición
continua y prolongada al sol puede causar
cambios de color en muchos materiales.
• Conservar el producto en un sitio seco.
• Para lavar los revestimientos, seguir las
indicaciones siguientes.
servicio de asistencia
Si por casualidad alguna parte del modelo
se pierde o se rompe, usar sólo piezas de
repuesto originales Peg Perego. Para todo
lo que concierne las reparaciones, cambios,
informaciones sobre los productos y la venta de
repuestos originales y accesorios, contacte con
el Servicio de Asistencia Peg-Perego:
USA:
tel.: 800.671.1701
fax: 260.471.6332
Call us toll free: 1.800.671.1701
www.pegperego.com
Peg-Perego podrá modificar los modelos

decritos en este prospecto, por razones técnicas
o commerciales. FR_Français
Merci d’avoir choisi un
produit Peg-Pérego.
ATTENTION
• IMPORTANT: LIRE CES
INSTRUCTIONS AVEC ATTENTION
ET LES CONSERVER POUR TOUTE
RÉFÉRENCE FUTURE. LA SÉCURITÉ
DE VOTRE ENFANT POURRAIT ÊTRE
MENACÉE SI CES INSTRUCTIONS NE
SONT PAS RESPECTÉES.
• LES OPÉRATIONS DE MONTAGE ET DE
RÉGLAGE DU PRODUIT DOIVENT ÊTRE
EFFECTUÉES PAR UN ADULTE; NE PAS
UTILISER LE PRODUIT SI LE MONTAGE
N’EST PAS CONVENABLEMENT TERMINÉ
ET SI LE PRODUIT PRÉSENTE DES
PIÈCES CASSÉES OU MANQUANTES.
• EMPÊCHER DE GRAVES BLESSURES
OU LA MORT DE L’ENFANT DUES À
SA CHUTE OU À SON GLISSEMENT:
TOUJOURS UTILISER LES CEINTURES DE
SÉCURITÉ À CINQ POINTS; UTILISER LES
CEINTURES EN POSITION INCLINÉE ET
À LA VERTICALE.
• UTILISER SYSTEMATIQUEMENT
L'ENTREJAMBE
• NE JAMAIS LAISSER L’ENFANT SANS
SURVEILLANCE; TOUJOURS GARDER
L’ENFANT EN VUE.
• LE PLATEAU ET SES ACCESSOIRES
N’ONT PAS ÉTÉ CONÇUS POUR
SUPPORTER LE POIDS DE L’ENFANT; LE
PLATEAU N’A PAS ÉTÉ CONÇU POUR
MAINTENIR L’ENFANT EN POSITION
ASSISE ET NE REMPLACE PAS LA
SANGLE DE SÉCURITÉ.
• S’ASSURER QUE LE PRODUIT EST
INSTALLÉ SUR UNE SURFACE
HORIZONTALE.
• N’UTILISER LE PRODUIT EN POSITION
VERTICALE QUE SI L’ENFANT EST
CAPABLE DE RESTER ASSIS TOUT SEUL.
• INSTALLER LE PRODUIT DE MANIÈRE
À CE QUE L’ENFANT NE PUISSE ÊTRE
MIS EN DANGER PAR DES CÂBLES
ÉLECTRIQUES, DES SOURCES DE
CHALEUR OU DES FLAMMES.

FREIN
7• La chaise haute est équipée de quatre roulettes
pivotantes dont deux avec frein. Pour bloquer
les freins, baissez les petites manettes des
roues arrières, pour les débloquer, relevez-
les.
PÉDALE RÉGLABLE
8• La hauteur de la pédale est réglable en 8
positions. Pour l’allonger, appuyer sur les
boutons situés sur les côtés et tirer la pédale
vers le bas jusqu’à ce que les boutons
s’enclenchent dans la position successive,
comme sur la figure.
PLATEAU
9• Pour appliquer le plateau, tirer vers soi le levier
situé sous le plateau tout en enfilant à fond ce
dernier dans les accoudoirs, comme indiqué sur
la figure.
10• Le plateau de la chaise haute est
allongeable en trois positions; ne pas
utiliser la troisième position (indiquée en
rouge), qui sert à refermer le plateau.
• Pour allonger le plateau, tirer vers soi le levier
situé sous le plateau et ce dernier jusqu’en
première position et répéter l’opération pour
l’amener en deuxième position.
• Pour extraire le plateau, tirer vers soi le levier
situé sous le plateau et ce dernier jusqu’à
l’extraire.
11• La chaise haute est dotée d’un double plateau,
celui du bas pour jouer et celui du haut pour
manger en conditions maximales d’hygiène car
il se lave facilement.
• Pour démonter le plateau repas, le décrocher
du plateau sous-jacent en le soulevant comme
indiqué sur la figure.
12• Pour replacer le plateau sur les montants à
l’arrière de la chaise haute, le positionner en
correspondance des fixations et l’accrocher
comme indiqué sur la figure.
• Lorsque la chaise haute est repliée, il n’est pas
possible d’accrocher le plateau aux montants
postérieurs.
CEINTURE DE SECURITE
13• Assurez-vous que la bretelle est bien insérée
en appuyant comme indiqué sur la Figure A.
Attachez la ceinture du tour de taille comme
indiqué sur la figure B.
14• Pour détacher la ceinture, enfoncez les côtés
de la boucle (fig. A) tout en tirant la ceinture du
tour de taille vers l’extérieur (fig. B)
15• Les bretelles de la ceinture peuvent être réglées
en hauteur en deux positions : détachez la
ceinture à l’arrière du dossier en tirant la boucle
vers le bas (fig. A). Retirez la ceinture par la
housse (fig. B)
16• Enfilez la boucle de la ceinture dans l’autre
fente du dossier (fig. A) et accrochez la boucle
à l’ergot en tirant la ceinture jusqu’au Clic
d’enclenchement (fig. B)
• NE PAS METTRE LES DOIGTS DANS LES
MÉCANISMES ET FAIRE ATTENTION
À LA POSITION DES MEMBRES DE
L’ENFANT AU COURS DES OPÉRATIONS
DE RÉGLAGE.
• L’UTILISATION D’ACCESSOIRES
N’AYANT PAS ÉTÉ APPROUVÉS PAR LE
FABRICANT PEUT ÊTRE DANGEREUSE.
• NE PAS UTILISER LE PRODUIT
À PROXIMITÉ DE MARCHES OU
D’ESCALIERS.
• FAIRE ATTENTION À NE PAS
POSITIONNER LE PRODUIT À
PROXIMITÉ DE SOURCES DE CHALEUR
OU DE FEUX COMME LES POÊLES À
GAZ, LES RADIATEURS ÉLECTRIQUES,
ETC.
• NE PAS UTILISER LA CHAISE HAUTE
SI TOUS LES ÉLÉMENTS NE SONT
PAS FIXÉS ET RÉGLÉS DE MANIÊRE
APPROPRIÉE.
• REMARQUE : CET ARTICLE REMPLIT LES
CONDITIONS REQUISES PAR LA NORME
ASTM F833 ET RÉVISIONS RÉCENTES
OU SATISFAIT À DES CONDITIONS PLUS
SÉVÈRES.
• CONFORME AUX EXIGENCES DE
SECURITE.
notice d’emploi
POUR ASSEMBLER LA CHAISE HAUTE
1• Montez les roues en faisant attention à
insérer celles avec les freins à l’arrière de la
chaise haute.
2• Montez les deux roues avant en faisant pression
dans le sens de la flèche.
3• Une fois sorti de son emballage, le siège
de la chaise haute est dans une position
inadaptée à son utilisation (position
emballage). Pour l’utiliser, soulever le siège
comme sur la figure jusqu’au déclic et
enclenchez-le à une des hauteurs de réglage
de la chaise haute. Pour faire reprendre au
siège la position emballage, voir ci-après.
POUR OUVRIR LA CHAISE HAUTE
4• Pour ouvrir la chaise haute, pousser vers le
bas les languettes rouges situées sur les côtés,
comme sur la figure, en faisant levier sur les
montants postérieurs.
5• Enlever les pièces d’écartement avant d’utiliser
la chaise haute, comme indiqué sur la figure.
6• Abaisser la pédale repose-pieds, comme sur la
figure.

7 HAUTEUR
La hauteur du siège est réglable en 7 positions.
17• Pour relever le siège, empoigner le plateau et
tirer le siège vers le haut.
18• Pour abaisser le siège, appuyer simultanément
sur les deux boutons latéraux et s’arrêter sur la
position voulue.
Ces opérations peuvent également être
effectuées alors que l’enfant est assis sur la
chaise haute.
SIÈGE INCLINABLE
19• Le siège est inclinable en quatre positions-:
repas, jeu, détente et sieste. Pour régler
l’inclinaison du siège, relever la poignée
située derrière le dossier et bloquer le siège
dans la position voulue. Cette opération peut
également être effectuée alors que l’enfant est
assis sur la chaise haute.
FERMETURE ET RÉOUVERTURE DU PLATEAU
20• Pour refermer le plateau, l’amener en troisième
position, marquée en rouge et indiquée par les
flèches sur la figure.
21• Abaisser le bouton indiqué par le chiffre 1.
22• Abaisser le bouton indiqué par le chiffre 2 tout
en relevant le plateau jusqu’à le bloquer en
hauteur.
• Pour rouvrir le plateau, abaisser le bouton
indiqué par le chiffre 2, abaisser le plateau et
l’amener en première ou deuxième position.
FERMETURE DE LA CHAISE HAUTE
• Avant de fermer la chaise haute:
- refermer le plateau;
- redresser le dossier;
- abaisser complètement le siège;
- refermer le repose-pied.
23•Débloquez le dispositif de sécurité A en le
faisant pivoter dans le sens de la flèche, puis
appuyez sur la pédale B.
24• Dans le même temps, saisissez-vous de la
chaise haute comme sur la figure et refermez-la
en tirant vers le haut.
• Lorsqu’elle est refermée, la chaise haute tient
debout toute seule.
POUR ENLEVER LA HOUSSE
25• Pour enlever la housse de la chaise haute,
retirez la ceinture de sous l’assise et du dossier.
26• Abaissez complètement le siège pour
déboutonner le sac des côtés du dossier et
retirez le sac par le haut.
POUR REMETTRE LA CHAISE HAUTE EN
«POSITION D’EMBALLAGE»
• Pour remettre la chaise haute en «position
d’emballage» (pour la transporter ou la remettre
dans son carton):
- démonter le plateau;
- redresser le dossier;
- abaisser complètement le siège;
- refermer le repose-pied.
27• Se munir d’un petit tournevis. Appuyer sur le
bouton latéral tout en enfilant le tournevis dans
la fente et en le poussant vers la droite.
28• Répéter l’opération en poussant le tournevis
vers la gauche et abaisser à fond le siège (en
position d’emballage).
• Refermer la chaise haute et la mettre dans son
carton.
accessoires
29• Plateau de jeu: pour monter le Plateau de
jeu, positionnez-le et montez-le comme sur
la figure. Ne montez pas le jeu sur le plateau
repas.
nettoyage et entretien
• Il est recommandé de maintenir toutes les
parties mobiles propres et, au besoin, de les
lubrifier avec une huile légère.
• Essuyer les parties métalliques du produit pour
prévenir la formation de rouille.
• Nettoyer régulièrement les parties en plastique
avec un chiffon humide, ne pas utiliser de
solvants ou d’autres produits du même type.
• Éliminer les dépôts de poussière et de sable des
roues.
• Protéger le produit contre les agents
atmosphériques, l’eau, la pluie ou la neige;
l’exposition continue et prolongée au soleil
pourrait altérer les couleurs de nombreux
matériaux.
• Conserver le produit dans un endroit sec.
• Pour le lavage du sac, suivre les instructions ci-
après.
service d’assistance
En cas de perte ou dommage fortuit de
pièces du modèle, utilisez exclusivement les
pièces de rechange originales Peg Perego.
Pour les éventuelles réparations, substitutions,
informations sur les produits, la vente de
pièces de rechange originales et d’accessoires,
contactez le Service d’assistance Peg-Perego:
CANADA:
tel.: 905.839.3371
fax: 905.839.9542
Call us toll free: 1.800.661.5050
www.pegperego.com
Pour des raisons techniques et commerciales,
Peg-Perego pourra apporter à tout moment
des modifications aux modèles décrits dans ce
manuel.

PEG PEREGO S.p.A.
VIA DE GASPERI 50 20043 ARCORE MI ITALIA
tel. 0039 039 60881 fax 0039 039 615869/616454
Servizio Post Vendita - After Sale:
tel. 0039 039 6088213 fax: 0039 039 3309992
PEG PEREGO U.S.A. Inc.
3625 INDEPENDENCE DRIVE FORT WAYNE INDIANA 46808
phone 260 482 8191 fax 260 484 2940
Call us toll free: 1 800 671 1701
PEG PEREGO CANADA Inc.
585 GRANITE COURT PICKERING ONTARIO CANADA L1W3K1
phone 905 839 3371 fax 905 839 9542
Call us toll free: 1 800 661 5050
www.pegperego.com
FINA0702I88
17/10/07
prima pappa best
AVOID SERIOUS INJURY FROM FALLING OR SLIDING OUT.
ALWAYS USE COMPLETE 5 POINT SEAT BELT.
WARNING:
Other manuals for prima pappa best
1
Table of contents
Languages:
Other Peg-Perego High Chair manuals

Peg-Perego
Peg-Perego tatamia User manual

Peg-Perego
Peg-Perego PRIMA PAPPA ZERO-3 User manual

Peg-Perego
Peg-Perego Prima pappa follow me User manual

Peg-Perego
Peg-Perego Siesta User manual

Peg-Perego
Peg-Perego Rialto User manual

Peg-Perego
Peg-Perego prima pappa duplo User manual

Peg-Perego
Peg-Perego PRIMA PAPPA ZERO-3 User manual

Peg-Perego
Peg-Perego Siesta User manual

Peg-Perego
Peg-Perego Prima Pappa Diner User manual

Peg-Perego
Peg-Perego Merenda User manual