Peg-Perego Prima Pappa Diner User manual

prima pappa diner
IT Istruzioni d’uso
EN Instructions for use
FR Notice d’emploi
DE Gebrauchsanleitung
ES Instrucciones de uso
PT Instruções para uso
NL Gebruiksaanwijzing
DK Brugsanvisning
FI Käyttöohjeet
CZ Návod na použití
SK Návod na použitie
HU Használati útmutató
SL Navodila za uporabo
RU Инструкции по пользованию
TR Kullanım kılavuzu
HR Upute za uporabu
EL Οδηγίες χρήσεως

3
2
1

4
6
5

9
8
7

12
11
10

13
14
Prima Pappa Diner
IT Ricambi disponibili in piú colori da specificare nella richiesta.
EN Spare parts available in different colours to be specified when ordering.
FR Pièces de rechange disponibles en plusieurs couleurs à spécifier dans la demande.
DE Ersatzteile in mehr Farben vorhanden, die in der Anfrage spezifiziert werden müssen.
ES Repuestos disponibles en otros colores que se especificarán en el pedido.
PT Peças de reposição disponíveis em cores alternativas a serem especificadas no pedido.
NL Reserveonderdelen verkrijgbaar in meerdere kleuren, bij bestelling te specificeren.
DK Reservedele kan leveres i flere farver som bør specificeres ved bestillingen.
FI Varaosia saatavana eri värisinä: ilmoita väri tilauksessa.
CZ U náhradních dílů, které jsou k dispozici ve více barvách, je nutné na objednávce specifikovat příslušnou barvu.
SK Pri náhradných dieloch, ktoré sú k dispozícii vo viacerých farbách, je potrebné pri objednávke špecifikovať želanú farbu.
HU A tartalék alkatrészek különböző színekben elérhetők, melyeket rendeléskor kell kiválasztani.
SL Rezervni deli so na voljo v več barvah, ki jih je treba navesti pri naročilu.
RU Запчасти имеются различных цветов, необходимый указать в запросе.
TR Siparişte belirtilen değişik renklerdeki yedek parçalari mevcuttur.
HR Zamjenski dijelovi dostupni u više boja što je potrebno specificirati u narudžbi.
EL Ανταλλακτικά διαθέσιμα σε διάφορα χρώματα. Προσδιορίστε όταν παραγγείλετε.

17
1
2
3
4
8
7
9
11
12
13
15
16
10
18
14
9
5
6
Prima Pappa Diner
1 EMPP3500•
2 SAPI4938GR
3 SPST5025XD•
SPST5025XS•
4 SPST5024DBM
SPST5024SBM
5 SPST5459GR
6 SPST5458BM
7 SPST5740GR
8 SPST4725•
9 SPST5728•
10 MUCI5P18GM
11 SAPU5730•
12 SPST5942K•
13 SAPI5934•
14 IRTR0021BMPEG
15 SPST5942J•
16 SPST4645BM
17 SAPI5171BMGR
18 SAPU5298KJ•PEG

- 8 -
IT_Italiano
Grazie per aver acquistato un prodotto Peg-Pérego.
AVVERTENZA
_ IMPORTANTE:
CONSERVARLE
PER UN FUTURO
UTILIZZO.
_ Leggere attentamente queste
istruzioni. La sicurezza del bambino
potrebbe essere messa a rischio se
non si eseguono queste istruzioni.
_ Questo articolo e’ omologato per
bambini da 6 a 36 mesi o fino a 15
kg di peso.
_ Assicurarsi che la cinghia sia
correttamente agganciata.
_ Non lasciate mai incustodito il
vostro bambino; tenete sempre di
vista il bambino.
_ Non usare il seggiolone se tutti gli
elementi non sono debitamente
fissati e regolati.
_ Le operazioni di montaggio e di
regolazione del prodotto devono
essere effettuate da un adulto; non
utilizzare il prodotto se il montaggio
non e’ correttamente completato e se
il prodotto presenta rotture o pezzi
mancanti
_ Le operazioni di pulizia e
manutenzione devono essere
effettuate solo da adulti.
_ Prevenite la caduta del bambino o il
suo scivolamento; utilizzate sempre
le cinture di sicurezza a cinque punti;
utilizzate le cinture sia in posizione
reclinata che in posizione eretta.
_ Non usare il prodotto finchè il
bambino non è in grado di restare
seduto da solo
_ Il vassoio e i suoi accessori non sono
progettati per reggere il peso del
bambino; il vassoio non è disegnato
per mantenere il bambino nella
seduta e non sostituisce il cinturino di
sicurezza
_ Assicurarsi che il prodotto sia su una
superficie orizzontale
_ Posizionare il prodotto in modo da
tenere il bambino lontano da pericoli
come cavi elettrici, sorgenti di calore
o fiamme
_ Non introdurre le dita nei meccanismi
e prestare attenzione alla posizione
degli arti del bambino durante le
operazioni di regolazione
_ Potrebbe essere pericoloso utilizzare
accessori non approvati dal
costruttore
_ Non utilizzare il prodotto in vicinanza
di scale o gradini
_ Prestare attenzione a non posizionare
il prodotto vicino a sorgenti di calore
o fuoco come fornelli a gas, stufe
elettriche, ecc...
ISTRUZIONI D'USO
1 MONTAGGIO RUOTE POSTERIORI E PIEDINI ANTERIORI:
prima di inserire le ruote, montare come in figura il
blocca ruote (fig_a). Applicare le due ruote nella parte
posteriore del seggiolone (fig_b) e i due piedini nella
parte anteriore (fig_c) facendo pressione nel senso
della freccia.
2 APERTURA: quando viene tolto dall’imballo, il
seggiolino é in una posizione non corretta per
l’utilizzo (posizione imballo). Per l’utilizzo, sollevarlo
fino al click, portandolo in una delle sette altezze del
seggiolone (fig_a). Per aprire il seggiolone, spingere
verso il basso le levette rosse laterali (fig_b) facendo
leva sui montanti posteriori.
3 Prima di procedere all’utilizzzo del seggiolone,
rimuovere i distanziali (fig_a) e abbassare la
pedanetta-poggiapiedi (fig_b).
4 VASSOIO: per applicare il vassoio, tirare verso
di sé la leva collocata sotto lo stesso (fig_a) e
contemporaneamente infilarlo nei braccioli
spingendolo fino in fondo (fig_b). Il vassoio è
allungabile in tre posizioni (fig_c), la terza posizione
(quella contrassegnata dai riferimenti rossi) non deve
essere utilizzata, perchè serve a richiudere il vassoio.
_ Per allungare il vassoio, tirare la leva collocata sotto lo
stesso e il vassoio verso di sé fino alla prima posizione
e ripetere l’operazione per portare il vassoio alla
seconda posizione.
_ Per estrarre il vassoio, tirare la leva e
contemporaneamente spingere verso di sè il vassoio
fino ad estrarlo.
5 Il seggiolone è dotato di doppio vassoio, quello
superiore è facilmente lavabile in lavastoviglie. Per
rimuoverlo occorre sganciarlo dal vassoio sottostante
sollevandolo (fig_a). Per riporre il vassoio sui montanti
posteriori del seggiolone, allinearlo in prossimità
degli attacchi e agganciarlo (fig_b). Quando il
seggiolone è chiuso, il vassoio non può essere
agganciato ai montanti posteriori.
6 CINTURA DI SICUREZZA 5 PUNTI: per agganciare,
inserire le due fibbie del cinturino girovita (con
bretelle agganciate) nel cinturino spartigambe fino
al click (fig_a). Per sganciare, premere ai lati della
fibbia e contemporaneamente tirare verso l’esterno
il cinturino girovita (fig_b). Per stringere il cinturino
girovita tirare, da entrambi i lati, nel senso della
freccia (fig_c), per allentarlo agire in senso contrario.
Il cinturino girovita può essere stretto fino al fermo di
sicurezza (fig_d).
7 Le bretelle del cinturino possono essere regolate

- 9 -
in altezza in due posizioni; sganciare il cinturino
da dietro lo schienale, spingendo la fibbia verso il
basso (fig_a) e sfilare il cinturino dalla sacca (fig_b).
Infilare poi la fibbia del cinturino nell'altra fessura
dello schienale (fig_c) e agganciare la fibbia al piolo,
tirando il cinturino fino al click di aggancio (fig_d).
8 REGOLAZIONE ALTEZZA: il seggiolino è regolabile
in altezza in 7 posizioni. Per alzare il seggiolino
prendere da sotto il vassoio e tirare verso l’alto (fig_a),
per abbassarlo premere contemporaneamente i
due pulsanti laterali, fermandosi nella posizione
desiderata (fig_b). Queste operazioni possono essere
eseguite anche con il bambino nel seggiolone.
9 SCHIENALINO RECLINABILE: il seggiolino é reclinabile
fino a quattro posizioni: per la pappa, il gioco, il relax
o la nanna. Per regolarlo alzare la maniglia posta
dietro lo schienale (fig_a) e bloccarlo nella posizione
desiderata (fig_b). Questa operazione puó essere
eseguita anche con il bambino nel seggiolone.
10 CHIUDERE E RIAPRIRE IL VASSOIO: per chiudere
il vassoio, allungarlo nella terza posizione
contrassegnata dai riferimenti rossi (fig_a), abbassare
il pulsante numero 1 (fig_b), abbassare il pulsante
numero 2 (fig_c) e contemporaneamente ruotare il
vassoio verso l'alto fino a bloccarlo (fig_d). Per riaprire
il vassoio occorre abbassare il pulsante numero 2,
ruotare verso il basso il vassoio e portarlo nella prima
o nella seconda posizione.
11 CHIUSURA: prima di chiudere il seggiolone occorre
richiudere il vassoio, portare lo schienale nella
posizione eretta, abbassare il seggiolino nell’ultima
posizione e richiudere la pedanetta-poggiapiedi.
Per chiudere il seggiolone sbloccare il dispositivo
di sicurezza ruotandolo nel senso della freccia
e successivamente schiacciare il pedale (fig_a).
Contemporaneamente impugnare il seggiolone e
chiudere tirando verso l’alto (fig_b). Il seggiolone
quando é chiuso rimane in piedi da solo.
12 FODERABILITA': per sfoderare il seggiolino sfilare i
cinturini dallo schienale (fig_a) e dalla seduta (fig_b).
Reclinare completamente il seggiolino per sbottonare
esternamente la sacca dai lati dello schienale (fig_c),
sbottonare internamente ai braccioli e infine sfilare la
sacca dall’alto.
13 POSIZIONE IMBALLO: per riportare il seggiolone nella
“posizione imballo” (per esigenze di trasporto o per
riporlo nella scatola), occorre: rimuovere il vassoio,
portare lo schienale nella posizione eretta, abbassare
il seggiolino nell’ultima posizione e richiudere la
pedanetta-poggiapiedi. Attrezzarsi con un piccolo
cacciavite, premere il pulsante laterale (fig_a) e
contemporaneamente infilare il cacciavite nella
fessura spingendo verso destra (fig_b). Ripetere la
stessa operazione (fig_c), spingendo il cacciavite
verso sinistra (fig_d) e abbassare fino in fondo il
seggiolino (nella posizione non utilizzabile). Quindi,
richiudere il seggiolone e inserirlo nella sua scatola.
NUMERI DI SERIE
14 PRIMA PAPPA DINER, riporta sotto al poggiagambe
informazioni relative alla data di produzione dello
stesso.
_ Nome del prodotto, data di produzione e numerazione
seriale.
Queste informazioni sono indispensabili in caso di
reclamo.
PULIZIA E MANUTENZIONE
MANUTENZIONE DELL' ARTICOLO: proteggere
da agenti atmosferici: acqua, pioggia o neve;
l’esposizione continua e prolungata al sole potrebbe
causare cambiamenti di colore in molti materiali;
conservare questo articolo in un posto asciutto.
PULIZIA DEL TELAIO: periodicamente pulire le parti in
plastica con un panno umido senza utilizzare solventi
o altri prodotti simili; mantenere asciutte tutte le
parti in metallo per prevenire la ruggine; mantenere
pulite tutte le parti in movimento (meccanismi di
regolazione, meccanismi di aggancio, ruote...) da
polvere o sabbia e se occorre, lubrificarle con olio
leggero.
PULIZIA DELLA SACCA: lavare con un panno umido
e detersivo neutro; non torcere; non candeggiare
al cloro; non stirare; non lavare a secco; non
smacchiare con solventi e non asciugare a mezzo di
asciugabiancheria a tamburo rotativo.
PEG-PÉREGO S.p.A.
Peg-Pérego S.p.A. è certificata ISO 9001.
La certificazione offre ai clienti e ai
consumatori la garanzia di una
trasparenza e fiducia nel modo di
lavorare dell'impresa.
Peg Pérego potrà apportare in
qualunque momento modifiche ai modelli descritti in
questa pubblicazione, per ragioni di natura tecnica o
commerciale.
Peg Pérego è a disposizione dei suoi Consumatori
per soddisfare al meglio ogni loro esigenza. Per
questo, conoscere il parere dei ns. Clienti, è per noi
estremamente importante e prezioso. Le saremo
quindi molto grati se, dopo aver utilizzato un
ns. prodotto, vorrà compilare il QUESTIONARIO
SODDISFAZIONE CONSUMATORE, segnalando
eventuali osservazioni o suggerimenti, che troverà nel
nostro sito internet: www.pegperego.com
SERVIZIO ASSISTENZA PEG-PÉREGO
Se fortuitamente parti del modello vengono
perse o danneggiate, usare solo pezzi di ricambio
originali Peg Pérego. Per eventuali riparazioni,
sostituzioni, informazioni sui prodotti, la vendita
di ricambi originali e accessori, contatta il Servizio
Assistenza Peg Pérego:
tel. 0039/039/60.88.213
numero verde: 800/147.414 (contattabile da rete
fissa)
fax 0039/039/33.09.992
e-mail assistenza@pegperego.it
sito internet www.pegperego.com

- 10 -
EN_English
Thank you for choosing a Peg-Pérego product.
WARNING
_ IMPORTANT: KEEP
FOR FUTURE
REFERENCE
_ Read these instructions carefully.
Failure to follow them may put the
child’s safety at risk.
_ The item is approved for children
aged 6-36 months and up to weight
of 15kg.
_ To make sure that any harness is
correctly fitted.
_ Do not leave the child unattended.
_ Do not use the high chair unless all
components are correctly fitted and
adjusted.
_ All assembly and operating
procedures should be performed by
an adult; Not to use the high chair if any
part is broken, torn or missing.
_ Cleaning and maintenance must only
be carried out by an adult.
_ Take precautions to prevent the
child from falling or slipping out of
the product. Always use the 5-point
safety belt. Use the safety belt when
the child is lying down and sitting up.
_ Not to use the high chair until the child
can sit up unaided.
_ Tray and accessory trays are not designed
to support the child’s weight; tray is not
designed to hold the child in the chair.
_ Always use the highchair on a flat,
horizontal surface.
_ To be aware of the risk of open fire and
other sources of strong heat, such as
electric bar fires, gas fires etc. in the
vicinity of the high chair.
_ Do not put fingers in the mechanism.
Make sure your child’s arms and legs
are clear of the moving parts during
adjustment.
_ Using accessories that have not been
approved by the manufacturer may
be hazardous.
_ Do not use the product near stairs or
steps.
_ Be careful not to place the product
near sources of heat or flames, such
as gas stoves, electric heaters, etc.
INSTRUCTIONS
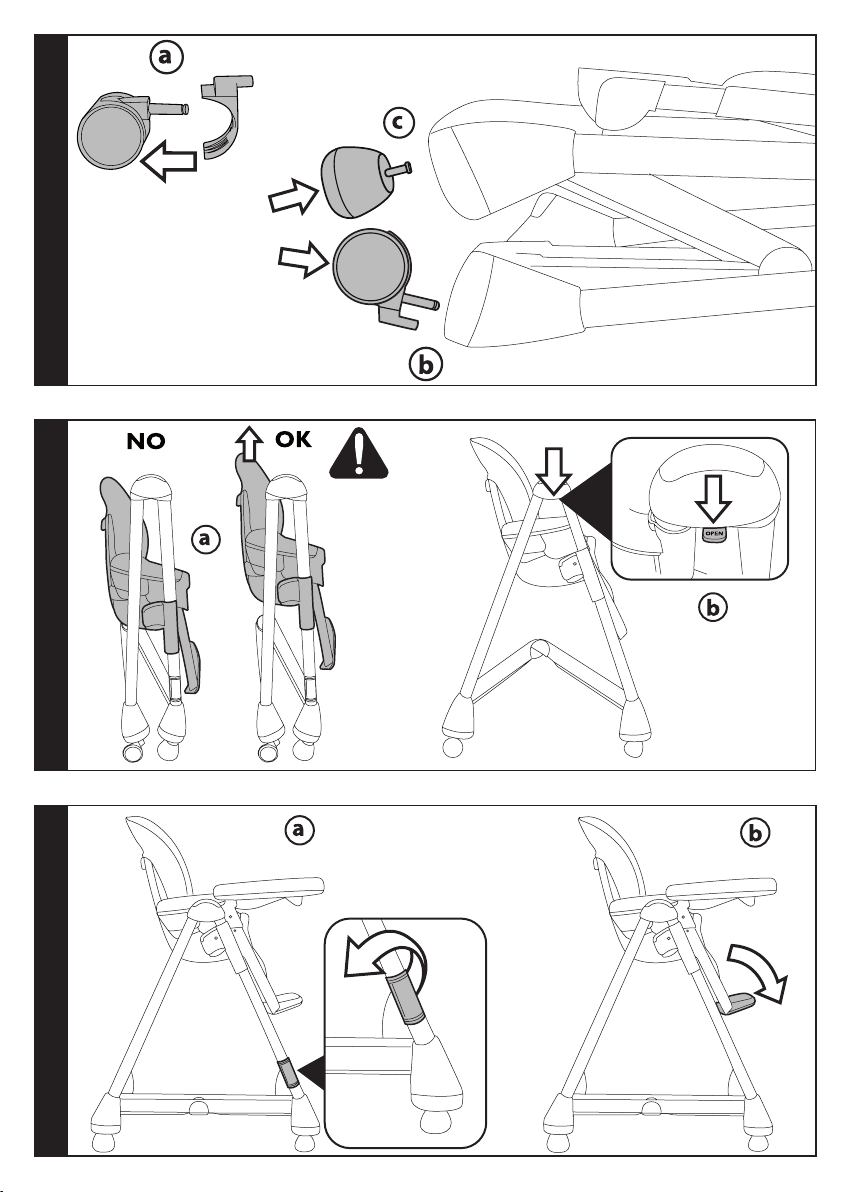
1 FITTING THE REAR WHEELS AND FRONT FEET: before
inserting the wheels, fit the wheel locks as shown in
the figure (fig_a). Fit the two wheels at the back of the
high chair (fig_b) and the two feet at the front (fig_c),
pushing in the direction of the arrow.
2 OPENING: when it is removed from the packaging,
the high chair is not in the correct position for use
(packing position). For use, raise it up until it engages
with a click at one of the seven chair heights (fig_a).
To open the high chair, push the red side levers down
(fig_b) and push the back supports outwards.
3 Before using the high chair, remove the spacers
(fig_a) and lower the footrest (fig_b).
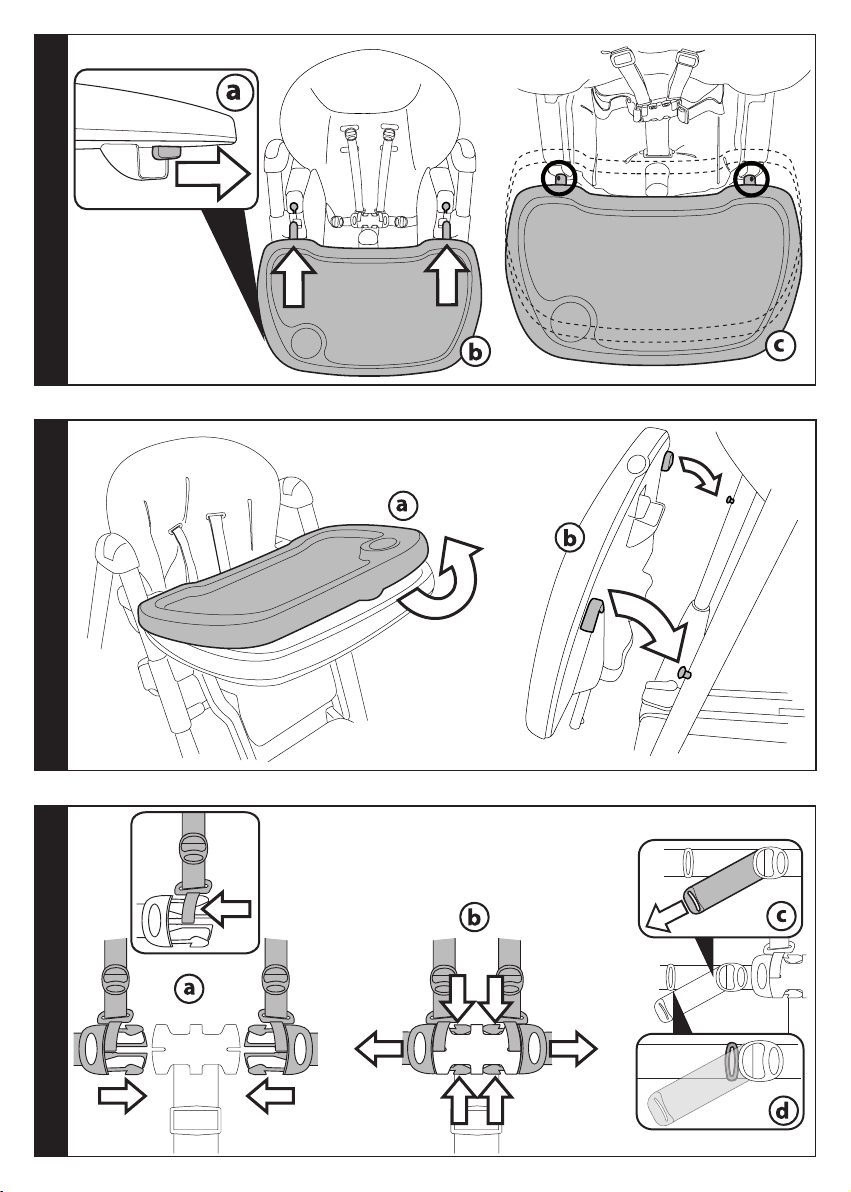
4 TRAY: to fit the tray, pull the lever underneath it
towards you (fig_a) while at the same time inserting
it onto the armrests, and push down fully (fig_b). The
tray is extendible to three positions (fig_c). The third
position (indicated with red markings) should not be
used and is only for reclosing the tray.
_ To extend the tray, pull the lever under it and pull the
tray towards you into the first position, repeating the
operation to move it into the second position.
_ To remove the tray, pull the lever and at the same time
push the tray towards yourself until it disengages.
5 The high chair has a double tray. The top tray can easily
be washed in a dishwasher. To remove it, detach it from
the lower tray and lift it up (fig_a). To fix the tray on the
rear supports of the high chair, align and engage it with
the attachments provided (fig_b). When the high chair is
closed, the tray cannot be attached to the rear supports.
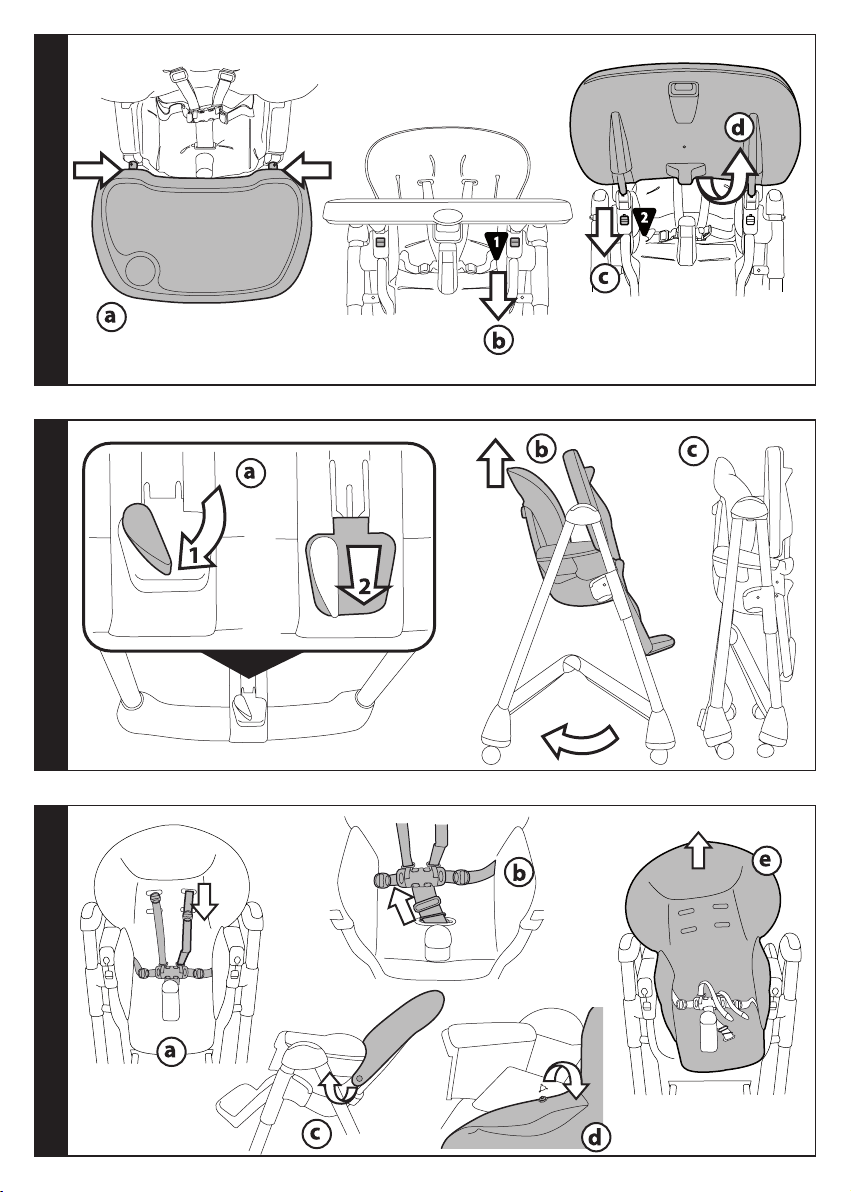
6 FIVE POINT SAFETY HARNESS: to close it, insert the two
waist strap buckles (with attached shoulder straps) into
the crotch strap until they click into position (fig_a). To
release it, press the two sides of the buckles and at the
same time pull the waist strap outwards (fig_b). To tighten
the waist strap pull from both sides in the direction of the
arrow (fig_c), to loosen do the opposite. The waist strap
can be tightened up to the safety stop (fig_d).
7 The shoulder straps can be adjusted to two different
heights. Unfasten the safety belt from behind the backrest
by pushing the buckle downwards (fig_a) and unthread
the strap from the cover (fig_b). Insert the strap buckle
into the other slot in the backrest (fig_c) and reattach the
buckle, pulling the strap until it clicks into position (fig_d).
8 ADJUSTING HEIGHT: the high chair can be set at 7 different
heights. To raise it, take hold below the tray and pull
upwards (fig_a). To lower it, press the two side buttons at
the same time and move to the required height (fig_b).
This can also be carried out with the child in the high chair.
9 RECLINING BACKREST. The high chair can be reclined
in four positions: for eating, playing, resting, or sleep.
To adjust it, raise the handle behind the backrest
(fig_a) and lock in the required position (fig_b). This
can also be carried out with the child in the high chair.
10 CLOSING AND REOPENING THE TRAY: to close the
tray, pull it to the third position indicated with the red
markings (fig_a), push down button 1 (fig_b), push
down button 2 (fig_c), and at the same time rotate
the tray upwards until it locks (fig_d). To reopen the
tray, push down button 2, rotate the tray downwards
and set it in the first or second position.
11 FOLDING: before folding up the high chair, close the
tray, move the backrest to the upright position, lower
the seat to the lowest position, and close the footrest.
To fold up the high chair, release the safety device by
turning it in the direction of the arrow and then press
the pedal (fig_a). At the same time take hold of the
seat and fold it by pulling it upwards (fig_b). The high
chair is freestanding when folded up.

- 11 -
12 REMOVING THE COVERS: to remove the high chair
covers, unthread the harness straps from the backrest
(fig_a) and from the seat (fig_b). Fully recline the seat
to unbutton the covers from the sides of the backrest
(fig_c), unbutton from the inside of the armrests, and
slide the cover upwards to remove it.
13 PACKING POSITION: in order to return the high chair to
its “packing position” (for transport purposes, or to put it
back into its box), proceed as follows (a small screwdriver
is required). Remove the tray, move the backrest into the
upright position, lower the seat to the lowest position,
and close the footrest. Press the side button (fig_a), at the
same time inserting the screwdriver into the slot, and push
towards the right (fig_b). Repeat the same operation on the
other side (fig_c), pushing the screwdriver towards the left
(fig_d) and lower the seat to the bottom (the non-usable
position). Then fold up the high chair and put it into its box.
SERIAL NUMBERS
14 Information relating to the date of manufacture of
the product are found under the PRIMA PAPPA DINER
footrest.
_ Product name, date of manufacture and serial number.
This information is required for any complaints.
CLEANING AND MAINTENANCE
PRODUCT MAINTENANCE: protect from the weather:
water, rain, or snow; prolonged and continuous exposure
to bright sunlight may give rise to colour changes of
various different materials; store this product in a dry place.
CLEANING THE CHASSIS: periodically clean all plastic parts
with a damp cloth. Do not use solvent or similar cleaning
products; keep all metal parts dry to prevent rusting; keep
moving parts clean (adjustment mechanisms, locking
mechanisms, wheels, ...) and free of dust and sand and, if
necessary, lubricate with light machine oil.
CLEANING THE SACK: Wash with a damp cloth and
neutral detergent. Do not wring. Do not use chlorine
bleach. Do not iron. Do not dry clean. Do not use
solvents for stain removal. Do not spin dry.
PEG-PÉREGO S.p.A.
Peg-Pérego S.p.A. is an ISO 9001
certified company. This certification is a
guarantee for customers and
consumers of the transparency and
trustworthiness of the company's
procedures and working methods.
Peg Pérego can make changes at any time to the
models described in this publication for technical or
commercial reasons.
Peg Pérego is at the disposal of its customers and
consumers to ensure that all their demands and queries
are fully satisfied. It is a key part of our policy to ensure
we are always aware of our customers' views and
requirements. We would therefore be very grateful if,
after using a Peg Pérego product, you take the time to
fill in our CUSTOMER SATISFACTION QUESTIONNAIRE,
making a note of any comments or suggestions you
might have. You can find the questionnaire on the Peg
Pérego website: www.pegperego.com
PEG-PÉREGO AFTER-SALES SERVICE
If any parts of your Peg Pérego product should be
accidentally mislaid or damaged, use exclusively
genuine original Peg Pérego replacements. For any
repairs, replacements, product information, and
orders for genuine original replacement parts and
accessories, contact Peg Pérego After-Sales Service:
tel. 0039/039/60.88.213 fax 0039/039/33.09.992
e-mail assistenza@pegperego.it website www.
pegperego.com
FR_Français
Merci d’avoir choisi un produit Peg-Pérego.
AVERTISSEMENT
_
IMPORTANT: À
CONSERVER POUR
TOUTE UTILISATION
ULTÉRIEURE.
_ Lire attentivement ces instructions.
La sécurité de l’enfant pourrait être
menacée en cas de non-respect de
ces instructions.
_ Cet article est homologué pour des
enfants de 6 à 36 mois et jusqu’à un
poids de 15 kg.
_ S’assurer que le harnais est
correctement fixé.
_ Ne jamais laisser l’enfant sans
surveillance; toujours garder
l’enfant en vue.
_ Ne pas utiliser la chaise haute si
tous les éléments ne sont pas fixés
et réglés de maniêre appropriée.
_ Les opérations de montage et de
réglage du produit doivent être
effectuées par un adulte; ne pas
utiliser le produit si le montage n’est
pas convenablement terminé et si le
produit présente des pièces cassées
ou manquantes.
_ Les opérations de nettoyage et
d’entretien doivent être effectuées
uniquement par des adultes.
_ Empêcher la chute ou le glissement
de l’enfant en utilisant toujours les
ceintures de sécurité à cinq points;
utiliser les ceintures en position
inclinée et à la verticale.
_ N’utiliser le produit que si l’enfant est
capable de rester assis tout seul.
_ Le plateau et ses accessoires n’ont
pas été conçus pour supporter le
poids de l’enfant; le plateau n’a pas
été conçu pour maintenir l’enfant en
position assise et ne remplace pas la
ceinture de sécurité.
_ S’assurer que le produit est installé
sur une surface horizontale.
_ Installer le produit de manière à ce

- 12 -
que l’enfant ne puisse être mis en
danger par des câbles électriques,
des sources de chaleur ou des
flammes.
_ Ne pas mettre les doigts dans les
mécanismes et faire attention à la
position des membres de l’enfant au
cours des opérations de réglage.
_ L’utilisation d’accessoires n’ayant pas
été approuvés par le fabricant peut
être dangereuse.
_ Ne pas utiliser le produit à proximité de
marches ou d’escaliers.
_ Faire attention à ne pas positionner
le produit à proximité de sources de
chaleur ou de feux comme les poêles à
gaz, les radiateurs électriques, etc.
_ Conforme aux exigences de sécurité.
INSTRUCTIONS D’UTILISATION
1 MONTAGE DES ROUES ARRIÈRE ET DES PIEDS AVANT
: avant d’insérer les roues, assembler le dispositif
de blocage des roues comme indiqué sur la figure
(fig_a). Monter les deux roues sur la partie arrière de
la chaise haute (fig_b) et les deux pieds sur la partie
avant (fig_c) en appuyant dans le sens indiqué par la
flèche.
2 OUVERTURE : une fois sorti de son emballage, le siège
est dans une position inadaptée à son utilisation
(position emballage). Pour l’utiliser, soulever le siège
jusqu’au déclic et l’enclencher dans une des sept
positions de réglage de la hauteur de la chaise haute
(fig_a). Pour ouvrir la chaise haute, pousser vers le bas
les languettes rouges situées sur les côtés (fig_b) en
faisant levier sur les montants arrière.
3 Enlever les pièces d’écartement avant d’utiliser la
chaise haute (fig_a) et abaisser la pédale repose-pieds
(fig_b).
4 TABLETTE: pour installer la tablette, actionner le levier
situé sous la tablette (fig a) tout en insérant les embouts
dans les trous prévus à cet effet sur les accoudoirs (fig
b). La tablette est réglable en 3 positions (fig c). Ne pas
utiliser la troisième position (indiquée par les repères
rouge) qui sert au pliage de la chaise.
_ Pour règler la tablette, actionner la poignée situés
sous la tablette et tirer jusqu’en première position.
Répéter l’opération pour l’amener en deuxième
position.
_ Pour retirer la tablette, actionner la poignée située
sous la tablette et tirer jusqu’à ce que la tablette soit
entièrement extraite.
5 La tablette est équipée d’un plateau repas amovible
facilement lavable au lave-vaisselle. Pour le retirer, le
décrocher du plateau inférieur en le soulevant (fig_a).
Pour replacer le plateau sur les montants à l’arrière de
la chaise haute, le positionner en correspondance des
fixations et l’accrocher (fig_b). Lorsque la chaise haute
est repliée, il n’est pas possible d’accrocher le plateau
aux montants arrière.
6 CEINTURE DE SÉCURITÉ À CINQ POINTS : pour
accrocher la ceinture, insérer jusqu’au déclic les deux
boucles de la ceinture ventrale (avec les bretelles
attachées) dans la sangle d’entrejambes (fig_a). Pour
décrocher la ceinture, enfoncer les côtés de la boucle
tout en tirant la ceinture ventrale vers l’extérieur
(fig_b). Pour serrer la ceinture ventrale, tirer des deux
côtés dans le sens indiqué par la flèche (fig_c). Pour la
desserrer, procéder à l’opération contraire. La ceinture
ventrale peut être serrée jusqu’à la butée de sécurité
(fig_d).
7 Les bretelles de la ceinture peuvent être réglées en
hauteur en deux positions : détacher la ceinture à
l’arrière du dossier en tirant la boucle vers le bas
(fig_a) et retirer la ceinture par la housse (fig_b). Enfiler
ensuite la boucle de la ceinture dans l’autre fente du
dossier (fig_c) et accrocher la boucle à l’ergot en tirant
la ceinture jusqu’au clic d’enclenchement (fig_d).
8 RÉGLAGE DE LA HAUTEUR : la hauteur du siège
est réglable en 7 positions. Pour relever le siège,
empoigner le plateau et tirer le siège vers le haut
(fig_a). Pour abaisser le siège, appuyer simultanément
sur les deux boutons latéraux et s’arrêter sur la
position souhaitée (fig_b). Ces opérations peuvent
également être effectuées alors que l’enfant est assis
dans la chaise haute.
9 SIÈGE INCLINABLE : le siège peut être incliné en
quatre positions : repas, jeu, détente et sieste. Pour
régler l’inclinaison du siège, relever la poignée située
derrière le dossier (fig_a) et bloquer le siège dans
la position souhaitée (fig_b). Cette opération peut
également être effectuée alors que l’enfant est assis
dans la chaise haute.
10 PLIAGE ET REOUVERTURE DE LA TABLETTE: pour
plier la tablette, l’amener en troisième position,
indiquée par les repères rouges (fig_a). Abaisser le
bouton numéro 1 (fig_b), puis le bouton numéro 2
(fig_c), tout en relevant la tablette jusqu’à ce qu’elle
se bloque (fig_d). Pour rouvrir la tablette, abaisser le
bouton numéro 2, abaisser la tablette et l’amener en
première ou deuxième position.
11 FERMETURE : avant de fermer la chaise haute, il
faut replier la tablette, redresser le dossier, abaisser
complètement le siège et replier la pédale repose-
pieds. Débloquer le dispositif de sécurité en le
faisant pivoter dans le sens indiqué par la flèche, puis
appuyer sur la pédale (fig_a). Et simultanément, saisir
la chaise et la refermer en tirant vers le haut (fig_b).
Lorsqu’elle est refermée, la chaise haute tient debout
toute seule.
12 POUR ENLEVER LA HOUSSE : pour enlever la housse
de la chaise haute, retirer les ceintures du dossier
(fig_a) et de l’assise (fig_b). Abaisser complètement le
siège pour déboutonner de l’extérieur la housse des
côtés du dossier (fig_c), déboutonner l’intérieur des
accoudoirs et retirer la housse par le haut.
13 POSITION D’EMBALLAGE : pour remettre la chaise
haute en position d’emballage (afin de la transporter
ou de la remettre dans son carton), il faut retirer la
tablette, redresser le dossier, abaisser complètement
le siège et replier la pédale repose-pieds. Se munir
d’un petit tournevis. Appuyer sur le bouton latéral
(fig_a) tout en enfilant le tournevis dans la fente
à l’arrière du siège et du côté gauche, pousser le
curseur vers la droite (fig b). Répéter cette opération
du côté droit (fig c) en poussant le curseur vers la
gauche (fig d) et abaisser complètement le siège en
position d’emballage. Refermer la chaise haute et la
mettre dans son carton.
NUMÉROS DE SÉRIE
14 PRIMA PAPPA DINER, reporte sous le repose-pieds, les
informations relatives à sa date de production.
_ Nom du produit, date de production et numéro de série.
Ces informations sont indispensables en cas de
réclamation.
NETTOYAGE ET ENTRETIEN
ENTRETIEN DE L’ARTICLE: protéger l’article des agents
atmosphériques (eau, pluie ou neige); une exposition
continue et prolongée au soleil pourrait entraîner
un changement de couleur de nombreux matériaux;
ranger cet article dans un lieu sec.

- 13 -
NETTOYAGE DU CHÂSSIS: nettoyer régulièrement
les pièces en plastique à l’aide d’un linge humide; ne
pas utiliser de solvants ou autres produits similaires.
Veiller à ce que toutes les pièces métalliques
restent sèches pour prévenir la formation de rouille.
Maintenir le bon état de propreté de toutes les pièces
mobiles (mécanismes de réglage, mécanismes de
fixation, roues, etc.) en enlevant poussière ou sable;
graisser avec une huile légère si nécessaire.
NETTOYAGE DES ÉLÉMENTS EN TISSU : nettoyer à
l’aide d’un linge humide et d’un détergent neutre
; ne pas tordre ; ne pas utiliser de javel ; ne pas
repasser ; ne pas laver à sec ; ne pas détacher à l’aide
de solvants ; ne pas sécher dans un sèche-linge à
tambour rotatif.
PEG-PÉREGO S.p.A.
Peg-Pérego S.p.A. est certifiée ISO 9001.
La certification offre à la clientèle une
garantie de transparence et représente
un gage de confiance dans la façon de
travailler de l’entreprise.
Peg-Pérego se réserve le droit de
procéder à tout moment à des modifications sur les
modèles décrits dans cet ouvrage, pour des raisons de
nature technique ou commerciale.
Peg-Pérego est à la disposition de sa clientèle pour
satisfaire au mieux chacune de ses exigences. En
cela, il est très important et précieux pour nous
de connaître l’opinion de notre clientèle. Nous
vous saurions donc gré, après avoir utilisé un de
nos produits, de remplir le QUESTIONNAIRE DE
SATISFACTION CLIENT, en nous faisant part de toute
observation ou suggestion éventuelle. Vous trouverez
ce questionnaire sur notre site Internet, à l'adresse
www.pegperego.com
SERVICE D’ASSISTANCE PEG-PÉREGO
En cas de perte de pièces ou de rupture de l'une
d'elles, utiliser exclusivement des pièces de rechange
originales Peg-Pérego. Pour les réparations, les
remplacements, les demandes d'informations
relatives aux produits et l’achat de pièces de rechange
originales et d’accessoires, contacter le service
d'assistance Peg-Pérego:
tél. 0039/039/60.88.213 fax 0039/039/33.09.992
e-mail assistenza@pegperego.it site Internet
www.pegperego.com
DE_Deutsch
Vielen Dank, dass Sie sich für ein Peg-Pérego Produkt
entschieden haben.
WARNUNG
_ WICHTIG: DIESE
ANWEISUNGEN
AUFBEWAHREN.
_ Lesen Sie die Anweisungen
sorgfältig durch. Die Sicherheit des
Kindes könnte bei Nichtbeachtung
der Anweisungen gefährdet werden.
_ Dieser Artikel ist für Kinder von 6-36
Monaten mit einem Gewicht von bis
zu 15 kg zugelassen.
_ Sicherstellen, dass der Riemen
korrekt angebracht ist.
_ Lassen Sie Ihr Kind nie
unbeaufsichtigt; behalten Sie Ihr
Kind immer im Auge.
_ Kinderstuhl nicht in Gebrauch
nehmen, bevor alle Teile korrekt
befestigt und eingestellt sind
_ Die Montage und die Einstellungen
_ Die Montage und Einstellung des
Produkts dürfen ausschließlich von
Erwachsenen durchgeführt werden;
das Produkt nicht benutzen, solange
die Montage des Produkts nicht
vollständig erfolgt ist oder Schäden
bzw. fehlende Teile aufweist.
_ Das Reinigen und die Wartung dürfen
nur von Erwachsenen vorgenommen
werden.
_ Dem Herausrutschen oder
Runterfallen des Kindes vorbeugen;
verwenden Sie immer die 5-Punkt-
Sicherheitsgurte; verwenden Sie
die Gurte sowohl beim Sitzen in
aufrechter Position, als auch bei
Rückenlage des Kindes.
_ Produkt nicht verwenden, solange das
Kind nicht selbständig sitzen kann.
_ Das Tablett und sein entsprechendes
Zubehör sind nicht entwickelt, um
dem Gewicht des Kindes Stand halten
zu könnten; das Tablett ist nicht dafür
gedacht dem Kind im Sitz Halt zu
geben und ersetzen folglich nicht die
sicherheitsgurte.

- 14 -
_ Sicherstellen, dass sich das Produkt
auf ebenem Grund befindet.
_ Das Produkt so positionieren, dass Ihr
Kind fern von Gefahrensituationen
wie Elektrokabeln, Wärmequellen
oder Feuer sitzt.
_ Finger nicht in Mechanismen stecken
und während dem Einstellen des
Produkts auf die Gliedmassen des
Kindes achten.
_ Der Gebrauch von nicht
genehmigtem Zubehör seitens des
Herstellers kann gefährlich sein.
_ Produkt nicht in der nähe von Treppen
oder Stufen benutzen.
_ Es wird davor gewarnt das Produkt
in der Nähe von Wärmequellen wie
Gasherde, elektrische Heizgeräte etc.
abzustellen.
GERAUCHSANWEISUNG
1 MONTAGE DER HINTEREN FUSSSTÜTZEN UND
VORDERROLLEN: Vor dem Einsetzen der Räder, die
Feststellbremse montieren (Abb. a). Die beiden Räder
am hinteren Teil des Kinderhochstuhls anbringen
(Abb. b) und die beiden vorderen Rollen (Abb. c)
durch Drücken in Pfeilrichtung anbringen.
2 ÖFFNEN: Wenn der Hochstuhl aus der Verpackung
genommenen wird, befindet sich dessen Sitz in
einer für den Gebrauch nicht geeigneten Position
(Verpackungsposition). Um den Sitz korrekt
verwenden zu können, muss er bis zum Einrasten
angehoben und dabei (Abb. b) in eine der sieben
möglichen Höhen gebracht werden. Zum Öffnen
des Hochstuhls die roten Hebel an der Seite nach
unten drücken (Abb. b) und dabei auf die hinteren
Querstangen Drück ausüben.
3 Vor Benutzung des Kinderstuhls die Abstandshalter
(Abb. a) entfernen und die Fußstütze absenken (Abb.
b).
4 ABLAGETABLETT: Zum Anbringen des Tabletts
den Hebel unter dem Tablett zu sich ziehen (Abb.
a) und das Tablett gleichzeitig in die Armlehnen
einführen und vollständig hineinschieben (Abb. b).
Das Ablagetablett lässt sich in drei verschiedene
Positionen herausziehen (Abb. c), wobei die dritte
Position (rot gekennzeichnet) jedoch nicht verwendet
werden darf, da diese lediglich zum Schließen des
Ablagetabletts dient.
_ Um das Ablagetablett herauszuziehen, den Hebel
unter dem Tablett betätigen und das Tablett zu
sich bis zur ersten Position ziehen. Den Vorgang
wiederholen, um das Tablett in die zweite Position zu
bringen.
_ Zum Abnehmen des Ablagetabletts den Hebel
betätigen und das Tablett gleichzeitig zu sich ziehen
bis es vollständig herausgezogen ist.
5 Der Hochstuhl ist mit einem doppelten Ablagetablett
ausgestattet, wobei sich das obere ganz einfach in
der Geschirrspülmaschine reinigen lässt. Um es zu
entfernen, muss es vom darunter liegenden Tablett
abgenommen werden, indem es nach oben gehoben
wird (Abb. b). Um das Tablett wieder auf den hinteren
Rahmenstützen des Kinderhochstuhls zu versorgen,
neben die Verbindungsstücke legen und einhängen
(Abb. b). Bei geschlossenem Kinderhochstuhl kann
das Tablett nicht in die hinteren Rahmenstützen
eingehängt werden.
6 SICHERHEITSGURT 5 PUNKTE: Zum Zuschnallen die
zwei Schnallen des Taillengurtes (mit eingehakten
Verbindungsstücken) in den Gurt des Mittelschafts
bis zum hörbaren Klick-Laut einführen (Abb. a). Zum
Öffnen des Gurtes beide Seiten des Verschlusses
zusammendrücken und gleichzeitig den Taillengurt
herausziehen (Abb. b). Zum Schließen des
Taillengurtes von beiden Seiten in Pfeilrichtung
ziehen (Abb. c) und zum Lösen den gleichen Vorgang
in die entgegengesetzte Richtung durchführen.
Der Taillengurt kann bis zur Sicherheitsblockierung
angezogen werden (Abb. d).
7 Die Verbindungsstücke des Gurtes können in zwei
verschiedene Höhen eingestellt werden. Dazu den
Gurt von der Rückseite der Rückenlehne lösen, den
Verschluss nach unten drücken (Abb. a) und den
Gurt aus dem Bezug herausziehen (Abb. b). Die
Gurtschnalle danach in die andere Öffnung der
Rückenlehne einfädeln (Abb. c) und den Verschluss
am Haken durch Ziehen des Gurtes bis zum Einrasten
befestigen (Abb. d).
8 HÖHENVERSTELLUNG: Der Hochstuhl lässt sich in
sieben unterschiedliche Höhen einstellen. Um den
Hochstuhl höher zu stellen, das Ablagetablett an die
Unterseite fassen und nach oben ziehen (Abb. a) und
um den Hochstuhl niedriger zu stellen, die beiden
Knöpfe an der Seite gleichzeitig betätigen und in
der gewünschten Position anhalten (Abb. b). Dieser
Vorgang lässt sich auch vornehmen, wenn sich das
Kind im Sitz befindet.
9 ZURÜCKKLAPPBARE RÜCKENLEHNE: Der Sitz kann
in bis zu 4 Positionen zurückgeklappt werden:
zum Essen, Spielen, Ausruhen oder Schlafen. Zum
Verstellen den Griff hinter der Rückenlehne nach
oben ziehen (Abb. a) und in der gewünschten Position
verriegeln (Abb. b). Dieser Vorgang lässt sich auch
vornehmen, wenn sich das Kind im Sitz befindet.
10 SCHLIESSEN UND ERNEUTES ÖFFNEN DES
TABLETTS: Zum Schließen des Tabletts dieses in
die dritte Position mit den roten Kennzeichnungen
(Abb. a.) herausziehen, den Hebel Nr. 1 (Abb.
b) herunterdrücken, den Hebel Nr. 2 (Abb. c)
herunterdrücken und das Tablett gleichzeitig nach
oben klappen bis es verriegelt ist (Abb. d). Zum
erneuten Öffnen des Tabletts den Hebel Nr. 2
herunterdrücken, das Tablett nach unten drücken und
in die erste oder zweite Position bringen.
11 SCHLIESSEN: Vor dem Schließen des Hochstuhls
das Tablett erneut schließen, die Rückenlehne in
die aufrechte Position bringen, den Hochstuhl in
die niedrigste Position bringen und die Fußstütze
verschließen. Zum Schließen des Hochstuhls die
Sicherheitsvorrichtung durch Drehen in Pfeilrichtung
entriegeln und danach das Pedal drücken (Abb. a).
Gleichzeitig den Hochstuhl ergreifen und diesen durch
das Ziehen nach oben schließen (Abb. b). Der Hochstuhl
bleibt in geschlossener Position von selbst stehen.
12 FÜTTERUNG: Zum Herausnehmen des Futters die
Gurte aus der Rückenlehne (Abb. a) und aus dem Sitz
(Abb. b) herausnehmen. Den Hochstuhl vollständig
neigen, um den Sack auf der äußeren Seite der
Rückenlehne (Abb. c) und auf der inneren Seite der
Armlehnen aufzuknöpfen wie auch um den Sack
nach oben abzuziehen.
13 VERPACKUNGSPOSITION: Zur Wiederherstellung
der „Verpackungsposition“ des Hochstuhls (für
Transportzwecke oder zur Aufbewahrung im Paket),
wie folgt vorgehen: Das Tablett entfernen, die
Rückenlehne in die aufrechte Position bringen, den
Hochstuhl in die niedrigste Position bringen und die
Fußstütze schließen. Einen kleinen Schraubenzieher
bereit halten, den seitlichen Hebel (Abb. a) ziehen
und gleichzeitig den Schraubenzieher in den

- 15 -
Schlitz einführen und nach rechts drehen (Abb. b).
Den Vorgang wiederholen (Abb. c) und dabei den
Schraubenzieher nach links drehen (Abb. d) und den
Hochstuhl bis zum Boden drücken (in die nicht für
den Gebrauch geeignete Position). Nun kann der
Hochstuhl geschlossen und in das Paket gepackt
werden.
SERIENNNUMMER
14 Am PRIMA PAPPA DINER sind unter der Beinauflage
Informationen zum Produktionsdatum des
Kinderwagens angebracht.
_ Produktname, Produktionsdatum und Seriennummer.
Diese Informationen sind unerlässlich im Falle von
Reklamationen.
REINIGUNG UND PFLEGE
REINIGUNG DES ARTIKELS: vor Witterungseinflüssen
schützen: Wasser, Regen oder Schnee; eine
längere Bestrahlung durch die Sonne kann zu
Farbänderungen der verschiedenen Materialien
führen; diesen Artikel an einem trockenen Ort
aufbewahren.
REINIGUNG DES GESTELLS: die Kunststoffteile
regelmäßig mit einem feuchten Lappen reinigen – keine
Lösungsmittel oder ähnliche Produkte verwenden;
sämtliche Metallteile trocken halten, um einem
eventuellen Rosten vorzubeugen; alle beweglichen Teile
(Einstellungsmechanismen, Befestigungsmechanismen,
Räder,…) von Staub oder Sand unbedingt sauber halten
und, wenn nötig, mit Leichtöl schmieren.
REINIGUNG DES SITZBEZUGS: Mit einem feuchten
Tuch und neutralem Waschmittel reinigen; nicht
auswringen; nicht mit Chlor bleichen; nicht bügeln;
nicht trocken reinigen; keine Fleckentferner benutzen
und nicht im Wäschetrockner mit rotierender
Trommel trocknen.
PEG-PÉREGO S.p.A.
Peg-Pérego S.p.A. ist gemäß ISO 9001
zertifiziert. Die Zertifizierung garantiert
den Kunden und Verbrauchern
Transparenz und ermöglicht das
Vertrauen in die Arbeitsweise des
Unternehmens.
Peg Pérego kann zu jedem beliebigen Zeitpunkt
Änderungen an den in dieser Veröffentlichung
beschriebenen Modellen sowohl aus technischen, als
auch aus kommerziellen Gründen vornehmen.
Peg Pérego steht den Verbrauchern zur
Verfügung, um deren Anforderungen auf das
Bestmöglichste gerecht zu werden. Demnach ist es
ausgesprochen wichtig und wertvoll für uns, über
die Meinung unserer Kunden Bescheid zu wissen.
Wir bitten Sie daher, das FORMULAR ÜBER DIE
KONSUMENTENZUFRIEDENHEIT auszufüllen, nachdem
Sie unsere Produkte ausprobiert haben. Das Formular
ist unter folgender Internetadresse abrufbar: www.
pegperego.com
KUNDENDIENST PEG-PÉREGO
Bei Verlust oder Beschädigung ausschließlich
Originalersatzteile von Peg Pérego verwenden. Für
eventuelle Reparaturen, Produktinformationen,
den Austausch diverser Teile bzw. den Kauf von
Originalersatzteilen oder Zubehörteilen wenden Sie
sich bitte an den Kundendienst Peg Pérego:
Tel. 0039/039/60.88.213 Fax 0039/039/33.09.992
E-Mail assistenza@pegperego.it Webseite
www.pegperego.com
ES_Español
Le agradecemos haber elegido un producto Peg-
Pérego.
ADVERTENCIA
_ IMPORTANTE:
CONSERVAR LAS
INSTRUCCIONES
PARA FUTURAS
CONSULTAS.
_ Léase atentamente estas
instrucciones. La seguridad del niño
podría estar en peligro si no se leen
dichas instrucciones.
_ Este artículo está homologado para
niños de 6 a 36 meses o de hasta 15
kg de peso.
_ Asegurarse de que se fije
correctamente el chasis.
_ No dejar nunca al niño sin
vigilancia; no perder nunca de vista
al niño.
_ Usar la silla alta únicamente si
todos los elementos se han fijado y
ajustado de modo adecuado.
_ Las operaciones de montaje y de
regulación del producto tienen que
ser realizadas por un adulto; no
utilizar el producto si el montaje no
ha sido completado y si el producto
presenta roturas o faltan piezas.
_ Las operaciones de limpieza y
mantenimiento sólo pueden ser
realizadas por adultos.
_ Prevenir la caída del niño o que
resbale; utilizar siempre los
cinturones de seguridad de cinco
puntos. Utilizar los cinturones tanto
en posición reclinada como erecta.
_ No usar el producto hasta que el niño
no sea capaz de estar sentado solo.
_ La bandeja y sus accesorios no han
sido concebidos para soportar el
peso del niño; la bandeja no ha sido
diseñada para sujetar al niño en el
asiento y no sirve como cinturón de
seguridad.
_ Asegurarse de que el producto esté
sobre una superficie horizontal.

- 16 -
_ Poner el producto de manera que el
niño esté lejos de posibles peligros
como cables eléctricos, fuentes de
calor o llamas.
_ No introducir los dedos en los
mecanismos y prestar atención a
la posición de las extremidades del
niño durante las operaciones de
regulación.
_ Puede ser peligroso utilizar
accesorios no homologados por el
fabricante.
_ No utilizar el producto cerca de
escaleras o escalones.
_ Prestar atención a no poner el
producto cerca de fuentes de calor o
fuego como hornillos de gas, estufas
eléctricas, etc.
INSTRUCCIONES DE USO
1 MONTAJE RUEDAS POSTERIORES Y PIES ANTERIORES:
antes de insertar las ruedas, montar el bloqueador
de ruedas como muestra la figura (fig_a). Colocar las
dos ruedas en la parte posterior de la trona (fig_b) y
colocar los dos pies delanteros (fig_c) presionando en
el sentido de la flecha.
2 APERTURA: cuando se quita el embalaje, la silla está
en una posición incorrecta para ser utilizada (posición
embalaje). Para utilizarla, levantarla hasta oír un clic,
poniéndola en una de las siete alturas de la trona
(fig_a). Para abrir la trona, empujar hacia abajo las
palanquitas rojas laterales (fig_b), haciendo presión
en los bastidores posteriores.
3 Antes de utilizar la trona, quitar los separadores
(fig_a) y bajar el peldaño reposapies (fig_b).
4 BANDEJA: para poner la bandeja, tirar hacia sí de
la palanca que se halla bajo la misma (fig_a) y al
mismo tiempo introducirla en los brazos encajándola
completamente (fig_b). La bandeja se extiende en
tres posiciones (fig_c), la tercera posición (identificada
con referencias rojas) no tiene que utilizarse pues
sirve para volver a cerrar la bandeja.
_ Para alargar la bandeja, tirar de la palanquita que está
debajo de la misma y tirar de la bandeja hacia sí hasta
la primera posición. Repetir la operación para poner
la bandeja en la segunda posición.
_ Para extraer la bandeja, tirar de la palanquita y al
mismo tiempo empujar hacia sí de la bandeja hasta
extraerla.
5 La trona está equipada de una bandeja doble, la
superior es fácil de lavar en el lavavajillas. Para
quitarla, hay que desengancharla de la bandeja
inferior levantándola (fig_a). Para volver a colocar la
bandeja sobre los bastidores posteriores de la trona,
alinearla con respecto a los enganches y encajarla
(fig_b). La bandeja no puede quedar enganchada
a los bastidores posteriores cuando la trona esté
plegada.
6 ARNÉS DE SEGURIDAD DE 5 PUNTOS: para
engancharlo, introducir las dos hebillas de la
correa de la cintura (con los tirantes enganchados)
a la tira entrepiernas hasta oír un clic (fig_a). Para
desengancharlo, presionar a los lados de la hebilla y al
mismo tiempo tirar hacia fuera la correa de la cintura
(fig_b). Para apretar la correa de la cintura, tirar de
ambos lados en el sentido que indica la flecha (fig_c).
Y para aflojarla, hacer lo mismo pero en sentido
contrario. La correa de la cintura puede apretarse
hasta la arandela de retención (fig_d).
7 La altura de las correas del arnés puede regularse en
dos posiciones: desenganchar el arnés por detrás del
respaldo, empujando la hebilla hacia abajo (fig_a), y
sacarlo de la funda (fig_b). Después, meter la hebilla
del arnés en la otra ranura del respaldo (fig_c) y
enganchar la hebilla, tirando del cinturón hasta oir el
clic de enganche (fig_d).
8 REGULACIÓN DE LA ALTURA: la silla se regula en 7
posiciones. Para levantar la silla, asir la bandeja desde
abajo y tirar hacia arriba (fig_a). Para bajar la silla,
presionar al mismo tiempo los dos botones laterales
y detenerse en la posición deseada (fig_b). Estas
operaciones pueden ser realizadas también con el
niño en la trona.
9 RESPALDO RECLINABLE: la silla puede reclinarse en
cuatro posiciones: comer, jugar, descansar o dormir.
Para regularla, subir el asa que está detrás del
respaldo (fig_a) y bloquearlo en la posición deseada
(fig_b). Esta operación puede ser realizada también
con el niño en la trona.
10 CERRAR Y VOLVER A ABRIR LA BANDEJA: para
cerrar la bandeja, alargarla hasta la tercera posición
identificada con las referencias rojas (fig_a), pulsar
el botón número 1 (fig_b), pulsar el botón número 2
(fig_c) y al mismo tiempo girar la bandeja hacia arriba
hasta bloquearla (fig_d). Para volver a abrir la bandeja
hay que pulsar el botón número 2, girar hacia abajo
la bandeja y colocarla en la primera o en la segunda
posición.
11 CIERRE: Antes de cerrar la trona, hay que volver a
cerrar la bandeja, colocar el respaldo en posición
erguida, bajar la silla hasta la última posición y volver
a cerrar el peldaño reposapiés. Para cerrar la trona,
desbloquear el dispositivo de seguridad girándolo en
el sentido de la flecha y sucesivamente presionar el
pedal (fig_a). Asir al mismo tiempo la trona y cerrarla
tirando hacia arriba (fig_b). Cuando la trona está
cerrada se sostiene en pie por sí sola.
12 QUITAR LA FUNDA: para quitar la funda de la silla,
sacar el arnés del respaldo (fig_a) y del asiento (fig_b).
Reclinar completamente la silla para desabrochar
externamente la funda por los lados del respaldo
(fig_c), desbotonarla internamente por los brazos y,
por último, sacar la funda desde arriba.
13 POSICIÓN DE EMBALAJE: para volver a colocar la
trona en la “posición embalaje” (para transportarlas o
volver a meterla en la caja), hay que quitar la bandeja,
colocar el respaldo en posición erguida, bajar la
silla hasta la última posición y volver a cerrar el
peldaño reposapiés. Usar un destornillador pequeño,
presionar el botón lateral (fig_a) y al mismo tiempo
introducir el destornillador en la ranura empujando
hacia la derecha (fig_b). Repetir la misma operación
(fig_c), empujando el destornillador hacia la izquierda
(fig_d) y bajar completamente la silla (en la posición
no utilizable). Entonces, volver a cerrar la trona y
guardarla en su caja.
NÚMEROS DE SERIE
14 PRIMA PAPPA DINER incluye debajo del apoyapiernas
información relativa a la fecha de fabricación de
producto.
_ Nombre del producto, fecha de producción y número
de serie.
Estas informaciones son indispensables en caso de
reclamación.
LIMPIEZA Y MANTENIMIENTO
MANTENIMIENTO DEL PRODUCTO: proteger contra
agentes atmosféricos (agua, lluvia o nieve). Una
exposición contínua y prolongada al sol podría causar
cambios de color de muchos materiales. Conservar
este producto en un lugar seco.

- 17 -
LIMPIEZA DEL CHASIS: Limpiar periódicamente las
partes de plástico con un paño húmedo sin usar
solventes u otros productos similares. Mantener secas
todas las partes de metal para prevenir la oxidación.
Mantener limpias todas las partes móviles (dispositivo
de regulación, de enganche, ruedas...) quitando el
polvo o la arena y, en caso necessario, engrasarlas con
aceites ligeros.
LIMPIEZA DEL FORRO: lavar con un paño húmedo
y detergente neutro. No torcer, no utilizar lejía, no
planchar, no lavar en seco, no eliminar las manchas
con disolventes y no secar en secadora con tambor
rotativo.
PEG-PÉREGO S.p.A
Peg-Pérego S.p.A posee la certificación
de la Norma ISO 9001. La certificación
ofrece a los clientes y a los
consumidores la garantía de
transparencia y de confianza en cuanto
a los procedimientos de trabajo de la
empresa.
Peg-Pérego podrá aportar en cualquier momento
modificaciones a los modelos que se describen en el
presente manual por razones técnicas o comerciales.
Peg-Pérego está a disposición de sus consumidores
para responder satisfactoriamente a sus exigencias.
De ahí que sea fundamental y extremamente
importante conocer la opinión de nuestros Clientes.
Les agradeceríamos por tanto que tras utilizar uno de
nuestros productos rellenase, indicando eventuales
observaciones o sugerencias, el CUESTIONARIO DE
SATISFACCIÓN DEL CONSUMIDOR que se halla en
nuestra página Web www.pegperego.com
SERVICIO DE ASISTENCIA PEG-PÉREGO
En caso de que se pierdan o se dañen partes del
producto, utilizar sólo repuestos originales Peg-
Pérego. Para eventuales reparaciones, cambios e
informaciones sobre los productos, así como la venta
de recambios originales y accesorios, contactar el
Servicio de Asistencia Peg-Pérego:
tel. 0039/039/60.88.213 fax 0039/039/33.09.992
e-mail assistenza@pegperego.it sito internet www.
pegperego.com
PT_Português
Obrigado por ter escolhido um produto Peg-Pérego.
ADVERTÊNCIA
_ IMPORTANTE:
CONSERVE-AS
PARA UMA FUTURA
CONSULTA.
_ Leia atentamente estas instruções.
A segurança da criança pode ser
colocada em risco se não seguir
estas instruções.
_ Este artigo está homologado para
crianças de 6 a 36 meses ou até a 15
kg de peso.
_ Assegurar-se que o cinto esteja
correctamente afivelado.
_ Não deixe jamais sua criança
sozinha; olhe sempre sua criança.
_ Não utilizar a cadeira sem que
todos os seus elementos estejam
devidamente fixados e regulados.
_ As operações de montagem e de
regulagem do produto devem ser
efectuadas por um adulto; não
utilize o produto se a montagem não
estiver correctamente terminada e
se o produto apresentar quebras ou
partes que faltem.
_ As operações de limpeza e
manutenção apenas podem ser
efectuadas por adultos.
_ Previna a possibilidade que a criança
possa cair ou escorregar; utilize
sempre os cintos de segurança de
cinco pontos. Utilize os cinto quer na
posição reclinada, quer na posição
erecta.
_ Não use o produto enquanto a
criança não for capaz de sentar-se
sozinha.
_ A bandeja e seus acessórios não são
projectados para suportar o peso da
criança; a bandeja não foi desenhada
para conservar a criança no assento e
não substitui o cinto de segurança.
_ Certifique-se que o produto esteja
sobre uma superfície horizontal.
_ Posicione o produto de modo a

- 18 -
conservar a criança longe de perigos
como cabos eléctricos, fontes de
calor ou chamas.
_ Não introduza os dedos nos
mecanismos e preste atenção na
posição dos membros da criança
durante as operações de regulagem.
_ Poderia ser perigoso utilizar
acessórios não aprovados pelo
fabricante.
_ Não utilize o produto nas
proximidades de escadas ou degraus.
_ Preste atenção em não colocar o
produto nas proximidades de fontes
de calor e fogo, como fogão à gás,
aquecedores eléctricos, etc.
INSTRUÇÕES DE USO
1 MONTAGEM DAS RODAS TRASEIRAS E PÉS
DIANTEIROS: antes de introduzir as rodas, monte o
travão das rodas como ilustrado na figura (fig_a).
Aplique as duas rodas, na parte traseira da cadeira de
comer (fig_b) e os dois pés na parte dianteira (fig_c),
pressionando no sentido da seta.
2 ABERTURA: quando é retirada da embalagem, a
cadeira de comer está numa posição incorrecta para
a utilização (posição de embalagem). Para utilizar
a cadeira, eleve-a até ouvir um clique, colocando-a
numa das suas sete alturas possíveis (fig_a). Para abrir
a cadeira de comer, empurre para baixo as patilhas
vermelhas laterais (fig_b), apoiando-se sobre os eixos
traseiros.
3 Antes de utilizar a cadeira de comer, remova os
distanciadores (fig_a) e desça o repousa-pés (fig_b).
4 BANDEJA: para aplicar a bandeja, puxe para si
a patilha situada por baixo da mesma (fig_a)
e, simultaneamente, introduza-a nos braços
empurrando-a até ao fundo (fig_b). A bandeja da
cadeira de comer, é extensível em três posições
(fig_c), mas a terceira posição (indicada pelos sinais
vermelhos) não deve ser utilizada, porque serve para
fechar a bandeja.
_ Para prolongar a bandeja, puxe a patilha existente
debaixo da mesma e, simultaneamente, faça deslizar
a bandeja na sua direcção, alcançando assim a
primeira posição e repita a operação para a estender
até à segunda posição.
_ Para extrair a bandeja, puxe a patilha e,
simultaneamente, puxe para si a bandeja até a
conseguir remover.
5 A cadeira de comer é dotada de bandeja dupla; a
bandeja superior pode ser facilmente lavada na
máquina de lavar louça. Para a remover, é necessário
soltá-la da bandeja inferior levantando-a (fig_a). Para
remontar a bandeja nos eixos traseiros da cadeira de
comer, alinhe-a com os encaixes e encaixe-a (fig_b).
Quando a cadeira estiver fechada, a bandeja não
pode ser encaixada nos eixos traseiros.
6 CINTO DE SEGURANÇA DE 5 PONTOS: para apertar,
insira as duas fivelas do cinto da cintura (com as
correias superiores encaixadas) no cinto entre-pernas
até ouvir um clique (fig_a). Para desapertar o cinto,
pressione dos lados das fivelas e simultaneamente,
puxe para fora o cinto da cintura (fig_b). Para
encolher o cinto da cintura puxe, de ambos os lados,
no sentido da seta (fig_c), para o alargar faça a
operação contrária. O cinto pode ser encolhido até ao
bloqueio de segurança (fig_d).
7 As correias superiores do cinto podem ser reguladas
em altura em duas posições; desenganche o cinto
por de trás do encosto, empurrando a fivela para
baixo (fig_a). Desenfie o cinto da vestidura (fig_b). De
seguida, introduza a fivela do cinto na outra abertura
do encosto (fig_c) e enganche a fivela no pino,
puxando o cinto até ouvir um click de acoplamento
(fig_d).
8 REGULAÇÃO DA ALTURA: a cadeira é regulável em
altura em 7 posições. Para subir a cadeira de comer
exerça pressão na bandeja, em sentido ascendente
(fig_a), para a descer, pressione, simultaneamente, os
dois botões laterais e desça até à posição desejada
(fig_b). Estas operações também podem ser feitas
com a criança na cadeira.
9 CADEIRA RECLINÁVEL : a cadeira é reclinável até
quatro posições: para a papa, para brincar, para
relaxar ou para dormir. Para a regular, levante a
pega situada atrás do encosto (fig_a) e bloqueie-o
na posição desejada (fig_b). Esta operação também
pode ser feita com a criança na cadeira.
10 FECHAR E ABRIR NOVAMENTE A BANDEJA: para fechar
a bandeja, estenda a bandeja até à terceira posição
assinalada pelos sinais vermelhos (fig_a), pressione
o botão número 1 (fig_b), pressione o botão número
2 (fig_c) e, simultaneamente, levante a bandeja até
a fixar (fig_d). Para reabrir a bandeja é necessário
pressionar o botão número 2, baixar a bandeja e
colocá-la na primeira ou na segunda posição.
11 FECHO: antes de fechar a cadeira de comer é
necessário fechar a bandeja, colocar o encosto na
posição direita, descer a cadeira até à última posição e
fechar o repousa-pés. Para fechar a cadeira de comer
desbloqueie o dispositivo de segurança, rodando-o
no sentido da seta e depois pressione o pedal (fig_a).
Ao mesmo tempo segure a cadeira de comer e
feche-a, puxando para cima (fig_b). Quando fechada,
a cadeira de comer permanece em pé sozinha.
12 RETIRAR A VESTIDURA: para retirar a vestidura da
cadeira de comer, remova os cintos do encosto (fig_a)
e do assento (fig_b). Recline totalmente a cadeira de
comer para desabotoar externamente a vestidura dos
lados do encosto (fig_c), desabotoar internamente os
apoios dos braços e finalmente puxe a vestidura por
cima.
13 POSIÇÃO DE EMBALAGEM: para recolocar a cadeira de
comer na “posição de embalagem” (por exigências de
transporte ou para a colocar novamente na caixa), é
necessário que: remova a bandeja, coloque o encosto
na posição direita, desça a cadeira de comer até à
última posição e feche o repousa-pés. Muna-se de
uma pequena chave de fendas, prema o botão lateral
(fig_a) e simultaneamente enfie a chave de fendas
na ranhura empurrando para a direita (fig_b). Repita
a mesma operação (fig_c), empurrando a chave de
fendas para a esquerda (fig_d) e desça a cadeira de
comer até ao fundo (na posição não utilizável). Em
seguida, feche a cadeira de comer e introduza-a na
sua caixa.
NÚMEROS DE SÉRIE
14 PRIMA PAPPA DINER, possui, sob o apoio de pernas,
informações relativas à data de produção do mesmo,
nome do produto, data de produção e número de
série.
Estas informações são indispensáveis em caso de
reclamação.
LIMPEZA E MANUTENÇÃO
MANUTENÇÃO DO ARTICO: Protesa dos agentes
atmosféricos: Água, chuva ou neve; a exposição
contínua e prolongada ao sol pode causar alterações
de cor em muitos materiais, conserve este artigo num
sítio seco.

- 19 -
LIMPEZA DO CHASSIS: Limpe periodicamente as
partes em plástico com um pano húmido sem usar
solventes ou outros produtos similares; mantenha
todas as partes em metal bem secas para prevenir
ferrugem; mantenha todas as parte em movimento
(mecanismos de regulação, mecanismos de encaixe,
rodas ...) limpas de poeiras ou areia e se necessário,
lubrifique com um óleo leve.
LIMPEZA DA VESTIDURA: lave com um pano húmido
e detergente neutro; não torça; não use lixívia com
cloro; não passe a ferro; não lave a seco; não tire as
manchas com solventes e não seque numa máquina
de secar roupa com tambor rotativo.
PEG-PÉREGO S.p.A.
Peg-Pérego S.p.A é certificada ISO 9001.
A certificação oferece aos clientes e aos
consumidores a garantia de
transparência e confiança no que se
refere ao modo com que a empresa
trabalha.
Peg Pérego poderá realizar em qualquer momento
alterações nos modelos descritos nesta publicação,
por motivos técnicos ou comerciais.
Peg Perego está à disposição dos seus Consumadores
para satisfazer ao máximo suas exigências. Portanto,
conhecer a opinião de nossos Clientes, é para nós
extremamente importante e precioso. Ficaremos
muito agradecidos se depois de ter utilizado um
nosso produto, quiser preencher o QUESTIONÁRIO DE
SATISFAÇÃO DO CONSUMADOR, a indicar eventuais
observações ou sugestões, que encontrará em nosso
site Internet: www.pegperego.com
SERVIÇO DE ASSISTÊNCIA PEG-PÉREGO
Se casualmente partes do modelo forem perdidas
ou danificadas, use somente peças sobressalentes
originais Peg-Pérego. Para eventuais reparos,
substituições, informações sobre o produto, venda
de sobressalentes originais e acessórios, contacte o
Serviço de Assistência Peg-Pérego:
tel. 0039/039/60.88.213 fax 0039/039/33.09.992
e-mail assistenza@pegperego.it sito internet
www.pegperego.com
NL_Nederlands
Wij danken u voor de keuze van een Peg-Pérego
product.
WAARSCHUWING
_ BELANGRIJK:
INSTRUCTIES
BEWAREN VOOR
TOEKOMSTIG
GEBRUIK.
_ Lees deze instructies aandachtig.
Het kind kan gevaar lopen als u
deze instructies niet opvolgt.
_ Het voorwerp is geschikt voor
kinderen van 6-36 maanden en tot
maximaal 15 kg.
_ Controleer of de riem correct
vastgekoppeld is.
_ Laat uw kind nooit zonder toezicht
achter; houdt het kind altijd in het
zicht.
_ De kinderstoel niet gebruiken
indien alle onderdelen niet correct
bevestigd en ingesteld zijn
_ De werkzaamheden die verband
houden met de montage en de
instelling van het product moeten
door een volwassene uitgevoerd
worden; gebruik het product niet
indien de montage niet correct
ten einde gebracht is en indien het
product breuken vertoond of er
onderdelen ontbreken.
_ Alleen volwassenen mogen dit artikel
reinigen en onderhouden.
_ Voorkom dat het kind valt of uitglijdt;
gebruik altijd de veiligheidsgordels
met vijf bevestigingspunten; gebruik
de gordels zowel in de gekantelde als
in de rechte positie.
_ Gebruik het product niet zolang het
kind niet in staat is alleen overeind te
zitten.
_ Het voorzetblad en bijbehorende
accessoires zijn niet ontworpen om
het gewicht van het kind te dragen;
het blad is niet ontworpen om het
kind in de zitting te houden en

- 20 -
vervangt niet de veiligheidsgordel.
_ Verzeker u ervan dat het product op
een horizontale ondergrond staat.
_ Breng het product zo in positie dat
het kind zich ver van gevaren als
elektriciteitskabels, warmtebronnen
of vlammen bevindt.
_ Steek uw vingers niet in de
mechanismen en let op de positie
van de ledematen van het kind
tijdens de instellingswerkzaamheden.
_ Het zou gevaarlijk kunnen zijn
gebruik te maken van accessoires die
niet door de fabrikant goedgekeurd
zijn.
_ Gebruik het product niet nabij
trappen of treden.
_ Zorg ervoor het product niet op te
stellen nabij warmtebronnen zoals
gasfornuizen, elektrische kachels,
enz.
GEBRUIKSAANWIJZINGEN
1 DE ACHTERWIELEN EN VOORSTE POOTJES MONTEREN:
voordat u de wielen erop steekt, dient u eerst de
wielstop (afb_a) te monteren. Steek de twee wielen
op de achterkant van de stoel (afb_b) en de twee
pootjes op de voorkant (afb_c). Duw in de richting
van de pijl.
2 OPENKLAPPEN: als u de stoel uit de verpakking
haalt, is hij ingeklapt om te worden vervoerd, niet
gebruiksklaar dus. Om de stoel gebruiksklaar te
zetten, tilt u hem op totdat u een klik hoort en
verstelt u hem in de hoogte in één van de zes
mogelijke standen (afb_a). Om de stoel helemaal
open te klappen, duwt u de rode hendeltjes op de
zijkanten (afb_b) naar onder terwijl u tegelijkertijd de
achterkant van de stoel tegenhoudt.
3 Voordat u een kind in de stoel zet, verwijdert u de
afstandhouders (afb_a) en zet u het voetsteuntje
(afb_b) naar onder.
4 BLAD: om het blad aan de stoel te bevestigen, trekt
u de hendel onder het blad naar u toe (afb_a) en
steekt u deze tegelijkertijd zo diep mogelijk in de
armleuningen (afb_b). U kunt het blad in drie standen
zetten (afb_c). Gebruik de derde stand (met de rode
aanduidingen) niet; dit is de inklapstand van het blad.
_ Maak het blad langer met de hendel onder het blad.
U trekt deze naar u toe tot in de eerste stand. Doe dit
opnieuw om het blad in de tweede stand te zetten.
_ Om het blad uit de stoel te trekken, trekt u aan de
hendel en duwt u tegelijkertijd het blad naar u toe
totdat het uit de stoel komt.
5 Op de stoel zitten twee bladen. Het bovenste mag
ook in de vaatwasmachine worden gewassen. Til
het op om het los te maken van het onderste blad
(afb_a). Om het blad vast te maken aan de achterkant
van de stoel, plaatst u het eerst ter hoogte van de
bevestigingen en haakt u het dan vast (afb_b). Als
de stoel ingeklapt is, kunt u het blad niet aan de
achterkant vastmaken.
6 VIJFPUNTSVEILIGHEIDSGORDEL: om de gordel
vast te maken, steekt u de twee gespen van het
buikgordeltje (met vastgemaakte schoudergordels)
in het beenstuk totdat u de gespen hoort klikken
(afb_a). Om de gordel los te maken, drukt u op de
zijkanten van de gesp en trekt u tegelijkertijd het
heupgordeltje eruit (afb._b). Trek het heupgordeltje
aan beide kanten in de richting van de pijl (afb_c) vast
en doe het tegenovergestelde om het los te maken.
U kunt het heupgordeltje aantrekken tot aan de
veiligheidsstop (afb_d).
7 U kunt de schoudergordels van het gordeltje in twee
verschillende standen in de hoogte verstellen; maak
het gordeltje achter de rugsteun los. Duw hiervoor
de gesp naar onder (afb_a) en trek het gordeltje uit
de zak (afb_b). Steek de gesp nu in het gordeltje in de
andere spleet in de rugsteun (afb_c) en maak de gesp
vast aan de haak en trek aan het gordeltje totdat u
een klikgeluid hoort (afb_d).
8 IN DE HOOGTE VERSTELLEN: u kunt het stoeltje in 7
standen in de hoogte verstellen. Om het naar boven
te zetten, pakt u het blad aan de onderkant beet
en trekt u naar boven (afb_a). Om het naar onder te
zetten, drukt u beide knoppen op de zijkanten in en
zet u het stoeltje naar onder in de gewenste stand
(afb_b). U mag dit ook doen als het kind in de stoel
zit.
9 VERSTELBARE RUGSTEUN: u kunt de rugsteun in vier
verschillende standen schuin zetten: om te eten, te
spelen, uit te rusten of te slapen. Til de hendel op
de rugsteun naar boven (afb_a) en zet hem in de
gewenste stand (afb_b). U mag dit ook doen als het
kind in de stoel zit.
10 HET BLAD IN- EN UITKLAPPEN: om het blad in te
klappen, trekt u het eerst in de derde stand met
de rode aanduidingen (afb_a). Dan zet u de knop
nummer 1 (afb_b) naar onder en ook de knop
nummer 2 (afb_c) en draait u tegelijkertijd het blad
naar boven totdat het vastzit (afb_d). Om het weer
uit te klappen, zet u de knop nummer 2 naar onder,
draait u het blad naar onder en zet u het in de eerste
of in de tweede stand.
11 INKLAPPEN: voordat u de stoel inklapt, moet u het
blad inklappen, de rugsteun rechtzetten, het stoeltje
in de laagste stand zetten en de voetsteun inklappen.
Om de stoel in te klappen, maakt u de beveiliging
los. Draai deze in de richting van de pijl en duw
vervolgens de pedaal in (afb_a). Pak tegelijkertijd
de stoel vast en trek hem naar boven om hem in te
klappen (afb_b). De ingeklapte stoel blijft valt niet
om.
12 BEKLEDING: om de bekleding van de stoel te halen,
trekt u de gordeltjes uit de rugsteun (afb_a) en uit
het zitje (afb_b). Zet het stoeltje helemaal schuin
om de zak los te maken van de knopen op de beide
buitenste zijkanten van de rugsteun (afb_c). Haal de
bekleding van de knopen aan de binnenkanten van
de armsteunen en trek de zak er naar boven af.
13 VERPAKKINGSTAND: om de stoel weer in de stand
te zetten “voor de verpakking” (als u de stoel moet
vervoeren of weer in de doos wenst te steken), doet
u het volgende: verwijder het blad, zet de rugsteun
recht, zet het stoeltje in de laagste stand en klap de
voetsteun in. Houd een kleine schroevendraaier bij de
hand, druk de knop op de zijkant in (afb_a) en steek
tegelijkertijd de schroevendraaier in de spleet en
duw naar rechts (afb_b). Herhaal dit (afb_c) en druk
de schroevendraaier naar links (afb_d). Zet op deze
manier het stoeltje helemaal naar onder (in de stand
die niet als zitstand kan worden gebruikt). Klap nu de
stoel in en steek hem in de doos
SERIENUMMERS
14 PRIMA PAPPA DINER heeft onder de benensteun
informatie over de productiedatum.
_ Naam van het product, productiedatum en
serienummer.
Deze gegevens zijn noodzakelijk in geval van een
klacht.
This manual suits for next models
1
Table of contents
Languages:
Other Peg-Perego High Chair manuals

Peg-Perego
Peg-Perego prima pappa best User manual

Peg-Perego
Peg-Perego Siesta Follow Me User manual

Peg-Perego
Peg-Perego Merenda User manual

Peg-Perego
Peg-Perego tatamia User manual

Peg-Perego
Peg-Perego PRIMA PAPPA ZERO-3 User manual

Peg-Perego
Peg-Perego Siesta User manual

Peg-Perego
Peg-Perego Prima pappa follow me User manual

Peg-Perego
Peg-Perego PRIMA PAPPA ZERO-3 User manual

Peg-Perego
Peg-Perego Rialto User manual

Peg-Perego
Peg-Perego Siesta User manual