Pentair Pool Products SpaBrite Reference guide

Rev. E 10-29-07 1 P/N 99610000
SpaBrite®/ AquaLight®Niche
Fixture Housing Installation Procedures
IMPORTANT SAFETY INSTRUCTIONS
READ AND FOLLOW ALL INSTRUCTIONS
SAVE THESE INSTRUCTIONS
DANGER
RISK OF ELECTRICAL SHOCK OR ELECTROCUTION!
This niche - fixture housing must be installed by a licensed or certified electrician in accordance with the National Electrical
Code and all applicable local codes and ordinances. Improper installation will create an electrical hazard which could result
in death or serious injury to pool users, installers or others due to electrical shock, and may also cause damage to property.
Read and follow the specific instructions below.
Important Notice
Attention Installer.
This manual contains important information about the installation, operation and safe use of this product. This information
should be given to the owner/operator of this equipment.
WARNING
Before installing this product, read and follow all warning notices and instructions accompanying this niche. Failure to follow safety warnings
and instructions can result in severe injury, death, and property damage. Call (800) 831-7133 for additional free copies of these instructions.
Table of Contents
Section I. General Information. ............................................................................................................ 3
Section II. Vinyl Liner/Fiberglass Pool Installation Instructions. ........................................................... 4
Section III. Concrete/Gunite Pool Installation Instructions. ................................................................... 5
Section IV. Technical Data ..................................................................................................................... 6
A. Replacement Parts .............................................................................................................. 6
Hole Pattern Template ......................................................................................................... 7
Pentair Water Pool and Spa, Inc.
1620 Hawkins Ave., Sanford, NC 27330 • (800) 831-7133 • (919) 566-8000
10951 West Los Angeles Ave., Moorpark, CA 93021 • (800) 831-7133 • (805) 553-5000
Visit www.pentairpool.com or www.staritepool.com

P/N 99610000 2 Rev. E 10-29-07
DANGER! Risk of Electrical Shock or Electrocution!
This product must be installed by a licensed or certified electrician or a qualified pool serviceman
in accordance with the National Electrical Code and all applicable local codes and ordinances.
Improper installation will create an electrical hazard which could result in death --- or serious
injury to pool users, installers or others due to electrical shock, and may also cause damage to
property. Always disconnect the power to the pool light at the circuit breaker before servicing
the light. Failure to do so could result in death or serious injury to serviceman, pool users or
others due to electrical shock. READ AND FOLLOW ALL INSTRUCTIONS IN THIS MANUAL.
WARNING — Important Safety Information for Pentair Niche and Light Installation
•All Niche and Light installations must conform with all codes. If local codes mandate a
cord seal, use Pentair plastic niches (P/N 79206600 and P/N 79206700).
• Under no circumstances replace lights by splicing wire under water or behind niche.
WARNING — RISK OF ELECTRIC SHOCK AND INJURY.
USE ONLY THE INSTALLATION METHOD SPECIFIED BELOW.
Important Safety Information for Fountain Fixture Installations
Location of Pentair Fountain Fixture* Required Installation Method
Luminaire (Light) Use (P/N 560000 – P/N 560001)
(P/N 560002 – P/N 560003)
Swimming Pool or Spa Wet-Niche Swimming Pool Fixture Housing (Forming Shell) ONLY.
(or Spa) Luminaire (Light) DO NOT USE Fountain Fixture Stand.
Fountain Wet-Niche Submersible Fixture Housing (Forming Shell) or
Swimming Pool (or Spa) Fountain Fixture Stand.
Luminaire (Light)
(*) Note: Wet-niche luminaires complying with requirements for both uses may bear both the Listed Wet-Niche
Swimming Pool (or Spa) Luminaire UL Mark and the Listed Wet-Niche Submersible Luminaire UL Mark. A luminaire
not bearing the corresponding UL Listing Mark is not considered by UL to have been produced under UL’s Listing
and Follow-Up Service for the associated usage location.
© 2007 Pentair Water Pool and Spa, Inc. All rights reserved.
1620 Hawkins Ave., Sanford, NC 27330 • (800) 831-7133 • (919) 566-8000
10951 West Los Angeles Ave., Moorpark, CA 93021 • (800) 831-7133 • (805) 553-5000
This document is subject to change without notice.
Trademarks and Disclaimers: The Pentair Pool Products logo, Because reliability matters most, SpaBrite and AquaLight are registered
trademarks of Pentair Water Pool and Spa, Inc. Other trademarks and trade names may be used in this document to refer to either the entities
claiming the marks and names or their products. Pentair Water Pool and Spa, Inc. disclaims any proprietary interest in trademarks and trade
names other than its own.

Rev. E 10-29-07 3 P/N 99610000
CONCRETE MUST BE CUT BACK
PILOT SCREW AT 12 O'CLOCK POSITION
AROUND NICHE TO ALLOW FOR
A COMPACTED PLASTER SEAL
#8 AWG GROUND CONNECTOR
BONDED TO REBAR
RIGID CONDUIT
8" MIN JUNCTION BOX
OR LOW VOLTAGE TRANSFORMER
48"
MIN
4.94
5.25
6.50
18" MIN TO TOP OF LENS (UNLESS LIGHT IS
UL LISTED FOR LESSER DEPTHS, REFER TO LIGHT
MANUAL FOR EXACT DEPTH REQUIREMENTS)
NOT LESS THAN 4"
TO GFCI, (FOR 120V)
CIRCUIT BREAKER
AND POWER SOURCE
Figure 1.
Section I. General Information
1. Verify the pool meets the requirements of the current National Electrical Code and all local codes and
ordinances. A licensed or certified electrician must install the electrical system to meet or exceed these
requirements before the niche (fixture housing) is installed.
2. Some of the requirements of the National Electrical Code which the pool's electrical system must meet
are as follows:
a. The light fixture and all metal items within 5 feet of the pool are properly electrically grounded.
b. The niche must be properly installed so the pilot screw hole is at the 12 o’clock position and that the
top edge of the Underwater Light's lens is at least 18 inches below the surface of the water in the
pool unless the light being used is UL listed for lesser depths. Refer to the Installation Manual of the
light for exact depth requirements. (See Figure 1.)
NOTE
The required orientation of all Pentair lights is with the pilot screw at the 12 o’clock position. This is guaranteed by proper
niche installation.
NOTE
This niche may be installed at less than 18 inches below the normal water level if the light is UL listed for lesser depths or if
the light is installed in an area that is not used for swimming and the lens is adequately guarded to keep any person from
coming in contact with the lens. Consult your local codes and ordinances, the Installation Manual of the light, and the
National Electric Code (NEC) for details.
c. The niche is properly electrically bonded and grounded via the No. 8 AWG ground connector located at the
rear of the niche.
d. The junction box (or, the 12 volt models, the low voltage transformer) is located at least 12 inches above
ground level and at least 48 inches form, the edge of the pool. (See Figure 1.)
3. Use only Pentair Water Pool and Spa lighting fixtures to insure proper bonding and grounding connections.

P/N 99610000 4 Rev. E 10-29-07
Section II. Vinyl Liner/Fiberglass Pool Installation Instructions
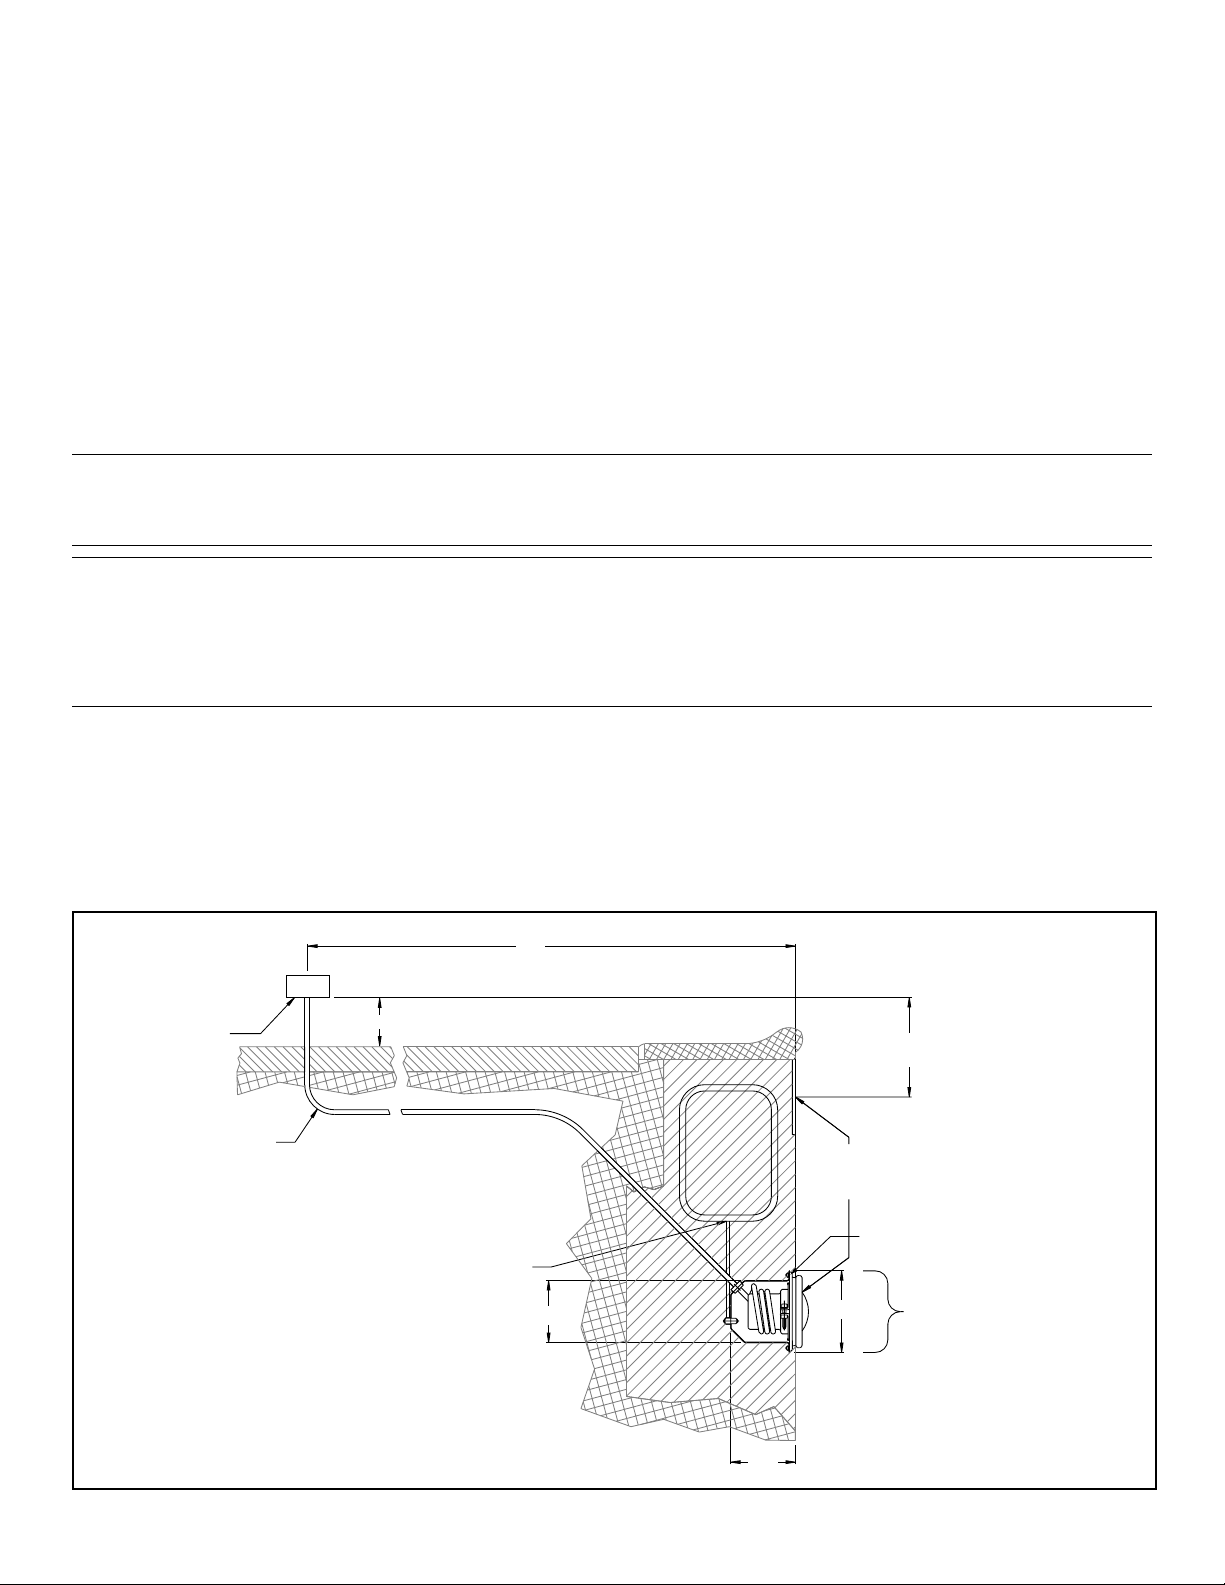
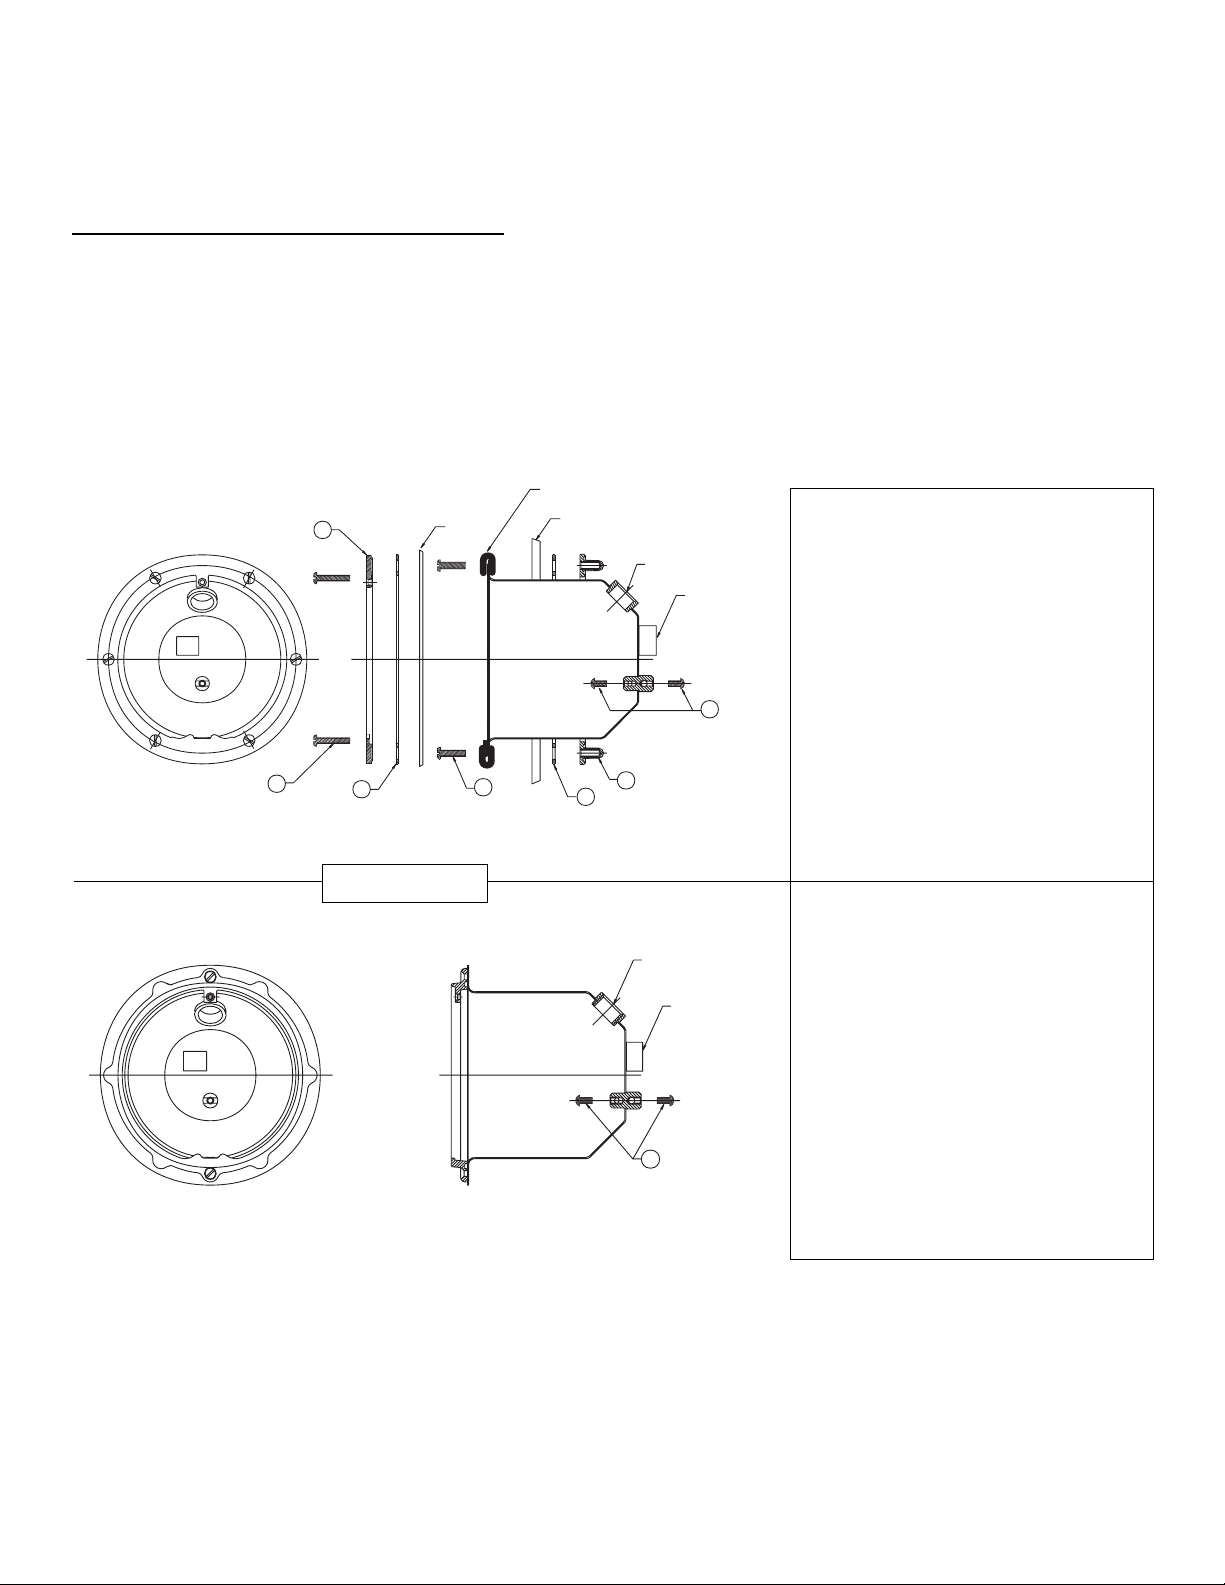
1. Punch or drill 6 sealing holes, 2 retainer holes and large panel hole, as per circular panel cut-out information.
NOTE
One of the two gaskets has larger holes to go over the retainer screw head.
2. Make sure double wall gasket is around the niche flange. Insert the stainless steel light niche through wall panel
from inside the pool.
a. Align the two retainer screws holes (diametrically opposite one another at top and bottom) of the light
niche with those that were drilled or punched in the wall panel.
b. Insert the two fillister head retainer screws through light niche and wall panel.
c. Align the holes of the back-up ring and rear gasket, (the gasket without larger holes), with the holes on
the back side of the wall panel.
d. Fasten the back-up ring and second gasket to the back of the wall panel by tightening the two fillister head
retainer screws. At this point the wall panel is sandwiched by two gaskets.
3. If this is a vinyl pool, install the vinyl liner. For fiberglass pools skip to step 4.
4. Align front gasket (gasket with the two larger holes to go over the retainer screw heads) with brass-chrome
sealing ring and fasten tightly to the light niche with the six 10-24 x 1 1/8 inch flat stainless screws provided
for that purpose.
a. Be sure the two countersinks on the back of the sealing ring (top and bottom) line up with the heads of
the retainer screws, and the two large holes in the third gasket are placed over the heads of the retainer
screws.
b. Be sure the pilot screw hole of the sealing ring is at the center top. For vinyl liner pools, pierce the liner
through the sealing ring holes, one at a time, and insert and tighten each screw at it's hole pierced.
c. Each screw should be inserted and tightened through the sealing ring (in proper order), front gasket, vinyl
liner if there is one, flange of the light niche, double wall gasket, wall panel, rear gasket and into the back-
up ring.
5. For a vinyl liner pool, cut out vinyl liner along inside diameter edge of the sealing ring.
6. Connect rigid conduit from niche-fixture housing to junction box. The junction box (or for 12 volt models,
the low voltage transformer) must be located at least 4 inches above ground level and 8 inches above water
level and at least 48 inches from the edge of the pool.
7. Bond the niche-fixture housing to all other metallic items within 5 feet of the pool, using a No. 8 AWG bond
wire. Bond connection is located at the rear of the niche.
8. If non metallic conduit is used a No. 8 AWG bonding/grounding wire must be installed through the conduit
from the junction box to the bonding/grounding lug inside the niche. The connection inside the niche must
be sealed with a listed sealant such as 3M Scotchcast.
DANGER
RISK OF ELECTRICAL SHOCK OR ELECTROCUTION
For proper bonding and grounding connections, use only Pentair Water Pool and Spa Underwater Light Fixtures with
this niche-fixture housing. Failure to do so could create an electrical hazard which would result in death or serious
injury to pool users, installers and others.

Rev. E 10-29-07 5 P/N 99610000
Section III. Concrete/Gunite Pool Installation Instructions
1. Locate position on vertical wall where light is to be installed. The top of the light lens must be a
minimum of 18 inches below normal water level unless the light being used is UL listed for lesser
depths. Refer to the Installation Manual of the light for exact depth requirements.
2. Connect conduit to the niche using a recommended thread sealant.
3. Secure niche to rebar with tie wires. Orient the niche so that the pilot screw receptacle is located at the
top of the niche.
4. Connect bonding wire from rebar and bonding grid to the bonding lug at the rear of the niche.
5. Bond the niche-fixture housing to all other metallic items within 5 feet of the pool, using a No. 8 AWG
bond wire. Bond connection is located at the rear of the niche.
6. If non metallic conduit is used a No. 8 AWG bonding/grounding wire must be installed through the
conduit from the junction box to the bonding/grounding lug inside the niche. The connection inside the
niche must be sealed with a listed sealant such as 3M Scotchcast.
7. Support conduit to hold niche the proper distance in front of rebar so that the front of mounting ring is
flush with the desired finish surface.
8. If pool surface is to be plastered, you must allow proper concrete cut-back for plaster thickness. Finished
concrete surface must be cut-back behind the niche flange. Finished area surrounding niche must be flat
and flush with the brass mounting ring on the front of the niche. This ensures a snug fit between light
and wall.

P/N 99610000 6 Rev. E 10-29-07
SMALL NICHE FOR MANUFACTURED
VINYL LINER/FIBERGLASS
POOLS OR SPAS & TUBS
(AVAILABLE NICHE HUB SIZES)
78241100 Niche Top 1/2 in. Hub
78241200 Niche Top 3/4 in. Hub
78241300 Niche Top 1 in. Hub
78242100 Niche Rear 1/2 in. Hub
78242200 Niche Rear 3/4 in. Hub
78242300 Niche Rear 1 in. Hub
POOL WALL
POOL WALL
VINYL
LINER
DOUBLE WALL GASKET
DOUBLE WALL GASKET
TOP HUB
REAR HUB
3
1165
2
4
VINYL/FIBERGLASS SMALL NICHE
CONCRETE/GUNITE SMALL NICHE
TOP HUB
REAR HUB
2
SMALL NICHE FOR CONCRETE/GUNITE
POOLS OR SPAS
(AVAILABLE NICHE HUB SIZES)
78243100 Niche Top 1/2 in. Hub
78243200 Niche Top 3/4 in. Hub
78243300 Niche Top 1 in. Hub
78244100 Niche Rear 1/2 in. Hub
78244200 Niche Rear 3/4 in. Hub
78244300 Niche Rear 1 in. Hub
Figure 2.
Section IV. Technical Data
A. Replacement Parts
Item P/N Description
1 79205500 Screw Kit, Vinyl
2 98204400 Screw, 10-24 x 1/2 in. R.H.
3 79206000 Sealing Ring
4 79204600 Front Gasket
5 79205600 Back-up Ring
6 79207600 Rear Gasket, Vinyl

Rev. E 10-29-07 7 P/N 99610000
R
R
TEMPLATE
AQUALIGHT
SPABRITE
1/4 IN. DIA.
HOLE THRU WALL
4-15/16 IN. DIA. MIN.
5 IN. DIA. MAX.
HOLE THRU WALL
TOP
HOLE PATTERN TEMPLATE
SAVE THESE INSTRUCTIONS.

P/N 99610000 8 Rev. E 10-29-07
© 2007 Pentair Water Pool and Spa, Inc. All rights reserved.
1620 Hawkins Ave., Sanford, NC 27330 • (800) 831-7133 • (919) 566-8000
10951 West Los Angeles Ave., Moorpark, CA 93021 • (800) 831-7133 • (805) 553-5000
This document is subject to change without notice.
Other manuals for SpaBrite
1
This manual suits for next models
1
Table of contents
Other Pentair Pool Products Swimming Pool Lighting manuals

Pentair Pool Products
Pentair Pool Products Pool and Spa MagicStream Laminar User manual

Pentair Pool Products
Pentair Pool Products IntelliBrite 5G 560001 User manual

Pentair Pool Products
Pentair Pool Products FIBERworks 20100100 User manual

Pentair Pool Products
Pentair Pool Products AquaLuminator User manual