Operating Instructions & Parts Manual
Page 9
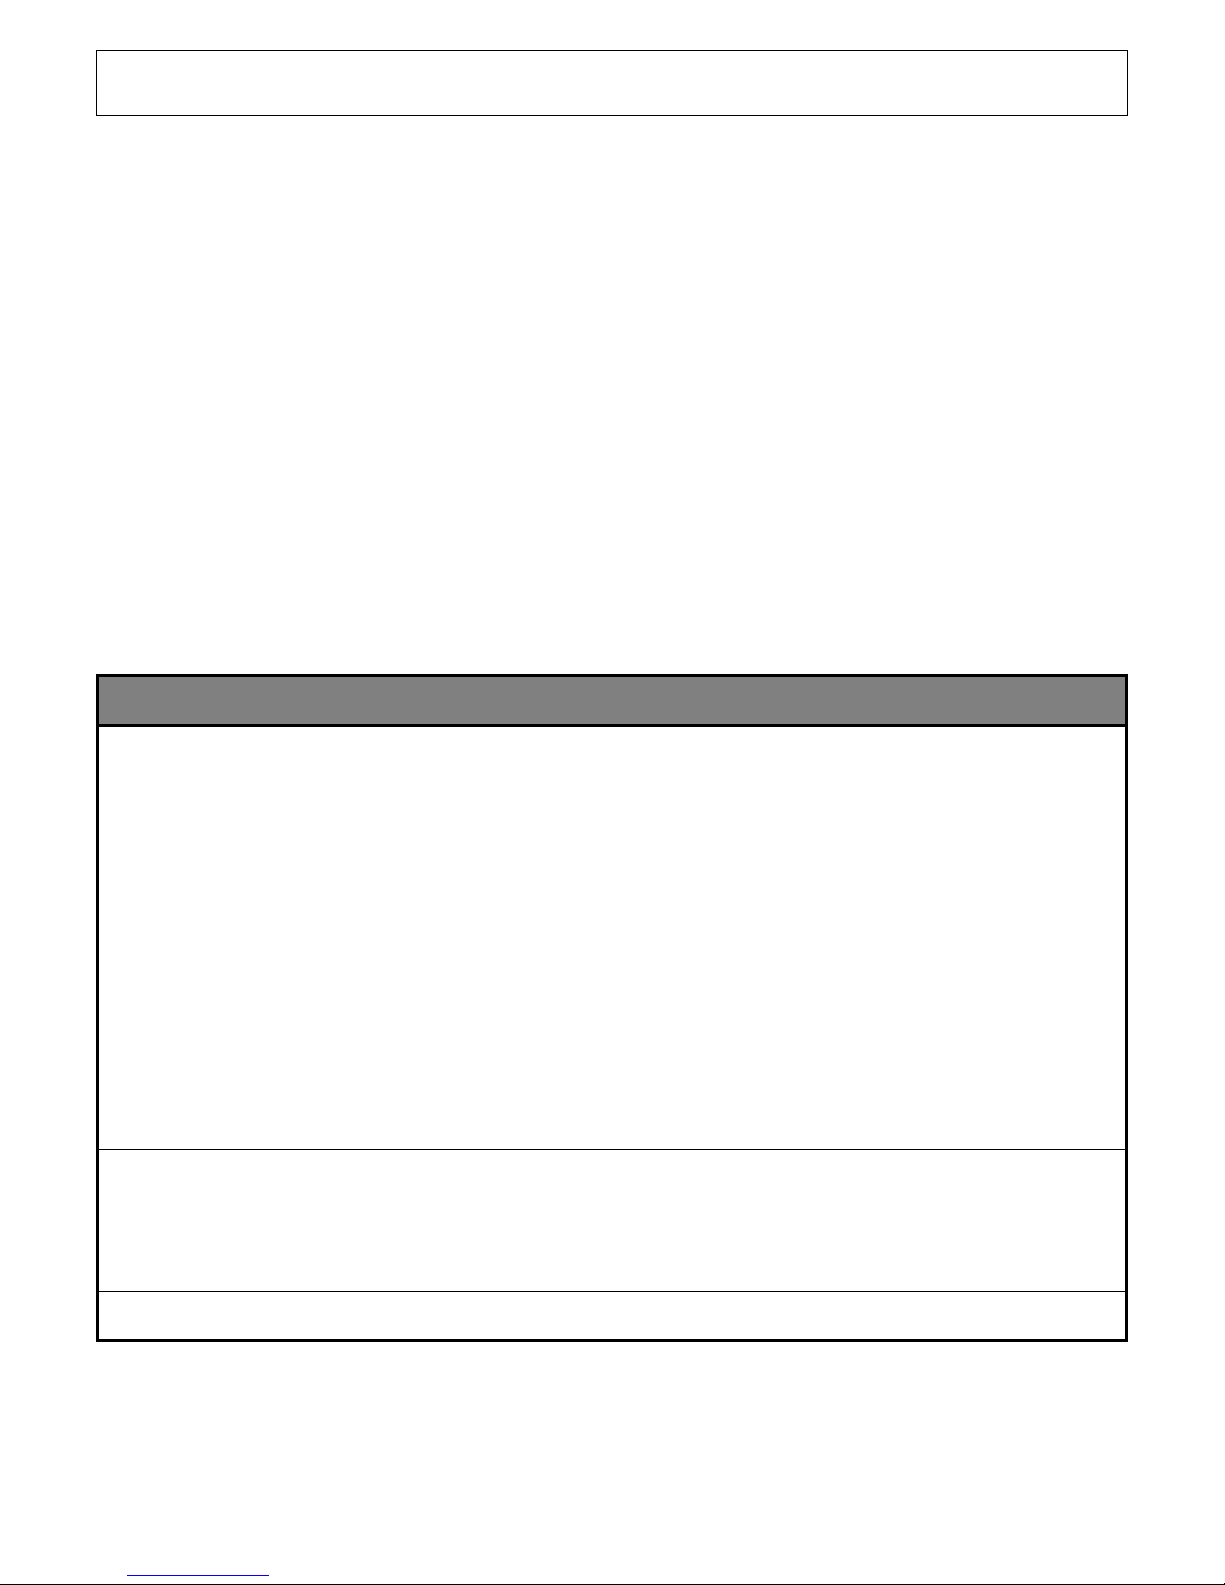
ASTM Hardness Conversion Chart
Rockwell C Hardness Range
Approximate Hardness Conversion Numbers for Non-Austenitic Steels, According to ASTM E-140
The Conversion Values contained herein should be considered approximate only and may be inaccurate for specific applications
C A D 15N 30N 45N Vickers Knoop Brinell Tensile
150 kgt 60 kgt 100kgt 15kgt 30 kgt 45 kgt Hardness Hardness Hardness Strength
diamond diamond diamond diamond diamond diamond 500gr 3000kgt 1000 lbs/
and over 10mm ball square in
68 85.6 76.9 93.2 84.4 75.4 940 920 .. ..
67 85.0 76.1 92.9 83.6 74.2 900 895 .. ..
66 84.5 75.4 92.5 82.8 73.3 865 870 .. ..
65 83.9 74.5 92.2 81.9 72.0 832 846 (739)
64 83.4 73.8 91.8 81.1 71.0 800 822 (722)
63 82.8 73.0 91.4 80.1 69.9 772 799 (705)
62 82.3 72.2 91.1 79.3 68.8 745 776 (688)
61 81.8 71.5 90.7 78.4 67.7 720 754 (670)
60 81.2 70.7 90.2 77.5 66.6 697 732 (654)
59 80.7 69.9 89.8 76.6 65.5 674 710 (634) 351
58 80.1 69.2 89.3 75.7 64.3 653 690 615 338
57 79.6 68.5 88.9 74.8 63.2 633 670 595 325
56 79.0 67.7 88.3 73.9 62.0 613 650 577 313
55 78.5 66.9 87.9 73.0 60.9 595 630 560 301
54 78.0 66.1 87.4 72.0 59.8 577 612 543 292
53 77.4 65.4 86.9 71.2 58.6 560 594 525 283
52 76.8 64.6 84.4 70.2 57.4 544 576 512 273
51 76.3 63.8 85.9 69.4 56.1 528 558 496 264
50 75.9 63.1 85.5 68.5 55.0 513 542 481 255
49 75.2 62.1 85.0 67.6 53.8 498 526 469 246
48 74.7 61.4 84.6 66.7 52.5 484 510 455 237
47 74.1 60.8 83.9 65.8 51.4 471 495 443 229
46 73.6 60 83.5 64.8 50.3 458 480 432 221
45 73.1 59.2 83.0 64.0 49.0 446 466 421 215
44 72.5 58.5 82.5 63.1 47.8 434 452 409 208
43 72.0 57.7 82.0 62.2 46.7 423 438 400 201
42 71.5 56.9 81.5 61.3 45.5 412 426 390 195
41 70.9 56.2 80.9 60.4 44.3 402 414 381 188
40 70.4 55.4 80.4 59.5 43.1 392 402 371 182
39 69.9 54.6 79.9 58.6 41.9 382 391 362 177
38 69.4 53.8 79.4 57.7 40.8 372 380 353 171
37 68.9 53.1 78.8 56.8 39.6 363 370 344 166
36 68.4 52.3 78.3 55.9 38.4 354 360 336 161
35 67.9 51.5 77.7 55.0 37.2 345 351 327 156
34 67.4 50.8 77.2 54.2 36.1 336 342 319 152
33 66.8 50.0 76.6 53.3 34.9 327 334 311 149
32 66.3 49.2 76.1 52.1 33.7 318 326 301 146
31 65.8 48.4 75.6 51.3 32.5 310 318 294 141
30 65.3 47.7 75.0 50.4 31.3 302 311 286 138
29 64.8 47.0 74.5 49.5 30.1 294 304 279 135
28 64.3 46.1 73.9 48.6 28.9 286 297 271 131
27 63.8 45.2 73.3 47.7 27.8 279 290 264 128
26 63.3 44.6 72.8 46.8 26.7 272 284 258 125
25 62.8 43.8 72.2 45.9 25.5 266 278 253 123
24 62.4 43.1 71.6 45.0 24.3 260 272 247 119
23 62.0 42.1 71.0 44.0 23.1 254 266 243 117
22 61.5 41.6 70.5 43.2 22.0 248 261 237 115
21 61.0 40.9 69.9 42.3 20.7 243 256 231 112
20 60.5 40.1 69.4 41.5 19.6 238 251 226 110
Hardness values in Brackets are outside the range recommended for Brinell testing in
ASTM E-10.The above tables is from ASTM E-110 except values for E-scale and Tensile Strength
which are not from or according to ASTM Standards.
Reprinted from the Annual Book of ASTM Standards,
Copyright American Society for Testing and Materials, 100 Barr Harbor Drive,West Conshohocken,PA 19428-2959.