Philips PM 6302 User manual

INSTRUCTION MANUAL
ANLEITUNG
NOTICE D'EMPLOI ET D'ENTRETIEN
RCL Bridge
RCLBrucke
Pont RCL PM6302
9452 063 02 ..1
9499 520 05902 790201/4

Please note
In correspondence concerning this instrument, please quote the type number and serial number as given on the
type plate.
Bitte beachten
Bei Schriftwechsel iiber dieses Gerat wird gebeten, die Typennummer und die Geratenummer anzugeben. Diese
befinden sich auf dem Typenschild an der Ruckseite des Gerates.
Noter s. v. p.
Dans votre correspondence et dans vos reclamations se rapportant $cet appareil, veuillez toujours indiquer
numero de type et le numSro de serie qui sont marques sur la plaquette de caracteristiques.
Important
As the instrument is an electrical apparatus, it may be operated only by trained personnel. Maintenance and repairs
may also be carried out only by qualified personnel.
Wichtig
Da das Gerat ein elektrisches Betriebsmittel ist, darf die Bedienung nur durch eingewiesenes Personal erfolgen.
Wartung und Reparatur diirfen nur von geschultem, fach- und sachkundigem Personal durchgefiihrt werden.
Important
Comme I'instrument est un equipement electrique, le service doit £tre assur6 par du personnel qualifie. De mSme,
I'entretien et les reparations sont 5confier aux personnes suffisement qualifies.
((T) Philips GmbH -Hamburg -Germany -1979
All rights are strictly reserved.
divulgation in any form whatsoever is not permitted without written author
Issued by Philips GmbH —Werk fur Messtechnik
yfrom the copyright owi

Contents
1. GENERAL INFORMATION
1.1. Introduction
1.2. Technical data
1.3. Accessories
1.4. Description of the block diagram
2.
DIRECTIONS FOR USE
2.1. Installation
2.1.1. Safety regulations
2.1.2. Controls and sockets
2.1.3. Position
2.1.4. Connection to the mains
2.1.6. Earthing
2.2. Operation
2.2.1. Switching on the instrument
2.2.2. Measuring resistors
2.2.3. Measuring capacitors
2.2.4. Measuring inductances
2.2.5. Measuring with external a.c. voltage supply
3.
SERVICE DATA
3.1. Circuit description
3.1.1. Bridge arrangements
3. 1.1.1. Bridge for Rmeasurement
3.1. 1.2. Bridge for Cmeasurement
3.1. 1.3. Bridge for Lmeasurement
3.1.2.
Zero indicator
3.1.2.1. A.c. -d.c. converter
3. 1.2.2. Operational amplifier as avoltage-current inverter
3.1.3. Supply voltage generator
3.1. 3.1 .D.C. voltage supply
3. 1.3.2. Supply oscillator
3.1.4. Arrangement for the searching range
3. 1.5. Current supply
3.2. Gaining access to parts
3.3. Maintenance and service
3.4. Survey of adjusting elements and auxiliary equipment
3. 5. Checki ng and adjusting
3.5.1. General test
3.5.2. Adjusting procedures
3.5.3. Testing the bridge functions
3.6. Parts list
3.6.1. Mechanical parts
3.6.2. Electrical parts
31
31
31
31
32
32
32
33
33
33
33
33
34
34
34
35
36
36
37
38
42
42
43

Inhalt
1. ALLGEME1NERTE1L
1.1. Einleitung
1.2. Technische Oaten
1.3. Zubehor
1.4. Beschreibung des Blockschaltbildes
2. GEBRAUCHSANLEITUNG
2.1. Anschluss und Inbetriebnahme
2.1.1. Sicherheitshinweise
2.1.2. Anschluss- und Bedienungselemente
2.1.3. Aufstellen
2.1.4. Netzanschluss
2.1.5. Erden
2.2. Bedienung
2.2. 1.Einschalten des Gerates
2.2.2. Widerstande messen
2.2.3. Kondensatoren messen
2.2.4. Induktivitaten messen
2.2.5. Messen mit externer Wechselspannungs-Speisung
19
19
19
19
19
20
20
20
20
21
22
Table des matieres
1. GENERALITES
1.1. Introduction
1.2. Caract6ristiques techniques
1.3. Accessoires
1.4. Description du schema synoptique
23
23
23
25
26
2. MODE D'EMPLOI 26
2.1. Installation
2.1.1. Regies de security
2.1.2. Commandes etdouilles
2.1.3. Position
2.1.4. Branchement au secteur
2.1.5. Miseaiaterre
2.2. Fonctionnement
2.2. 1. Mise en service de I'appareil
2.2.2. Mesure de resistance
2.2.3. Mesure de condensateurs
2.2.4. Mesure d'inductances
2.2.5. Mesure avec source de tension alternative externe
26
26
26
27
27
27
27
27
27
27
28
29

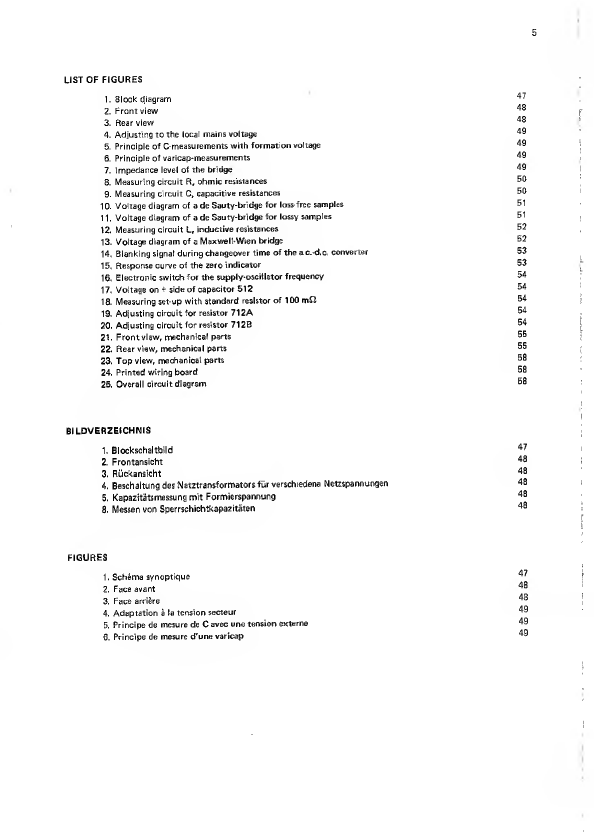
LIST OF FIGURES
1. Block djagram
2. Front view
3. Rearview
4. Adjusting to the local mains voltage
5. Principle of C-measurements with formation voltage
6. Principle of varicap-measurements
7. Impedance level of the bridge
8. Measuring circuit R, ohmic resistances
9. Measuring circuit C, capacitive resistances
10. Voltage diagram of ade Sauty-bridge for loss-free samples
11. Voltage diagram of ade Sauty-bridge for lossy samples
12. Measuring circuit L, inductive resistances
13. Voltage diagram of aMaxwell-Wien bridge
14. Blanking signal during changeover time of the a.c.-d.c. converter
15. Response curve of the zero indicator
16. Electronic switch for the supply-oscillator frequency
17. Voltage on +side of capacitor 512
18. Measuring set-up with standard resistor of 100 mfi
19. Adjusting circuit for resistor 71 2A
20. Adjusting circuit for resistor 71 2B
21. Front view, mechanical parts
22. Rear view, mechanical parts
23. Top view, mechanical parts
24. Printed wiring board
25. Overall circuit diagram
47
48
48
49
49
49
49
50
50
51
51
52
52
53
53
54
54
54
54
54
55
55
56
56
58
BILDVERZEICHNIS
1. Blockschaltbild
2. Frontansicht
3. Ruckansicht
4. BeschaltungdesNetztransformatorsfurverschiedene Netzspannungen
5. Kapazitatsmessung mit Formierspannung
6. Messen von Sperrschichtkapazitaten
FIGURES
1. Schema synoptique
2. Face avant
3. Face arriere
4. Adaptation ala tension secteur
5. Principe de mesure de Cavec une tension externe
6. Principe de mesure d'une varicap
47
48
48
49
49
49


1. General information
1.1. INTRODUCTION
The RCL-bridge PM 6302 is used to measure ohmic resistors in the range 0.05 Q.... 105 MI2, capacitors in the
range 0.5 pF ... 1050 pF and inductances in the range 0.5 pH ... 1050 H. When measuring capacitors and
inductances also a measuring value of the loss factor Dor the quality factor Qis obtained.
For the adjusting a vernier with linear indicator scale is used. The unknown measuring value is obtained after
the adjusting by multiplying the scale value by the factor of the selected measuring range.
The bridge balance is indicated by amoving-coil indicator, which is controlled by an amplifier with
logarithmic gain characteristic, adjusting of the bridge sensitivity being then redundant.
Push-button SEARCH is used to find quickly the correct measuring range in the searching mode.
For measuring electrolytic capacitors an external formation voltage can be supplied.
By means of an external adjustable d.c.-voltage it is possible to measure junction-capacitances on varicaps.
1.2. TECHNICAL DATA
Properties expressed in numerical values with tolerances stated are guaranteed by the factory.
Numerical values without tolerances stated represent the properties of an average instrument and merely serve
as aguide.
Measurement of resistors (R)
Nominal range :005 J2 -105
Measuring ranges :a100 mQ. in'r
b1Qio n
c10 nioo n
ioo aiknwith overlapping sub-ranges:
e1kft 10 kft scale 0,5 -10,5
f10 k£2 100 kfi
gioo kn 1Mfi
hiMn 10 MO
i. 10 M£2 100 Mf2
Setting error limits {see diagram A, page 46)
-In sub-ranges bto h
—In sub-ranges aand i
Measurement of capacitors (C)
Nominal range
Self capacitance CG
Measuring ranges
:±0,5 %of measured value, additional
±0,15 %of end-of-range value
:±1%of measured value, additional
±0,2 %of end-of-range value
0,5 pF -1050 pF. 0,1 pF
^sample =indicated ^
:<0,5 pF
:a. 100 pF -1000 pF
b. 10 pF- 100 pF
c. 1pF -lOpF
d. 100 nF -1pF
e. 10 nF- 100 nF
f. InF- 10 nF
g. 100 pF -1nF
h. 10 pF -100 pF
i. 1 pF -10 pF
nbe measured
(0.1 pF =1.4 mm scale distance
in range i)
with overlapping sub-ranges:
scaie 0,5- 10,5

Setting error limits (see diagram A, page 46)
—In sub-ranges bto h
—In sub-ranges aand i
Measuring ranges for loss factor D
—At 1kHz for internal bridge supply
—At 100 Hz for internal bridge supply
—Setting error limits
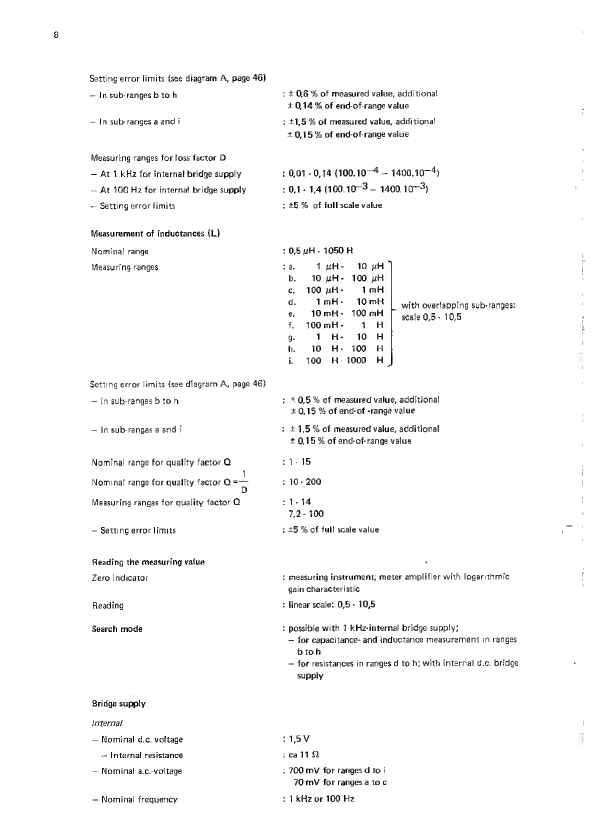
Measurement of inductances (L)
Nominal range
Measu ring-ranges
Setting error limits (see diagram A, page 46)
—In sub-ranges bto h
—In sub-ranges aand i
Nominal range for quality factor Q
1
Nominal range for quality factor Q=—
Measuring ranges for quality factor Q
—Setting error limits
:±0,6 %of measured value, additional
±0,14 %of end-of-range value
:±1,5 %of measured value, additional
±0,15% of end-of-range value
:0,01 -0,14 (100.10—4—1400.10—4)
:0,1 -1,4 (100. 10—3—1400.10—3)
:±E %of full scale value
:0,5 /nH -1050 H
:a. 1mH- 10
b. 10 /JH -100 mH
C. 100 mH- 1mH
d. 1mH -10 mH
e. 10 mH- 100 mH
f. 100 mH- 1H
g. 1H- 10 H
h. 10 H- 100 H
i. 100 H-1000 H
:±0,5 %Of measured value, additional
±0. 15%of end-of -range value
:±1,5 %of measured value, additional
±0,15 %of end-of-range value
:115
:10-200
:1-14
7,2-100
:±5 %of full scale value
with overlapping sub-ranges:
scale 0,5 •10,5
Reading the measuring value
Zero indicator
Reading
Search mode
Bridge supply
Internal
—Nominal d.c. voltage
—Internal resistance
—Nominal a.c.-voltage
—Nominal frequency
:measuring instrument; meter amplifier with logarithmic
gain characteristic
:linear scale: 0,5 -10,5
:possible with 1kHz-internal bridge supply;
—for capacitance- and inductance measurement in ranges
bto h
—for resistances in ranges dto h; with internal d.c. bridge
supply
:1,5 V
:ca 11S2
:700 mV for ranges dto i
70 mV for ranges a to c
:1kHz or 100 Hz

External
Nominal voltage
—Nominal range setting
Maximum value
Frequency
—Nominal range setting
—Operating-range limit
Formation voltage
Nominal range setting
Internal impedance
Internal resistance
:6V
:2- 7V
:10 V
:100 Hz -20 kHz
:100 Hz -30 kHz
:up to 60 V. Supply only from external galvanic battery
avoid mis reading
:10 or sample impedance; lower value permissible
:>50 S2/V of supplied voltage (For current limitting at
20 mA in case of defective sample)
Power supply
Mains voltage
—Reference value
Mains frequency
—Reference value
Power consumption
115 Va.c. or 230 Va.c. ±15%
220 Va.c.
48 -62 Hz
50 Hz
3,5 W
Environmental conditions
Reference temperature
Nominal operating temperature
Operating-range limit
Temperature range for transport and storage
25 ±1°C
+5 to +40 °C
0to 50 °C
-35 to +80 °C
Mechanical data
dimensions (over all)
—Height
—Width
—Depth
Weight
14,5 cm
24 cm
30 cm
approx. 3,3 kg
The instrument conforms to IEC 348 and DIN 40050 protection standards
1.3- ACCESSORIES
Supplied with the instrument:
—terminal adaptor
—short-circuit plug
—manual

10
1.4. DESCRIPTION OF THE BLOCK DIAGRAM (see Fig. 1
)
The bridge circuit comprises range resistors, reference parts and afine-adjustment potentiometer.
The range resistors in the bridge circuit are identical for all measurements and can be switched-over with the
range selector.
For R-measurement aresistor is used as areference, for C-measurement acapacitor with aseries-connected
potentiometer and for L-measurement acapacitor and apotentiometer; these are series-connected in the
higher Q-range and parallel-connected in the lower Q-range. The fourth branch of the bridge is the sample
itself.
The bridge circuit is earthed at that end of the measuring diagonal which is connected to the adjusting
potentiometer and the reference parts. In this wav, harmful influence of switching and stray capacitances
remains small.
The d.c. voltage supply for the bridge is originated from aseparate mains part, the input voltage of which is
tapped from aextra-screened secundary winding of the mains transformer.
The internal resistance of this mains part is dimensioned in such away that low-ohmic measuring objects can
not be overloaded.
The a.c. voltage supply for the bridge is originated from aWien-bridge oscillator, the output of which is coupled
to the bridge circuit via atransducer.
The mater amplifier amplifies the voltage across the diagonals of the bridge circuit. For R-measurements a
d.c. voltage appears, which is chopped by an electronic switch and amplified in an a.c. voltage amplifier
(identical for all measurements) with high-ohmic input resistance.
The output voltage of the amplifier is rectified and indicated with amoving-coil indicator. As aresult of the
logarithmic characteristic of the amplification, the indication sensitivity is higher for lower input voltages, i.e.
near the bridge balance.
Push-button SEARCH is used to search the correct measuring range. As long as this button is depressed, the
supply voltage of the bridge is connected to aseries circuit consisting of the sample and the measuring range
resistor. The voltage drop across the sample is indicated. In this mode the meter-amplifier characteristic is
switched-over into alinear amplification characteristic.
2. Directions for use
2.1. INSTALLATION
2.1.1. Safety regulations (see IEC 348 or VDE 0411)
Before using the instrument after stocking and transport, pay attention that the instrument has not been
mechanically damaged. If there is doubt about the safety (of the protection) check this.
If the protection is no longer guaranteed, disconnect the instrument from the mains and do not operate it.
Do not open the instrument before it has been disconnected from the mains.
Maintenance and service works, which must be done with the instrument on, should only be performed by a
qualified technician.
The mains connector may only be plugged in atrains socket with earth contacts, It is not allowed to make this
safety protection inoperative, e.g. with an unproper extension cable.
1.2. Controls and sockets (see Figs. 2and 3}


11
2.1.3. Position
The instrument should be used in horizontal or in sloping position by hinging out the tilting bracket. Make
sure that the ventilation holes in bottom- and top plate are free.
Pay attention that the instrument is not positioned on objects which produce heat or radiate heat.
2.1.4. Connection to the mains
The instrument must only supplied with a.c. voltage.
On delivery the instrument is set to 230 V±15 %.
If adifferent mains voltage is required, proceed as follows:
—Plug off the mains connector
—Remove the bottom plate after loosening both screws at the rear
—Change the connections on the transformer in accordance with the diagram annexed (see Fig. 4)
—Close the bottom plate and remove the top plate
—Exchange the mains-voltage plate on the rear side in accordance with the mains voltage adjusted
—Close the instrument
2.1.5. Earthing
The instrument must be earthed in conformity with the local safety regulations. The supplied mains cable
contains aprotective conductor which is connected to the earth contacts of the plug. The instrument must be
connected to amains socket with earth contacts. The protective earthing of the instrument is only guaranteed
when performed in this way.
The cabinet socket (_L) at the rear should on no account be used to connect aprotective conductor.
The circuit earth potential of the measuring bridge is connected to the protective conductor.
2.2.
OPERATION
2.2.1. Switching on the instrument
After the measuring bridge has been connected to the mains in accordance to 2. 1.4., it may be switched on by
depressing mains switch POWER. The scale in the indicator should light up. This means that the instrument is
ready for use. The white spot inside the POWER switch indicates mechanically that the instrument is switched
on.
2.2.2. Measuring ohmic resistors
—Depress push-button "R"
—Connect the sample to sockets "l-E"
2.2.2. 1. Searching the correct range in case of unknown resistance value
-Depress push-button "SEARCH"
—Switch-over the measuring-ranges
—The correct measuring range is found, when the indicator points to the "VW"-field.
—Pointer deflection too large —*select alower measuring range
—Pointer deflection too small ~select ahigher measuring range
Note: In the ranges 0.1 SI -1SI; 1Si -10 Si and 10 SI -100 SI, the searching range is limited.
If the pointer in range 100 SI -1kSl points above the marked field and, switching over, the deflection
in range 10 SI -100 SI becomes higher or remains the same, the resistor must be measured in one of
the lower ranges.
2.2.2.2. Measuring the resistance value for aknown measuring range
—With the vernier adjust the pointer deflection to aminimum
—Multiply the scale reading by the value selected with the range selector to obtain the exact resistor value.
2.2.3. Measuring capacitors
—Depress push-button "C"
—Connect the sample to sockets "l-E" (casing to socket E)

12
2.2.3. 1. Searching the correct measuring range in case of unknown capacitance value
—Depress push-button "SEARCH"
—Switch over the measuring ranges
—The correct measuring range is found when the indicator points to the "WV"-field
—Pointer deflection too small —* select alower measuring range
—Pointer deflection too large —*• select ahigher measuring range.
2.2. 3.2. Measuring the capacitance and the loss factor Din case of aknown measuring range
—With the vernier adjust the pointer deflection to aminimum.
—With potentiometer "Q/D" adjust the loss factor Dso that abetter minimum is obtained
—Repeat this two adjustments alternately for the lowest minimum
—If no clear minimum can be reached, depress push-button "D" (D <1.4; measuring frequency 100 Hz) and
repeat the procedure above.
—Multiply the scale reading by the value selected with the range selector to obtain the exact capacitance value.
—To obtain the loss factor D=tag 6read the value adjusted with potentiometer "Q/D" and multiply it by
0.01 or 0.1 depending on the position of push-button "D"
—When measuring smaller capacitances substract the initial capacitance of this instrument from the measured
value. The initial capacitance can be measured, when no sample is connected to sockets "l-E".
Note: If, when measuring smaller capacitances, no correct minimum can be adjusted, eventually screen the
sample for external mains stray fields.
2.23.3. Measuring capacitances with formation voltage A
In order to form electrolytic capacitors and in case of capacitance measurements with d.c. bias voltage for the
sample, amains-independent battery can be connected to sockets "DC-BI AS" at the rear. The short-circuit
plug must then be removed.
Pay attention for the polarity of the sample: "+" —*"I";
"
»"E"
The a.c. internal resistance of the battery must be low; i.e. under certain circumstances acapacitor Cpmust be
connected in parallel with the battery; the value of Cpshould be higher than or equal to the sample capacitance;
but it must be at least lOOpF (see Fig. 5).
In order to protect the measuring bridge, the d.c. current from the battery must be limited by aresistor Rv.
The resistance must be at least 50 Qper volt of the supplied d.c. voltage (see Fig. 5).
For measuring the capacitance and the loss factor of the sample see 2.2.3. 1. and 2.2.3.2.
2.2.34. Measuring junction capacitances
In order to measure the junction capacitance of avaricap, proceed as follows:
-Supply an adjustable d.c. voltage from amains-independent galvanic battery and connect an external a.c.
voltage source to the bridge supply conform to figure 6.
—Connect the sample with the cathode to terminal Iand the anode to terminal E.
By stepwise changing the d.c. voltage and measuring the capacitance of the varicap in accordance with
2.2.3.I. and 2. 2.3. 2., the characteristic of the sample can be determined.
Note: The voltage of the external bridge supply should not be higher than 1V, in order to avoid faulty
measurement by overloading the sample.
2.2.4. Measuring inductances
—Depress push-button "L"
—Connect the sample to sockets "l-E"
2.2.4. 1. Searching the correct measuring range in case of unknown inductance value
—Depress push-button "SEARCH"
—Switch over the measuring ranges
—The correct measuring range is found when the indicator points to the "WV"fie!d.
—Pointer deflection too small *select alower measuring range
—Pointer deflection too large *select ahigher measuring range
—For inductances with smaller Q«1) the searching procedure can indicate arange which is one decade too
low.

13
2.2.4.2. Measuring the inductance and die quality factor Qin the case of aknown measuring range
—With the vernier adjust the pointer deflection to aminimum.
—With potentiometer "Q/D" adjust the quality factor Qso that abetter minimum is obtained.
—Repeat this two adjustments alternately for the lowest minimum.
—If no clear minimum can be reached, depress push button "Q" (Q <14) and repeat the procedure above.
—When measuring inductances with smaller Q{< 1) various minima can be found by adjustment. The correct
measuring value is obtained at that minimum for which the pointer deflection is the smallest.
—To obtain the exact inductance, multiply the scale reading by the value selected with the range selector
—To obtain the quality factor Q: ^
When push-button Qis not depressed, the Qis the reciprocal of the loss factor; Q=—.Read the loss factor
Don potentiometer "Q/D" and multiply by 0.01.
When push-button Qis depressed, the Qcan be read directly on potentiometer "Q/D".
Note: When measuring very high inductances {100 H-1000 H) the natural resonance frequency can be in
the range of the measuring frequency of the bridge, in this case the measuring result can be considerably
falsed.
Remedy:
If the natural resonance frequency of the inductance can be obtained, the measuring result can be corrected
using the following equation.
Lx Lm fo2~fM 2
fo2
Lx”unknown inductance
Lm “ inductance measured with the bridge
f0=natural resonance frequency of the coil
f|yi =measuring frequency of the bridge
(internal 1kHz or external 100 Hz -20 kHz)
2.2.5. Measuring with external a.c. voltage supply
If capacitances or inductances are to be measured for measuring frequencies different than internal, an
external sine-wave generator can be connected to sockets "Ext-AC" at the rear of the instrument.
The lower frequency limit of 100 Hz should not be passed because operating the instrument at frequencies
<100 Hz could cause defects.
For frequencies higher than 20 kHz the bridge sensitivity and thus the measuring accuracy decrease.
The scales for measuring the loss factor Dand quality factor Qonly apply for internal measuring frequencies.
For finding these factors at other measuring frequencies the following formulas can be used.
—For capacitance measurement:
Push-button "D" not depressed
fM
Push-button "D" depressed
DfM =DiqOHz 100 Hz
—For inductance measurement:
Push-button "Q" not depressed

Push-button "Q" depressed
QflW =Ql kHz 1kHz
DfM respectively QfM
Di kHz respectively Qi kHz
=searched loss factor respectively quality factor
=read loss factor respectively quality factor
=measuring frequency

1. Allgemeiner Teil
1.1. EINLEITUNG
Die RCL-Messbriicke PM 6302 diertt zum Messen von ohmschen Widerstanden im Bereich 0,05 £2 ... 105 £2,
von Kapazitaten im Bereich 0,5 pF ... 1050 nF und von Induktivitaten im Bereich 0,5 ,uH ... 1050 H.
Bei Kapazitats- und Induktivitatsmessungen wird auch ein Messwert des Verlustfaktors bzw. der Giite erhalten.
Zum Abgleich dient ein Feineinsteller mit einer linearen Anzeigeskala. Der gesuchte Messwert ergibt sich nach
dem Abgleich aus dem Skalenwert multipliziert mit dem Faktor des eingestellten Messbereichs.
Die Anzeige des Briickengleichgewichts erfolgt miteinem Drehspulinstrument, das von einem Verstarker mit
logarithmischer Verstarkungskennfinie gesteuert wird. Dadurch wird eine Einsteilung der Briickenempfind-
lichkeit uberflussig.
Die Taste SEARCH dient zum schnellen Auffinden des richtigen Messbereichs im Suchbetrieb.
Zum Messen von Elektrolytkondensatoren kann eine Formierspannung aus einer externen Batterie eingespeist
werden.
Durch Einspeisen einer einstellbaren Gleichspannung aus einer externen Batterie sind Messungen der
Sperschichtkapazitat in Abhangigkeit von der Sperrspannung an Kapazitatsdioden (Varicaps) moglich.
1.2. TECHNISCHE DATEN
Nur Werte mit Toleranzen Oder Grenzen gelten als garantierte Daten.
Ohne Toleranzen angegebene Werte dienen zur Orientierung des Benutzers und stellen die Eigenschaften eines
Durchschnittgerats dar.
Widerstandsmessung (R)
Nennbereich
Messbereiche
:0,05 £2 -105 M£2
a. 0,1 £2 1£2
b. 1£2 10 £2
c. 10 £2 100 £2
d. 100 n1k£2
e. 1 k£2 10 k£2
f. 10 k£2 100 k£2
9- 100 k£2 1M£2
h. 1M£2 10 M£2
i. 10 M£2 100 M£2
mit Uberlappung der Teilnenn-
bereiche: Skale 0,5 -10,5
Gebrauchsfehlergrenzen (siehe Diagramm A, Seite 46)
—In den Messbereichen b... h
—In den Messbereichen aund i
Kapazitatsmessung (C)
Nennbereich
Restkapazitat C0
:±0,5 %vom Messwert, zuziiglich
t0,15 %vom Messbereichsendwert
±1 %vom Messwert, zuziiglich
±0,2 %vom Messbereichsendwert
:0,5 pF -1050pF. 0,1 pF messbar
Cist =C^nzeige —CQ(0,1 pF =1,4 mm Skalenweg im
Messbereich i)
:<0,5 pF

16
Messbereiche :a. lOOpF -1000 pF
b. IDpF -100 pF
c. 1/nF -lOpF
d. 100 nF -1pF
e. 10 nF- 100 nF
f. 1nF -10 nF
g. lOOpF- 1nF
h. 10 pF- lOOpF
i. 1pF -10 pF
Gebrauchsfehlergrenzen {siehe Diagramm A, Seite 46)
-In den Messbereichen b... h:±0,6 %vom Messwert, zuzuglich
±0,14 %vom Messbereichsendwert
-In den Messbereichen aund i:±1,5 %vom Messwert, zuzuglich
±0,15 %vom Messbereichsendwert
D-Messbereiche
-Bei 1kHz fur interne Bruckenspeisung :0,01 -0,14 (100.10-4 -1400.10” 4)
-Bei 100 Hz fur interne Bruckenspeisung :0,1 1,4 (1 00. 10 ^-1400.10“^)
-Gebrauchsfehlergrenzen :±5 %vom Skalenendwert
Induktivitatsmessung (L)
Nennbereich :0,5 pH -1050 H
Messbereiche :a. 1yH- 10 pH
b. 10 pH -100 pH
c. 100 pH -1mH
d. 1mH -10 mH
e. 10 mH -100 mH
f. 100 mH -1H
g. 1H-10 H
h. 10 H•100 H
i. 100 H-1000 H
Gebrauchsfehlergrenzen (siehe Diagramm A, Seite 46)
-In den Messbereichen b... h:±0,5 %vom Messwert, zuzuglich
±0,15 %vom Messbereichsendwert
-In den Messbereichen aund i:±1.5 %vom Messwert, zuzuglich
±0,15 %vom Messbereichsendwert
Q-Nennbereiche :1-15
Q=— -10 -200
Q-Messbereiche :1-14
7.2- 100
-Gebrauchsfehlergrenzen :±5 %vom Skalenendwert
Ablesung des Messwertes
Nullindikator :Mess instrument; mit logarithmischer Charakteristik
Ablesung :0,5 -10,5; Lineare Skala
Suchbetrieb :—moglich bei interner Bruckenspeisung mit 1kHz fur
Kapazitats- und Induktivitatsmessung in den Messbereichen
b... h
—Fur Widerstandsmessung in den Messbereichen d... hmit
Gleichstrom Bruckenspeisung
mit Uberlappung der Teilnenn-
bereiche: Skale 0,5 -10,5

17
Briickenspeisung
Intern
Nenngleichspannung
—Innenwiderstand
iMennwechselspannung
Nennfrequenz
Extern
Nennspannung
—Nenngebrauchsbereich
—Oberer Grenzwert
Frequenz
—Nenngebrauchsbereich
—Grenzbetriebsbereich
Formierspannung
Nenngebrauchsbereich
Quellenimpedanz
Quetlenwiderstand
:1,5 V
:ca. 1 1 £2
:700 mV fur Messbereiche d... i
70 mV fur Messbereiche a... c
:1kHz Oder 100 Hz
:6V
:2- 7V
:10 V
:100 Hz -20 kHz
:100 Hz 30 kHz
:bis 60 V. Speisung ausexterner galvanischer Batterie
:10 £2 Oder Pruflingsimpedanz; jeweils kleinerer Wert gQltig
:>50£2/V angelegte Formierspannung (zur Strombegrenzung
auf 20 mA bei defektem Priifling)
Versorgung
Nennspannung
-Referenzwert
Frequenznennbereich
—Referenzwert
Leistungsaufnahme
115 VOder 230 V±15%
220 V
48 -62 Hz
50 Hz
3,5 W
Umgebungstemperatur
-Referenzwert
-Nenngebrauchsbereich
-Grenzbetriebsbereich
-Grenzbereich fur Lagerung und Transport
Gehause
Schutzklasse
Schutzart
Mechanische Daten
Abmessungen uber alles
-Hohe
-Breite
-Tiefe
Gewicht
:25 +1°C
:+5 bis +40 °C
:0bis 50 °C
:-35 bis +80 °C
:I; nach IEC 348 (Schutzleiteranschluss)
:P20; nach DIN 40050
14,5 cm
24 cm
30 cm
ca. 3,3 kg

18
1.3. ZUBEHOR
Normatzubehor:
—Klemmadapter
—Kurzschlussstecker
—Geratehandbuch
1.4. BESCHREIBUNG DES BLOCKSCHALTBILDES (Abb. 11
Die Briickenschaltung (BRIDGE CIRCUIT) enthalt die fur alle Messarten gleichen, mit dem Messbereichs-
Wahter umschaltbaren Bereichswiderstande, die Vergleichselemente und das Potentiometer fur den Feinabgieich.
Als Vergleichselemente dienen fur R-Messung ein Widerstand. fur C-Messung ein Kondensator mit einem in
Reihe geschalteten Potentiometer und fur L-Messung ein Kondensator und ein Potentiometer, die im Bereich
hoher Gute in Reihe, im Bereich niedriger Gute parallel geschaltet sind. Der vierte Zweig der Briicke wird
durch den Prufling gebildet.
Die Briickenschaltung ist an dem Endeder Messdiagonale geerdet, das mit dem Abgleichpotentiometer und
den Vergleichselementen verbunden ist
Dadurch wird ein schadlicher Einfluss von Schalt- und Streukapazitaten klein gehalten.
Die Gleichspannungsspeisung erfolgt aus einem separaten Netztei! (DC-BRIDGE SUPPLY), dessen Eingangs-
spannung einer besonders geschirmten Sekundarwicklung des Netztransformators entnommen wird. Der
Innenwiderstand dieses Netzteils wurde so dimensioniert, dass auch niederohmige Messobjekte nicht uberlastet
werden konnen.
Die Wechselspannungsspeisurtg erfolgt aus einem Wien-Briicken-Oszillator, dessen Ausgang iiber einen
Ubertrager an die Briickenschaltung angekoppelt ist (AC-BRIDGE SUPPLY).
Der Anzeigeverstarker (METER AMPLIFIER) verstarktdie Spannung der Messdiagonale der Briickenschaltung.
Bei R-Messungen tritt hier eine Gleichspannung auf. die durch einen elektronischen Schalter zerhackt und
dann in dem fiir alle Messarten-Werte gleichen Wechselspannungsverstarker mit hochohmigen Eingangswiderstand
verstarkt wird.
Die Ausgangsspannung des Verstarkers wird gleichgerichtet und mit einem Drehspulinstrument (INDICATOR)
angezeigt. Durch die logarithmische Kennlinie der Verstarkung wird die Empfindlichkeit der Anzeige bei
kleinerer Eingangsspannungd.h. in der Nahe des Bruckengleichgewichts grosser.
Die Suchtaste (SEARCH) dient zum Auffinden des richtigen Messbereichs. Solange sie gedriickt ist wird die
Briickenspeisespannung an eine Reihenschaltung aus Prufling und Messbereichswiderstand gelegt und der
Spannungsabfall am Prufling angezeigt. Der Anzeigeverstarker wird in diesem Fall auf eine lineare Verstarkungs-
kennlinie umgeschaltet.

19
2. Gebrauchsanleitung
2.1. ANSCHLUSS UND INBETRIEBNAHME
2.1.1. Sicherheitshinweise (siehe IEC 348 oder VDE 0411)
Vor der Inbetriebnahme nach Lagerung und Transport ist darauf zu achten, dass das Gerat keine
mechanischen Schaden aufweist
Besteht der Verdacht, dass die Schutzmassnahmen nlcht mehr ausreichend wirksam sind, ist deren Wirksam-
keit zu priifen.
Ist der Schutz nicht mehr sichergesteilt, so ist das Gerat ausser Betrieb zu nehmen und gegen Inbetriebnahme
zu sichern.
Das Gerat ist vor dem tiffnen vom Netz zu trennen.
Wartungs- und Uberholungsarbeiten diirfen nur unter Beachtung der gebotenen Vorsichtsmassnahmen durch
eingearbeitete Fachleute ausgefiihrt werden.
Der Netzanschlussstecker darf nur in eine Schutzkontaktsteckdose gesteckt werden; diese Schutzmassnahme
darf nicht unwirksam gemacht werden, z.B. durch eine unvollkommene Verlangerungsleitung.
2.1.2. Anschliisse und Bedienungselemente (Abb. 2und 3)
2.1.3. Aufstellen
Das Gerat darf entweder in horizontal Lage Oder mit Hilfe des heruntergeklappten Tragbiigels in gekippter
Lage aufgestellt und betrieben werden.
Die Beluftungsdffnungen an Boden und Deckel diirfen nicht verdeckt werden. Es ist ferner darauf zu achten,
dass die Messbriicke nicht auf andere Gegenstande, die Warms entwickeln, gestellt wird oder ubermassiger
Warmeeinstrahlung ausgesetzt wird.
2.1.4. Netzanschluss
Das Gerat darf nur an Wechselspannung betrieben werden. Es ist bei Auslieferung auf einen Netznennspannungs-
bereich von 230 V±15 %eingestellt.
Soil das Gerat auf einen anderen Netzspannungsbereich umgestellt werden, wird wie folgt verfabren:
—Netzstecker ziehen
-Bodenabdeckung abnehmen, dazu zwei Schrauben an der Riickwand entfernen
-Primarbeschaltung des Netztrafos umloten entsprechend Schema (Abb. 4)
—Bodenabdeckung schliessen und Deckel abnehmen
-Netzspannungsschild an der Gehauseriickwand entsprechend der eingestellten Netzspannung auswechseln
-Gerat schliessen
2.1.5. Erden
Die Schutzerdung des Gerates muss den ortlichen Vorschriften entsprechend vorgenommen werden.
Die mit dem Gerat fest verbundene Netzzuleitung enthalt einen Schutzleiter und ist mit einem Schutzkontakt-
Stecker versehen. Dieser Stecker muss mit einer Schutzkontakt-Steckdose verbunden werden. Nur auf diese
Weise ist eine wirksame Schutzerdung des Gerates gewihrleistet
.
Die an der Riickwand angeordnete Gehauseanschlussbuchse darf nicht als Anschluss fur einen Schutzleiter
verwendet werden.
Das Schaltungsnullpunkt -Potential der Messbrucke ist mit dem Schutzleiter verbunden.

20
2.2.
BEDIENUNG
2.2.1. Einschalten des Gerates
Nachdem die Verbindung der Messbrucke mit dem Netz entsprechend Ziffer 2.1.4. hergestellt ist, wird das
Gerat durch Eindriicken des Netzschalters POWER eingeschaltet.
Das Aufleuchten des Skalenfeldes im tndikator zeigt an, dass das Gerat betriebsbereit ist.
Das weisse Feld im Knopf des Netzschalters signal isiert mechanisch die Stellung des Netzschalters.
2.2.2. Messung ohmscher Widerstande
—Taste "R" betatigen
-Prufling an Buchsen "l-E" anschliessen
2.2.2. 1. Suchen des richtigen Bereiches bei unbekanntem Widerstandswert
—Taste "SEARCH" betatigen
—Messbereiche umschalten
—Der richtige Messbereich ist gefunden, wenn der Zeiger des Indikators in dem mit "VW "gekennzeichrtete
Feld steht
—Zeigerausschlag zu gross —kleineren Messbereich wahlen
—Zeigerausschlag zu klein —
*
grosseren Messbereich wahlen
Hinweis: In den Bereichen 0,1 £1... 1Si 1SI ... 10 Q; und 10 0. ... WO Oist der Suchbetrieb nur einge-
schrankt moglich.
Wenn der Zeiger im Bereich 100 ... 1kO oberhalb des markierten Feldes am Indikator steht und
der Ausschlag beim Ubergang in den Bereich 10 O... 100 Ogrosser wird odergleich bleibt. dann
ist der Widerstand in einem der drei untersten Bereiche zu messen.
2. 2. 2. 2. Messen des Widerstandswertes (bei bekanntem Messbereich
)
_Mit dem Feineinsteller, den Zeigerausschlag am Indikator auf Minimum abgleichen.
—Skalenwert ablesen und mit dem am Bereichsschalter eingestellten Wert multiplizieren.
2.2.3. Messung von Kapazitaten
-Taste "C" betatigen
—Prufling an Buchsen "l-E" anschliessen (Aussenbelag an Buchse E)
2.2.3. 1. Suchen des richtigen Messbereiches bei unbekanntem Kapazitatswert
-Taste "SEARCH" betatigen
—Messbereiche umschalten
-Der richtige Messbereich ist gefunden. wenn der Zeiger des Indikators in dem mit "VW" gekennzeichnete
Feld steht
-Zeigerausschlag zu klein *kleineren Messbereich wahlen
—Zeigerausschlag zu gross ——grosseren Messbereich wahlen
2.2. 3. 2. Messen der Kapazitat und des Verlustfaktors bei bekanntem Messbereich
-Mit Feineinsteller Kapazitatswert abgleichen so dass der Zeigerausschlag am Indikator ein Minimum erreicht
-Mit Einsteller "CUD" Verlustfaktor abgleichen so dass ein besseres Minimum erreicht wird.
—Durch eventuell mehrmaliges wechselseitiges Abgleichen von Kapazitat und Verlustfaktor niedrigstes
Minimum einstellen
—Kann kein eindeutiges Minimum gefunden werden. Taste "D" betatigen (D <1,4; Messfrequenz 100 Hz)
und Abgleich erneut versuchen
-Zur Ermittlung der Kapazitat, den Skalenwert ablesen und mit dem am Bereichsschalter eingestellten Wert
multiplizieren
-Zur Emittlung des Verlustfaktors D=tan 5den am Potentiometer "Q/D" eingestellten Wert ablesen und
entsprechend der Stellung der Taste "D" mit 0,01 Oder 0,1 multiplizieren.
-Bei der Messung kleiner Kapazitaten ist die Anfangskapazitat des Gerates von dem Messergebnis zu
subtrahieren. Die Anfangskapazitat kann gemessen werden, wenn kein Prufling an den Buchsen "l-E"
angeschlossen ist.
Hinweis: Lasst sich bei der Messung kleiner Kapazitaten kein gutes Minimum einstellen, eventuell den
Prufling vor ausseren Netz-Streufeldem abschirmen.
Other manuals for PM 6302
1
Table of contents
Languages:
Other Philips Test Equipment manuals

Philips
Philips ST80i User manual

Philips
Philips GM 5605 User manual

Philips
Philips PM 3256U User manual

Philips
Philips MPX2 User manual

Philips
Philips SmartPair Beacon 77-S230 User manual

Philips
Philips PM 3207 User manual

Philips
Philips pm3232 User manual

Philips
Philips PM3055 User manual

Philips
Philips PM 3266 User manual

Philips
Philips PM 3206 User manual