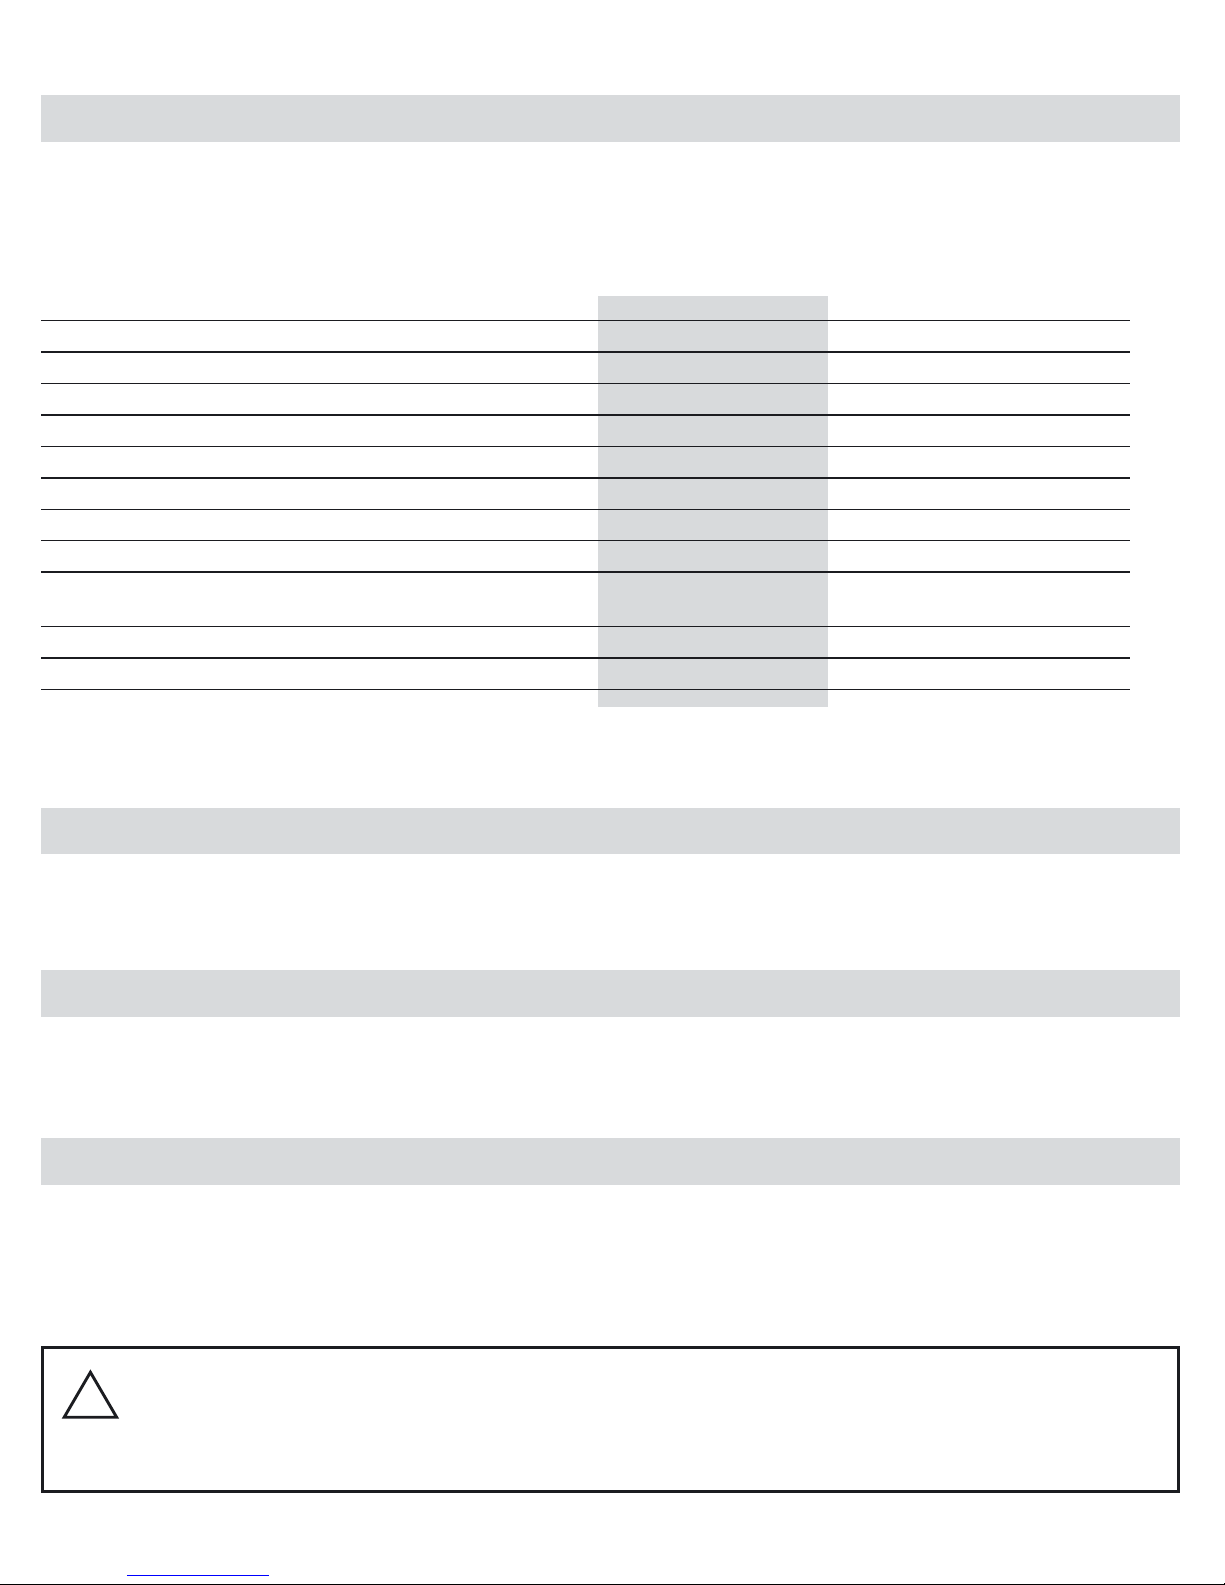
Phonocar 4/084 User manual

INTERFACCIA PER COMANDI AL VOLANTE
INTERFACE FOR STEERING-WHEEL COMMANDS
INTERFACE POUR COMMANDES AU VOLANT
INTERFACE FÜR LENKRAD-STEUERUNGEN
INTERFAZ PARA MANDOS DE VOLANTE
ALPINE - BLAUPUNKT - CLARION - KENWOOD ‘06>
PANASONIC - PIONEER - PHONOCAR- SONY - JVC
Istruzioni di montaggio
Instructions manual • Instructions de montage
Montageanleitung • Instrucciones para el montaje
4/084
Leggere attentamente le istruzioni di montaggio al fine di familiarizzare con tutti i controlli.
Carefully read the Mounting Instructions in order to get familiar with the various control keys.
Lire les Instuctions de Montage avec attention, an de familiariser avec les touches de commande.
Montage-Anweisungen aufmerksam durchlesen und sich gut mit den Kontroll-Knöpfen auseinander setzen.
Leer atentamente las instrucciones de montaje con el n de familiarizarse con todos los controles.
SW PH12

SEQUENZA DI INSTALLAZIONE
1) Connessioni 2) Memorizzazione dei comandi al volante
3) Memorizzazione del marchio autoradio 4) Verifica funzionamento
CONNESSIONI
Dalla centralina escono 14 cavi che dovranno essere collegati secondo i modelli di auto (vedi Foglio Connessioni). Isolare
quelli non utilizzati.
Attenzione: per accertarsi che i cavi individuati nel connettore siano quelli corretti, premendo i tasti al volante, avverrà una
variazione del valore resistivo (ohm). Non deve essere presente tensione (Volt).
ALPINE - CLARION - JVC - PIONEER - SONY
CAR RADIO
INTERFACE
Connettore originale dell’auto
Connettore personalizzato marchio autoradio
x
BLAUPUNKT - PANASONIC - PHONOCAR - KENWOOD ‘06>
CAR RADIO
INTERFACE
Connettore originale dell’auto
Connettore personalizzato marchio autoradio.
Non collegare
ITALIANO

MEMORIZZAZIONE DEI COMANDI AL VOLANTE
- Dopo aver effettuato i collegamenti, senza inserire il jack comandi al volante nel retro dell’autoradio, ruotare la chiave di
accensione ed il led si illuminerà con un lampeggio di colore rosso.
- Per memorizzare correttamente le funzioni dei comandi, eseguire la programmazione dalla funzione 1 (VOLUME -) e,
procedendo in progressione, fino alla funzione 10.
- Funzione 1 (VOLUME -) : premere il comando al volante VOLUME - e il led si illuminerà con un lampeggio di colore
rosso per confermare l’avvenuta memorizzazione.
Lo stesso metodo dovrà essere utilizzato per memorizzare le restanti funzioni.
- Nel caso che alcuni marchi di autoradio non permettano l’utilizzo di tutte le funzioni disponibili (10) premere il tasto PRG
tante volte quante sono le funzioni mancanti.
Esempio: Pioneer permette solo otto funzioni. Premere due volte il tasto PRG al termine della programmazione delle
funzioni disponibili.
- Completata la programmazione il led lampeggerà ripetutamente con colore verde.
Clarion Kenwood JVC Pioneer Sony Alpine Panasonic Panasonic
Blaunpunkt Phonocar
car AV
1
2
3
4
5Func Source Source Mode Source Source Mode Mode Source Mode
6Mute Mute Mute Mute Mute Mute Mute Mute Mute Mute
7Band Up Up Up Up Band Pwr Pwr Up
Play/Pause
8Disp Down Down Down Down Up Prog Prog Down Band
9Ta Speech Sound No No Down No No Ok Int
10 Af Dnpp No No No Power No No No RPT
CAR RADIO
DESCRIZIONE DELLE FUNZIONI PRESENTI SUI TASTI AUTORADIO
VOLUME -
VOLUME +
SEEK -
SEEK +
Sequenza per
memorizzare
i comandi
RESET MEMORIZZAZIONE COMANDI AL VOLANTE
Tenere premuto il tasto PRG fino a che il led comincia a lampeggiare con colore rosso. Ricominciare la programmazione

Nel caso che la selezione non sia corretta, verificare il numero di lampeggi corrispondenti al marchio e variarli utilizzando i
tasti VOLUME + per aumentarli e VOLUME - per diminuirli. A memorizzazione ultimata, il Led s’illuminerà di verde.
RESET GENERALE
Staccare il connettore della centralina e tornarlo ad inserire tenendo premuto il tasto PRG per 5 secondi fino a quando il
led non lampeggerà velocemente.
VERIFICA FUNZIONAMENTO
Inserire il jack nell’apposito ingresso sul retro dell’autoradio.
Accendere l’autoradio, sintonizzare la radio ed utilizzare i comandi al volante della vettura per gestire le funzioni; qualora
si evidenziassero delle anomalie, resettare la centralina e ripetere attentamente la procedura di programmazione.
MEMORIZZAZIONE DEL MARCHIO AUTORADIO
Per effettuare la selezione, agire sui comandi al volante: premendo VOLUME + , si selezionerà il marchio autoradio, pre-
mendo SEEK + si memorizza.
Es.: per memorizzare Alpine premere cinque volte il tasto VOLUME + . Il led verde eseguirà cicli di sei lampeggi rapidi e
una pausa. Premere SEEK + per memorizzare
CLARION non premere led verde 1 lampeggio premere SEEK +
KENWOOD premere 1 volta Vol + led verde 2 lampeggi premere SEEK +
JVC premere 2 volte Vol + led verde 3 lampeggi premere SEEK +
PIONEER premere 3 volte Vol + led verde 4 lampeggi premere SEEK +
SONY premere 4 volte Vol + led verde 5 lampeggi premere SEEK +
ALPINE premere 5 volte Vol + led verde 6 lampeggi premere SEEK +
PANASONIC premere 7 volte Vol + led verde 8 lampeggi premere SEEK +
PANASONIC Car AV premere 8 volte Vol + led verde 9 lampeggi premere SEEK +
BLAUPUNKT premere 9 volte Vol + led verde 10 lampeggi premere SEEK +
PHONOCAR premere 11 volte Vol + led verde 12 lampeggi premere SEEK +
VM020 - VM021
PHONOCAR VM016 premere 12 volte Vol + led verde 13 lampeggi premere SEEK +
PHONOCAR VM030-VM031 premere 13 volte Vol + led verde 14 lampeggi premere SEEK +
RESET MEMORIZZAZIONE MARCHIO AUTORADIO
Staccare il connettore dalla centralina, inserire il connettore tenendo premuto il tasto PRG.
Attenzione: rilasciare il tasto al primo lampeggio di colore rosso. Quando il led lampeggerà di colore verde, è possibile
memorizzare di nuovo il marchio autoradio.
• AVVERTIMENTI: Non smontare o modificare l’apparecchio. Utilizzare il prodotto in veicoli con batteria da 12V. Usare fusibili di ricambio
dell’amperaggio corretto. Eseguire correttamente i collegamenti. Evitare che i cavi si impiglino agli oggetti circostanti.
•ATTENZIONE:Icollegamentiel’installazionedevonoessereeffettuatidapersonaleformatoeinformato.•Sistemareicaviinmodo
chenonvenganopiegatiocompressidapartimetallichetaglienti.•Noninstallareinluoghiumidiopolverosi.
!

ENGLISH
x
ALPINE - CLARION - JVC - PIONEER - SONY
BLAUPUNKT - PANASONIC - PHONOCAR - KENWOOD ‘06>
CAR RADIO
INTERFACE
Original car-connector
CAR RADIO
INTERFACE
Original car-connector
Car-radio custom connector.
Car-radio custom connector
INSTALLATIONS-PHASES
1) Establish Connections 2) Memorize Steeringwheel-Commands
3) Select Radio-Model 4) Check good Functioning
The 14 cables coming from the Central-box have to be connected in strict relation to the instructions valid for the radio-
model in question. (Please see Connection-Plan).
Important: to make sure that the cables found within the connector are correct, press the steeringwheel command-keys
and check that the Resistance (Ohm) has changed. There must be no Tension (Volt).
Do NOT connect
CONNECTIONS

Clarion Kenwood JVC Pioneer Sony Alpine Panasonic Panasonic
Blaunpunkt Phonocar
car AV
1
2
3
4
5Func Source Source Mode Source Source Mode Mode Source Mode
6Mute Mute Mute Mute Mute Mute Mute Mute Mute Mute
7Band Up Up Up Up Band Pwr Pwr Up
Play/Pause
8Disp Down Down Down Down Up Prog Prog Down Band
9Ta Speech Sound No No Down No No Ok Int
10 Af Dnpp No No No Power No No No RPT
CAR RADIO
FUNCTIONS PROGRAMMING TABLE
VOLUME -
VOLUME +
SEEK -
SEEK +
Sequency to
memorize the
comands
MEMORIZING THE STEERINGWHEEL-COMMANDS
- Once the connections have been carried out, turn the ignition key without inserting the steeringwheel commands-Jack
into the back of the car-radio. The Led will turn on red.
- To correctly memorize the functions of the commands, start programming from function 1 (VOLUME-) and proceed, one
after the other, up to function 10.
- Function 1 (VOLUME -) : press steeringwheel-command VOLUME-. The Led will turn on red, signifying that memoriza-
tion has successfully been carried out.
Repeat this procedure for all remaining functions to be memorized.
- In those cases where the car-radio does not allow the whole number of functions (10), press the PRG-key as many times
as are the functions not covered by the car-radio.
Example: Pioneer allows only 8 functions. In this case, press PRG-key twice, after having programmed the functions
covered by the car-radio.
- When the programming-phase has been completed, the Led will repeated blink green.
RESETTING THE CAR-RADIO MODEL
Programming:keep the PRG-key pressed until the Led starts blinking red. Now start programming from the beginning

SELECTING THE RADIO MODEL
CLARION do not press Led green 1 blinking press SEEK +
KENWOOD press Vol + 1 time Led green blinks 2 times press SEEK +
JVC press Vol + 2 times Led green blinks 3 times press SEEK +
PIONEER press Vol + 3 times Led green blinks 4 times press SEEK +
SONY press Vol + 4 times Led green blinks 5 times press SEEK +
ALPINE press Vol + 5 times Led green blinks 6 times press SEEK +
PANASONIC press Vol + 7 times Led green blinks 8 times press SEEK +
PANASONIC Car AV press Vol + 8 times Led green blinks 9 times press SEEK +
BLAUPUNKT press Vol + 9 times Led green blinks 10 times press SEEK +
PHONOCAR press Vol + 11 times Led green blinks 12 times press SEEK +
VM020 - VM021
PHONOCAR - VM016 press Vol + 12 times Led green blinks 13 times press SEEK +
PHONOCAR - VM030 - VM031 press Vol + 13 times Led green blinks 14 times press SEEK +
GB - To effect the selection, act on the steeringwheel-commands as follows: By pressing VOLUME+, you will select
the car-radio model. By selecting SEEK+, you will memorize the car-radio model.
Example: to memorize Alpine, press VOLUME+ five times. The green Led will effect cycles of six fast blinkings and
one pause. Press SEEK+ to memorize.
If the selection has been carried out wrong, check the number of blinkings stated for the radio-model concerned. Change
the number of blinkings by using VOLUME+ (to increase) or VOLUME- (to reduce). Once the programming has been
effected, the Led remains green.
VERIFYING THE GOOD FUNCTIONING
GENERAL RE-SET
Insert the jack on the back of the car-radio. Switch-on the car-radio and x on the required radio-station. Use the
steeringwheel-commands to select the requested functions. In case of unnormal events, re-set the central-box and repeat
the programming-procedure.
Take connector away from the Central-Box. Re-insert the connecter, while keeping the PRG-key pressed for 5 seconds,
until the Led starts ashing rapidly.
RESETTING THE CAR-RADIO MODEL
Eliminate the connector from the Central-box. Insert the connector again, by keeping the PRG-key pressed.
Attention: release the key as soon as the Led turns red. When the Led gets green, another radio-model can be memori-
zed.
• ATTENTION: Do NOT open or modify the appliance. Use the product only on vehicles having a 12V-battery. Make sure replacement
fuses have the correct Amp.-value. Make sure the connections are carried out correctly. Avoid that the cables get imprisoned by nearby
objects.
•IMPORTANT:InstallationandConnectionsneedtobecarriedoutbytrainedandwell-informedpersonnel.•Placethecablesinsucha
waytoavoidthattheygetfoldedorcompressedbysharpmetalpieces.•Donotinstallinhumidordustylocations.
!

ALPINE - CLARION - JVC - PIONEER - SONY
CAR RADIO
INTERFACE
Connecteur d’origine en voiture
Connecteur personnalise
x
BLAUPUNKT - PANASONIC - PHONOCAR - KENWOOD ‘06>
CAR RADIO
INTERFACE
Connecteur d’origine en voiture
Connecteur personnalise.
Ne PAS brancher
FRANÇAISE
CONNEXIONS
A partir de l’unité centrale, il y a 14 câbles qui devront être branchés selon la méthode valable pour le modèle d’autoradio
(voire le Tableau Connexions). Isoler les fils non utilisés.
Attention: Pour vérifier que les câbles individués dans le connecteur soient effectivement corrects,appuyer sur les touches
du volant. La valeur résistive (Ohm) devra changer, en absence de tension (Volt).
SEQUENCE POUR L’INSTALLATION
1) Effectuer les Connexions 2) Mémoriser les commandes au volant
3) Sélectionner le modèle d’autoradio 4) Vérifier le fonctionnement

Clarion Kenwood JVC Pioneer Sony Alpine Panasonic Panasonic
Blaunpunkt Phonocar
car AV
1
2
3
4
5Func Source Source Mode Source Source Mode Mode Source Mode
6Mute Mute Mute Mute Mute Mute Mute Mute Mute Mute
7Band Up Up Up Up Band Pwr Pwr Up
Play/Pause
8Disp Down Down Down Down Up Prog Prog Down Band
9Ta Speech Sound No No Down No No Ok Int
10 Af Dnpp No No No Power No No No RPT
CAR RADIO
LISTE DE FONCTIONS A EFFECTUER POUR LA PROGRAMMATION
VOLUME -
VOLUME +
SEEK -
SEEK +
Séquence pour
mémoriser les
commandes
MEMORISER LES COMMANDES AU VOLANT
Après avoir effectués les branchements, tourner la clé de démarrage, sans introduire le Jack des commandes au volant
sur le dos de l’autoradio. Le Led devient rouge.
- Pour correctement mémoriser les fonctions des commandes, effectuer la programmation de la fonction 1 (VOLUME -)
et, progressivement, toutes les autres fonctions, jusqu’à la fonct. 10.
- Fonction 1 ( VOLUME - ): Appuyer sur la commande volant VOLUME -. Le Led devient rouge, significant que la
mémorisation à eu lieu.
Utiliser la même méthode pour la mémorisation de toutes les autres fonctions.
- Dans les modèles d’autoradio où les 10 fonctions ne sont pas entièrement disponibles, appuyer sur la touche PRG,
une fois pour chacune fonction manquant.
Exemple: Pioneer ne permet que huite fonctions. Dans ce cas, appuyer deux fois sur la touche PRG, après avoir
terminé la programmation des fonctions disponibles.
- Quand la programmation est terminée, le Led tourne vert en clignotant plusieures fois.
RESET DE LA PROGRAMMATION COMMANDES AU VOLANT.
Tenir appuyée la touche PRG jusqu’au moment où le Led tourne rouge. Recommencer avec la programmation.

SÉLECTION AUTORADIO
CLARION ne pas appuyer led vert 1 clignotement appuyer SEEK
KENWOOD appuyer 1 fois Vol+ Led vert 2 clignotements appuyer SEEK +
JVC appuyer 2 fois led vert 3 clignotements appuyer SEEK +
PIONEER appuyer 3 fois led vert 4 clignotements appuyer SEEK +
SONY appuyer 4 fois led vert 5 clignotements appuyer SEEK +
ALPINE appuyer 5 fois led vert 6 clignotements appuyer SEEK +
PANASONIC appuyer 7 fois led vert 8 clignotements appuyer SEEK +
PANASONIC Car AV appuyer 8 fois led vert 9 clignotements appuyer SEEK +
BLAUPUNKT appuyer 9 fois led vert 10 clignotements appuyer SEEK +
PHONOCAR appuyer 11 fois led vert 12 clignotements appuyer SEEK +
VM020 - VM021
PHONOCAR - VM016 appuyer 12 fois led vert 13 clignotements appuyer SEEK +
PHONOCAR - VM030 - VM031 appuyer 13 fois led vert 14 clignotements appuyer SEEK +
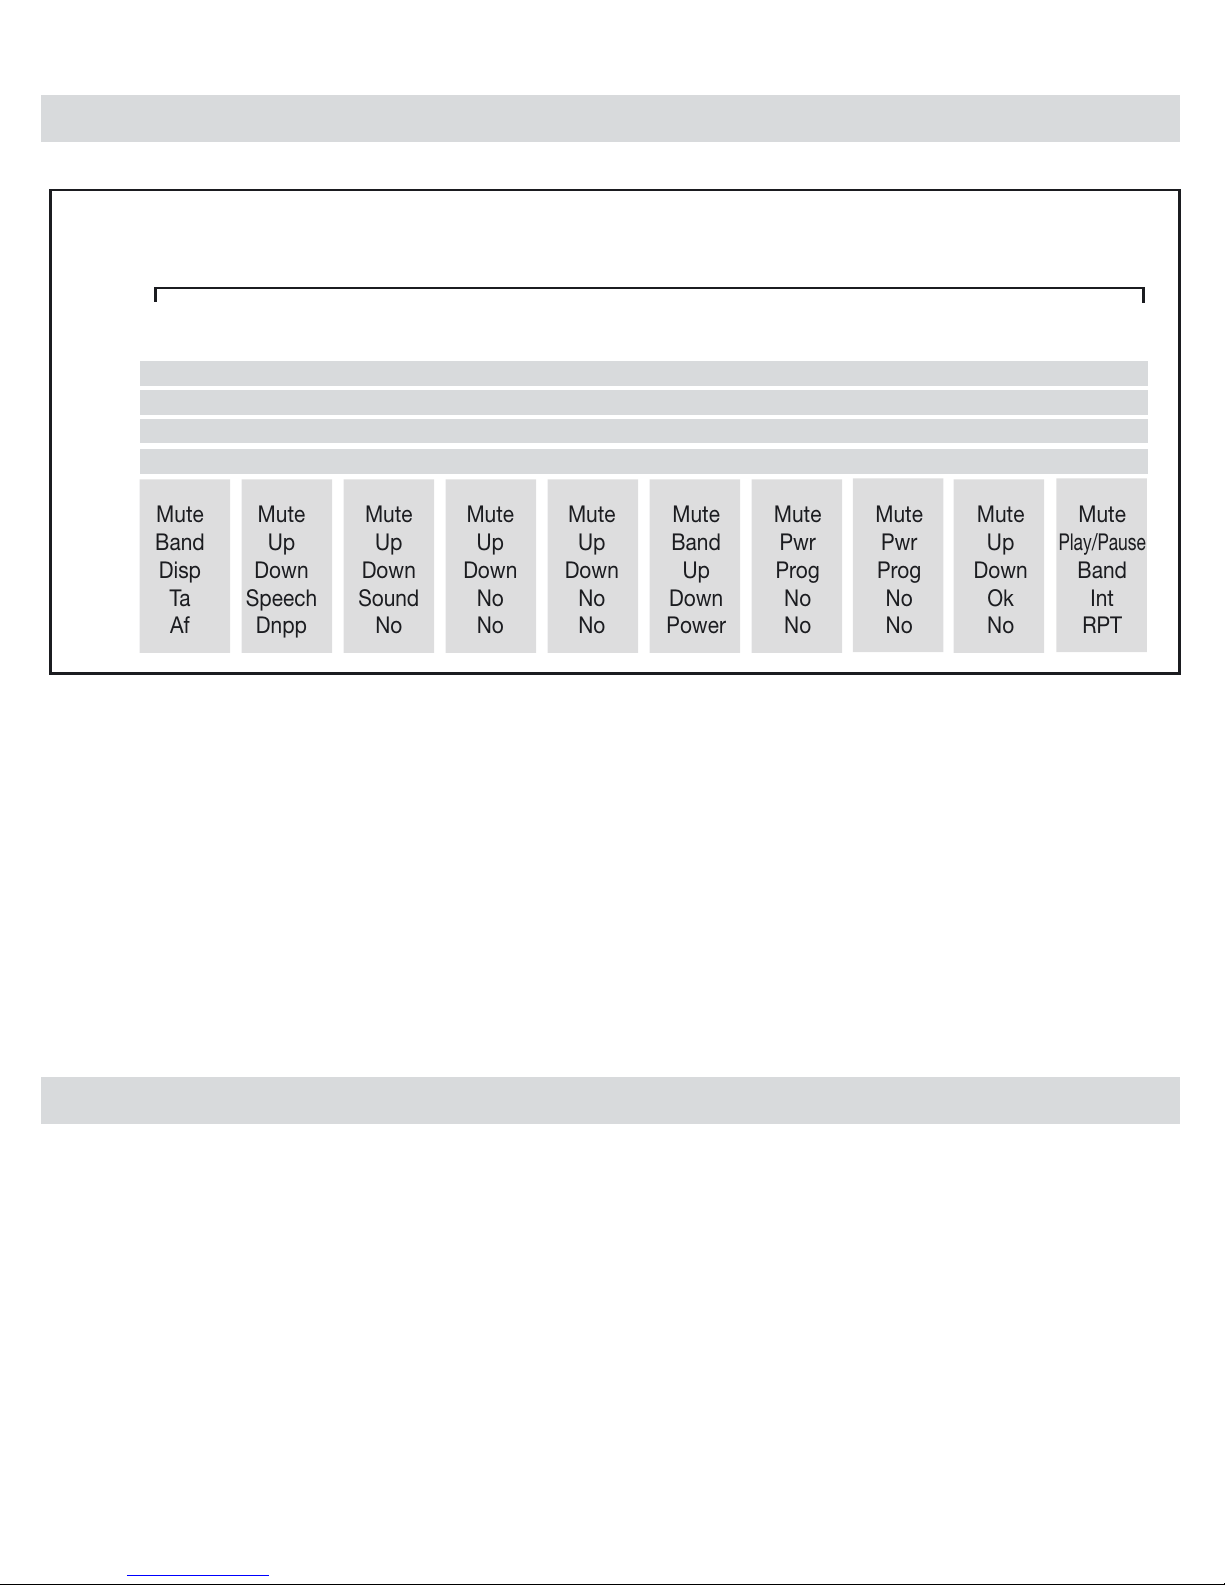
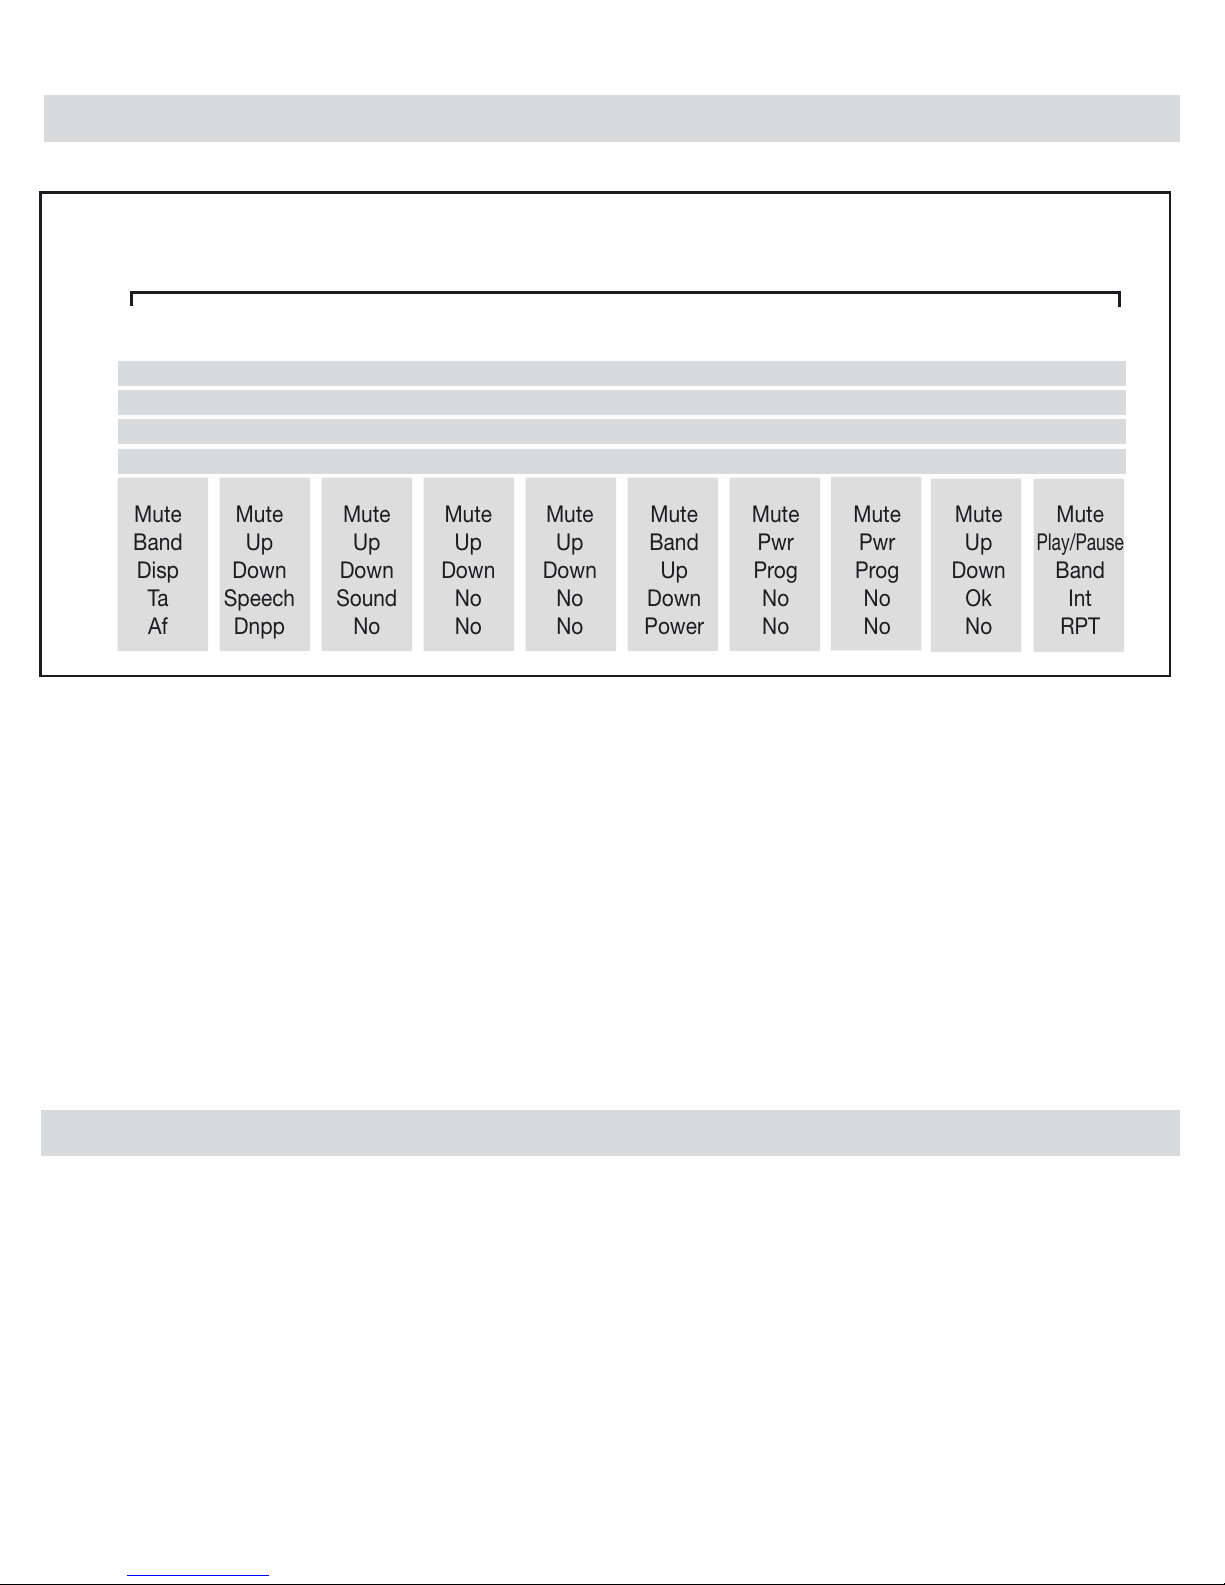
Pour effectuer la sélection, opérer sur les commandes au volant: en appuyant VOLUME+, on fait la sélection de la
marque de l’autoradio. En appuyant SEEK+ on mémorise.
Exemple: pour mémoriser Alpine, appuyer cinq fois sur la touche VOLUME+. Le Led vert effectuera un cycle de 6
clignotements rapids et une pause. Appuyer SEEK+ pour mémoriser.
Si la sélection résulte incorrecte, vérifier le nombre de clignotements correspondant à la marque de l’autoradio, et,
si nécessaire, le corriger en utilisant: la touche VOLUME+, pour augmenter le nombre. La touche VOLUME-, pour
réduire le nombre. A la fin de la mémorisation, le Led tourne vert.
VERIFIER LE FONCTIONNEMENT
RE-SET GENERAL
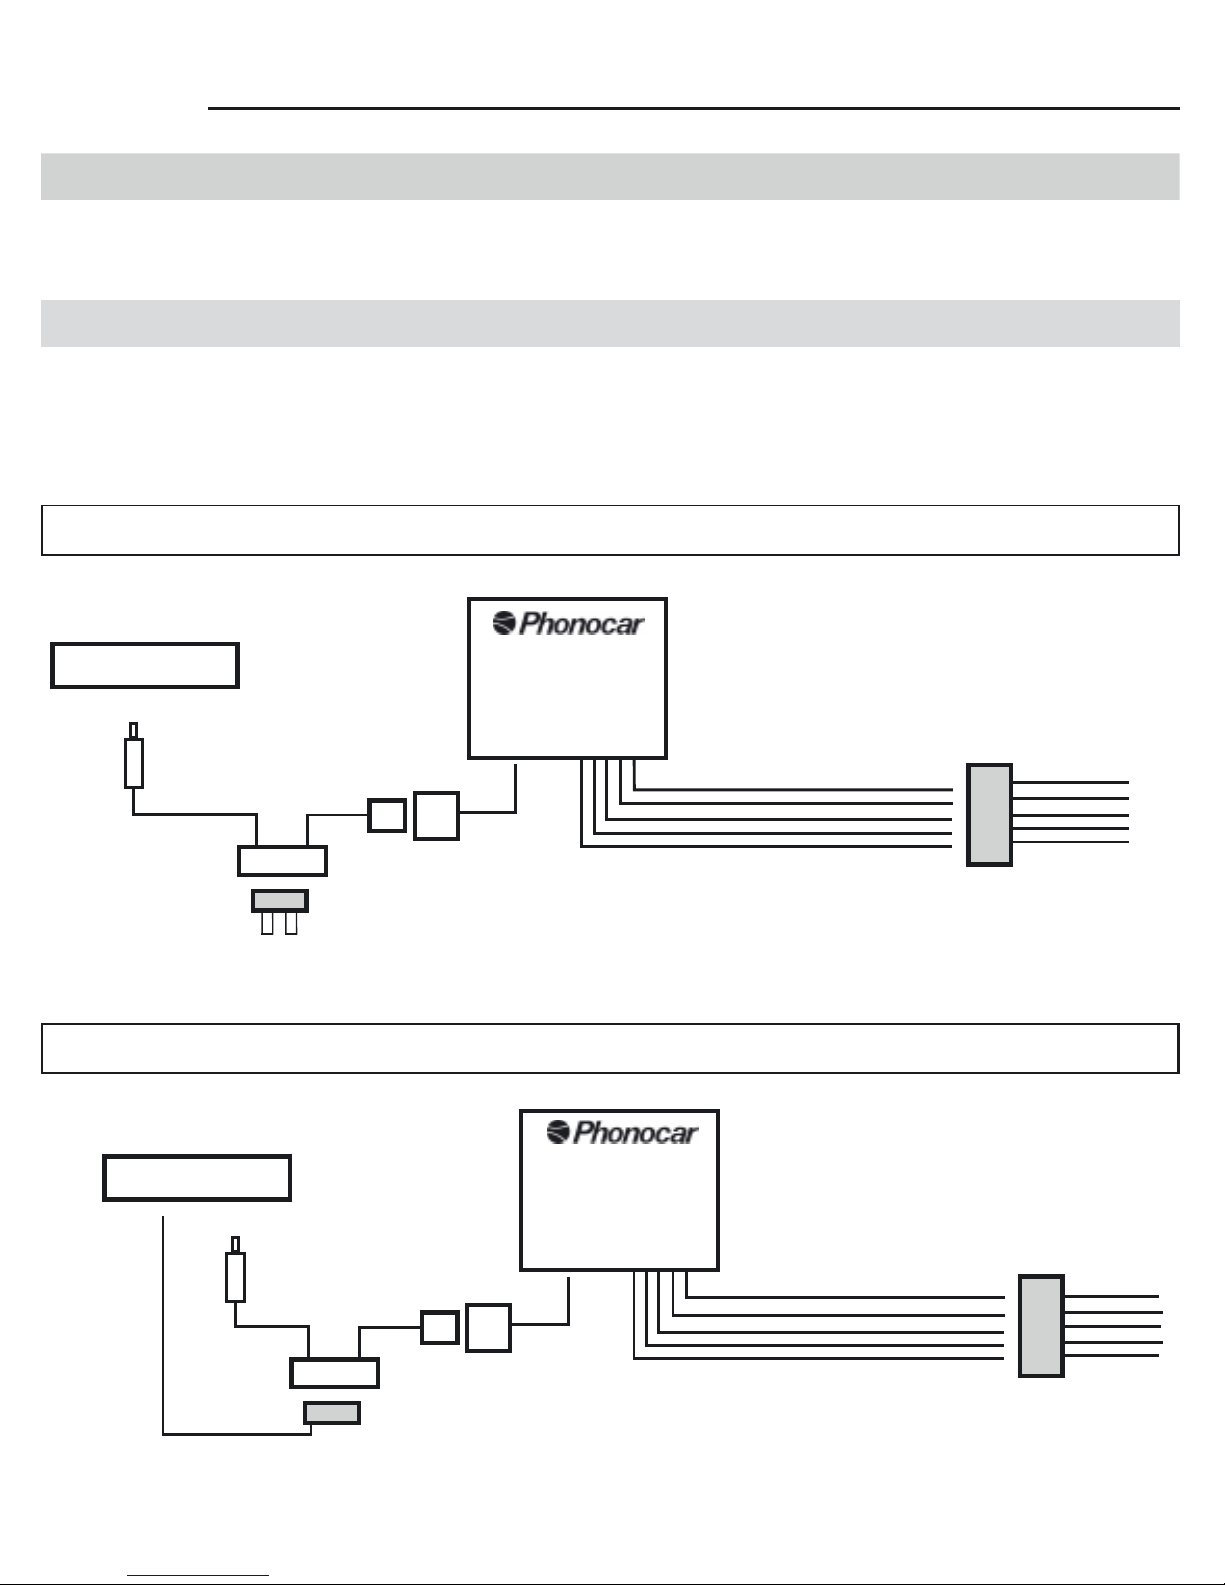
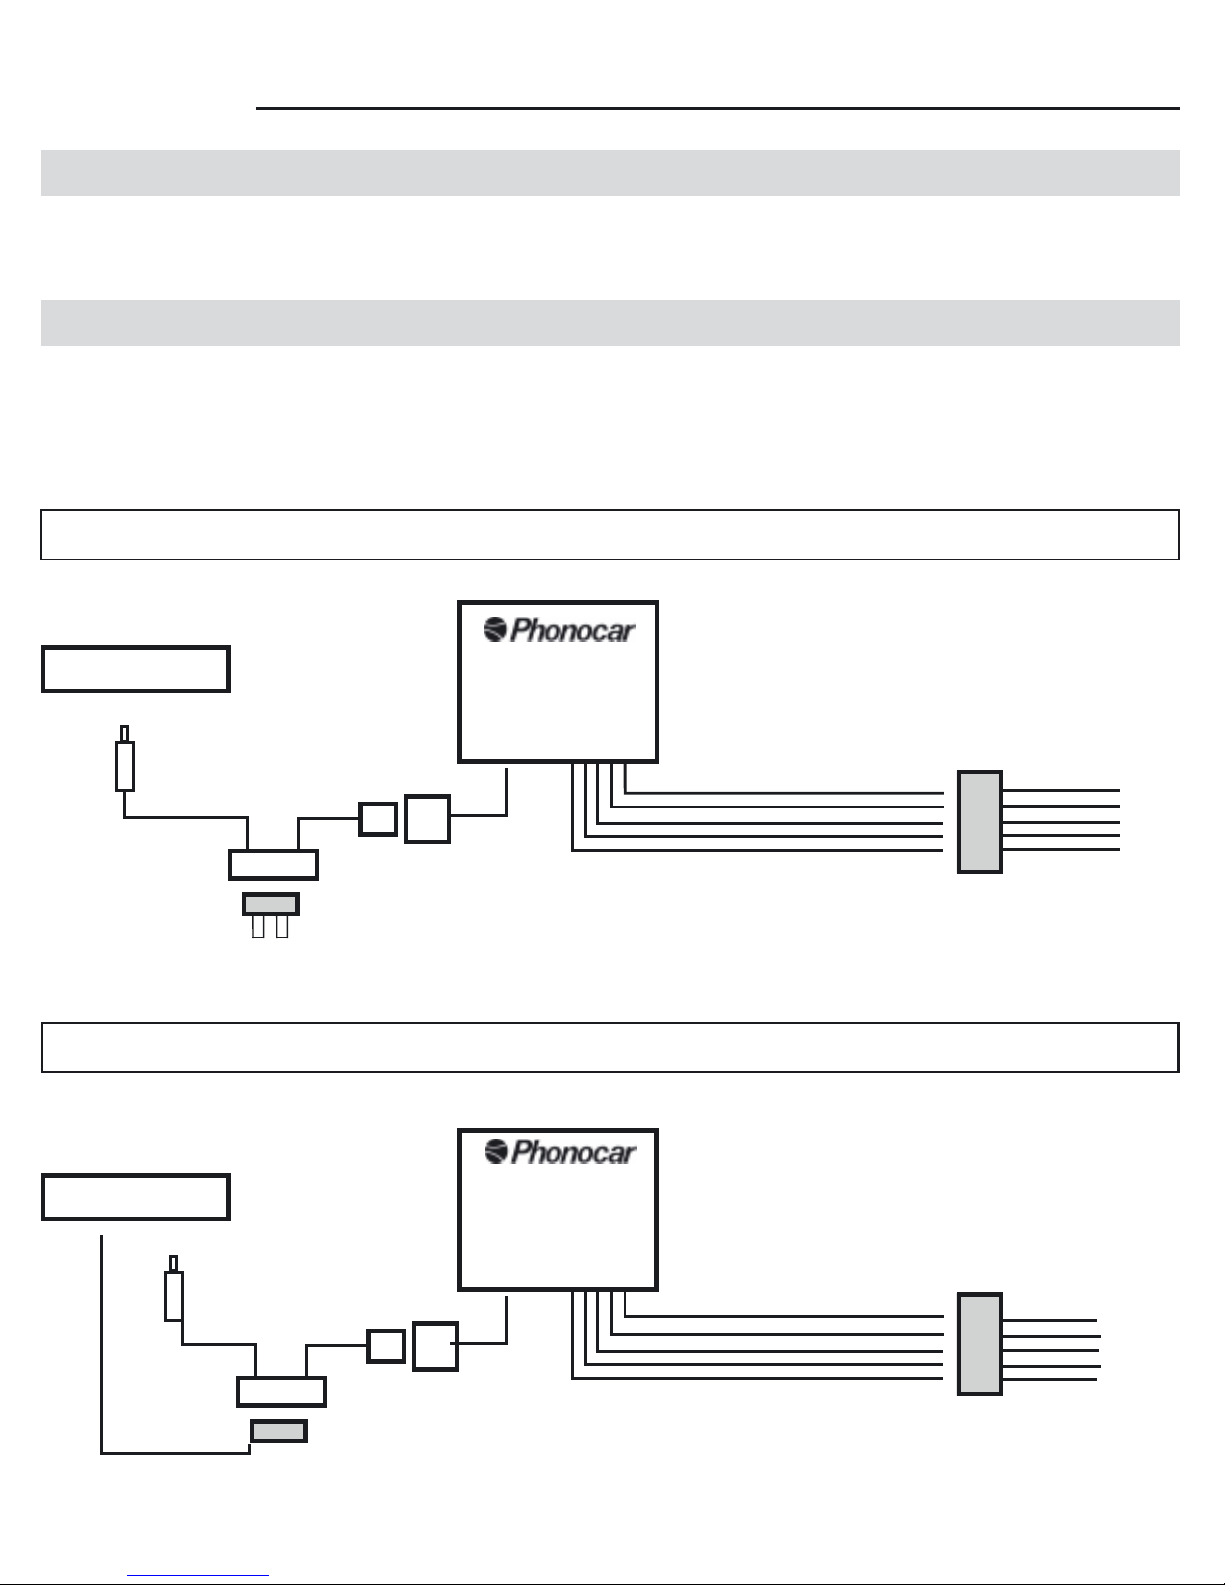
Introduire le Jack dans la prise prévue sur le dos de l’autoradio.
Allumer l’autoradio. Sélectionner la station et utiliser les commandes au volant pour choisir les fonctions. En cas d’anoma-
lies, effectuer le Reset de l’unité centrale et repéter, avec attention, la procédure de programmation.
Débrancher le connecteur de l'Unité Centrale. Rentroduire le connecteur en appuyant sur la clé PRG pour 2 seconds
jusqu'à quand le Led commence à clignoter rapidement.
Débrancher le connecteur depuis l’unité centrale. Introduire le connecteur en appuyant la touche PRG.
Attention: laisser la touche dès que le Led devient rouge. Quand le Led tourne vert, il est possible d’effectuer la mémori-
sation d’une autre marque d’autoradio.
RESET DE LA PROGRAMMATION COMMANDES AU VOLANT.
• AVERTISSEMENTS: Ne pas ouvrir ou modifier l’appareil. Utiliser le produit exclusivement sur des véhicules avec une batterie à 12V.
Utiliser des fusibles de rechange avec les Ampères corrects. Effectuer les connexions de manière correcte. Eviter que les câbles puissent
s’accrocher aux object voisins.
• IMPORTANT: L’Installation et les Connexions doivent être effectuées par du personnel spécialisé et bien informé sur le produit.
•Placerlescâblesdemanièreàéviterleurplissementoutranchementpardespartiesmétalliques.•Nepasinstallerdansdes
endroits humides ou poussiéreux.
!

DEUTSCH
INSTALLATIONS-PHASEN
VERBINDUNGEN
1) Anschlüsse herstellen 2) Lenkradsteuerungen einspeichern
3) Autoradio-Marke wählen 4) Auf Inbetriebnahme kontrollieren
Aus der Zentral-Einheit kommen 14 Kabel, die, je nach Wagenmodell, angeschlossen werden müssen (siehe Verbindung-
sanweisungen). Die nicht verwendeten Kabel bitte isolieren.
Wichtig: um sicher zu gehen, dass die im Verbinder lokalisierten Kabel auch die richtigen sind, bitte die Tasten der Len-
kradsteuerungen drücken. Der Widerstand (Ohm) muss sich dabei ändern. Es darf keine Spannung (Volt) vorhanden sein.
x
ALPINE - CLARION - JVC - PIONEER - SONY
BLAUPUNKT - PANASONIC - PHONOCAR - KENWOOD ‘06>
CAR RADIO
INTERFACE
Original-Verbinder im Wagen
CAR RADIO
INTERFACE
Original-Verbinder im Wagen
Radio-Spezifischer Verbinder.
.
Radio-Spezifischer Verbinder
bitte NICHT
anschließen

EINSPEICHERUNG DER LENKRAD-STEUERUNGEN
- Sobald die Verbindungen hergestellt sind, Zündschlüssel drehen. Jack-Verbinder für die Lenkradsteuerungen dabei
NICHT am Autoradio einstecken. Das Led leuchtet nun rot auf.
- Um die Lenkradsteuerungen richtig einzuspeichern, bei Funktion 1 (VOLUME-) beginnen und, der Reihe nach, bis zur
Funktion 10, alle Einspeicherungen vornehmen.
- Funktion 1 (VOLUME -) : Funktion VOLUME- am Lenkrad drücken. Das Led leuchtet rot auf, um die durchgeführte
Einspeicherung zu bestätigen.
Auf dieselbe Weise auch alle übrigen Funktionen einspeichern.
- Sollten bestimmte Autoradio-Modelle nicht alle 10 Funktionen zulassen, PRG-Taste so oft drücken, wie die Anzahl der
nicht vorhandenen Funktionen.
Beispiel: Pioneer bietet nur acht Funktionen. In diesem Fall, die vorhandenen Funktionen einspeichern und dann 2 mal
Taste PRG drücken.
- Nach abgeschlossener Programmierung blinkt das Led mehrmals grün auf.
Clarion Kenwood JVC Pioneer Sony Alpine Panasonic Panasonic
Blaunpunkt Phonocar
car AV
1
2
3
4
5Func Source Source Mode Source Source Mode Mode Source Mode
6Mute Mute Mute Mute Mute Mute Mute Mute Mute Mute
7Band Up Up Up Up Band Pwr Pwr Up
Play/Pause
8Disp Down Down Down Down Up Prog Prog Down Band
9Ta Speech Sound X X Down X X Ok Int
10 Af Dnpp X X X Power X X X RPT
CAR RADIO
ANWEISUNGEN HINSICHTLICH DER PROGRAMMIERUNG
VOLUME -
VOLUME +
SEEK -
SEEK +
Arbeitsgang zur
Einspeicherung der
Funktionen
RESET DER LENKRADSTEUERUNGS-PROGRAMMIERUNG
PRG-Taste so lange gedrückt halten, bis das Led rot aufleuchtet. Nun kann die Programmierung von Neuem starten.

WAHL DER AUTORADIO-MARKE
CLARION nicht drücken Led grün 1 Aufblinken SEEK + drücken
KENWOOD 1 mal Vol + drücken Led grün blinkt 2 mal SEEK + drücken
JVC 2 mal Vol + drücken Led grün blinkt 3 mal SEEK + drücken
PIONEER 3 mal Vol + drücken Led grün blinkt 4 mal SEEK + drücken
SONY 4 mal Vol + drücken Led grün blinkt 5 mal SEEK + drücken
ALPINE 5 mal Vol + drücken Led grün blinkt 6 mal SEEK + drücken
PANASONIC 7 mal Vol + drücken Led grün blinkt 8 mal SEEK + drücken
PANASONIC Car AV 8 mal Vol + drücken Led grün blinkt 9 mal SEEK + drücken
BLAUPUNKT 9 mal Vol + drücken Led grün blinkt 10 mal SEEK + drücken
PHONOCAR 11 mal Vol + drücken Led grün blinkt 12 mal SEEK + drücken
VM020 - VM021
PHONOCAR VM016 12 mal Vol + drücken Led grün blinkt 13 mal SEEK + drücken
PHONOCAR VM030-VM031 13 mal Vol + drücken Led grün blinkt 14 mal SEEK + drücken
Um die Autoradio-Marke zu wählen, Tasten folgender Lenkradsteuerungen drücken: VOLUME+, um die Autoradio-Marke
zu wählen. SEEK+, um die Wahl einzuspeichern.
Beispiel: um Alpine einzuspeichern, Taste VOLUME+ fünf Mal drücken. Das grüne Led wird wiederholt einen Zyklus von 6
mal Blinken und einmal Pause absolvieren. Taste SEEK+ drücken, um die Marke einzuspeichern.
Falls die Wahl nicht richtig durchgeführt worden ist, überprüfen, wie oft das Led zur in Frage stehenden Autoradio-Marke
aufblinken muss. Die richtige Zahl des Aufblinkens eingeben: VOLUME+ drücken, um die Zahl zu erhöhen. VOLUME-
drücken, um die Zahl zu reduzieren. Nach abgeschlossener Einspeicherung wird das Led grün.
ÜBERPRÜFUNG DER BETRIEBS-BEREITSCHAFT
GENERELLES RE-SET
Jack in die vorgesehene Buchse, hinten auf dem Autoradio, einstecken.
Autoradio einschalten und Sender einstellen. Um die verschiedenen Funktionen zu bedienen, Lenkradsteuerungen
verwenden. Bei etwaigen Problemen, ein Reset der Zentral-Einheit durchführen. Dann die Programmierungsprozedur
aufmerksam wiederholen.
Verbinder von der Zentraleinheit entfernen. Verbinder wieder einstecken: dabei die PRG-Taste 2 Sekunden gedrückt hal-
ten, bis das Led anfängt, schnell zu blinken.
Verbinder von der Zentral-Einheit entfernen. Verbinder wieder einstecken und dabei Taste PRG gedrückt halten.
Achtung: sobald das Led rot aufleuchtet, Taste loslassen. Sobald das Led grün aufleuchtet, kann eine andere Autoradio-
Marke eingespeichert werden. Nach abgeschlossener Programmierung bleibt das Led grün.
RESET DER EINSPEICHERUNG DER AUTORADIO-MARKE
• BESONDERE HINWEISE: Das Gerät niemals auseinander nehmen oder Änderungen vornehmen. Das Produkt nur auf Fahrzeugen
verwenden, die über eine 12V-Batterie verfügen. Beim Austauschen der Sicherungen immer auf den korrekten Ampere-Wert achten.
Elektro-Verbindungen korrekt vornehmen und kontrollieren. Sicherstellen, dass sich die Kabel nicht an naheliegenden Gegenständen
verhängen können.
• WICHTIG:InstallationundVerbindungenmüssenvomgutinformiertenFachmannvorgenommenwerden.•Kabelfernhaltenvonschar
fkantigenMetall-Teilen,umihrVerknickenoderAbtrennenzuvermeiden.•NichtanfeuchtenoderstaubigenMontagestellen
installieren.
!

ESPAÑOL
SEQUENCIA DE INSTALACIÓN
CONEXIONES
1) Conexiones 2) Memorización de los mandos de volante
3) Selección de la marca del autoradio 4) Verificación de funcionamiento
Desde la centralita salen 14 cables que tienen que ser conectados según el modelo de coche (Ver apartado Conexiones).
Aislar los cables que no van a ser utilizados.
Atención: para comprobar que los cables que hemos seleccionado son los correctos, presionando las teclas del mando
de volante se producirá una variación del valor resistivo (Ohm). No tiene que haber tensión (Voltios).
x
ALPINE - CLARION - JVC - PIONEER - SONY
BLAUPUNKT - PANASONIC - PHONOCAR - KENWOOD ‘06>
CAR RADIO
INTERFACE
Conector de origen del coche
CAR RADIO
INTERFACE
Conector de origen del coche
Conector personalizado marca autoradio.
Conector personalizado marca autoradio
No conectar

SELECCIÓN DE LA MARCA DEL AUTORADIO
CLARION no presionar Led verde 1 parpadeo presionar SEEK+
KENWOOD presionar 1 vece Vol + Led verde 2 parpadeos presionar SEEK+
JVC presionar 2 veces Vol + Led verde 3 parpadeos presionar SEEK+
PIONEER presionar 3 veces Vol + Led verde 4 parpadeos presionar SEEK+
SONY presionar 4 veces Vol + Led verde 5 parpadeos presionar SEEK+
ALPINE presionar 5 veces Vol + Led verde 6 parpadeos presionar SEEK+
PANASONIC presionar 7 veces Vol + Led verde 8 parpadeos presionar SEEK+
PANASONIC Car AV premere 8 volte Vol + led verde 9 lampeggi premere SEEK +
BLAUPUNKT premere 9 volte Vol + led verde 10 lampeggi premere SEEK +
PHONOCAR presionar 11 veces Vol + Led verde 12 parpadeos presionar SEEK+
VM020 - VM021
PHONOCAR - VM016 presionar 12 veces Vol + Led verde 13 parpadeos presionar SEEK+
PHONOCAR - VM030-VM031 presionar 13 veces Vol + Led verde 14 parpadeos presionar SEEK+
Para efectuar la selección, accionar los mandos de volante; presionando VOLUMEN + se seleccionará la marca del
autoradio, presionando SEEK+ se memoriza.
Ejemplo: para memorizar Alpine presionar 5 veces la tecla VOLUMEN +. El Led verde ejecutara ciclos de 6 parpadeos
rápidos y una pausa. Presionar SEEK+ para memorizar.
CONTROL DE FUNCIONAMIENTO
RESET GENERAL
Insertar el Jack en la especíca entrada que se encuentra en la parte trasera del autoradio.
Encender el autoradio, sintonizar la radio y utilizar los mandos de volante del coche para gestionar las funciones;
En el caso de que se evidencien anomalías en el funcionamiento, hacer un reset de la centralita y repetir atentamente el
proceso de programación.
Desconectar el conector de la centralita y volver a reposicionarlo haciendo presión en la tecla PRG durante 5 segundos
hasta cuando el Led no parpadeará más rápidamente.
En el caso de que la selección no sea correcta, verificar que el número de destellos correspondan a la marca del autora-
dio que se desee configurar, variarlos utilizando las teclas VOLUMEN + para aumentarlos y VOLUMEN - para disminuir-
los. Terminada la memorización el Led se iluminará de verde.
Desconectar el conector de la centralita insertar el conector teniendo presionado la tecla PRG .
Atención: soltar la tecla al primer destello de color rojo. Cuando el Led parpadee de color verde, es posible memorizar
nuevamente la marca del autoradio.
RESET MEMORIZACIÓN MARCA AUTORADIO

MEMORIZACIÓN DE LOS MANDOS DE VOLANTE
Clarion Kenwood JVC Pioneer Sony Alpine Panasonic Panasonic
Blaunpunkt Phonocar
car AV
1
2
3
4
5Func Source Source Mode Source Source Mode Mode Source Mode
6Mute Mute Mute Mute Mute Mute Mute Mute Mute Mute
7Band Up Up Up Up Band Pwr Pwr Up
Play/Pause
8Disp Down Down Down Down Up Prog Prog Down Band
9Ta Speech Sound X X Down X X Ok Int
10 Af Dnpp X X X Power X X X RPT
CAR RADIO
TABLA DE LAS FUNCIONES PARA EJECUTAR LA PROGRAMACION
VOLUME -
VOLUME +
SEEK -
SEEK +
- Después de efectuar las conexiones, sin insertar el jack del mando de volante en la parte trasera del autoradio. Girar la
llave de encendido, el Led se iluminará con un destello de color rojo.
- Para memorizar correctamente las funciones de los mandos, ejecutar la programación desde la función 1 (VOLUMEN -)
y avanzando en progresión, hasta la función 10.
- Función 1 (VOLUMEN -): presionar el mando de volante VOLUMEN - el Led se iluminará con un destello de color rojo
para confirmar la memorización.
El mismo método tiene que ser utilizado para memorizar las además funciones.
- En el caso de que algunas marcas de autoradio no permita la utilización de todas las funciones disponibles (10) pre-
sionar la tecla PRG) tantas veces cuantas son las funciones que faltan.
Ejemplo: Pioneer permite solo 8 funciones, Presionar 2 veces la tecla PRG al final de la programación de las funciones
disponibles.
- Una vez terminada la programación el Led parpadeará repetidamente de color verde.
Secuencia para
memorizar los
mandos
Tener presionada la tecla PRG hasta que el Led empiece a parpadear de color rojo. Recomenzar la programacion.
RESET PROGRAMACIÓN MANDOS DE VOLANTE
S.pA. - Via F.lli Cervi, 167/C - 42100 Reggio Emilia (Italy) - Tel. +39 0522 941621 - Fax +39 0522 942452
www.phonocar.com - e-mail:info@phonocar.it
• SE ADVIERTE DE: No desmontar o modificar el aparato. Utilizar este aparato en vehículos con batería de 12 Voltios. Usar fusibles
de recambios con el amperaje correcto. Ejecutar correctamente las conexiones. Evitar que los cables se enganchen con los objetos
cercanos.
• ATENCION: Las instalaciones y las conexiones tienen que ser efectuadas por personal especializado y formado. Colocar los cables
con especial cuidado evitando de doblarlos, o comprimirlos.
!
Other manuals for 4/084
1
Table of contents
Languages:
Other Phonocar Automobile Electronic manuals
Popular Automobile Electronic manuals by other brands

Axxess
Axxess GMOS-MOST-02 installation instructions

VDO
VDO RESSURE GAUGE installation instructions

CARLO GAVAZZI
CARLO GAVAZZI Carpark 3 Design and installation manual

PerTronix
PerTronix Ignitor II instructions

Rostra
Rostra 250-8883 installation instructions

ALGO GROUP
ALGO GROUP ZR HY702 L Installation instruction