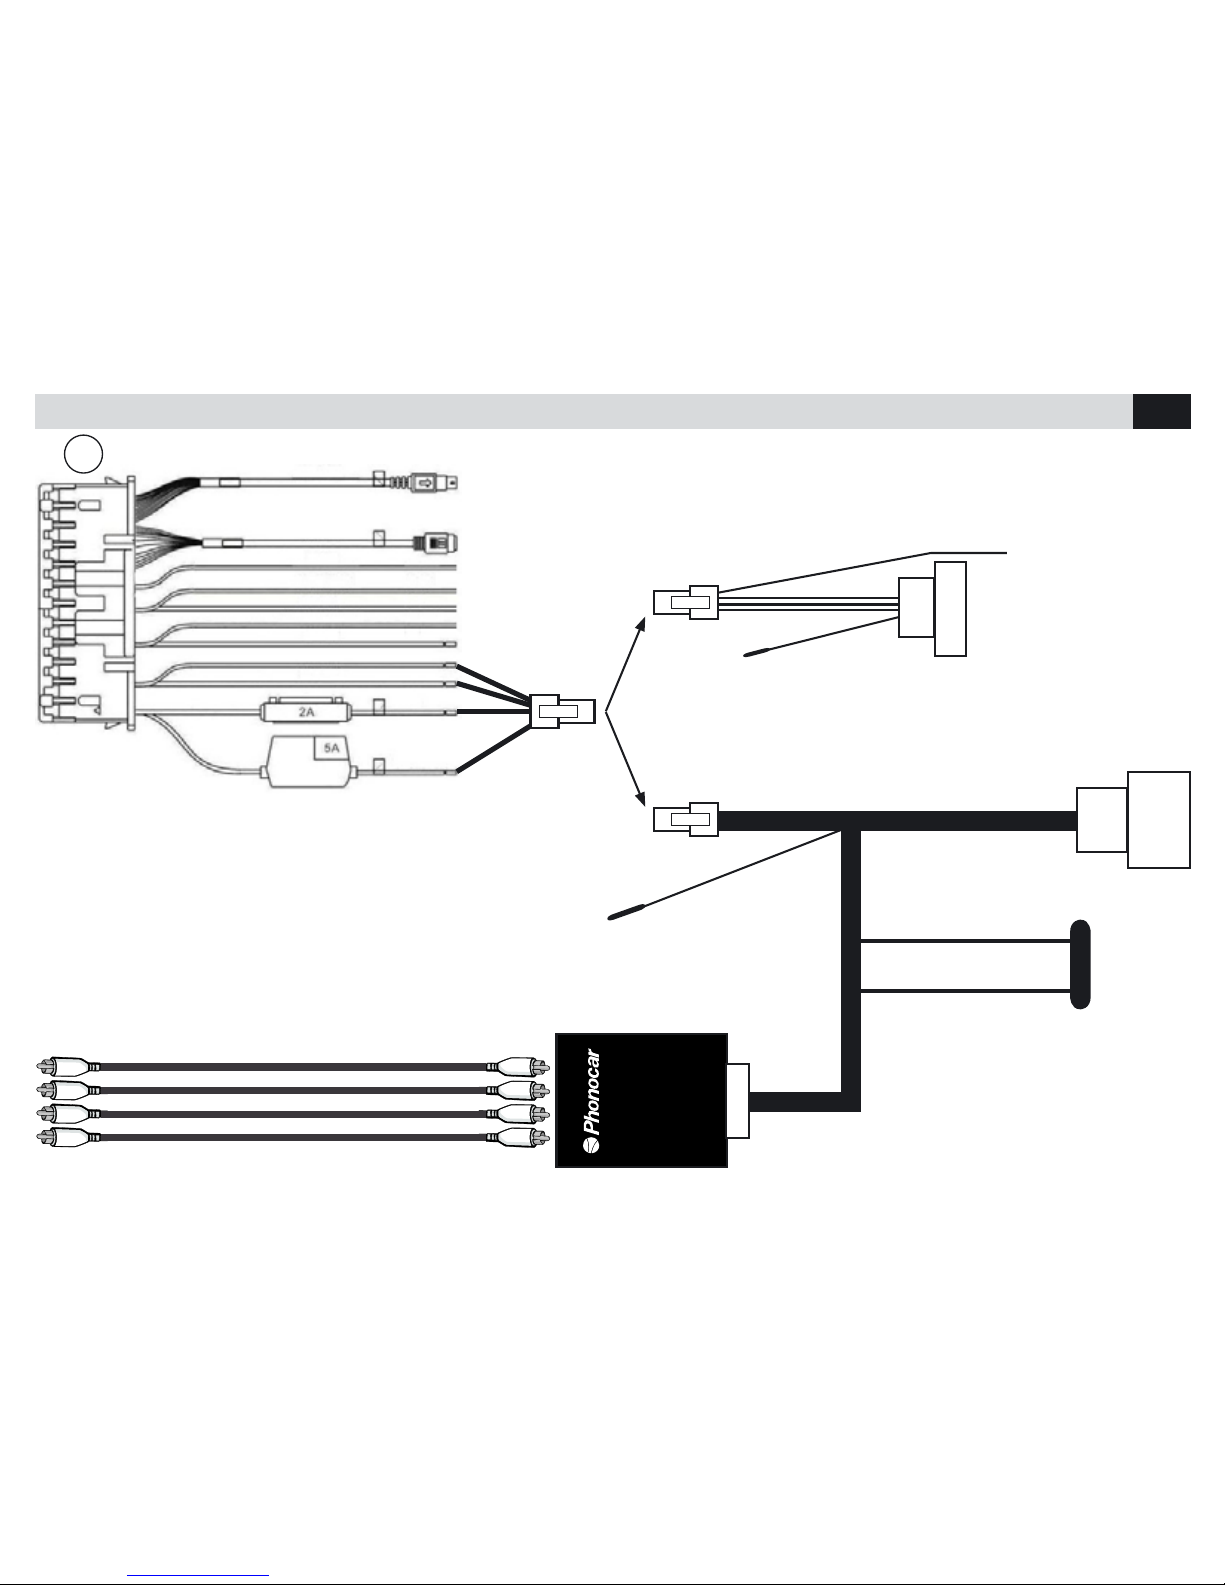
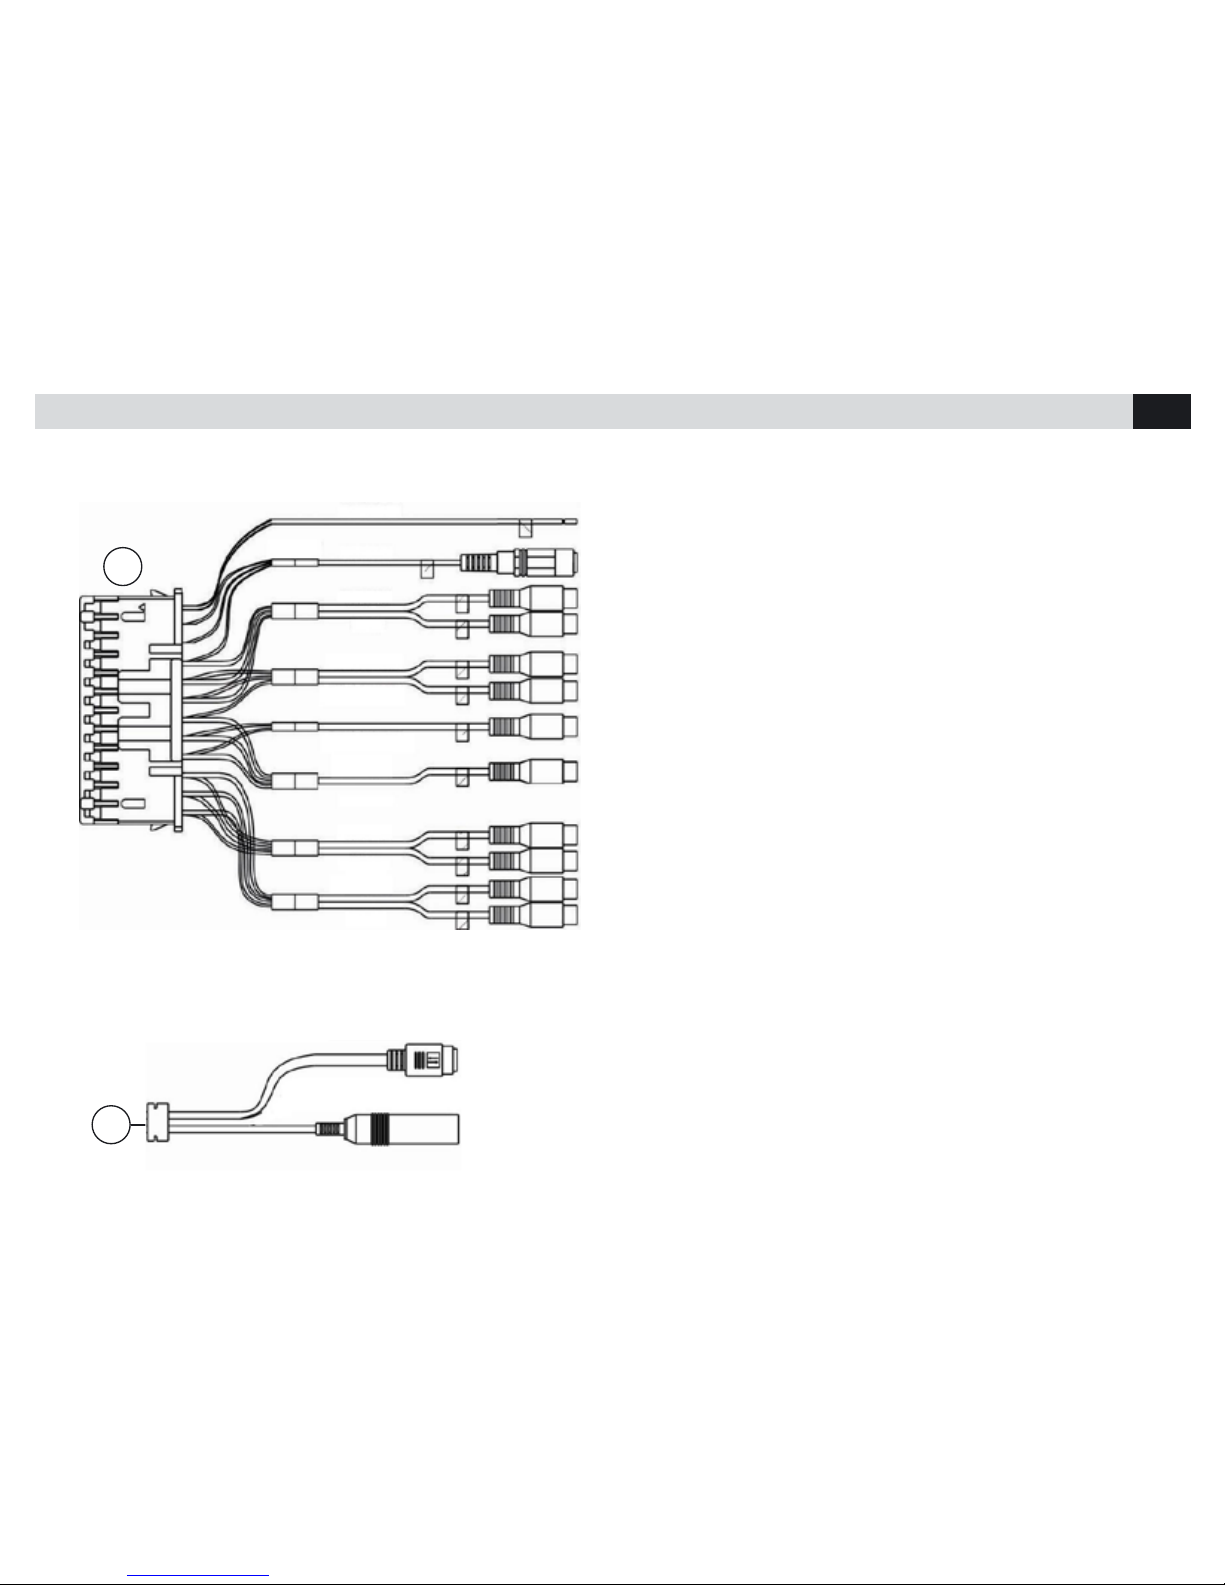
Phonocar VM 050 User manual

MANUALE ISTRUZIONI • INSTRUCTIONS MANUAL
NOTICE DE MONTAGE ET D’EMPLOI • GEBRAUCHSANWEISUNGEN
MANUAL DE INSTRUCCIONES
VM 050
8” TFT/LCD
MOTORIZED DVD RECEIVER
ENGLISH
ITALIANO
FRANÇAIS
DEUTSCH
ESPAÑOL

2
IT/GB
CONNESSIONI • CONNECTIONS
1 2 3
GPS-ANT
DVB-T
SR-1
ILL
SR-GND
BRAKE
AUTO ANT
AMP
GND
ACC
BATT
NERO/BLACK
ROSA/PINK
BLU/BLUE
BLU-BIANCO/ BLUE-WHITE
NERO/BLACK
BIANCO/WHITE
ROSSO/RED
GIALLO
YELLOW
ARANCIONE/ORANGE
Ingresso Antenna GPS
Ingresso DVB-T (opzional)
Non collegare
Ingresso Dimmer +12V
Non collegare
Cavo freno a mano
Accensione antenna elettrica
Accensione amplificatore
Massa
+12V sottochiave
+12V permanente
Input GPS-Antenna
Input DVB-T (Optional)
Do NOT connect
Input Dimmer +12V
Do NOT connect
Handbrake-Cable
Electric Antenna Switch-on
Amplifier Switch-on
Ground
+12V underkey
+12V permanent
1

3
IT/GB
GIALLO/YELLOW
GIALLO/YELLOW FUSE
Alimentazione in caso di collegamento con amplificatore non originale.
Power-Supply when connection with non-Original amplifier is requested.
Collegamenti con amplificatore originale.
Connections with Original-Amplifier.
Nel caso l’alimentazione presente nel vano
autoradio non sia sufficiente, collegare il
cavo giallo direttamente alla batteria.
Should the power-supply available at the
car-radio-location not be sufficient, con-
nect yellow cable directly with the battery.
CONNESSIONI • CONNECTIONS
USCITE AUTORADIO PREAMPLIFICATE / PRE-OUT RADIO
POWER
AMPLIFIER
4X60 WATT
AUTO ANT
BLU/BLUE
ISO
ALIMENTAZIONE
POWER
4 ALTOPARLANTI
SPEAKERS
AMP REM
AUTO ANT
BLU-BIANCO/BLUE-WHITE
BLU/BLUE
ISO
ALIMENTAZIONE
POWER
1

4
IT/GB
+12V Luce retromarcia
per retrocamera
Ingresso microfono bluetooth
Ingresso Audio sinistro
Ingresso Audio destro
Ingresso Retrocamera
Ingresso Video
Uscita Video
Uscita Subwoofer
USCITE AMPLIFICATORI
Anteriore sinistra
Anteriore destra
Posteriore sinistra
Posteriore destra
+12V Reverse-Gear Light
For Rear-Camera
Input for Bluetooth-Microphone
Input Left Audio
Input Right Audio
Input Rear-Camera
Input Video
Output Video
Output Subwoofer
OUTPUTS FOR AMPLIFIERS
Front Left
Front Right
Rear Left
Rear Right
REVERSE
CONTROL
MIC IN
AUX LIN
AUX RIN
RV VIDEO
VIDEO IN
VIDEO OUT
SUB OUT
LF OUT
RF OUT
LR OUT
RR OUT
ARANCIONE/ORANGE
NERO/BLACK
BIANCO/WHITE
ROSSO/RED
YELLOW/GIALLO
YELLOW/GIALLO
YELLOW/GIALLO
NERO/BLACK
BIANCO/WHITE
BIANCO/WHITE
ROSSO/RED
ROSSO/RED
2
3
CONNESSIONI • CONNECTIONS
Connettore I POD
Antenna radio veicolo
I POD connector
Vehicle Radio-Antenna
IC2
AERIAL

5
IT/GB
FUNZIONI • FUNCTIONS
1. Volume/Eq/Mute/Menù/GPS
2. Porta mini USB
3. Porta SD card A/V
4. Ingresso Audio/Video
5. Accensione/Spegnimento
Sorgente
6. Apertura/chiusura pannello
frontale
7. Espulsione disco
8. Microfono
9. Sensore IR
10. Tasto reset
11. Joystick di direzione
12. Porta SD card Mappe
1. Volume/Eq/Mute/Menu /GPS
2. mini-USB Port
3. SD-card A/V Port
4. Input Audio/Video
5. Switch-on/Switch-off / Source
6. Open /Shut front-panel
7. Eject Disk
8. Microphone
9. IR-Sensor
10. Reset-key
11. Joystick for Directions
12. Port for road-maps SD-card
DISPLAY
13. Indicazione Equalizzatore
14. Icona di segnalazione disco
15. Display principaleA
16. Indicazione Loudness
17. Icona STEREO
18. Indicazione tipologia disco
DISPLAY
13. Equalizer Indication
14. Icon for disk-presence
15. Main Display
16. Loudness Indication
17. Icon for STEREO
18. Disk-Type Indication
18
17 13
14 15 16
12
1
2 3 4 5 6 7 8 9 10
11
8” WIDE SCREEN MONITOR
DVD RECEIVER VM050

6
IT/GB
PWR/SRC MUTE SETUP
P.ANGLE
VOL
MENU
LOUD/EQ
PROG
RDM
SLOW
ZOOM
AUDIO
PTY
AF
PREV
TITLE
SUB-T
PBP
PBN
TF
CLR
#
MP
PH
AP
PP
BAND
PBC/AST
SYS/NAVI
D.ANGLE
NEXT
REPEAT
ST
DISP
F.REV
STOP
PLAY/PAUSE
A-B
P/N
F.FWD
OPEN /
CLOSE
1 2 3
654
7 8 9 0
FUNZIONI
TELECOMANDO
• REMOTE-CONTROL FUNCTIONS
1. Accensione/spegnimento/sorgente
2. Mute
3. Tastierino numerico
4. Menù
5. Selezione Audio
6. Loudness/Equalizzatore
7. Spostamento in alto/PTY
8. Spostamento a sinistra
9. Conferma/Banda radio
10. Programma
11. Spostamento in giù/AF
12. Riproduzione casuale
Trasferimento chiamata
13. Traccia precedente
14. Aggancia telefonata in corso
15. Titolo DVD
16. Accetta chiamata in arrivo
17. Sottotitoli DVD
18. Apre/chiude pannello frontale
19. Menù Setup
20. Aumenta volume
21. Diminuisce volume
22. Visualizzazione display
23. PBC/AST/CLEAR
24. Avvolgimento veloce
25. Navigazione
26. Avanzamento veloce
27. Spostamento destra
28. Ferma riproduzione
29. Cambia angolo visione
30. Avvia riproduzione/Pausa
31. Traccia successiva
32. Accoppiamento telefono bluetooth
33. Ripetizione
34. Cambia sistema PAL/NTSC
35. Stereo/MP
1. Switch-on/Switch-off/Source
2. Mute
3. Number-keys
4. Menu
5. Audio-Selection
6. Loudness/Equalizer
7. Move up/PTY
8. Move Left
9. Confirm / Radio Frequency-Band
10. Programme
11. Move down/AF
12. Random Reproduction
Forward Call
13. Previous Track
14. End Phone-call
15. DVD-Title
16. Answer Phone-call
17. DVD-Subtitles
18. Open /Shut front-panel
19. Setup-Menu
20. Increase Volume
21. Reduce Volume
22. Visualize on Display
23. PBC/AST/CLEAR
24. Fast Rewind
25. Navigation
26. Fast Forward
27. Move Right
28. Stop Reproduction
29. Change Watching-Angle
30. Start Reproduction/Pause
31. Next Track
32. Couple Phone with Bluetooth
33. Repeat
34. Change System PAL/NTSC
35. Stereo/MP
1
118
19
20
21
22
23
24
25
26
27
28
29
30
31
32
33
34
35
2
3
4
5
6
7
8
9
10
11
12
13
14
15
16
17

7
IT/GB
Ad ogni pressione sull’icona si entra nella relativa funzione.
Enter the requested Function, by pressing the related Icon.
MENÙ • MENU
DISC SYSTEM
DVB-T CLOSE TFT
RADIO AV IN1
Bluetooth EJECT
GPS DIM 1
USB
i-POD AV IN2
SD CARD

8
IT/GB
• Inserire disco
• Toccare lo schermo
• Tasti funzione
• Per il MENU premere l’icona
• Introduce Disk
• Touch Screen
• Function-Keys
• Press Icon for the MENU
• Inserire USB
• Toccare lo schermo
• Tasti funzione
• Per il MENU premere l’icona
• Introduce USB
• Touch Screen
• Function-Keys
• Press Icon for the MENU
• Inserire SD Card
• Toccare lo schermo
• Tasti funzione
• Per il MENU premere l’icona
• Introduce SD-card
• Touch Screen
• Function-Keys
• Press Icon for the MENU
FUNZIONI MENÙ • MENU FUNCTIONS
TASTI FUNZIONE PER • FUNCTION-KEYS FOR DVD/CD/USB/SD CARD
Passaggio menù
Go to Menu
Indietro veloce
Fast Rewind
Traccia precedente
Previous Track
Traccia successiva
Next Track
Avanti veloce
Fast Forward
Riproduzione/Pausa
Reproduction/Pause
Stop
Stop
Passa al menù principale
Go to the main menu
Mute
Mute
Menù principale DVD
DVD Main Menu
Frecce per spostamento sul menù
Direction Keys moving within DVD-Menu
Informazioni sulla riproduzione
Reproduction-Information
Menù di SETUP (Vedi pag 8 )
SETUP-Menu (See page 8)
Cattura immagine su schermo
Capture picture on screen
Ripetizione traccia/capitolo/disco
Repeat Traccia/chapter/Disk
DISC USB SD CARD
DISP
DVD
SETUP
REP.
MENU

9
IT/GB
SETUP SISTEMA
TASSO VISUAL Formati di visualizzazione 4:3 PAN SCAN – 4:3 LETTER BOX – 16:9
PASSWORD Immette password per limitare la visione ai minori
RAPPORTO Livello di sicurezza attivo solo con password
DI FABBRICA Ripristina le impostazioni di fabbrica
SETUP LINGUA
LINGUA OSD Sceglie la lingua del menù di SETUP
LINGUA AUDIO Sceglie la lingua principale del film DVD
LIN. SUBTITOL Sceglie la lingua dei sottotitoli (se presenti) del film DVD
LINGUA MENU Sceglie la lingua del menù del film DVD
SETUP VIDEO
BRIGHTNESS Luminosità
CONTRAST Contrasto
HUE Tinta
SATURATION Saturazione
SHARPNESS Nitidezza
SETUP ALTOPARLANTI
MODO MISTO Miscelazione dei canali audio LT/RT – STERO – VSS
FRONTE Dimensione altoparlanti installati: MODE 1 piccoli – MODE 2 grandi
SETUP DIGITALE (DOLBY)
MODO OP Seleziona USCITA LINEA o RF RIMOD
GAMMA DINAMICA Regola la gamma dinamica del suono da FULL a OFF
SIN. + DES. Seleziona STEREO – MONO - MISTO
MENU’ DI SETUP DVD
Per muoversi all’interno del menù premere e muoversi con
OK

10
IT/GB
SYSTEM-SETUP
TASSO VISUAL Formats 4:3 PAN SCAN – 4:3 LETTER BOX – 16:9
PASSWORD Set password to limit viewing by children
RAPPORTO Viewing-Limit activates only in the presence of a password
DI FABBRICA Resume the Manufacturer’s Setup
LANGUAGE-SETUP
OSD-Language Select language for SETUP-Menu
AUDIO-Language Select main language for DVD-film
Subtitle-Language Select language for Subtitles (if available) of DVD-film
MENU-Language Select language of MENU for DVD-film
VIDEO-SETUP
BRIGHTNESS Brightness
CONTRAST Contrast
HUE Colour-Tone
SATURATION Saturation
SHARPNESS Sharpness
SPEAKERS-SETUP
MIXED MODE Mixing the Audio-channels LT/RT – STERO – VSS
FRONT Dimensions of installed speakers: MODE 1 small – MODE 2 large
DIGITAL SETUP (DOLBY)
MODE OP SELECT RANGE-EXIT or RF RIMOD
DINAMIC RANGE Set dynamic range of the Sound from FULL to OFF
LEFT + RIGHT Select STEREO – MONO - MIXED
SETUP DVD MENU
To move within the Menu, first press then use keys
OK

11
IT/GB
RADIO
Memorizzare le stazioni tenendo premuto per 2 secondi il numero della posizione desiderata.
Le bande sono 3 in FM e 2 in AM e si possono memorizzare 6 stazioni per ogni banda.
Memorize Stations by keeping requested position-key pressed for 2 seconds.
3 FM-bands and 2 AM-bands available: 6 stations can be memorized on each Band.
Seleziona Bande Radio
Select Radio-Band
Ricerca automatica
Automatic Research
Seleziona LOC/DX
Select LOC/DX
Ricerca manuale indietro
Manual Research Backwards
Ricerca manuale avanti
Manual Research Forward
Ricerca automatica indietro
Automatic Research Backwards
Ricerca automatica avanti
Automatic Research Forward
Informazioni traffico
Traffic-Information
Ricerca Stazioni in base
al programma musicale
Research Station per
Muscial Programme
Stazioni regionali
Regional Stations
RADIO
BAND
AST
LOC
SEEK-
SEEK+
AF
TA
REG
PTY

12
IT/GB
NAVIGAZIONE / SINTONIZZATORE TV / I-POD • NAVIGATION / TV-TUNER / IPOD
Accede al programma di navigazione I-GO (mappa opzionale NV992). Per l’utilizzo vedi istruzioni allegate alla mappa.
Per mantenere l’audio di una sorgente durante la riproduzione tenere premuto per 2 sec. la manopola del volume
Enter I-GO Navigation-programme (maps Optional NV992). Maps include related User-Instructions.
To maintain the source-Audio during reproduction, keep Volume-Knob pressed for 2 seconds.
Collegando Il sintonizzatore DVB-T VM208 (opzionale) si accede alla televisione digitale-terrestre.
Per l’utilizzo vedi istruzioni del sintonizzatore TV.
By connecting the DVB-T-Tuner VM208 (Optional), Digital-Earth-TV will appear.
Please read the TV-Tuner User-Instructions
Supporta I-pod e I-phone (2G/3G/3GS). Collegando il dispositivo inizia la riproduzione dalla prima playlist.
Sullo schermo Vengono visualizzati titolo del brano, album e artista.
Supports I-pod and I-phone (2G/3G/3GS). By connecting the device, reproduction will start from the first Playlist.
Display will show: Track-title, Album and Artist.
DVB-T
GPS
i-POD
Riproduce solo audio
Reproduce Audio only
VIDEO
Traccia successiva
Next Track
Avvia/Ferma riproduzione
Start/Stop reproduction
Traccia precedente
Previous Track

13
IT/GB
BLUETOOTH
AUTO ANSWER ON/OFF
Risposta automatica
Automatic Answer
PHONE CONNECT ON/OFF
Connessione automatica
Automatic connection
PHONE PAIRING
Accoppiamento telefono
Pairing phone
AUDIO PAIRING
Accoppiamento audio
Pairing Audio-device
PIN CODE 0000
Codice di sicurezza
Security code
RUBRICA CELLULARE
PHONE-DIRECTORY
RUBRICA SIM
SIM-DIRECTORY
CHIAMATE EFFETTUATE
EFFECTED CALLS
CHIAMATE RICEVUTE
RECEIVED CALLS
CHIAMATE PERSE
LOST CALLS
Ascolto della musica via bluetooth con telefoni AD2P
Music-Listening via Bluetooth with AD2P-phones
Premere i tasti fino a far comparire la scritta “AUDIO/PHONE PAIRING WAITING”. Dal proprio cellulare effettuare la connessione digitando la password 0000.
Keep keys pressed, until the indications “AUDIO/PHONE PAIRING WAITING” will appear. On your mobile-phone, effect the connection by digiting the password 0000.
Trasferimento
Transfer
TRANS
Bluetooth
Tastiera telefonica
Telephone keypad
Invia/Risponde
Send/Responds
Chiude/Rifiuta
Closes/Reject
Cancella
Cancel
C

14
IT/GB
INGRESSI AUDIO/VIDEO • AUDIO/VIDEO-INPUTS
Visualizza una sorgente esterna
collegata al jack frontale A/V
Visualize an external source connected
with the front A/V-jack.
Visualizza una sorgente esterna
collegata alle prese RCA A/V posteriori
Visualize an external source connected
with the rear A/V-RCA-sockets.
Espelle il disco presente all’interno
dell’unità
Expel Disk from the device.
Diminuisce l’intensità
della luminosità dello schermo
Reduce intensity of Screen-Brightness
Chiude il pannello frontale
Shut Front-panel
EJECT
DIMM 1
CLOSE TFT
AV IN 1
AV IN 2

15
IT/GB
IMPOSTAZIONI DI SISTEMA • SYSTEM SETUP
La regolazione dell’ascolto avviene premendo FRONT per spostare l’ascolto davanti,
REAR per spostarlo dietro, R per spostarlo a destra e L per spostarlo a sinistra.
La regolazione dei toni alti (TRE), bassi (BASS), volume subwoofer (SUB WF VOL),
crossover subwoofer (SUB WF), avviene tramite
Select listening-position: press FRONT for listening in front;
REAR for the back; R for right and L for left.
Setting of high tones (TRE), bass (BASS), subwoofer-volume (SUB WF VOL),
subwoofer-crossover(SUB WF), carried out with these keys:
Regolazioni: schermo, audio, orologio, sfondo, salvaschermo, angolazione schermo, area frequenze radio, sensibilità sintonizzatore
radio, equalizzatore, volume annuncio sul traffico (TA), ripristino impostazioni iniziali.
Settings : screen, audio, time, background, screen-saver, screen-angle, radio frequency-area
Radio-Tuner Sensitivity (local), equalizer, volume for traffic announcements (TA), re-establish Factory setup.
Regola contrasto (CONT), tinta (TINT), colore (COLR), luminosità (BRIG)
Set contrast (CONT), tint (TINT), colour (COLR), brightness (BRIG).
Regola ascolto anteriore/posteriore, destra/sinistra, acuti, bassi, volume e crossover subwoofer
Attiva funzione X-Bass enfatizzazione sulle basse frequenze
Set listening front/rear, right/left, acute, bass, volume and subwoofer-crossover.
Activate X-Bass-function to boost low frequencies.
SYSTEM
SCREEN
SOUND

16
IT/GB
Regolazione orologio
Setting the Clock
La regolazione dell’orologio avviene tramite la pressione delle frecce (HOUR) per l’ora e
(MIN) per i minuti. Premere MODE per selezionare la modalità 24/12 ore.
To set the Clock, press the arrow-keys: (HOUR) for the hours, (MIN) for the minutes. Press
MODE, to select 24/12 hours-mode.
Imposta sfondo menù e salvaschermo con immagini catturate da schermo.
Set Menu-Background and Screen-Saver-picture, using photos captured from screen.
SOURCE Cartella immagini
Per catturare le immagini premere nel menù DVD/USB/SD il tasto
Ad ogni pressione verrà memorizzata l’immagine nel riquadro SOURCE.
Per cancellare le immagini premere
DEL
e confermare con DELETE.
SOURCE Picture-Folder
To capture pictures, press in the DVD/USB/SD-Menu.
Every time you press this key, a picture will be memorized in the SOURCE-box.
To cancel the pictures, press
DEL
and confirm pressing DELETE.
SAVER Cartella salvaschermo
Per spostare le immagini nel riquadro SAVER premere il tasto ADD. Tutte le immagini trasferite verranno mostrate a rotazione quando non si usa il touch
screen secondo il tempo impostato in SAVER TIME. Per eliminare una immagine e premere
DEL
Sfondo menu principale Selezionare una immagine da SOURCE e premere il tasto DESKTOP
SAVER Screen-Saver-Folder.
To move pictures into the SAVER-box, press ADD.
All transferred pictures will be shown in circle, when Touch-Screen is idling during the time-period set in SAVER TIME. To delete pictures, press
DEL
MAIN-MENU BACKGROUND Select picture from SOURCE and press DESKTOP-key.
IMPOSTAZIONI DI SISTEMA • SYSTEM SETUP
CLOCK
SAVER

17
IT/GB
Imposta angolazione schermo, sintonizzatore radio, equalizzatore e volume TA.
Set Screen-angle, Radio-Tuner, Equalizer and TA-Volume.
TFT ANGLE Regola l’angolazione dello schermo tramite....................................Set Screen-angle with UP/DOWN/OUT/IN
UP/DOWN/OUT/IN UP/DOWN/OUT/IN
AREA Seleziona il continente di appartenenza..........................................Select related Continent
LOC Seleziona la sensibilità di ricezione per stazioni locali ...................Select Reception-Sensitivity for local stations
(LOCAL) o distanti (DX) (LOCAL) or distant stations (DX).
EQ Equalizzatore pre-impostato per i seguenti generi musicali: ..........Equalizer is pre-set for the following musical types :
POP/CLASSIC/ROCK/JAZZ POP/CLASSIC/ROCK/JAZZ
USER: Impostazioni regolabili da SOUND USER Setups, variable through SOUND-function.
TA VOL Regola il volume dell’annuncio sul traffico ......................................Set Volume of Traffic Announcements.
Ripristina le impostazsioni di fabbrica.
Re-establish Factory Setup.
DEF
OTHERS
IMPOSTAZIONI DI SISTEMA

18
FR/D
CONNEXIONS • ANSCHLÜSSE
IEntrée antenne GPS
Entrée DVB-T (optionnel)
Ne pas brancher
Entrée Dimmer +12V
Ne pas brancher
Câble frein de stationnement
Allumage antenne électrique
Allumage amplificateur
Masse
+12V après contact
+12V permanent
Eingang GPS-Antenne
Eingang DVB-T (Optional)
NICHT anschließen
Eingang Dimmer +12V
NICHT anschließen
Handbrems-Kabel
Elektro-Antenne Einschalten
Verstärker Einschalten
Masse
+12V Zündplus
+12V permanent
1 2 3
GPS-ANT
DVB-T
SR-1
ILL
SR-GND
BRAKE
AUTO ANT
AMP
GND
ACC
BATT
BLACK
PINK
BLUE
BLUE-WHITE
BLACK
WHITE
RED
YELLOW
ORANGE
1

19
FR/D
CONNEXIONS • ANSCHLÜSSE
YELLOW
YELLOW FUSE
Alimentation en cas de branchement avec amplificateur pas original
Stromanschluss für nicht-Original-Verstärker.
Branchements avec amplificateur original.
Anschlüsse für Original-Verstärker
Dans le cas où l’alimentation presente
dans l’emplacement autoradio ne soit pas
suffisante, brancher le câble jaune directe-
ment à la batterie.
Sollte der im Radioschacht verfügbare
Strom unzureichend sein, gelbes Kabel
direkt an der Batterie anschließen.
PRE-OUT RADIO
POWER
AMPLIFIER
4X60 WATT
AUTO ANT
BLUE
ISO
POWER
4 SPEAKERS
AMP REM
AUTO ANT
BLUE-WHITE
BLU
ISO
POWER
1

20
FR/D
+ 12V lumière de marche
arrière pour caméra de recul
Entrée microphone bluetooth
Entrée audio gauche
Entrée audio droit
Entrée caméra de recul
Entrée Vidéo
Sortie vidéo
Sortie Subwoofer
SORTIES AMPLIFICATEURS
Antérieure gauche
Antérieure droite
Postérieure gauche
Postérieure droite
+12V Rückfahr-Licht
für Rückfahr-Kamera
Eingang für Bluetooth-Mikrofon
Eingang Audio Links
Eingang Audio Rechts
Eingang Rückfahr-Kamera
Video-Eingang
Video-Ausgang
Subwoofer-Ausgang
AUSGÄNGE FÜR VERSTÄRKER
Front Links
Front Rechts
Heck Links
Heck Rechts
REVERSE
CONTROL
MIC IN
AUX LIN
AUX RIN
RV VIDEO
VIDEO IN
VIDEO OUT
SUB OUT
LF OUT
RF OUT
LR OUT
RR OUT
ORANGE
BLACK
WHITE
RED
GIALLO
GIALLO
GIALLO
BLACK
WHITE
WHITE
RED
RED
2
3
CONNESSIONI • CONNECTIONS
Connecteur I POD
Antenne radio de la voiture
I-pod Kabel
Fahrzeug-Radio-Antenne
IC2
AERIAL
Table of contents
Other Phonocar Receiver manuals

Phonocar
Phonocar VM115 User manual

Phonocar
Phonocar VM 038 User manual

Phonocar
Phonocar VM010 User manual

Phonocar
Phonocar VM 017 User manual

Phonocar
Phonocar Golf VII User manual

Phonocar
Phonocar VM103 User manual

Phonocar
Phonocar VM 044 User manual

Phonocar
Phonocar VM112D User manual

Phonocar
Phonocar VM 099 User manual

Phonocar
Phonocar VM 057 User manual

Phonocar
Phonocar VM111 User manual

Phonocar
Phonocar VM 030 User manual

Phonocar
Phonocar VM224 User manual

Phonocar
Phonocar VM 039 User manual

Phonocar
Phonocar vm 032 User manual

Phonocar
Phonocar VM 078 User manual

Phonocar
Phonocar VM 094 User manual

Phonocar
Phonocar VM 035 User manual

Phonocar
Phonocar VM 037 User manual

Phonocar
Phonocar VM116 User manual