PNI IP240 User manual

PNI IP240
Video surveillance IP camera/IP камера за видеонаблюдение/
Videoüberwachung IP-Kamera/Cámara IP de videovigilancia/Caméra
IP de vidéosurveillance/Videó megfigyelő IP kamera/Telecamera IP di
videosorveglianza/Videobewaking IP-camera/Kamera IP nadzoru wideo/
Camera supraveghere video cu IP
EN User manual ......................................................... 3
BG Ръководство за употреб а .............................. 14
DE Benutzerhandbuch .............................................. 25
ES Manual de usuario ............................................... 36
FR Manuel utilisateur ............................................... 47
HU Használati utasítás .............................................. 58
IT Manuale utente .................................................. 69
NL Handleiding ........................................................ 80
PL Instrukcja obsługi ............................................... 91
RO Manual de utilizare ............................................. 102


3User manual
English
Main features
• Connection modes: WiFi, LAN and AP
• Supports recording on micro SD card, max. 128GB (card not included)
• Two-way audio communication (built-in microphone and speaker)
• Outdoor mounting, protection class IP66, ABS housing
• 8 IR LEDs for night viewing up to 20 m and 8 white LEDs
• Supports P2P connection for remote monitoring
• The camera can be controlled remotely through the CamHi application
(Android/iOS) and through the HiP2P application (Windows PC)
• PTZ control from the dedicated application
What’s in the box
• Surveillance camera
• WiFi antennas
• 230V - 12V/2A power adapter
• Ethernet cable (1 m)
• CD software
Connectors
• 12V power connector - insert the power adapter included in the package
(230V - 12V/2A)
• RJ45 connector - insert the Ethernet cable included in the package to
connect the camera to the router

User manual 4
English
Camera installation and connection
1. Install the WiFi antennas on the camera
2. Install the micro SD card (max. 128GB) in the camera. Note: The micro
SD card is not included in the package.
3. Connect the power adapter to the camera and to a 230V outlet.
Note: Use the power adapter included in the package (12V/2A).
Note:To resetthecamera,holddowntheResetbuttonuntilyouhearaconfirmation
sound.
Quick setup - Add the camera to the application
The camera will start in AP mode when connected to the power supply. You
can connect directly to the camera via AP mode (Acces Point).
On your smartphone, search for the WiFi network created by the camera:
“IPCAM-121221” (example of network).
• Connect to this WiFi network. WiFi password is: “01234567”
• You must keep connected to this WiFi network to continue.
• From the CamHi application, click on “+ Add camera”
• In the next menu click on “Search camera from LAN”
• As a result of the search, the UID and IP of your camera will appear on

5User manual
English
the screen
• Click on the result (change the name of the camera, if you wish) and
confirm from the top right corner.
• The camera will appear online in the application.
• Continue setting up the camera, the procedure described on page 7
“Connect the camera to the WiFi network”.
Configure and view the camera on the mobile phone
Note:
To add and configure the camera through the application, the
camera and the mobile phone must be connected to the same
router (the phone via WiFi to the 2.4 GHz network, and the
camera through the cable LAN cable, as described above).
The default username and password of the camera are admin.
Connect the network cable to the router and to the RJ45 connector of the
camera.
Warnings:
The router must be connected to the internet.
Check if the LAN port in the router where you will connect the camera has internet
access. Use a laptop or PC connected to this port. Green network indicator means
that the transmission of network data is normal.

User manual 6
English
Add the camera to the application
1. Download and install the CamHi app.
Android iOS
2. Open the application, create an account and log in.
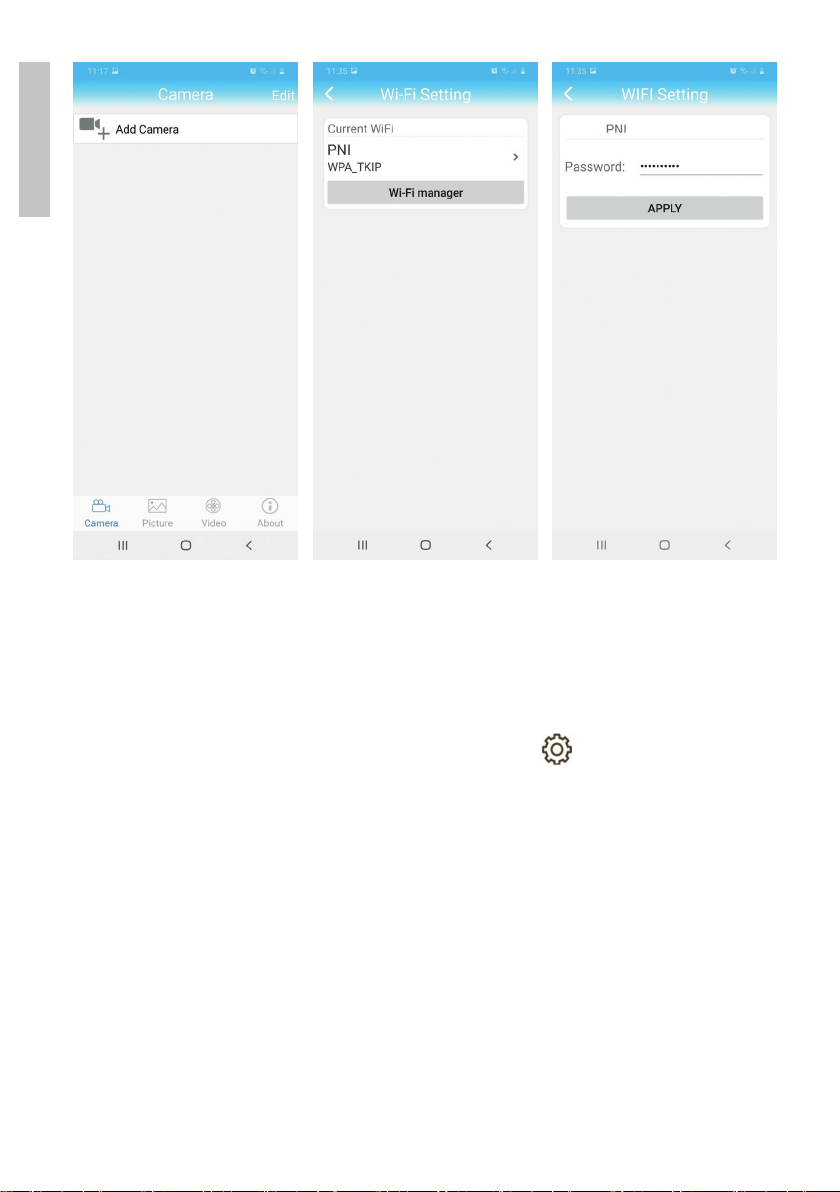
3. Click Add Camera
4. In the following interface, you have several options for adding the camera:
• Manually enter the camera UID, username and password (you can find
this data on the label pasted to the camera)
• Scan the QR code from the label pasted on the camera (Scan QR code,
add UID)
• Search the network for the camera (Search Camera from LAN)
Note: If the procedure Search camera from LAN fails, make sure you have
internet access on the LAN port where the camera is connected.
• After successfully adding the camera, tap the camera to view the images
taken by it in real time. Note: the status of the camera must be Online.

7User manual
English
Connect the camera to the WiFi network
1. Click on next to the camera you want to configure. Note: the status
of the camera must be Online.
2. From the settings menu, select Wi-Fi Setting.
3. Select the WiFi network to which you want to connect the camera and
enter its password.
Warning: Make sure this is a 2.4 GHz wireless network. If you also have a 5 GHz
network, contact your network administrator to check and separate the 2.4 GHz
wireless network from the 5 GHz wireless network.

User manual 8
English
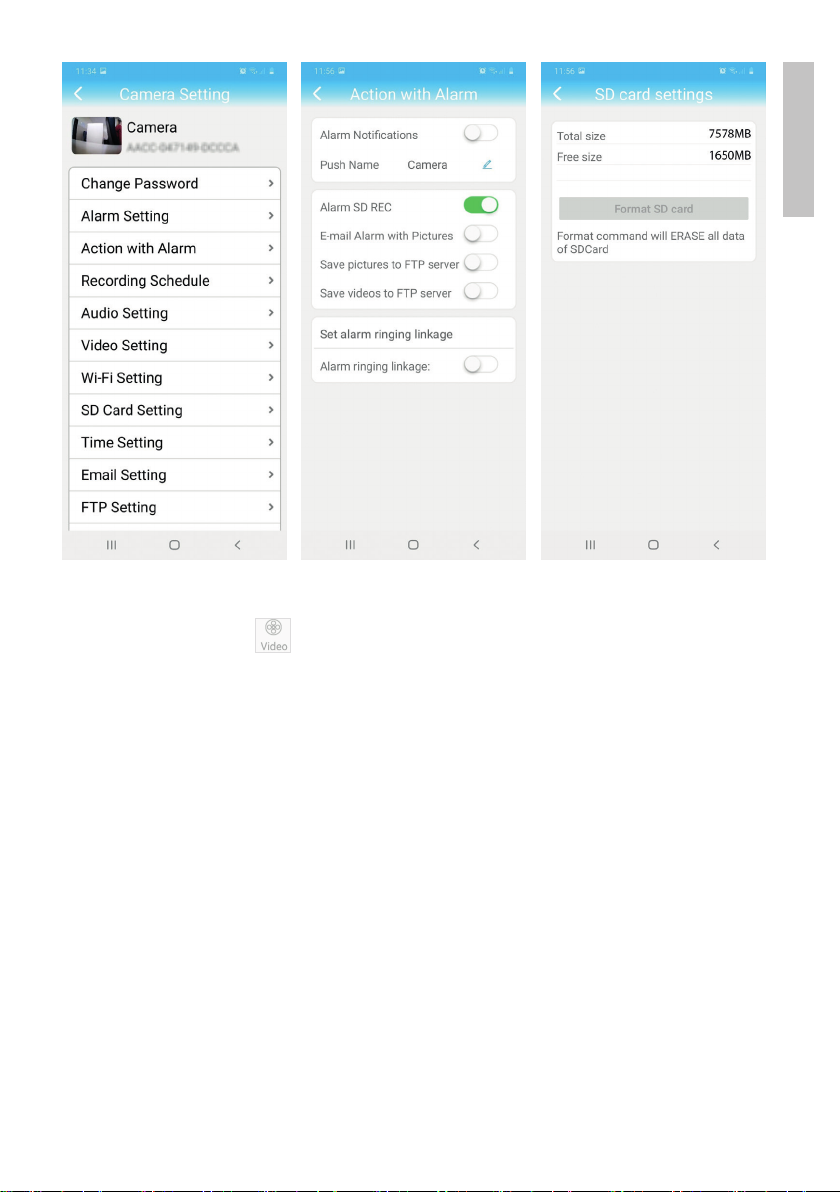
Setup recording on micro SD card
1. Install in the camera a micro SD card (max. 128GB). The card installation
location is shown on page 4.
2. Open the mobile application, click on the icon next to the camera
you want to configure. Note: the status of the camera must be Online.
3. From the settings menu, select Action with alarm.
4. Activate the option Alarm SD REC.
5. Return to the main menu and select the option SD Card setting to check
the space available on the card.
6. Make sure that in the menu Recording Schedule the option Enable
Record is checked.
Note: When you use a small capacity micro SD card, we recommend activating
the recording at motion detection. To do this, access the menu Alarm Setting -
Motion Detection.

9User manual
English
7. To view the recordings on the micro SD card installed in the camera, press
the video option from the bottom of the main application interface.
Select the camera and the file you want to play or download.
Note: Detailed instructions about the CamHi application can be found on the CD
included in the package and on the camera’s website.
Configure and view the camera on your computer
Your camera can be accessed from your computer in two ways: through the
Internet Explorer browser or through the HiP2P application.
Access the camera via Internet Explorer
1. Install the Search Tool application (the installation file can be found on
the CD included in the package)
2. Connect your computer and camera to the same router.

User manual 10
English
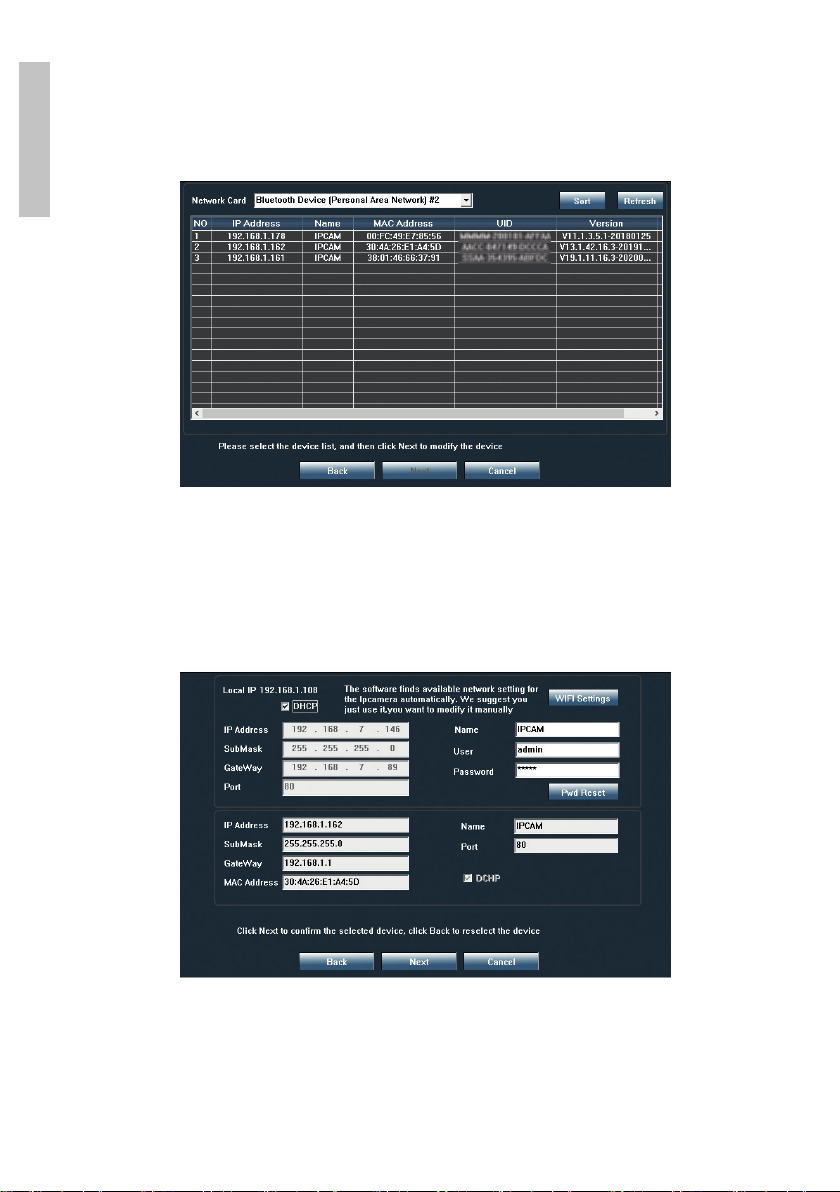
3. Open the Search Tool application and click on the Refresh button to find
all the cameras on the network.
4. From the displayed list, identify your camera by UID .
5. Click the Next button to configure the network parameters. You can
enter the network parameters manually or check the DHCP option.
Click Next.
6. Open Internet Explorer and add your camera’s IP address to the address
bar or return to the camera list in the Serach Tool application and
double-click the camera you want to view. Internet Explorer will open
automatically.

11 User manual
English
7. From Internet Explorer you can view live images taken by the camera,
you can play the recordings saved on the micro SD card installed in the
camera and you can make various settings related to network, video,
audio and alarm.
Note: You can only access the camera in Internet Explorer if you are on the same
network as the camera. If you want to access the camera from your computer, but
from another network, install the HiP2P application.

User manual 12
English
Access the camera through the HiP2P application
(Windows)
1. Install the HiP2P application on your computer (the installation file can
be found on the CD included in the package)
2. Open the application, access the Config menu, select or add a new area
(Add Area) and add the camera via UID (Input UID) .
Note: Detailed instructions on the HiP2P application can be found on the CD
included in the package and on the camera’s website.
Technical specifications
Sensor 1/2.9” F23
Sensor resolution 2MP
Registration resolution 1920 x 1080/1-30 fps
Video compression H.264
LUX Colour: 0.1Lux @(F1.2,AGC ON); 0 Lux with
IR, White/Black 0.01 Lux @ (F1.2,AGC ON),0
Lux with IR
Audio compression AMR/G.711A

13 User manual
English
Lens 3.6mm @ F1.8
Viewing angle 80°
Ethernet 10/100 Mbps RJ45
Wireless standard IEEE802.11b/g/n
Frequency 2.4GHz
Transmission power 100mW
Network protocol TCP/IP,HTTP,ONVIF,SMTP,DHCP,DNS,P2P
IR LEDs 8 x IR LED + 8 x white LED
IR range Up to 20 m
Motion detection Yes
SD card slot Micro SD, max. 128GB
P2P connection Yes
Dedicated application CamHi (Adroid/iOS)
Supply voltage 12V/2A
Dimensions 150 x 140 x 80 mm
Waterproof class IP66
Housing ABS
Working temperature -26°C ~ +80°C

Ръководство за употреба
Български
14
Основните функции
• Режими на връзка: WiFi, LAN и AP
• Поддържа запис на micro SD карта, макс. 128GB (картата не е
включена)
• Двупосочна аудио комуникация (вграден микрофон и
високоговорител)
• Външен монтаж, клас на защита IP66, корпус от ABS
• 8 инфрачервени светодиода за нощно гледане до 20 м и 8 бели
светодиода
• Поддържа P2P връзка за отдалечен мониторинг
• Камерата може да се управлява дистанционно чрез приложението
CamHi (Android/iOS) и чрез приложението HiP2P (компютър с
Windows)
• PTZ управление от специално приложение
Какво има в кутията
• Камера за видеонаблюдение
• WiFi антени
• 230V - 12V/2A захранващ адаптер
• Ethernet кабел (1 м)
• CD софтуер
Съединители
• 12V захранващ конектор - поставете захранващия адаптер,
включен в пакета (230V - 12V/2A)
• Конектор RJ45 - поставете включения в пакета Ethernet кабел, за
да свържете камерата към рутера

Ръководство за употреба
Български
15
Инсталиране и свързване на камера
1. Инсталирайте WiFi антените на камерата.
2. Поставете micro SD картата (макс. 128GB) във фотоапарата.
Забележка: Micro SD картата не е включена в пакета.
3. Свържете захранващия адаптер към камерата и към 230V
контакт.
Забележка: Използвайте захранващия адаптер, включен в пакета
(12V/2A).
Забележка: За да нулирате камерата, задръжте бутона Reset, докато
не чуете звук за потвърждение.
Бърза настройка - Добавете камерата към
приложението
Камерата ще стартира в режим AP, когато е свързана към
захранването. Можете да се свържете директно към камерата чрез
режим AP (Acces Point).
На вашия смартфон потърсете WiFi мрежата, създадена от камерата:
„IPCAM-121221“ (пример за мрежа)

Ръководство за употреба
Български
16
• Свържете се с тази WiFi мрежа. Паролата за WiFi е: „01234567“
• Трябва да поддържате връзка с тази WiFi мрежа, за да
продължите.
• От приложението CamHi кликнете върху „+ Добавяне на камера“
• В следващото меню кликнете върху „Търсене на камера от LAN“
• В резултат на търсенето UID и IP на вашата камера ще се появят
на екрана
• Кликнете върху резултата (променете името на камерата, ако
желаете) и потвърдете от горния десен ъгъл.
• Камерата ще се появи онлайн в приложението.
• Продължете настройването на камерата, „Свържете камерата
към WiFi мрежата“.
Конфигурирайте и прегледайте камерата на
мобилния телефон
Забележка:
За да добавите и конфигурирате камерата чрез приложението,
камерата и мобилният телефон трябва да бъдат свързани към
един и същ рутер (телефонът чрез WiFi към мрежата от 2,4 GHz, а
камерата чрез кабелния LAN кабел, както е описано по -горе).
По подразбиране потребителското име и паролата на камерата са
администратор.
Свържете мрежовия кабел към рутера и към конектора RJ45 на
камерата.
Предупреждения:
Рутерът трябва да е свързан с интернет.
Проверете дали LAN портът на рутера, към който ще свържете
камерата, има достъп до интернет. Използвайте лаптоп или
компютър, свързан към този порт. Зеленият индикатор на мрежата
означава, че предаването на мрежови данни е нормално.

Ръководство за употреба
Български
17
Добавете камерата към приложението
1. Изтеглете и инсталирайте приложението CamHi.
Android iOS
2. Отворете приложението, създайте акаунт и влезте.
3. Натиснете Add camera
4. В следния интерфейс имате няколко опции за добавяне на
камерата:
• Въведете ръчно камерата UID, username и password (намерете
тези данни на етикета, залепен към камерата). Потребителското
име и паролата по подразбиране са admin.
• Сканирайте QR кода върху етикета, поставен върху камерата
(Scan QR code, add UID)
5. След като успешно сте добавили камерата, изберете я от
списъка с устройства, добавени към приложението, за да видите
изображенията, направени от нея в реално време.
Забележка: Състоянието на камерата трябва да е Онлайн. Ако
състоянието е Офлайн, влезте в режима за разширена конфигурация
на следващата страница.

Ръководство за употреба
Български
18
Свържете камерата към WiFi мрежата
1. Кликнете върху до камерата, която искате да конфигурирате.
Забележка: състоянието на камерата трябва да бъде Online.
2. От менюто с настройки изберете Wi-Fi Seng.
3. Изберете WiFi мрежата, към която искате да свържете камерата,
и въведете нейната парола.
Внимание: Уверете се, че това е безжична мрежа от 2,4 GHz. Ако
имате и 5 GHz мрежа, свържете се с мрежовия си администратор,
за да проверите и отделите безжичната мрежа 2,4 GHz от 5 GHz
безжичната мрежа.

Ръководство за употреба
Български
19
Настройте записа на micro SD карта
4. Инсталирайте във фотоапарата микро SD карта (макс. 128GB).
5. Отворете мобилното приложение, щракнете върху иконата
до камерата, която искате да конфигурирате. Забележка:
състоянието на камерата трябва да бъде Online.
6. От менюто с настройки изберете Acon with alarm.
7. Активирайте опцията Alarm SD REC.
8. Върнете се в главното меню и изберете опцията Настройка на SD
карта, за да проверите наличното място на картата.
9. Уверете се, че в менюто Recording Schedule опцията Enable
Record се активира.
Забележка: Когато използвате микро SD карта с малък капацитет,
препоръчваме да активирате записа при откриване на движение. За
да направите това, влезте в менюто Alarm Seng - Moon Detecon.

Ръководство за употреба
Български
20
10. За да видите записите на микро SD картата, инсталирана във
фотоапарата, натиснете опцията за видео от долната част
на основния интерфейс на приложението. Изберете камерата и
файла, който искате да възпроизведете или изтеглите.
Забележка: Подробни инструкции за приложението CamHi можете
да намерите на компактдиска, включен в пакета, и на уебсайта на
камерата.
Достъп до камерата от вашия компютър
Камерата ви може да бъде достъпна от компютъра ви по два начина:
чрез браузъра Internet Explorer или чрез специално приложение за
Windows HiP2P Client.
Достъп до камерата чрез Internet Explorer
1. Инсталирайте Search Tool приложение (инсталационният
This manual suits for next models
1
Table of contents
Languages:
Other PNI Security Camera manuals
Popular Security Camera manuals by other brands

Security Camera King
Security Camera King CVIOD-EL2MPIR50 user manual

Swann
Swann SWPRO-1080FLB instruction manual

Novus
Novus NVIP-2DN2101V/IR-1P user manual

Panasonic
Panasonic BB-HNP15 Important information

Asante
Asante SecureNet Voyager II Specifications

Ningbo UTEC Electric
Ningbo UTEC Electric 6324W-CAM manual

Cantonk
Cantonk KIR-2421K20 user guide

OPTICOM
OPTICOM LPC-3430 datasheet

Axis
Axis P1405-E installation guide

Digital Watchdog
Digital Watchdog Star-Light Plus Universal HD over Coax... user manual

EverFocus
EverFocus H.265 VANGUARD II Series Quick installation guide

A1 Security Cameras
A1 Security Cameras AXIS Q35 Series user manual