PNI PT949S User manual

PNI PT949S 1080P
Outdoor Wifi Solar camera
H264 MicroSD slot Night vision
Tuya app P2P
Quick Start Guide / Ghid rapid de congurare
EN User manual ............................................. 2
RO Manual de utilizare ................................... 9

EN
2
1. ABOUT PNI PT949S 1080P CAMERA
Product introduction and main features:
PNI PT949S product is a 2MP IP camera intended for video/audio surveillance and remote monitoring
of desired outdoor locations. It connects to the Internet by Wireless in order to remotely transmit realtime
video to dedicated app on your smartphone anytime and anywhere. It can save surveillance videos on
local microSD card. The camera is wire free because it is solar and rechargeable battery powered. It also
supports alarm functions such as smartphone notications push and much more other functions.
● High denition recording ● Wire free
● Schedule Recording ● Solar panel + 4 Batteries power supply
● PIR Motion detection Recording ● Wireless conection
● Motion detection alarm push notication ● MicroSD TF card slot max 64 GB ( not included)
● Tuya Smart iOS & Android App ● Infrared Night Vision
● Two way audio communication ● Cloud storage ( optional for monthly fee)
2. CAMERA INSTALLATION
Important conditions:
- Connect internal rechargeable battery and power on camera. You can use power adapter from package to
recharge batteries, if they are empty and camera does not start.
- First configuration of camera should be made with camera close to the Internet source / Router device;
- If you need local recording, install a maximum 64GB TF microSD card ( sold separately) in camera’s side
card socket.
Search for “Tuya Smart” app for iOS/Android Smartphones in App Store/Google Play store, or
scan the below QR code to download and install dedicated app:
3. REGISTER / LOG IN WITH EXISTING ACCOUNT
3.1 Register
If you don not have a Tuya App account yet, you can register an account or log in via personal e-mail
or personal phone number using a verication code procedure. Please read and follow next steps for the
description of registration process:

EN
3
3.2 Register
If you have already registered an account, you can skip the creating a new account,click “Log in with
existing account”, enter the log in page.
(1) The system automatically select the current Country/Region, or you can manually select the Country/
Region.
(2) Enter your registered e-mail address or mobile number enter your password to log in the system.
If your phone has installed WeChat App or QQ App, click WeChat/QQ icon in the log in with social media
acount area. After accessing the authorization page, and lled in received code from your e-mail/phone log in
the system.

EN
4
4. ADD DEVICE
4.1 Product description
USB Interface: The battery of the equipment is charged through the USB interface. When connected to USB
the camera will be automatically turned on.
Reset / Power Button
Power On camera: Press power button briey for 1 second to wake up device from stand-by.
Power Off camera: Press and hold power button for 3 seconds to send camera to stand-by. Camera will
conrm with a sound.
Battery Compartment: It ts a 4 pcs 18650 battery pack that once connected power the device.
MICROPHONE: Used to collect ambient sound and audio two-way communication
Speaker: Used to send a vocal message nearby camera and for audio two-way communication
IR LED: 8 IR Leds for night illumination
HD Lens: Lens of camera
Solar panel: Solar panel permanently charge the battery ( Sunny day)
PIR sensor: PIR detection is used for much more accurate detection of warm objects, human, animans.
TF Card Slot: used to insert a Micro SD card ( transash) maximum 64 GB for video and image storage .
Indicator Lights:
Red light allways On - Network connection failed
Blue light allways On - Device is connected to network and working
Light Sensor/Photoresistor: Helps for image brightness adjustments when night falls and in darkess areas;

EN
5
Switch camera to pairing mode
Press and hold reset button for 8 seconds to reset camera to default settings. Camera wil conrm enter
pairing mode with blue led blinking and a vocal message: “The camera is now ready to begin pairing”
Reset camera
In standby mode, press and hold the reset button until you hear the voice prompt: Reset successfully.
4.2 QR code net-pairing (Recommended)
The product only support 2.4GHz Wi-Fi network. It does not support 5GHz Wi-Fi network. Before
conguring Wi-Fi, please check and conrm you have a 2.4 GHz network, and activate GPS Location on
your phone. The Wi-Fi password should not contain special characters of ~!@#$%^&*(). When conguring
Wi-Fi, make sure your router, mobile and device are as close as possible for a quick conguration of the
device.
Connect smartphone to this Wi-Fi 2.4 GHz router with internet access. Activate GPS location from phone.
If any of this condition are not met conguration will fail.
● App supports QR code net-pairing and Wi-Fi connection. You can choose to add device by other options.
● Power On the camera, and start “Pairing mode“ following described procedure
● With mobile phone connected to Wi-Fi, click “Add Device” or “+“ icon (gure 1) on the Home screen of the
App, select “Security & Sensor”(gure 2)→ “Smart Camera”, click “next step” (gure 3).
Check WiFi Network name on screen and enter wireless password . Click “Conrm” to continue
(gure 4).
Figure 1 Figure 2
● Hold the mobile phone screen in the front of the camera (gure 5), the distance between the two should
be 15 to 20 cm. (gure 6) Try not to shake the mobile phone during the scanning.

EN
6
Figure 3 Figure 4 Figure 5
● When you hear a conrmation “ Beeeeeeeeeep”, click “Connect Internet”, and wait for connecting (gure
7).
● Device added successfully (gure 8), you can choose the device name and room scene.
Figure 6 Figure 7 Figure 8
5. FUNCTION DESCRIPTION
Real-time preview interface
1. Setting & Management
2. Wi-Fi signal strength

EN
7
3. Sound switch
4. SD/HD
5. Full screen
6. Screenshot
7. Voice chat
8. Record live view
9. Playback of video
10. PTZ control (The camera can be arbitrarily rotated
to give you a different perspective. You can move it up
and down, capture any corner you want to view)
11. Motion detection alarm (abnormal report notication
through intelligent detection of anomaly in home. You
can go out to work and play condently. To set the alarm
level according to the camera’s led of view can make
the alarm more accurate)
6. CLICK “ 1 “ IN THE UPPER RIGHT CORNER OF THE CONTROL PAGE FOR THE MANAGEMENT
AND SETTING OF THE DEVICE.
● Device Name - can modify the device name and device location;
● Device Information - to view: Device ID, Wi-Fi signal strength, IP address, Mac address, Device time zone.
● Tap-to-Run and Automation - View automations and scenaries created for this device
● Third Party Supported - Compatible smart services
● Basic Settings - Basic settings of camera
● Advanced Settings - Detection Alarm Settings - can set the motion detection switch, motion detection
alarm sensitivity and motion tracking function
● Storage settings - Shows microSD card informations, and settings for Local Recording mode.
● VAS - Value-added service : you can purchase separately video cloud storage service for this camera for
monthly fee (optional according to customer needs)
● Offline Notification - Activates an alarm is camera goes Offline
● Share Device - can share this device to other people, enter the people’s e-mail or mobile phone number;
(Note: the entered e-mail / mobile phone number should be registered with a Tuya App account).
● FAQ & Feedback - Questions and solutions for any problems with product behaviour.
● Firmware Information - Support OTA Remote Upgrade (Do not disconnect during upgrading).

EN
8
7. CLICK “ME” ON THE HOME SCREEEN OF TUYA APP FOR MORE SERVICES
1. Home Management
2. Message Center
3. FAQ & Feedback
4. More Services
- Free Services: IFTTT , Google Assistant, Alexa, etc;
- Value-added Services : you can check the purchasing record of purchased value-added services: Cloud
Storage for Cameras, AI Filtered Notications etc;
5. Settings and informations for your Tuya app account: Sound, Notications, Network, Cache
8. FREQUENTLY ASKED QUESTIONS
Q:Fail to add device during net-pairing?
A:Please make sure the mobile phone and device are connected to 2.4GHz router. Make sure the correct
Wi-Fi password is entered. Make shure you have activated GPS Location from your Phone.
Q:Still fail to add device after re-scanning?
A:If fail to add device, it is recommended to restart the device or power off the device, and try again.
Q: The device cannot preview?
A:Check for weak Wi-Fi signal. You can place the camera closer to the router. If it still doesn’t work, reset the
device, and add it again.
Q:Why the device is still on the list after resetting the device?
A:The device resetting only resets the camera’s network conguration and cannot change the conguration
on the App. You must log in the App to delete the camera from the list.
Q:How to connect the camera to another router?
A:First log in the App to delete and reset the device, and congure the device again through the App.
Q:Why the device cannot identify SD card?
A:It is recommended to power Off and On the device after inserting the SD card. Check if the SD card is
under normal service conditions and the format is FAT32. The App shall suggest “”could not nd SD card””
under unstable network of the mobile phone or the device.
Q:The device is online and has an alarm event, but the mobile phone cannot receive the information?

EN
9
A:First conrm that App allows notication in the settings of your mobile phone.
Under normal circumstances, when an anomaly is detected, a message will appear in the notication bar of
your mobile phone. You should set a notication sound or vibration in your mobile phone.
In addition, when viewing real-time video in the App you cannot receive alarm from the camera being viewed.
Because the device default function the camera being viewed indicating that the user is focusing on the
monitoring video, and there is no need for an alarm.
9. PRODUCT SPECIFICATIONS
Camera image sensor 1/2,7" CMOS
Application TUYA Smart / Smart Life
Video
High Denition 1920 x 1080
Video Compression Smart H.264
low illumination 0.1LUX
picture/video Capture Support
Lens
Illumination
Camera lens 3.1 MM xed lens
Lamp board 4 pcs IR Array LED - max 25 m
Audio Two-way Speech Support / G.711
Rcord
Record Mode Manual record, motion detection record, scheduled record, alarm rec
Video storage TF Card ( Max 64 Gb) / Cloud
Wake-up mode call button wake-up, PIR detection wake-up, mobile phone active wake
Alarm trigger Alarm recording, screen shot capture
General
Solar panel Yes
Rechargeable batteries 4 x 18650 pack included
Working Temperature –10°C to +50°C
Humidity 5%--95% non-condensing
Material ABS for outdoor use
Size / Weight 95 X 200 X 73 mm / 931 g
WIFI 802.11b/g/n
transmission mode P2P, Smart Cloud Server
WIFI connection Sweep QR code
Reset key Support
Power supply DC 5V 1A

RO
10
1. DESPRE CAMERA PNI PT949S 1080P
Introducere produs si caracteristici principale:
Produsul PNI PT949S este o camera IP de 2MP destinata supravegherii video / audio si monitorizarii de
la distanta a locatiilor exterioare dorite. Se conecteaza la Internet prin Wireless la un router de la acea locatie
pentru a transmite de la distanta videoclipuri in timp real catre aplicatia dedicata de pe telefonul smartphone
oricand si oriunde. Poate salva videoclipuri de supraveghere pe cardul microSD local( nu este inclus).
Camera nu are re, deoarece este alimentata cu energie solara si de la baterii reincarcabile. Suporta, de
asemenea, functii de alarma, cum ar noticarile push catre smartphone si multe altele.
● Inregistrare de inalta definitie ● Fara r
● Programarea inregistrarii ● panou solare + 4 acumulatori
● Inregistrare la detectie miscare PIR ● Conectare wireless
● Noticare push alarma la detectare a miscarii ● Slot pentru card MicroSD TF maxim 64 GB (nu
este inclus)
● Aplicatie Tuya Smart iOS si Android ● Vizionare nocturna cu infrarosu
● Comunicare audio bidirectionala ● Stocare in cloud (optional pentru taxa lunara)
2. INSTALARE CAMERA INSTALLATION
Conditii importante:
- Conectati bateria reincarcabila interna si porniti camera. Puteti utiliza cablul USB de alimentare din pachet
pentru a reincarca bateriile, daca acestea sunt descarcate si camera nu porneste.
- Prima congurare a camerei trebuie facuta cu camera aproape de sursa Internet / router;
- Daca aveti nevoie de inregistrare locala, instalati un card microSD TF de maximum 64 GB (vandut separat)
in slotul de card dedicat .
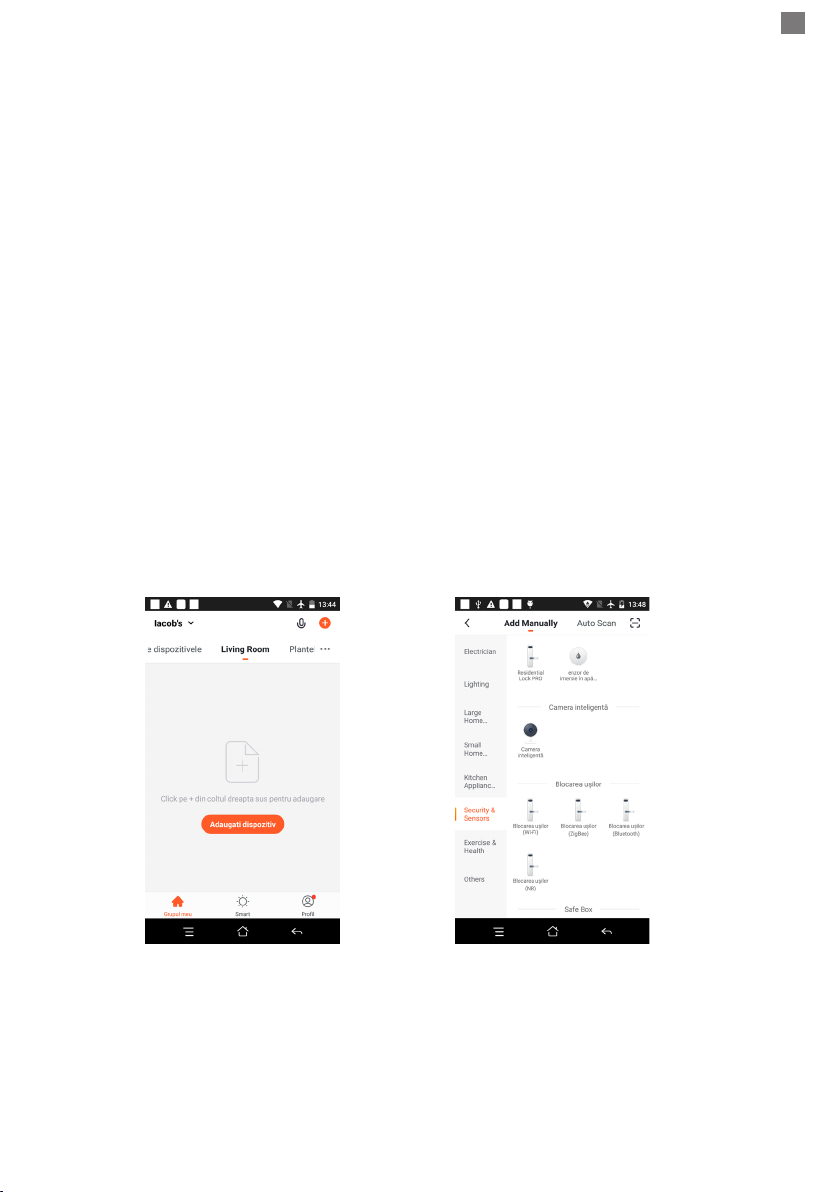
Cautati aplicatia „Tuya Smart” pentru smartphone iOS / Android in App Store / magazinul Google
Play sau scanati codul QR de mai jos pentru a descarca si instala aplicatia dedicata:
3. INREGISTRARE / CONECTATI-VA CU UN CONT EXISTENT
3.1 Inregistrare
Daca nu aveti inca un cont in aplicatia Tuya, puteti sa va inregistrati/creati un cont sau sa va autenticati
prin e-mail personal sau prin numarul de telefon personal, folosind o procedura cu cod de vericare. Cititi si
urmati pasii urmatori in care este descris procesul de inregistrare:

RO
11
3.2 Inregistrare
Daca aveti deja un cont in aplicatia Tuya, puteti sari peste crearea unui cont nou si faceti clic pe „Log in
with existing account” pentru a accesa pagina de autenticare.
(1) Sistemul selecteaza automat Tara / Regiunea curenta sau puteti selecta manual Tara / Regiunea.
(2) Introduceti adresa dvs. de e-mail inregistrata sau numarul mobil si o parola pentru a va autentica in
sistem.
Daca telefonul dvs. are instalata aplicatia WeChat sau QQ App, faceti clic pe pictograma WeChat / QQ in
zona de logare cu un cont de social media. Dupa ce ati accesat pagina de autorizare si ati completat codul
primit pe e-mail / telefon puteti sa accesati contul dumneavoastra.

RO
12
4. ADAUGARE DISPOZITIV
4.1 Descriere produs
USB Interface: Bateria echipamentului se poate incarca si prin interfata USB. Cand este conectata la USB,
camera va porni automat.
Reset / Power Switch
Pornire camera: apasati scurt butonul de alimentare pentru a porni dispozitivul din stand-by.
Oprire camera: Tineti apasat butonul de alimentare timp de 3 secunde pentru a trece camera in stand-by.
Camera va conrma cu un sunet.
Battery Compartment: Se monteaza 4 acumulatori 18650 cu folia de protectie scoasa, odata conectati
alimenteaza dispozitivul.
MIC: Folosit pentru a colecta sunet ambiental si comunicare audio bidirectionala
Speaker: Folosit pentru a trimite un mesaj vocal in apropierea camerei si pentru comunicarea audio
bidirectionala
IR LED: 8 leduri IR pentru vizualizare nocturna alb-negru
HD Lens: Lentilele camerei
Solar panel: Panoul solar incarca permanent bateria (in zilele insorite)
PIR: Detectarea PIR este utilizata pentru detectarea mult mai precisa a obiectelor calde: oameni, animale.
TF Card Slot: used to insert a Micro SD card (transash) maximum 64 GB for video and image storage .
Indicator Lights:
Lumina rosie intotdeauna aprinsa - conexiunea la retea a esuat
Lumina albastra intotdeauna aprinsa - Dispozitivul este conectat la retea si functioneaza

RO
13
Light Sensor/Photoresistor : Ajuta la reglarea luminozitatii imaginii cand cade noaptea si in zonele
intunecate;
Switch camera to pairing mode
Tineti apasat butonul de resetare timp de 8 secunde pentru a reseta camera la setarile implicite. Camera
va conrma intrarea in modul de asociere cu led albastru intermitent si un mesaj vocal: „Camera este acum
gata sa inceapa asocierea”
Reset camera
In modul stand-by tineti apasat butonul de resetare pana cand camera va conrma cu un mesaj vocal
resetarea la setarile implicite.
4.2 Procedura adaugare in aplicatie prin scanare QR code (Recommended)
Produsul accepta doar retele Wi-Fi de 2,4 GHz. Nu suporta retele Wi-Fi de 5 GHz. Inainte de a congura
camera pe Wi-Fi, va rugam sa activati Locatia GPS pe telefonul mobil si sa setati / vericati parametrii
routerului. Parola Wi-Fi nu trebuie sa contina caractere speciale de tipul: ~! @ # $% ^ & * (). Cand
congurati conexiunea Wi-Fi, asigurati-va ca routerul, telefonul mobil si camera sunt cat mai aproape posibil
pentru o congurare rapida a dispozitivelor.
Conectati smartphone-ul la routerul Wi-Fi de 2.4 GHz cu acces la internet. Activati locatia de la telefon,
pentru a continua.
● Aplicatia accepta configurare prin scanare cod QR. Puteti alege sa adaugati dispozitivul si prin alte optiuni.
● Porniti camera si in cateva clipe veti auzi mesajul vocal de imperechere (daca nu auziti nici un mesaj
va rugam sa apasati si sa mentineti apasat butonul „reset” timp de 5 secunde pentru a restabili camera la
setarile din fabrica).
● Cu telefonul mobil conectat la Wi-Fi, porniti aplicatia Tuya si faceti clic pe „Adaugati dispozitiv” sau
pictograma „+” (figura 1) pe ecranul principal al aplicatiei, selectati „Security & sensors” (figura 2) → „Smart
Camera”, faceti clic pe „Next step” (figura 3).
Vericati numele retelei WiFi pe ecran si introduceti parola fara r. Faceti clic pe „Conrmare” pentru a
continua (gura 4).
Figure 1 Figure 2
● Tineti ecranul telefonului mobil in fata camerei (figura 5); distanta dintre cele doua ar trebui sa fie intre 15 si
20 cm. (figura 6) Incercati sa nu miscati telefonul mobil in timpul scanarii.

RO
14
Figure 3 Figure 4 Figure 5
● Cand auziti sunetul de confirmare, faceti clic pe „Am auzit sunetul” si asteptati conectarea (figura 7).
● Dispozitiv adaugat cu succes (figura 8) daca puteti alege numele dispozitivului si numele camerei / locatiei.
Figure 6 Figure 7 Figure 8
5. DESCRIERE FUNCTII
Interfata de vizualizare in timp real
1. Setare si informatii
2. Putere semnal Wi-Fi
3. Activare difuzor

RO
15
4. SD/HD
5. Ecran complet
6. Captura de ecran
7. Activare microfon
8. Inregistrare video pe telefon
9. Redare inregistrari salvate
10. Stocare in Cloud
11. Alarma la detectie miscare (declanseaza o noticare
prin detectarea inteligenta a miscarii. Puteti pleca la munca,
iesi in oras sau pleca de acasa oricand cu incredere. Puteti
seta nivelul de alarma in functie de imaginea inregistrata de
camera pentru a face alarma mai precisa).
6. FACETI CLIC PE „1” IN COLTUL DIN DREAPTA SUS AL APLICATIEI PENTRU GESTIONAREA SI
SETAREA DISPOZITIVULUI.
● Device Name - poate modica numele dispozitivului si locatia dispozitivului;
● Device Information - pentru a vizualiza: ID dispozitiv, nivel semnal Wi-Fi, adresa IP, adresa MAC, fus orar.
● Tap-to-Run and Automation - Vizualizati automatizari si scenarii create pentru acest dispozitiv
● Third Party Supported - Servicii inteligente compatibile
● Basic Settings - Setari de baza ale camerei
● Advanced Settings - Detection Alarm Settings - puteti activa functia de detectie a miscarii, sensibilitatea
detectiei si functia de urmarire a miscarii
● Storage settings - Prezinta informatii despre cardul microSD si setari pentru modul de inregistrare locala.
● VAS - Serviciu cu valoare adaugata: puteti achizitiona separat serviciul de stocare video in cloud pentru
aceasta camera contra unei taxe lunare (optional si contracost in functie de nevoile clientilor)
● Offline Notification - Activeaza o alarma/notificare daca camera se deconecteaza
● Share Device - puteti partaja acest dispozitiv cu alte persoane; introduceti adresa de e-mail sau numarul
de telefon al persoanei; (Nota: adresa de e-mail / numarul de telefon introdus trebuie sa fie inregistrat cu un
cont Tuya App).
● FAQ & Feedback - Intrebari si solutii pentru orice situatie despre comportamentul produsului.
● Firmware Information - Asistenta actualizare firmware - OTA Remote Upgrade (Nu deconectati camera de
la curent si nu va deconectati de la camera in timpul actualizarii).

RO
16
7. FACETI CLIC PE „ME” PE ECRANUL PRINCIPAL AL APLICATIEI TUYA PENTRU MAI MULTE
SERVICII
1. Home Management - Management familii
2. Message Center - Centru de mesaje si noticari
3. FAQ & Feedback - Intrebari si Raspunsuri
4. More Services - Alte servicii
- Free Services ( Servicii gratuite): IFTTT , Google Assistant, Alexa, etc;
- Value-added Services :puteti verica posibilitatea achizitiei de serviciilor cu valoare adaugata (contracost):
stocare in cloud, noticari ltrate inteligent AI etc;
5. Setari si informatii pentru contul dvs. in aplicatia Tuya: Sound, Notications, Network, Cache
8. INTREBARI FRECVENTE
I: Nu ati reusit adaugarea dispozitivului in timpul procedurii de imperechere ?
R: Va rugam sa va asigurati ca telefonul mobil si dispozitivul sunt conectate la routerul de 2,4 GHz. Asigurati-
va ca parola Wi-Fi este introdusa corect.
I: Nu reusiti sa adaugati dispozitivul dupa re-scanare cod QR?
R: Daca nu reusiti adaugarea, se recomanda sa reporniti dispozitivul sau sa il resetati si sa incercati din nou.
I: Dispozitivul nu poate asa imagini video?
R: Vericati daca exista semnal Wi-Fi sau daca are un nivel scazut. Puteti testa nivelul de semnal aducand
camera mai aproape de router. Daca inca nu functioneaza, resetati dispozitivul si adaugati-l din nou.
I: De ce dispozitivul este inca pe lista dupa resetarea dispozitivului?
R: Resetarea dispozitivului reseteaza doar setarile de retea ale camerei si nu poate modica conguratia din
aplicatia de mobil. Trebuie sa va conectati la aplicatie pentru a sterge camera din lista.
I: Cum conectati camera la un alt router?
R: Mai intai conectati-va la aplicatie pentru a sterge si reseta dispozitivul, resetati si camera si apoi
congurati-le din nou de la zero prin intermediul aplicatiei.
I: De ce camera nu recunoaste cardul microSD?
R: Se recomanda introducerea si scoaterea cardului microSD doar dupa oprirea dispozitivului. Vericati apoi
functionalitatea cardului intr-un PC/Laptop si daca formatul este FAT32. Aplicatia poate asa eroarea „nu a
putut gasi cardul SD” in caz de conexiune slaba a telefonului mobil sau chiar a camerei.
I: Dispozitivul este online si are un eveniment de tip alarma, dar telefonul mobil nu aseaza noticarea?

RO
17
R: Mai intai, conrmati ca aplicatia are toate permisiunile de noticari activate in setarile telefonului mobil.
In circumstante normale, cand este declansata o alarma, un mesaj va aparea in bara de noticari a
telefonului mobil. Ar trebui sa setati un sunet sau o vibratie la noticare in telefonul dvs. mobil.
Atentie atunci cand vizionati video in timp real in aplicatie, nu veti primi alarme de la camera video
deoarece functia implicita a dispozitivului este vizualizarea camerei moment in care se considera ca
utilizatorul urmareste deja imaginile live, si nu mai sunt necesare noticari.
Datorita algoritmului avansat inteligent de trimitere a noticarilor veti primi mai putine mesajele de alarma,
desi camera va inregistra toate mesajele si pozele de alarma.
9. SPECIFICATII PRODUS
Camera Senzor de imagine 1/2.7" CMOS
Aplicatie TUYA Smart / Smart Life
Video
Rezolutie 1920 x 1080
Compresie Video Smart H.264
Iluminare redusa 0.1LUX
Captura foto/video Da
Lens
Illumination
Lentile camera 3.1 MM
Leduri 8 buc IR Array LED - max 25 m
Audio Comunicare bidirectionala Da / G.711
Rcord
Mod inregistrare Inregistrare manuala, inregistrare detectare miscare, inregistrare
programata, inregistrare alarma
Stocare video Card TF (Max 64 Gb) / Cloud
Mod de trezire trezire buton , trezire detectare PIR, trezire activa telefon mobil
Declansare alarma Inregistrare alarma, captura de ecran
General
Panou solar Da
Baterii reincarcabile Pachet 4 x 18650 inclus
Temperatura de lucru –10 ° C pana la + 50 ° C
Umiditate 5% - 95% fara condens
Material ABS pentru uz exterior
Dimensiune / Greutate 95 X 200 X 73 mm / 931 g
WIFI 802.11b/g/n
Mod de transmisie P2P, Smart Cloud Server
Conexiune WIFI Scanare QR code
Tasta Reset Da
Alimentare DC 5V 1A

RO
18
BG:
Опростена декларация за съответствие на ЕС
SC ONLINESHOP SRL декларира, че Камера за наблюдение PNI PT949S 1080P спазва директивата EMC
2014/30/EU, директивата ROHS 2011/65/EU и RED 2014/53/UE. Пълният текст на ЕС декларацията за
съответствие е достъпен на следния интернет адрес:
https://www.mypni.eu/products/7285/download/certications
EN:
EU Simplied Declaration of Conformity
SC ONLINESHOP SRL declares that PNI PT949S 1080P surveillance camera complies with the Directive EMC
2014/30/EU, Directive ROHS 2011/65/EU and RED 2014/53/UE. The full text of the EU declaration of conformity is
available at the following Internet address:
https://www.mypni.eu/products/7285/download/certications
DE:
Vereinfachte EU- Konformitätserklärung
SC ONLINESHOP SRL erklärt, dass das PNI PT949S 1080P Überwachungskamera der Richtlinie EMC 2014/30/
EU, Richtlinie ROHS 2011/65/EU entspricht und RED 2014/53 / EU-Richtlinie. Sie nden den ganzen Text der EU-
Konformitätserklärung an der folgenden Internetadresse:
https://www.mypni.eu/products/7285/download/certications
ES:
Declaración UE de conformidad simplicada
SC ONLINESHOP SRL declara que el Cámara de vigilancia PNI PT949S 1080P cumple con la Directiva EMC
2014/30/EU, Directiva ROHS 2011/65/EU y la Directiva RED 2014/53/EU. El texto completo de la declaración de
conformidad de la UE está disponible en la siguiente dirección de Internet:
https://www.mypni.eu/products/7285/download/certications
FR
Déclaration de conformité simpliée de l’UE
SC ONLINESHOP SRL déclare que Caméra de surveillance PNI PT949S 1080P est conforme à la directive EMC
2014/30/EU, directive ROHS 2011/65/EU et RED 2014/53/UE. Le texte complet de la déclaration de conformité UE
est disponible à l’adresse Internet suivante:
https://www.mypni.eu/products/7285/download/certications
HU:
Egyszerűsített EU Megfelelési Közlemény
SC ONLINESHOP SRL kijelenti azt, hogy a PNI PT949S 1080P meggyelő kamera megfelel az EMC 2014/30/EU,
ROHS 2011/65/EU és RED 2014/53/UE irányelvnek. Az EU-megfelelőségi nyilatkozat teljes szövege a következő
internetes címen érhető el:
https://www.mypni.eu/products/7285/download/certications
IT:
Dichiarazione UE di conformità semplicata
SC ONLINESHOP SRL dichiara che il Telecamera di sorveglianza PNI PT949S 1080P è conforme alla direttiva
EMC 2014/30/UE, direttiva ROHS 2011/65/EU e alla direttiva RED 2014/53/UE. Il testo completo della dichiarazione
di conformità europea è disponibile al seguente indirizzo Internet:
https://www.mypni.eu/products/7285/download/certications
PL:
Uproszczona deklaracja zgodności UE
SC ONLINESHOP SRL oświadcza, że Kamera monitorująca PNI PT949S 1080P jest zgodny z dyrektywą EMC
2014/30/EU, dyrektywą ROHS 2011/65/EU i RED 2014/53/UE. Pełny tekst deklaracji zgodności UE dostępny jest
pod następującym adresem internetowym:
https://www.mypni.eu/products/7285/download/certications
RO:
Declaratie UE de conformitate simplicata
SC ONLINESHOP SRL declara ca Camera supraveghere PNI PT949S 1080P este in conformitate cu Directiva
EMC 2014/30/EU, Directiva ROHS 2011/65/EU si Directiva RED 2014/53/UE. Textul integral al declaratiei UE de
conformitate este disponibil la urmatoarea adresa de internet:
https://www.mypni.eu/products/7285/download/certications
Table of contents
Languages:
Other PNI Security Camera manuals