manuals.online logo
Brands
  1. Home
  2. •
  3. Brands
  4. •
  5. Purmo
  6. •
  7. Heater
  8. •
  9. Purmo RADSON ULOW E2 V Quick start guide

Purmo RADSON ULOW E2 V Quick start guide

min.
200 mm
max. 1100 mm
min.
150 mm
min.
150 mm
max.
350 mm
A
B
14
1/2”
3/4”
12
min.
Max.
60 Nm
ULOW E2 V
1 2 3
4 5 7
8 9
6
6 bar max.
max. 60°
230VAC
50Hz
6 bar max.
max. 60°
230VAC
50Hz
Belangrijke aanwijzingen
(NL)
ATTENTIE: Voor een correcte installatie van de radiatoren
is het belangrijk dat de radiator zo wordt gemonteerd, zodat
deze voor het beoogde doel en een te voorzien verkeerd
gebruik wordt geïnstalleerd. Verschillende items moeten
worden nagegaan voordat ze zijn voltooid, inclusief de
methode om de radiator aan de muur te bevestigen, de aard
en toestand van de muur zelf en eventuele extra krachten of
gewichten.
In ieder geval wordt sterk aanbevolen dat de installatie
wordt uitgevoerd door een goed opgeleide monteur
of gekwalificeerde vakman, met behulp van geschikt
bevestigingsmateriaal.
De installatie en inbedrijfstelling van uw Ulow-E2 V lage
temperatuur radiator moet worden uitgevoerd door een
geautoriseerd gespecialiseerd bedrijf. Bij de installatie
moet rekening worden gehouden met de relevante normen.
Voordat u met de installatie begint moet u rekening houden
met de instructies onder „BELANGRIJKE AANWIJZINGEN“
vermelde punten.
• Het apparaat mag alleen door een erkende installateur
gemonteerd worden.
• De montage van het apparaat mag niet direct onder een
wandcontactdoos plaatsvinden.
• In bad- en doucheruimten moeten de apparaten zodanig
worden geïnstalleerd dat schakelaars en andere regel- en
besturingsinrichtingen door een persoon die het bad of
douche gebruikt, niet kunnen worden aangeraakt.
• Bij beschadiging van de aansluitingleiding van het
apparaat mag deze alleen door de fabrikant vervangen
worden.
• Let op! Om oververhitting te voorkomen, mag de radiator
uit veiligheidstechnische redenen niet geheel afgedekt
worden.
• Na de montage van het apparaat moet de stekker
toegankelijk zijn.
• Bij toestellen zonder ingebouwde AAN-UIT schakelaar,
is een scheiding van alle polen van het net met een
contactopening van minstens 3 mm breed of een
scheiding van het net door middel van een stekker
noodzakelijk.
• Bij de keuze van de installatieplaats zijn de plaatselijke of
de nationale elektrotechnische veiligheidsvoorschriften
op te volgen.
• Dit apparaat kan door kinderen vanaf 8 jaar en ouder en
door personen met verminderde fysieke, zintuiglijke of
mentale bekwaamheden of gebrek aan ervaring en kennis
worden gebruikt, als er wordt op toegezien of aangaande
het veilig gebruik van het apparaat worden aangeleerd
en de daaruit resulterende gevaren begrijpen. Kinderen
mogen niet met het apparaat spelen. Reinigingen en
onderhoud door de gebruiker mogen niet zonder toezicht
door kinderen worden uitgevoerd.
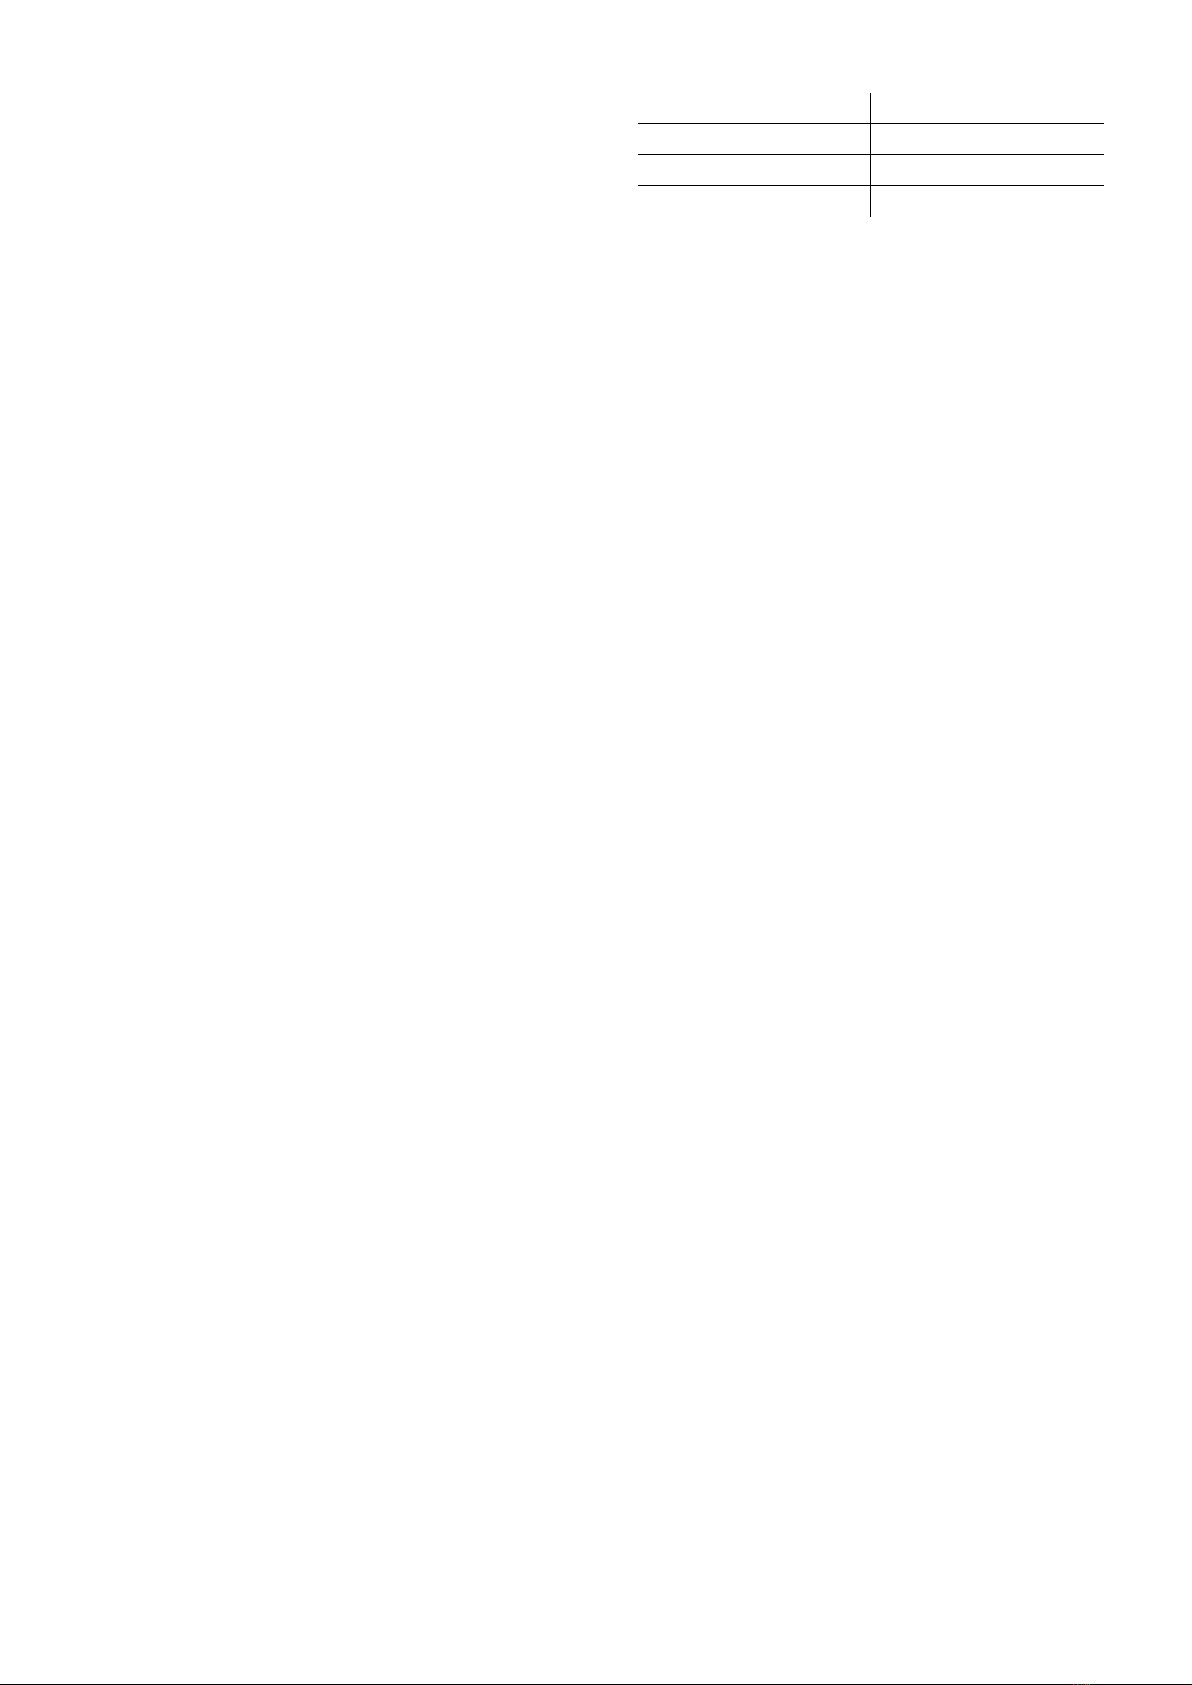
• Aantal ventilatoren =
Bouwlengte (mm) Ventilatoren
450 2x3
600 2x4
750 2x6
• Gebruik voor de reiniging van het apparaat geen schurend
poetsmiddel of kleur verdunners!
• Bij het installeren van de radiatoren moeten de volgende
normen in acht worden genomen:
- DIN 55900: Sproeigebied in natte ruimtes
- VDI 2035: Voorkoming van schade in
warmwaterverwarmings-systemen
- DIN 18017 deel 3: Ventilatie van badkamers en
toiletten zonder ramen
- EN 14336: Verwarmingssystemen in
gebouwen, installaties en acceptatie van
warmwaterverwarmingssystemen
Consignes importantes
(FR)
ATTENTION! Lors de l‘installation de votre radiateur, veillez
à ce que la bonne fixation murale livrée avec l‘appareil soit
utilisée. La fixation murale doit être correctement installée
afin d‘éviter toutes erreurs de montage. Avant de raccorder
votre appareil, il est important de porter une précaution
particulière à : la méthode de montage de la console murale,
la nature et la qualité du mur, les différences forces exercées
sur l‘appareil ainsi que son poids.
Il est fortement recommandé que l‘installation soit effectuée
par un professionnel ou une personne qualifiée à cet effet
utilisant les fixations livrées avec l‘appareil.
Les appareils doivent être installés conformément à la
norme
NF C 15 100 et aux règles de l’art. Les appareils doivent être
montés par un professionnel agréé. L’installation doit être
conforme aux normes en vigueur de sécurité électrique et
aux règles de l’art du pays dans lequel il est mis en œuvre.
• Faire installer le radiateur par un technicien agréé.
• Eviter de fixer le radiateur directement sous une prise
murale.
• Lors de l’installation d’un radiateur dans une salle de
bains, veiller à ce que la personne dans la salle de bains
ne puisse entrer en contact avec les interrupteurs ou
autres dispositifs de commande ou de régulation.
• En cas de détérioration du câble électrique du radiateur,
faire remplacer ce dernier par le fabricant uniquement.
• Attention! Ne pas couvrir entièrement le radiateur, afin
d’éviter toute surchauffe. Après l’installation du radiateur,
la prise doit rester accessible.
• Pour les radiateurs sans interrupteur MARCHE-ARRÊT,
une séparation des contacts, d’une largeur de 3 mm
minimum, ou une séparation du réseau au moyen d’une
fiche est nécessaire.
• L’installation doit être conforme aux normes en
vigueur de sécurité électrique et aux règles de l’art du
pays dans lequel il est mis en œuvre.
• Cet appareil n’est pas prévu pour être utilisé par des
enfants de moins de 8 ans ou des personnes dont les
capacités physiques, sensorielles ou mentales sont
réduites ou dénuées d’expérience ou de connaissance,
sauf si elles ont pu bénéficier, par l’intermédiaire
d’une personne responsable de leur sécurité, d’une
surveillance ou d’instructions préalables concernant
l’utilisation de l’appareil. Il convient de surveiller
les enfants pour s’assurer qu’ils ne jouent pas avec
l’appareil. Le nettoyage ainsi que l’entretien de
l’appareil ne doit pas être fait par un enfant sans
surveillance.
• Nombre de ventilateurs =
Longueur (mm) Ventilateurs
450 2x3
600 2x4
750 2x6
• Lors du nettoyage, éviter les produits abrasifs et les
solvants, même dilués.
• Les normes suivantes doivent être respectées lors du
montage du radiateur:
- DIN 55900: Pulvérisation dans les pièces humides
- VDI 2035: Prévention des dommages dans les
installations avec systèmes de chauffage à eau
chaude
- DIN 18017 Partie 3: Ventilation des salles de bains
et des toilettes sans fenêtres
- EN 14336: Système de chauffage dans les
bâtiments, Installation et commissionnement des
systèmes de chauffage à eau
Important notes
(EN)
WARNING: In order to assemble the radiator correctly, it
is important that the mounting be carried out according
to the intended use and configured for a possible misuse.
Before completion of the assembly several points must
be considered, including the mounting method for
the assembly of the radiator on the wall, the type and
characteristics of the wall itself, as well as respective
additional forces and weights.
In every case it is strongly recommended that the
assembly be carried out by a properly trained assembler
or qualified craftsman, and that a suitable mounting
material is used. The installation and initial operation of
your Ulow-E2 V temperature radiator should be carried
out by an approved specialist company. During the
installation the relevant standards and/or the ÖVE and
VDE regulations should be observed. Before beginning
assembly please follow the points below under
“IMPORTANT NOTES”.
• The appliance must only be fitted by a qualified expert.
• The appliance must not be fitted directly under a wall
socket.
• Install the appliances in bathrooms or shower rooms
so that a person using the bath or shower cannot
touch switches and other controls.
• If the appliance connector lead is damaged, it must
only be replaced by the manufacturer.
• Important! To avoid overheating, the radiator must
never be completely cover for safety reasons.
• After fitting the appliance, the fuse spur must be
accessible.
• Appliances without an integrated OFF-ON switch
require all-pole separation from the mains with a
minimum contact separation of 3 mm or separation
from the mains by means of a plug.
• When choosing the installation location, and when
installing to an earthed safety socket, observe local
and national electrical safety rules such as ÖVE and
VDE.
• This appliance may be used by children aged 8 or
older and by people with impaired physical, sensory
or mental abilities or a lack of experience and
knowledge if they are supervised or instructed with
regard to safe use of the appliance and understand
the resulting risks. Children must not play with the
appliance. Children must not perform cleaning or user
maintenance without supervision.
• Number of fans =
Overall length (mm) Fans
450 2x3
600 2x4
750 2x6
• Do not use any abrasive cleaning agents or paint
thinners for cleaning!
• The following standards must be adhered to when
installing radiators:
- DIN 55900: Spraying area in wet rooms
- VDI 2035: Prevention of damage in water heating
installations
- DIN 18017 Part 3: Ventilation of bathrooms and
toilets without windows
- EN 14336: Heating systems in buildings.
Installation and commissioning of water based
heating systems
Wichtige hinweise
(DE)
ACHTUNG: Für eine richtige Montage der Heizkörper
ist es wichtig, dass die Befestigung des Heizkörpers
entsprechend ausgeführt wird, so dass diese für den
Verwendungszweck und eine vorhersehbare Fehlan-
wendung ausgelegt ist. Vor Abschluss der Montage müssen
mehrere Punkte berücksichtigt werden, einschließlich der
Befestigungsmethode zur Montage des Heizkörpers an der
Wand, Art und Beschaffenheit der Wand selbst sowie jeg-
liche zusätzliche Kräfte oder Gewichte. Es wird in jedem Fall
dringend empfohlen, dass die Montage von einem entspre-
chend geschulten Monteur oder einem befähigten Handwer-
ker ausgeführt und dabei geeignetes Befestigungsmaterial
verwendet wird. Die Installation und Inbetriebnahme Ihres
Ulow-E2 V Tieftemperaturheizkörper ist von einer zugelas-
senen Fachfirma durchzuführen. Bei der Installation sind die
einschlägigen Normen bzw. ÖVE- und VDE-Bestimmungen
zu beachten. Vor Montagebeginn berücksichtigen Sie bitte
die unter „WICHTIGE HINWEISE“ angeführten Punkte.
• Das Gerät darf nur von einem konzessionierten Fachmann
montiert werden.
• Die Montage des Gerätes darf nicht unmittelbar unterhalb
einer Wandsteckdose erfolgen.
• In Bade- oder Duschräumen sind die Geräte so zu
installieren, dass Schalter und andere Regel- und
Steuereinrichtungen von einer Person, die gerade das
Bad oder die Dusche benutzt, nicht berührt werden
können.
• Bei Beschädigung der Anschlussleitung des Gerätes darf
diese nur vom Hersteller ersetzt werden.
• Achtung! Um eine Überhitzung zu vermeiden, darf der
Heizkörper aus sicherheitstechnischen Gründen nicht
komplett abgedeckt werden.
• Nach der Montage des Gerätes muss der Stecker
zugänglich sein.
• Bei Geräten ohne eingebautem AUS-EIN Schalter, ist eine
allpolige Trennung vom Netz mit Kontaktöffnungsweite
von mind. 3 mm oder eine Trennung vom Netz mittels
Stecker erforderlich.
• Bei der Wahl des Anbringungsortes, sowie bei einer
Schukosteckdoseninstallation, sind die örtlichen bzw. die
nationalen elektrotechnischen Sicherheitsvorschriften
wie ÖVE und VDE zu beachten.
• Dieses Gerät kann von Kindern ab 8 Jahren und darüber
sowie von Personen mit verringerten physischen,
sensorischen oder mentalen Fähigkeiten oder Mangel
an Erfahrung und Wissen benutzt werden, wenn sie
beaufsichtigt oder bezüglich des sicheren Gebrauchs
des Gerätes unterwiesen wurden und die daraus
resultierenden Gefahren verstehen. Kinder dürfen nicht
mit dem Gerät spielen. Reinigungen und Benutzerwartung
dürfen von Kindern ohne Beaufsichtigung nicht
durchgeführt werden.
• Anzahl der Lüfter =
Baulänge (mm) Lüfter
450 2x3
600 2x4
750 2x6
• Für die Gerätereinigung keine scheuernden Putzmittel
bzw. Farbverdünnungen verwenden!
• Folgende Normen sind bei der Montage der Heizkörper
unbedingt einzuhalten:
- DIN 55900: Sprühbereich in Nassräumen
- VDI 2035: Vermeidung von Schäden in
Warmwasserheizungsanlagen
- DIN 18017 Teil 3: Lüftung von Bädern und Toiletten
ohne Fenster
- EN 14336: Heizungsanlagen in Gebäuden,
Installationen und Abnahme der
Warmwasserheizungsanlagen

Other Purmo Heater manuals

Purmo Squara User manual

Purmo

Purmo Squara User manual

Purmo YALI DIGITAL PLUS User manual

Purmo

Purmo YALI DIGITAL PLUS User manual

Purmo APOLIMA Instruction Manual

Purmo

Purmo APOLIMA Instruction Manual

Purmo FLORES Series Instruction Manual

Purmo

Purmo FLORES Series Instruction Manual

Purmo BH 300 User manual

Purmo

Purmo BH 300 User manual

Purmo ULOW-E2V User manual

Purmo

Purmo ULOW-E2V User manual

Purmo INSPIRATION - User manual

Purmo

Purmo INSPIRATION - User manual

Purmo RADSON APOLIMA Maintenance and service guide

Purmo

Purmo RADSON APOLIMA Maintenance and service guide

Purmo FLORES E Maintenance and service guide

Purmo

Purmo FLORES E Maintenance and service guide

Purmo FCIR User manual

Purmo

Purmo FCIR User manual

Purmo OPTIMO 500E ECO Installation instructions

Purmo

Purmo OPTIMO 500E ECO Installation instructions

Purmo YALI DIGITAL User manual

Purmo

Purmo YALI DIGITAL User manual

Purmo H10 User manual

Purmo

Purmo H10 User manual

Purmo CAMPAIGN User manual

Purmo

Purmo CAMPAIGN User manual

Purmo PARADA PLINTH User manual

Purmo

Purmo PARADA PLINTH User manual

Purmo JARL 10 05 230 03 2 W User manual

Purmo

Purmo JARL 10 05 230 03 2 W User manual

Purmo KABA2 User manual

Purmo

Purmo KABA2 User manual

Purmo RADSON MINORCA Maintenance and service guide

Purmo

Purmo RADSON MINORCA Maintenance and service guide

Purmo MCW-V User manual

Purmo

Purmo MCW-V User manual

Purmo BR222 User manual

Purmo

Purmo BR222 User manual

Purmo YALI PARADA PLUS User manual

Purmo

Purmo YALI PARADA PLUS User manual

Purmo KABA User manual

Purmo

Purmo KABA User manual

Purmo OPTIMO 500E ECO Installation instructions

Purmo

Purmo OPTIMO 500E ECO Installation instructions

Purmo TECHNICAL POCKET BOOK - User manual

Purmo

Purmo TECHNICAL POCKET BOOK - User manual

Popular Heater manuals by other brands

Create WARM CONNECT 2000 user manual

Create

Create WARM CONNECT 2000 user manual

SKF TIH L Instructions for use

SKF

SKF TIH L Instructions for use

Clarke Devil 6003 Operating and maintenance instructions

Clarke

Clarke Devil 6003 Operating and maintenance instructions

EQUATION YF01-7 Safety instructions

EQUATION

EQUATION YF01-7 Safety instructions

ThermoUp FLOOR operating manual

ThermoUp

ThermoUp FLOOR operating manual

Home FK 1 PRO instruction manual

Home

Home FK 1 PRO instruction manual

Tylo Combi Compact RC Installation and operating instructions

Tylo

Tylo Combi Compact RC Installation and operating instructions

TwinStar 7HM1000 Owner's operating manual

TwinStar

TwinStar 7HM1000 Owner's operating manual

ARDES AR4R09BTT Instructions for use

ARDES

ARDES AR4R09BTT Instructions for use

REMKO AT 25 manual

REMKO

REMKO AT 25 manual

Rointe Elba PRO 400 instruction & installation guide

Rointe

Rointe Elba PRO 400 instruction & installation guide

MILL Gentle Air Series Assembly and instruction manual

MILL

MILL Gentle Air Series Assembly and instruction manual

Rinnai RHFE-1510F Operating and installation instructions

Rinnai

Rinnai RHFE-1510F Operating and installation instructions

MO-EL GUADALUPA Use and maintenance

MO-EL

MO-EL GUADALUPA Use and maintenance

IRSAP TESI3 Elettrico Operation instructions

IRSAP

IRSAP TESI3 Elettrico Operation instructions

Taurus Cairo Slim 650 Manual information

Taurus

Taurus Cairo Slim 650 Manual information

Ruby TFTT5000 Installation and operating instructions

Ruby

Ruby TFTT5000 Installation and operating instructions

Toyotomi FF-V30 operating manual

Toyotomi

Toyotomi FF-V30 operating manual

manuals.online logo
manuals.online logoBrands
  • About & Mission
  • Contact us
  • Privacy Policy
  • Terms and Conditions

Copyright 2025 Manuals.Online. All Rights Reserved.