manuals.online logo
Brands
  1. Home
  2. •
  3. Brands
  4. •
  5. Pyronix
  6. •
  7. Keypad
  8. •
  9. Pyronix EURO mini EUR-068 User manual

Pyronix EURO mini EUR-068 User manual

Contemporary Keypad
EUR-068 (Prox Enabled)
EUR-069 (Standard)
RINS1266-5
For electrical product’s sold within the
European Community. At the end of the
electrical product life, it should not be
disposed of with household waste. Please
recycle where facilities exist. Check with
your Local Authority or retailer for
recycling advice in your country.
Disassemble the Keypad
Cable and Screw Mounting Holes
The Printed Circuit Board
2. Insert a wide at-head screw-driver
into each of the two lugs on the underside
of the keypad (as shown above).
3. Lever the screwdriver as shown in
the direction above to open the cover.
1. Loosen the screw on the
underside of the keypad.
lugs
D1- RESET
JMP1
TAMPER
D2+
D3
D4
-
+
Z1
Z2
PGM1
D1- = 0V
D2+ = 12v+
D3 = RS485 ‘A’ BUS
D4 = RS485 ‘B’ BUS
NOTE: If the keypad cover is not needed,
there is a bottom keypad cover supplied that
can be tted
Cable Routes Screw Holes
Insert a screw into the rear
tamper break out section. If
the keypad casing is pulled off
the wall, the break out section
will stay xed, and a tamper
activation will occur.
Location: Keypads/Tag readers should not be mounted on metal surface, or be located within
1m from each other. Loudspeakers also should not be located within 1m from a keypad/tag
reader, other tag reader response will degrade.
Technical Specication
Connections for the keypad
Addressing the keypad
Tag Reader (EUR-068)
To address the keypad, hold down the ‘D’ key for 6 seconds and enter code ‘2000’. Use
the number keys to enter the keypad address and press the ‘A’ key to save the changes.
The keypad also needs to be enabled in the Engineer menu, please follow instructions in
Programming manual (RINS1210) and the function is ‘Assign Keypads/Readers’.
If the EUR-068 has been purchased, the tag reader
is enabled, which can be used to program tags to
be used for setting/unsetting. This is done in the
‘CHANGE CODES’ submenu of the Manager menu
function, for more details please see the control
panel user manual.
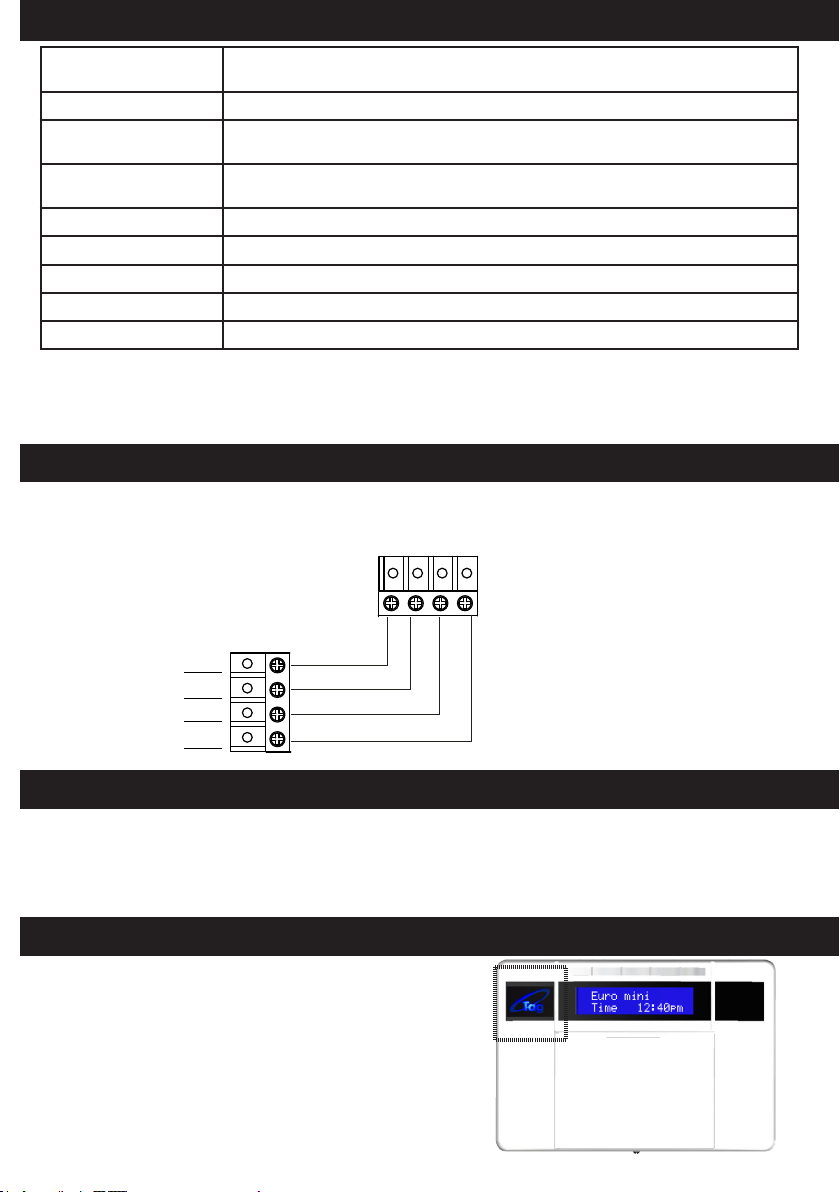
When presenting a tag, please make sure it is
presented in the area marked shown to the right,
when it is acknowledged a ‘beep’ will be heard.
Compliant with EN50131-3:2009 (as harmonised with EN50131-1:2006+A1:2009
by BSIA Form 179). PD6662:2010
Security grade 2x
Environmental
class
2
Temperature
range
-10°C to +40°C. NOTE: The LCD display may not function correctly
at temperatures below +2°C but this will not affect system operation
Voltage 11-15v DC
Current load 50mA
Dimensions 144 x 99 x 34mm
Weight 256g
Housing material ABS with clear display window from polycarbonate
D1-
To the Euro One
Control panel
D2+
D3
D4
-
+
Z1
Z2
PGM1
D1-
D1-
To the Euro mini
Control panel
Keypad D2+
D2+
D3
D3
D4
D4
D1-D2+D3D4
N/C T T
Input
TAMPER N/C + -
+ -
Output
(Negative
Applied)
4k7
2k2
This product is sold subject to our standard warranty conditions and is warranted against
defects in workmanship for a period of 18 months. In the interest of continuing improvement
of quality, customer care and design, We reserve the right to amend specications without
giving prior notice.
The Keypad Menu
To enter the keypad menu - press and hold the ‘D’ key and enter ‘2000’. Press the YES
key to scroll to the next item, and use the ‘D’ key to change the option. The menu items
are as follows:
ADDRESS: Keypad address
LANGUAGE: Use the ‘D’ key to scroll through the languages
ZONE STATUS: The status of both inputs on the keypad
KEYCLICK VOLUME: The volume of the key press sound
TAG VOLUME: The volume of the tag sound
MASTER VOLUME: Overall volume and speaker output sound
TAG ID: Gives the identication of a tag when presented
FACTORY RESET: Enter ‘2000’ to reset the defaults of the keypad
BACKLIGHT FORCE: 0 = ON for 20 secs. 1 = ON all the time.
PA/FIRE TIMER: The number of seconds that keys 1 and 7 must be pressed in order to
sound an activation.
Press the ‘A’ key to exit the menu.
Contact Details
Secure Holdings,
Braithwell Way, Hellaby,
Rotherham, S66 8QY
Sales & General: 01709 700 100
Technical Support: 0845 6434 999 (local rate) or 01709 535 225
(Hours: 8:00am - 6.30pm)

This manual suits for next models

1

Other Pyronix Keypad manuals

Pyronix ATLAS 8 User manual

Pyronix

Pyronix ATLAS 8 User manual

Pyronix STERLING 10 User manual

Pyronix

Pyronix STERLING 10 User manual

Pyronix PCX 162i Operating instructions

Pyronix

Pyronix PCX 162i Operating instructions

Pyronix STERLING 10 User manual

Pyronix

Pyronix STERLING 10 User manual

Pyronix PCX-LCD/UK User manual

Pyronix

Pyronix PCX-LCD/UK User manual

Pyronix HIKVISION LEDP/R-WE User manual

Pyronix

Pyronix HIKVISION LEDP/R-WE User manual

Pyronix MX-ICON User manual

Pyronix

Pyronix MX-ICON User manual

Pyronix Matrix 424 Owner's manual

Pyronix

Pyronix Matrix 424 Owner's manual

Pyronix MATRIX User manual

Pyronix

Pyronix MATRIX User manual

Pyronix BUMBT!8 User manual

Pyronix

Pyronix BUMBT!8 User manual

Pyronix ATLAS 8 PLUS User manual

Pyronix

Pyronix ATLAS 8 PLUS User manual

Pyronix ATLAS 4 User manual

Pyronix

Pyronix ATLAS 4 User manual

Pyronix EURO mini User manual

Pyronix

Pyronix EURO mini User manual

Pyronix ATLAS 4 User manual

Pyronix

Pyronix ATLAS 4 User manual

Pyronix Wireless KF4-WE User manual

Pyronix

Pyronix Wireless KF4-WE User manual

Pyronix STERLING 10 User manual

Pyronix

Pyronix STERLING 10 User manual

Popular Keypad manuals by other brands

Philips Home Access 1000 Series user manual

Philips

Philips Home Access 1000 Series user manual

i4Home i4H-KP-3S manual

i4Home

i4Home i4H-KP-3S manual

Satel INT-TSG2 user manual

Satel

Satel INT-TSG2 user manual

Honeywell ADEMCO 6160RF user guide

Honeywell

Honeywell ADEMCO 6160RF user guide

CDVI CAASE Installation

CDVI

CDVI CAASE Installation

WatchNet WAR-E10-VKR quick start guide

WatchNet

WatchNet WAR-E10-VKR quick start guide

jablotron JA-150E quick guide

jablotron

jablotron JA-150E quick guide

NAPCO GEM-RP8LCD operating guide

NAPCO

NAPCO GEM-RP8LCD operating guide

Nidec Control Techniques Digistart D2-Keypad Installation sheet

Nidec

Nidec Control Techniques Digistart D2-Keypad Installation sheet

Visonic CL-80 installation instructions

Visonic

Visonic CL-80 installation instructions

Channel Vision A0127 instructions

Channel Vision

Channel Vision A0127 instructions

SpeakerCraft MODE 3.1 installation instructions

SpeakerCraft

SpeakerCraft MODE 3.1 installation instructions

Kaba Keyscan WSSKP-1 Installation & programming guide

Kaba

Kaba Keyscan WSSKP-1 Installation & programming guide

Sargent and Greenleaf 6120 instructions

Sargent and Greenleaf

Sargent and Greenleaf 6120 instructions

Securemme 8190 instructions

Securemme

Securemme 8190 instructions

Rose electronics RCK-KP4x5-P Installation and operation manual

Rose electronics

Rose electronics RCK-KP4x5-P Installation and operation manual

AMX AXP-MLCD Dimensional drawing

AMX

AMX AXP-MLCD Dimensional drawing

olympia electronics JA-81F manual

olympia electronics

olympia electronics JA-81F manual

manuals.online logo
manuals.online logoBrands
  • About & Mission
  • Contact us
  • Privacy Policy
  • Terms and Conditions

Copyright 2025 Manuals.Online. All Rights Reserved.