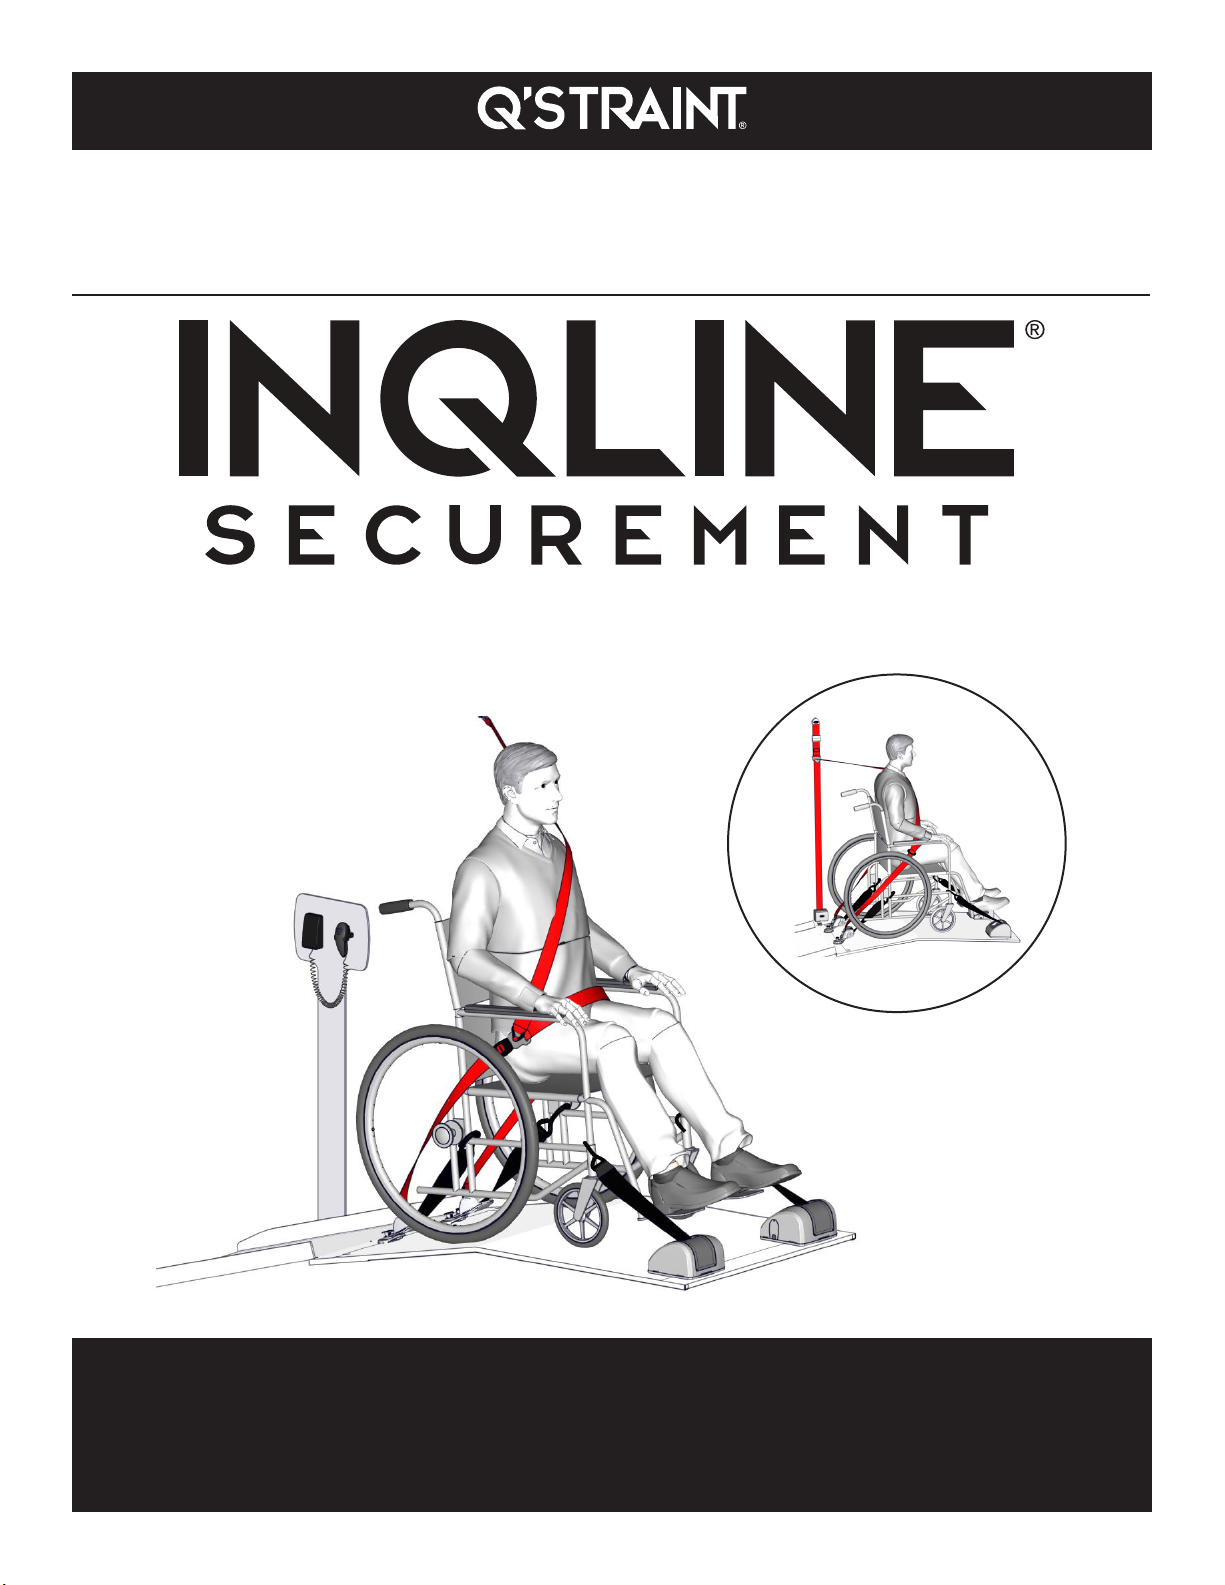
Q'STRAINT INQLINE SECUREMENT User manual

THIS REAR-ENTRY INTEGRATED SECUREMENT SYSTEM AND COMPONENTS COMPLY WITH ALL APPLICABLE PARTS
OF RELATED SAFETY REGULATIONS AND STANDARDS INCLUDING ADA, FMVSS & CMVSS 209/302, AND CSA Z605.
IN ADDITION, ALL SYSTEMS ARE CRASH TESTED AT 30MPH (48KPH), 20G, AND FULLY COMPLY WITH RESNA WC-4,
SECTION 18 AND ISO-10542-1.
INTEGRATED WINCH & RETRACTOR SYSTEM
Use and Care Manual

© 2019 Q’Straint®. All Rights Reserved.
Q’Straint®, Q’Straint® logo, OMNI® and Slide ‘N Click® are registered trademarks of Q’Straint®, Inc. QRT™ and INQLINE SECUREMENT™ are trademarks of Q’Straint®,
Inc. Products mentioned herein are for identication purposes only and may be registered trademarks or trademarks of their respective companies. All other brand
names, trademarks or registered trademarks are the property of their respective owners.

3
TABLE OF CONTENTS
IMPORTANT INSTALLATION REQUIREMENTS................................................................................................4
IMPORTANT SAFEGUARDS AND WARNINGS .................................................................................................5
INTRODUCTION .......................................................................................................................................................6
COMPLIANCE ............................................................................................................................................................6
ELECTRICAL REQUIREMENTS ..............................................................................................................................7
SYSTEM DEFINITIONS ........................................................................................................................................
OPERATIONAL SEQUENCE ................................................................................................................................ 10
OPERATING INSTRUCTIONS .......................................................................................................................
EMERGENCY RELEASE...................................................................................................................................
TROUBLESHOOTING .....................................................................................................................................
MAINTENANCE AND CARE................................................................................................................................
WARRANTY.............................................................................................................................................................

4
NOT alter,
MUST
NOT install
• Do NOT
stated, ONLYNOT
NOT
Shoulder and Pelvic Belt.
device.
IMPORTANT INSTALLATION REQUIREMENTS
SAVE THESE INSTRUCTIONS

5
• Do NOT
• ONLY
MUST
each use. Do NOT
MUST
NOT
MUST
SAVE THESE INSTRUCTIONS
IMPORTANT SAFEGUARDS AND WARNINGS

6
ENGINEERED TO PERFORM
This Integrated Winch and Retractor Compact System, designed by our engineers has revolutionized the industry
with its innovative design that automatically steers a wheelchair passenger up the ramp, self-tensions and secures—all
at the Touch-of-a-Button. Oering peace-of-mind and full control over the ascent and descent of the mobility device.
BUILT TO LAST
Equipped with energy-absorbing steel frame and heavy-duty precision belt retractors that hold the load in place as it
guides the wheelchair passenger up and down the ramp. The self-tensioning, high strength webbing system minimizes
rearward movement during the loading and unloading process to ensure the wheelchair occupant is always secured.
SECURED ON THE ROAD
The safe transportation of wheelchair passengers is our mission and the reason why we are involved in all major
international safety committees to assist in developing and improving wheelchair and occupant safety standards. All of
our systems are held to the highest standards by undergoing a crash test and endurance testing at a world renowned
test facility to meet and exceed all applicable requirements.
COMPLIANCE
INTRODUCTION

7
SYSTEM DEFINITIONS
ELECTRICAL REQUIREMENTS
Power Supply
• Connection to be 12Vdc using a 30 amp fuse between + terminal of battery and controller.
J-Hooks
Front, Automac Right and Le INQLINE SECUREMENT™ Retractors

8
SYSTEM DEFINITIONS
Thumb Controller and Wall Mount
Rear QRT Retractors (compliant with RESNA WC-4,
Secon 18 and ISO 10542-1) with OMNI®
Slide ‘N Click®
•
Reset Buon
LOCKS Front Retractors
Press Both to Release Front Retractors
UNLOCKS Front Retractors
Wall Control Panel
Thumb Controller Z Buon
Wall Mount
J-Hooks
Slide 'N Click

9
SYSTEM DEFINITIONS
Securement Zone
US Occupant Securement
Pelvic Belt
Shoulder Belt
Lap Belt
UK Occupant Securement
Pelvic Belt
Shoulder Belt
Lap Belt
Occupant Securement System may dier from what is illustrated depending on the vehicle model.
Securement Zone
13" (330mm) - 15" (380mm)
From Webbing Center Line
27" (658mm) - 34" (865mm)
48" (1220mm) - 54" (1370mm)
13" - 15"(330mm) - (380mm)

10
OPERATIONAL SEQUENCE
The following is a quick guide on how the INQLINE SECUREMENT™ Integrated Winch & Retractor System works.
Reference the Operang Instrucons Secon in this Manual for complete instrucons.
1 2
34
56
Press & Hold Z Buon

11
OPERATING INSTRUCTIONS
SECURING WHEELCHAIR
1. Park wheelchair behind ramp, lock brakes or power o
chair (A).
2. Press and hold both buttons (4 seconds) to release
front INQLINE SECUREMENT™ retractors (B).
3. Attach front J-Hooks to solid wheelchair frame
(30 seconds), unlock brakes and keep chair powered
o (C).
If front retractors lock down before attaching the
J-Hooks to the wheelchair, repeat step 2 then
continue.
J-Hooks must be attached to a Solid Wheelchair Frame
(no spokes, wheels or movable components) (D).
4. Press and hold Z Button; push Thumb Controller
forward to move wheelchair up the ramp with
CAUTION, then move Controller slightly left or right to
adjust wheelchair direction (E).
D
E
A
B
C
Press & Hold Z Buon
Chair O
Chair O

12
4” (101.6mm)
27” - 34”
(658mm - 865mm)
48” (1220mm) - 54” (1370mm)
OPERATING INSTRUCTIONS
Use CAUTION when adjusting the direction of the
wheelchair as it goes up the ramp (F).
5. Position wheelchair in Securement Zone (G).
Ensure there are 4" between existing securement
attached points and rear wheel edges of the
wheelchair for correct securement.
6. Release Z Button and place Thumb Controller in
Wall Mount (H).
7. Attach rear retractors to the oor and J-Hooks to a
solid wheelchair frame (J).
J-Hooks must be attached to a Solid Wheelchair
Frame (no spokes, wheels or movable components)
at an approximate 45 degree angle with oor once in
the Securement Zone (K).
K
SECURING WHEELCHAIR
F
G
HRelease
J

13
Q
OPERATING INSTRUCTIONS
8. Press and hold Lock Button (3 seconds) to lock
INQLINE SECUREMENT™ Retractors in place (L).
10. Attach Pelvic Belt Pin Connector to Retractor Pin,
buckle Lap Belt on hip and adjust belt length (N).
11. Attach Wall Belt Pin Connector to Shoulder Belt
Pin (P).
12. Pull Shoulder Belt over occupant’s chest, attach
Shoulder Belt Pin Connector to Lap Belt Pin and adjust
belt length (Q).
L
P
SECURING WHEELCHAIR
Occupant Securement System may dier from what is
illustrated depending on the vehicle model
9. Attach Lap Belt Pin Connector to Retractor Pin (M).
M
N
SECURING PASSENGER
Press & Hold
3
OR
OR

14
OPERATING INSTRUCTIONS
13. Make sure Buckle is on top of occupant’s hip. Lock
wheelchair brakes and keep chair powered o, ready
for transport (S).
14. Detach Shoulder Belt Pin Connector from Lap Belt Pin
(T).
15. Detach Wall Belt Pin Connector from Shoulder Belt
Pin (U) and place Shoulder Belt in Storage.
16. Unbuckle Lap Belt from Pelvic Belt (V).
ORIGINAL
NEW ILLUSTRATION
NEW VERSIONS, 2COLOR AND FRENCH.
Shoulder and Lap Belt must go across occupant’s shoulder
and hip, and not be held away from the occupant’s body
by wheelchair components. We recommend using both a
pelvic and shoulder belt together and not individually since
it will compromise the performance of the system. Make sure
Shoulder Belt does not rub against the occupant’s neck (R).
R
S
RELEASING PASSENGER
T
U
V
SECURING PASSENGER
OR
OR

15
OPERATING INSTRUCTIONS
17. Detach Pelvic Belt Pin Connector from Retractor Pin
(W) and place Pelvic Belt in storage.
18. Detach Lap Belt Pin Connector from Retractor Pin (X)
and place Lap Belt in storage.
19. Unlock brakes and keep chair powered o (Y).
20. Press and hold Unlock Button (4 seconds) to release
retractors (Z).
21. Press Levers and detach rear J-Hooks (AA).
W
X
Y
Z
Press
AA
RELEASING WHEELCHAIR
RELEASING PASSENGER
10
4

16
OPERATING INSTRUCTIONS
22. Remove rear QRT Retractors from oor by lifting
the Slide ‘N Click® and sliding out the retractors (BB).
Place retractors in storage.
23. Press and hold Z Button; push the Thumb Controller
downward to move wheelchair down the ramp
with CAUTION, then move it slightly left or right to
adjust wheelchair direction (CC).
Use CAUTION when adjusting the direction of the
wheelchair as it goes down the ramp (DD).
24. Position wheelchair on the ground, release Z Button
and place it in storage. Lock wheelchair brakes and
keep chair powered o (EE).
25. Press and hold both buttons (4 sec) to release
retractors. Return J-Hooks to stowage, unlock brakes
or power on chair. Place wheelchair in secure area (FF).
BB
CC
DD
EE
FF
RELEASING WHEELCHAIR
Release Z Buon
Press & Hold Z Buon

17
EMERGENCY RELEASE
1. Unbuckle Occupant Securement (GG).
2. Detach Lap Belt and Pelvic Belt Pin Connectors from
Retractor Pins (HH).
If Occupant Securement System (Shoulder and Lap
Belt) does not release, detach Pelvic Belt Pin Connector
from Retractor Pin or cut the Pelvic Belt Webbing at an
angle. For safety reasons, we recommend using the
Q’Straint® Emergency Cutter to cut Webbings at an
angle (JJ). (Q’Straint® Emergency Cutter—sold
separately).
3. Press and hold the Unlock Button (4 seconds) to
release the front INQLINE SECUREMENT™ Retractors
(KK).
4. If the front INQLINE SECUREMENT™ Retractors do NOT
release, disconnect the Thumb Controller Cord from
the Wall Control Panel (LL); in order to use the Wall
Control Panel as the Thumb Controller.
GG
HH
JJ
KK
LL
If Retractors release, proceed to step 6.
10
Press
OR
4

18
5. Then press the Unlock Button to unlock front
Retractors and move the wheelchair back a few inches
(MM).
If the front INQLINE SECUREMENT™ Retractors do NOT
release, make sure someone is behind the wheelchair
to hold it in place before cutting the front webbings
at an angle with the Q’Straint® Emergency Cutter
(NN).
6. Press Levers and detach rear J-Hooks (PP).
7. Remove rear QRT Retractors from oor by lifting
the Slide ‘N Click® and sliding out the retractors (QQ).
If the front INQLINE SECUREMENT™ Webbing was cut
proceed to the next step (RR). If Webbing was not cut
proceed to step 9.
MM
NN
PP
QQ
RR
Someone Behind Wheelchair to Hold it in Place
Webbing Was Cut
EMERGENCY RELEASE
Press

19
8. Unlock brakes or power on chair. Use CAUTION and
watch your step as you manually back wheelchair
down the ramp (SS). Place wheelchair in secure area.
If the front INQLINE SECUREMENT™ Webbing was NOT
cut proceed to the next step (TT).
9. Unlock brakes and keep chair powered o. Press and
hold Z Button; push the Thumb Controller downward
to move wheelchair down the ramp with CAUTION,
then move it slightly left or right to adjust wheelchair
direction (UU).
Use CAUTION when adjusting the direction of the
wheelchair as it goes down the ramp (VV).
10. Position wheelchair on the ground, release Z Button
and place it in storage. Lock wheelchair brakes and
keep chair powered o (WW).
SS
TT
UU
V V
WW
Manually Backdown Wheelchair
Webbing Was NOT Cut
Release Z Buon
EMERGENCY RELEASE
Press & Hold Z Buon

20
11. Return J-Hooks to stowage, unlock brakes or
power on chair. Place wheelchair in secure area
(XX).
XX
TROUBLESHOOTING
IMAGE ANSWER
Front INQLINE SECUREMENT™
Retractors are not working.
PROBLEM
Make sure they have power, all wires are
connected and interlock circuit is working
properly. Also, that the car battery has no less
than 12 volts of power.
Front INQLINE SECUREMENT™
Retractors are not releasing the
J-Hooks.
Press and hold both buttons on the Wall
Control Panel for about 4 seconds to release
J-Hooks.
Rear Retractors are not releasing
the J-Hooks. Press and hold Unlock Button for about 10
seconds to release retractors. Then press
levers and detach rear J-Hooks.
EMERGENCY RELEASE
Table of contents
Other Q'STRAINT Wheelchair manuals

Q'STRAINT
Q'STRAINT QLK-150 User manual

Q'STRAINT
Q'STRAINT QLK-150 User manual

Q'STRAINT
Q'STRAINT Q'POD User manual

Q'STRAINT
Q'STRAINT SURE-LOK DOUBLE INERTIA OCCUPANT BELT User manual

Q'STRAINT
Q'STRAINT QLK-150 User manual

Q'STRAINT
Q'STRAINT QUANTUM User manual

Q'STRAINT
Q'STRAINT QLK-150 User manual

Q'STRAINT
Q'STRAINT QRT-1 Series User manual

Q'STRAINT
Q'STRAINT ONE User manual

Q'STRAINT
Q'STRAINT QLK-150 User manual