Quick TR1350 User manual

TR1350
Rework System
Instruction Manual
Thank you for purchasing our production. Keep this manual handy for
future reference.

1
CONTENTS
1 Safety Instruction ................................................................................................................................................. 2
2 Introduction ......................................................................................................................................................... 3
3 Characteristic ....................................................................................................................................................... 3
4 Technical Data ..................................................................................................................................................... 3
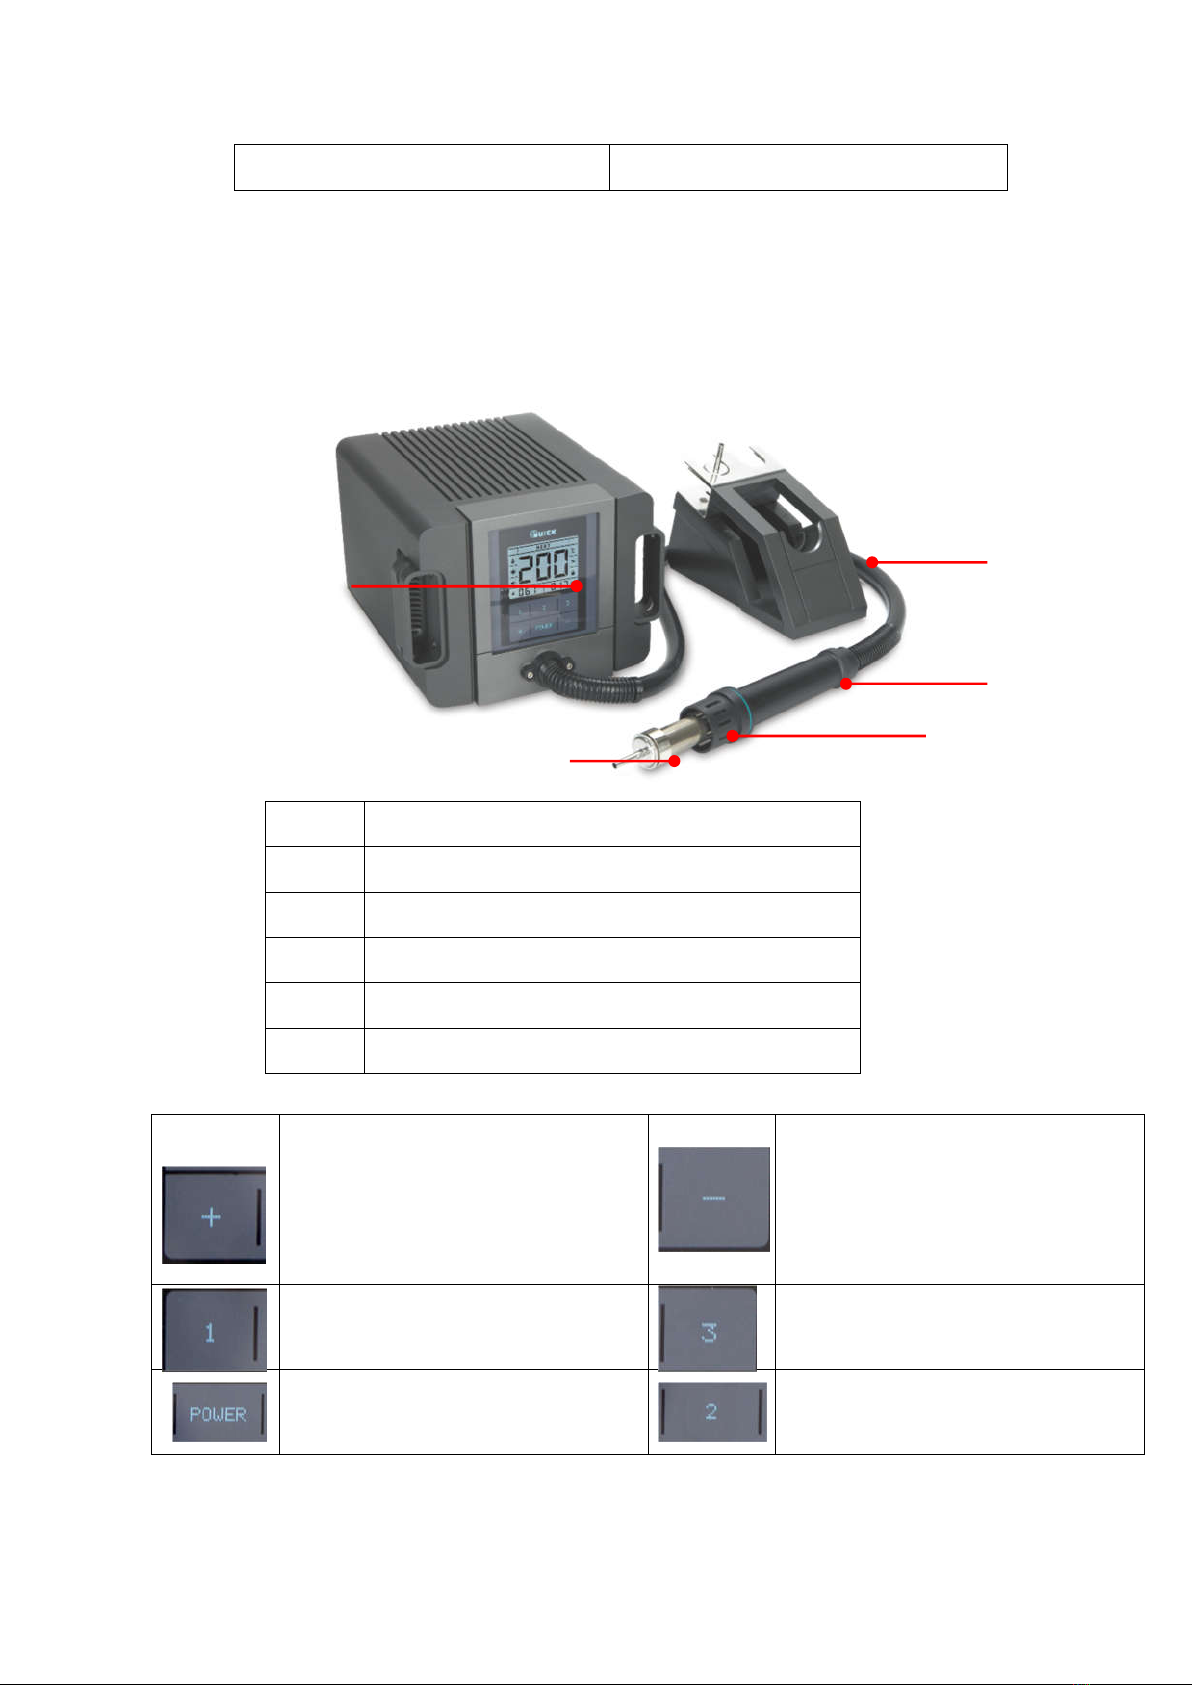
5 Part Description ................................................................................................................................................... 4
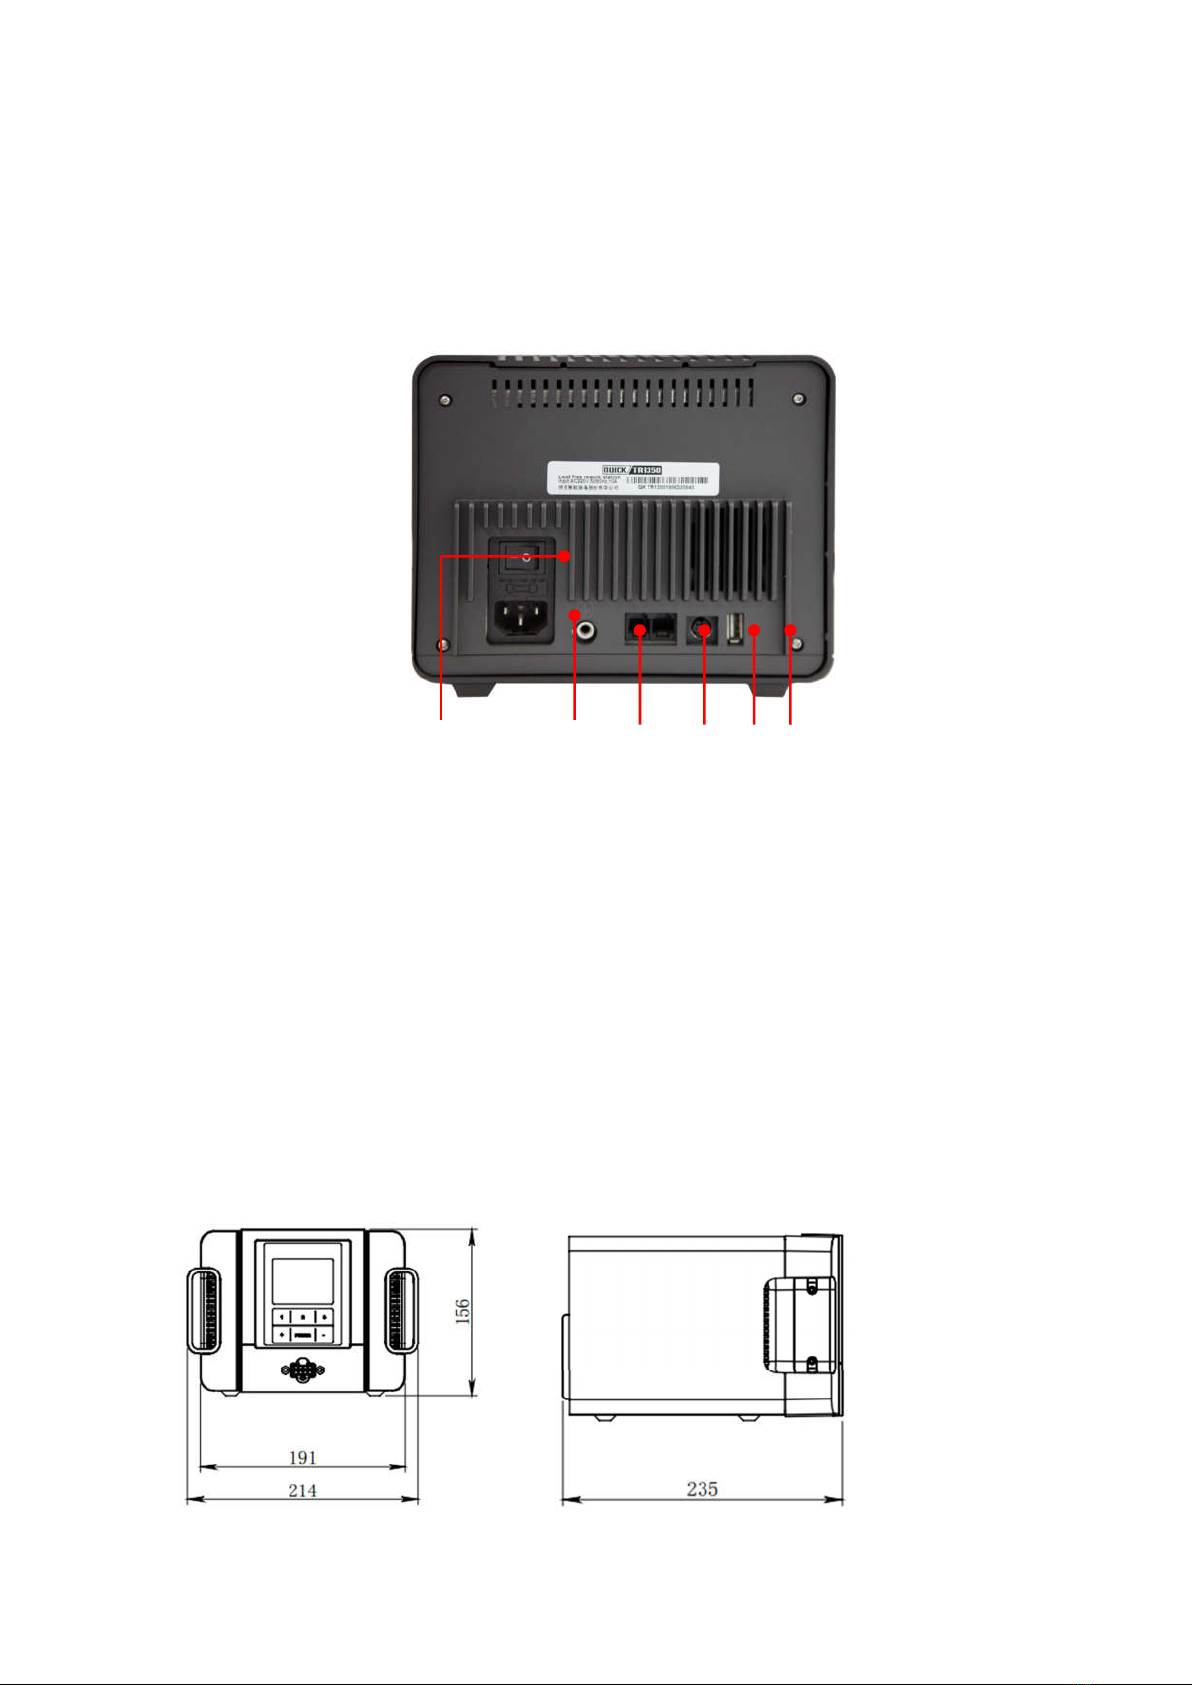
6 Connection and Dimension.................................................................................................................................. 5
6.1 Connection .................................................................................................................................................... 5
6.2 Dimension ..................................................................................................................................................... 5
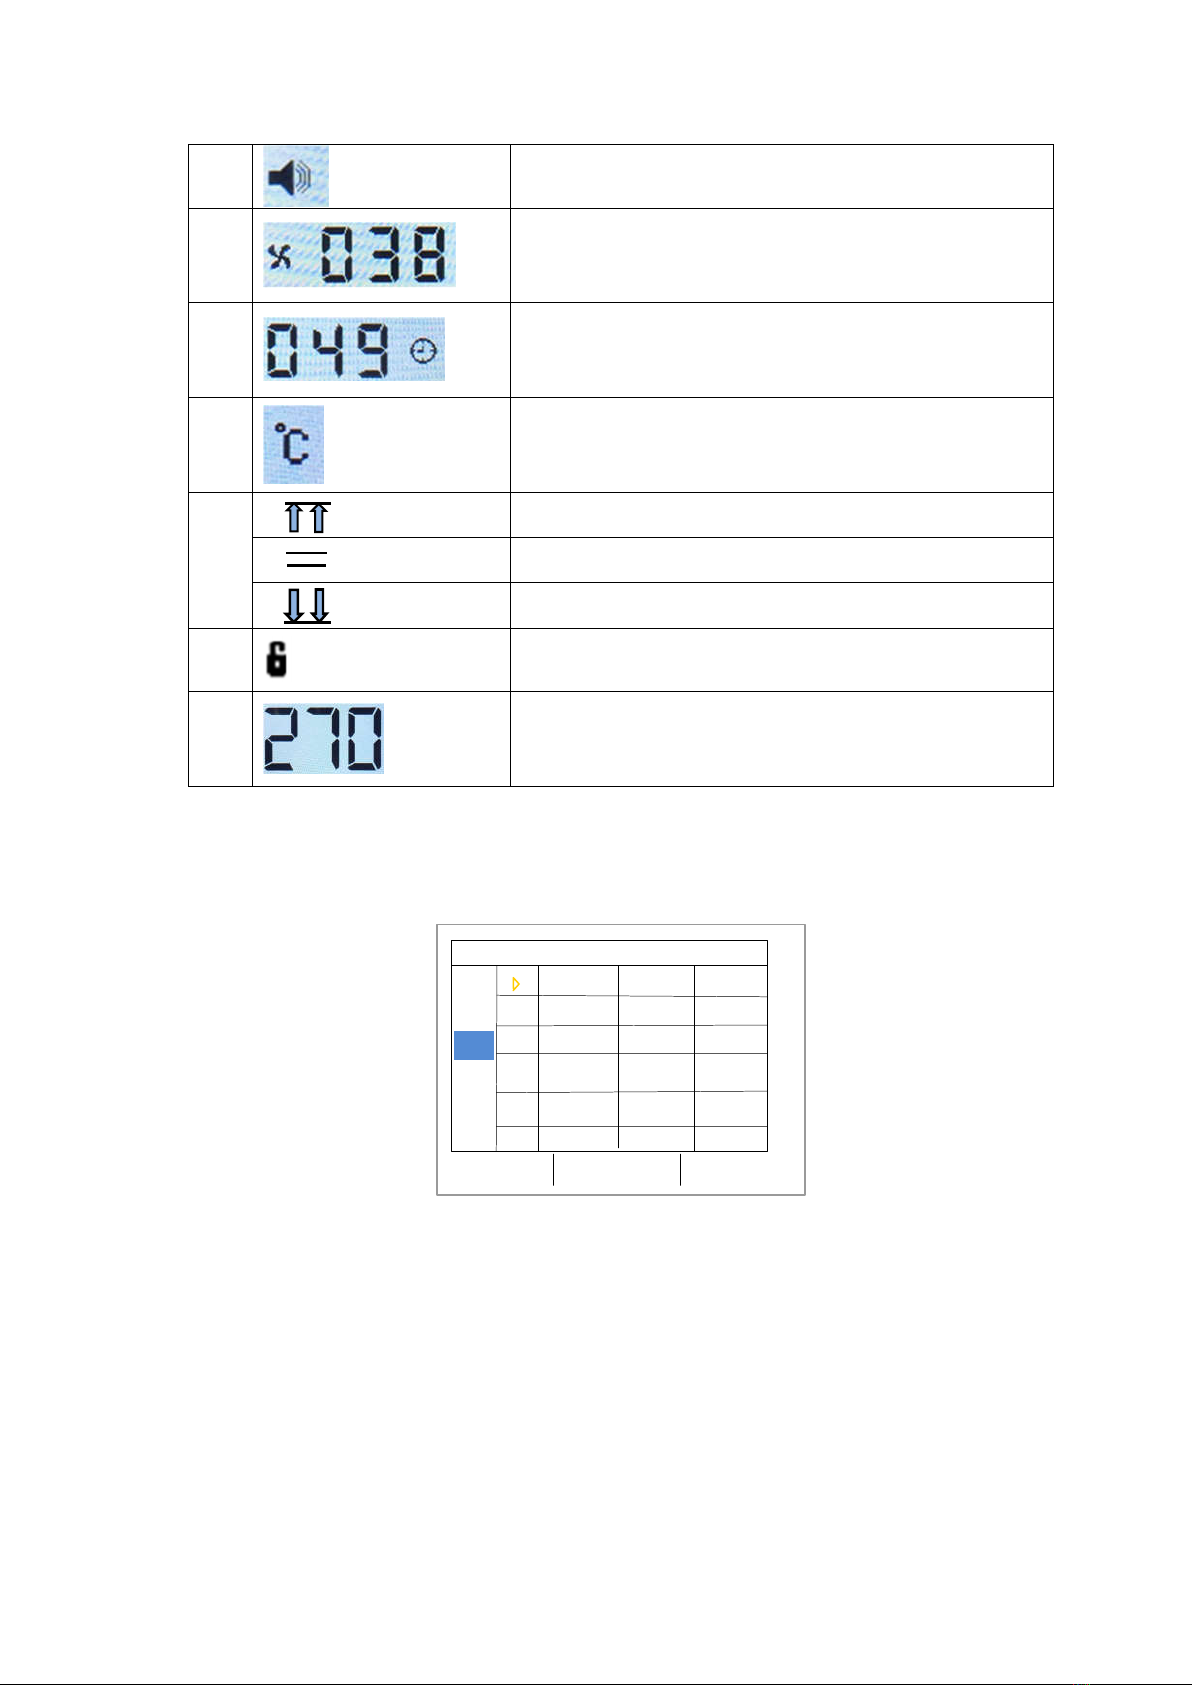
7 Operation Process ................................................................................................................................................ 6
7.1 Turn ON/OFF ................................................................................................................................................. 6
7.2 Foot Switch Function .................................................................................................................................... 6
7.3 Sleep and Work Mode .................................................................................................................................. 6
7. 4 Break Sleep Method .................................................................................................................................... 7
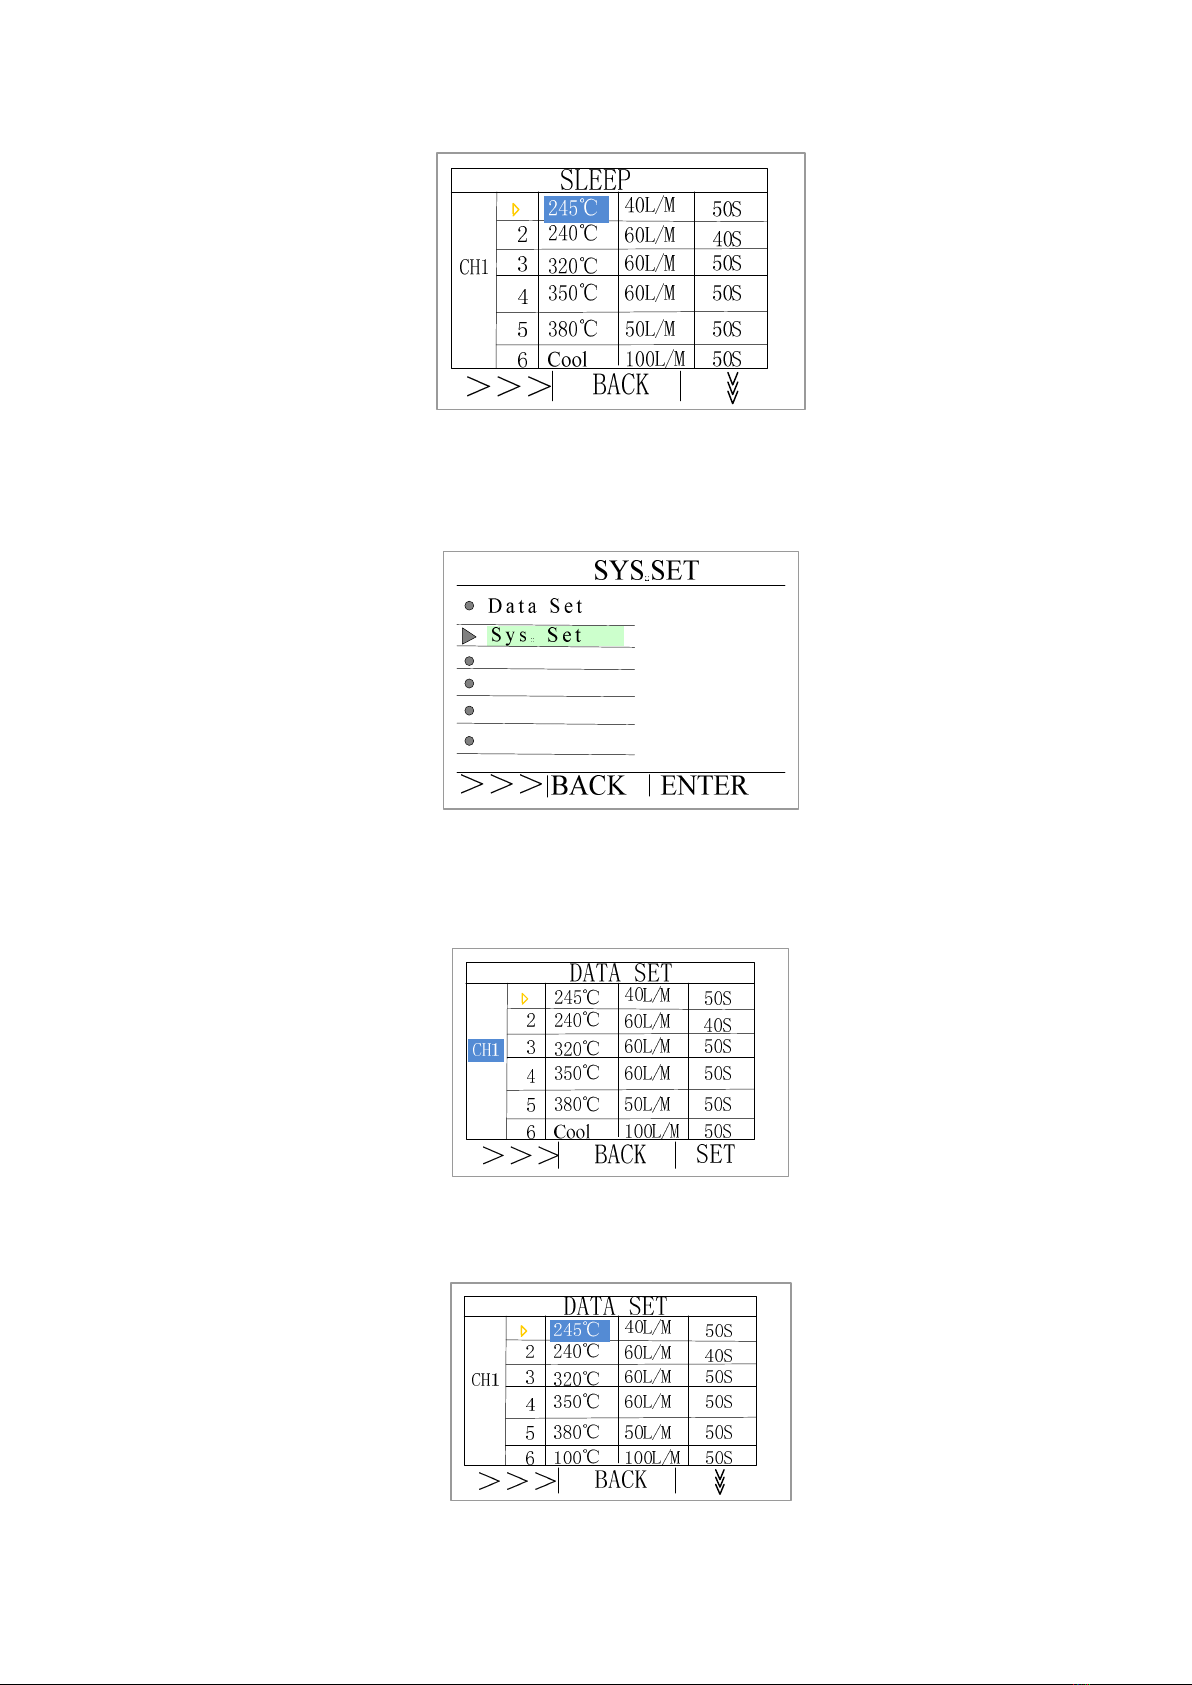
8 Menu Setting ........................................................................................................................................................ 7
8.1 Main Menu ................................................................................................................................................... 7
8.2 Data Set Menu .............................................................................................................................................. 9
8.3 System Set Menu ........................................................................................................................................ 10
8.3.1 Password .............................................................................................................................................. 10
8.3.2 Unit ...................................................................................................................................................... 10
8.3.3 Alarm Temperature ............................................................................................................................. 11
8.3.4 ESD Test ............................................................................................................................................... 11
8.3.5 Key Tone .............................................................................................................................................. 11
8.3.6 Address ................................................................................................................................................ 12
9 Maintenance ...................................................................................................................................................... 12
10 Error Symbol ................................................................................................................................................... 13

2
1 Safety Instruction
Please read this manual carefully before use.
This system uses rated voltage and frequency.(Please refer to the trademark on the
back of the system.)
The handle is placed on the holder, the system will sleep automatically when the
temperature is below 100 ℃.
This system uses a three-core grounding plug, which must be inserted into a three-hole
grounding socket.
Do not change the plug or use an ungrounded three-head adapter, which will cause
poor grounding. If you need to extend the wire, use a grounded three-core power cord.
When the system is turned on and the soldering tip and air nozzle are in a high
temperature state, do not touch them with your hands to avoid burns.
Notify other personnel of the factory that this system is extremely susceptible to burn
and may cause dangerous accidents. Turn off the system when resting or after
completion.
When installing or disassembling, remember to turn off the system and pull out the
power plug to avoid damage to the machine or cause accidents.
Do not use this system near flammable materials.
Fume will be generated during soldering, and the factory should maintain a good
ventilation environment.
Regular inspection and maintenance, please do not use when it’s damaged.
Do not modify this product without authorization.
When replacing parts, the power supply should be cut off, and original parts should be
used. Air nozzle and heating element should be replaced after cooling to room temperature.
Do not use or store it within the reach of children.

3
2 Introduction
1. It’s easy to use, suitable for the de-soldering of a variety of packaged components, such
as SOIC,CHIP,QFP,PLCC,BGA ect.
2. Air volume is adjustable and suitable for different volume.
3. Include magnet switch and foot switch, easy to use.
3 Characteristic
Large TFT screen.
Integrates temperature control and air volume control.
Use ten channels to control air volume, temperature and time ect.
Digital temperature calibration, easy to use.
Equip with the DC brushless motor.
Light handle, comfortable to use and ESD design.
With RS 485 communication function.
4 Technical Data
Item Data
Mode TR1350
Voltage 220V AC 50/60Hz
Power 1300W
Display TFT
Hot Air Temperature Range 100℃~500℃ /212F~932F
Hot Air Volume 6~70L/min
Operation Temperature(Max) 40℃
Dimension (W*D*H) 215*155*1230mm

4
Weight About 5.3kg
★NOTE: Ensure that your power supply data agrees with the information on the
nameplate of the machine!
5 Part Description
Item
Part Name
1 Operation panel
2 Hot air gun holder
3 Hot air gun protective cover
4 Hot air gun
5 Nozzle
Operation panel functions of all buttons
In Set menu, press “+” button once
to increase the gun temperature
value by one digit, press and hold it
to continuously increase.
In Set menu, press “-” button once
to decrease the gun temperature
value by one digit, press and hold it
to continuously decrease.
In Main menu, press “+” button to
change the working mode.
In Set menu, press “3” button to
activate menu.
Soft Power ON/OFF button
In Main menu, press “2” button to
enter into Channel Parameter menu.
1
2
3
4
5

5
6 Connection and Dimension
6.1 Connection
Item functions:
1. Hard Power Switch: it’s a power connecting or disconnecting rework system.
2. Power inlet module: connect the outlet of the power supply 220V AC power line into
power inlet module.
3. ESD socket
4. RJ11 socket: it follows RS485 Standard Protocol.
5. Foot switch socket
6. USB socket
6.2 Dimension
Front view Left view
1
2
3 4
5 6

6
7 Operation Process
7.1 Turn ON/OFF
1. Hard Power ON: Turn on the equipment by switch on hard power switch, when it is
connected outlet power supply. The Figure 1 will appear, press any button to enter into
Main Menu, see following picture:
1 2 3
+POWER -
Touch Key
Figure 1 Main Menu
2. Soft Power ON: Press “POWER” button for 3s to ON or OFF equipment during it is
hard powered on.
7.2 Foot Switch Function
1. Press foot switch to enter into cool process when the machine is working. During sleep
mode, press foot switch to enter into working process.
2. The foot switch is invalid when the hot air gun is placed in the holder.
3. The working process will continue heat when press and hold foot switch.
7.3 Sleep and Work Mode
1. The handle is placed on the holder, the system will sleep automatically when the heating
temperature is below 100 ℃. Press any button to break sleep.
2. The handle is not on the holder, press “1” button to select work (heat or cool) mode.
When the cool temperature is below 100℃, it will enter into sleep mode.

7
7. 4 Break Sleep Method
1: The handle is placed on the holder, the system will sleep automatically when the
temperature is below 100 ℃, and remove it from holder to break sleep.
2: The handle is not placed on the holder, the sleep is break when you press “1” button.
3: Press the foot switch to break sleep.
4: Sent break sleep code, when the equipment is communicated with other machine.
8 Menu Setting
8.1 Main Menu
Function of all symbols list:
NO.
Figure Function
1 Shows the equipment work status(heat, cool, sleep)
2
Shows the current channel number.
3
Shows the heating element status (black indicates ON
status and red indicates OFF status).

8
4
Buzzer symbol
5
Shows the hot air volume.
6
Shows the temperature timing, it is preset timing
down to 0.
7
Shows temperature unit (℃/℉)
8
Shows the heating element is heating.
Show the heating element preset temperature value.
Shows the heating element is cooling.
9 Shows lock or unlock status.
10
Display real time temperature value.
Press and hold “2” button to enter into channel set menu, you can press “+” or “-” button to
select channel, , see following picture, there are nine channels can be set.
BACK SET
SLEEP
CH1
2
3
4
5
6
245℃
240℃
320℃
350℃
380℃
Cool
40L/M
60L/M
60L/M
60L/M
50L/M
70L/M
50S
40S
50S
50S
50S
50S
Press “3” button to activate the parameters (blue indicates it is activated), press “+” or “-”
button to set the number of channel and press “2” button to save.
NOTE: There are six steps in every channel, and the first five steps are heating status,
the last one is cooling status!

9
8.2 Data Set Menu
1. Press and hold “2” & “3” buttons to enter into System Set Menu, see above picture.
2. Press “1” button to move the cursor to the required item (such as Data Set) and press “3”
button to enter into Data Set Menu, see following picture.
3. You can press “+” or “-” button to select the required channel, and press “3” button to
activate parameters, and press “3” or “1” button to move the cursor.

10
4. Press “2” button to save.
8.3 System Set Menu
Press “+” or “-” button to move the cursor to the SYS SET.
8.3.1 Password
1. Press “+” or “-” button to move the cursor to the Password, and the default activated
menu is Password.
2. Press “3” button to activate Password.
3. Press “+” or “-” button to select the number and press “1” to change digit. The default
password is 000000.
4. Enter the new password two times, it is changed successfully after the same new
password is entered both times.
5. Press “3” button to save it.
8.3.2 Unit
1. Press “+” or “-” button to move the cursor to the Unit.
2. Press “3” button to activate Unit.
3. Press “1” button to select temperature unit, and press “3” button to save.
4. Press “2” button to back.

11
8.3.3 Alarm Temperature
1. Press “+” or “-” button to move the cursor to the Alarm Temp.
2. Press “3” button to activate Alarm Temp.
3. Press “1” button to select alarm temperature mode (ON/OFF).
4. Press “+” or “-” button to change temperature value, the preset value is 2~99℃.
5. Press “3” button to save.
6. Press “2” button to back.
8.3.4 ESD Test
1. Press “+” or “-” button to move the cursor to the ESD Test.
2. Press “3” button to activate ESD Test.
3. Press “1” button to select ESD Mode, and press “3” button to save.
4. Press “2” button to back.
8.3.5 Key Tone

12
1. Press “+” or “-” button to move the cursor to the Key Tone.
2. Press “3” button to activate Key Tone.
3. Press “1” button to select Key Tone mode (ON/OFF), and press “3” button to save.
4. Press “2” button to back.
8.3.6 Address
1. Press “1” or “+” button to move the cursor to Address.
2. Press “3” button to activate Address.
3. Enter the password.
4. Enter required address,
5. Press “+” or “-” button to select number and press “1” button to change digit.
6. Press “3” button to save.
7. Press “2” button to back.
9 Maintenance
(1) After work or during prolonged break, switch off appliance and remove plug
(3) Clean the nozzle regularly with sponge, the oxide and carbide produced by residual
flux will damage the nozzle, like soldering deviation and slow heat conduction etc.

13
10 Error Symbol
Various error messages will be displayed when there is something wrong with the
equipment.
“NO Handle”: handle is not inserted.
“Sensor Error”: temperature sensor error.
“Room Sensor Error”: temperature offset sensor error.
“Heater Error”: heating element error.
“Hot Fan Run Error!”: hot air fan error.

14
QUICK INTELLIGENT EQUIPMENT CO., LTD.
ADD: NO.11, FengXiang Road, Wujin High-Tech Industrial Development Zone,
Jiangsu, China
TEL: 86-519-86225678
FAX: 86-519-86558599
POSTCODE: 213167
WEBSITE: www.quick-global.com
Table of contents
Other Quick Soldering Gun manuals