QUORION CR 2500 Owner's manual

User and Programming Manual
Electronic Cash Register
CR 2500 series

2
...designed to Succeed
Dear valued customer!
On behalf of our proud company we wish to welcome you to the QUORION family of fine
business machines. We sincerely hope you will appreciate the many benefits of being
associated with a distinguished product name that represents both quality and
commitment to customer satisfaction.
The QUORION cash register is fully customizable and yet simple to operate. Users can
easily adapt it to any type of retail or scanning system. Moreover, our dynamic software
generates a compatible environment for a wide array of peripheral devices. It is exactly
this versatility and quality that has made us successful among our multinational
customers.
It is therefore with great pride that we look forward to continuing our close collaboration
with our customers.
Sincerely,
Your QUORION Team

3
Index
Introduction........................................................................................................................5
1. Before Starting Operations...........................................................................................6
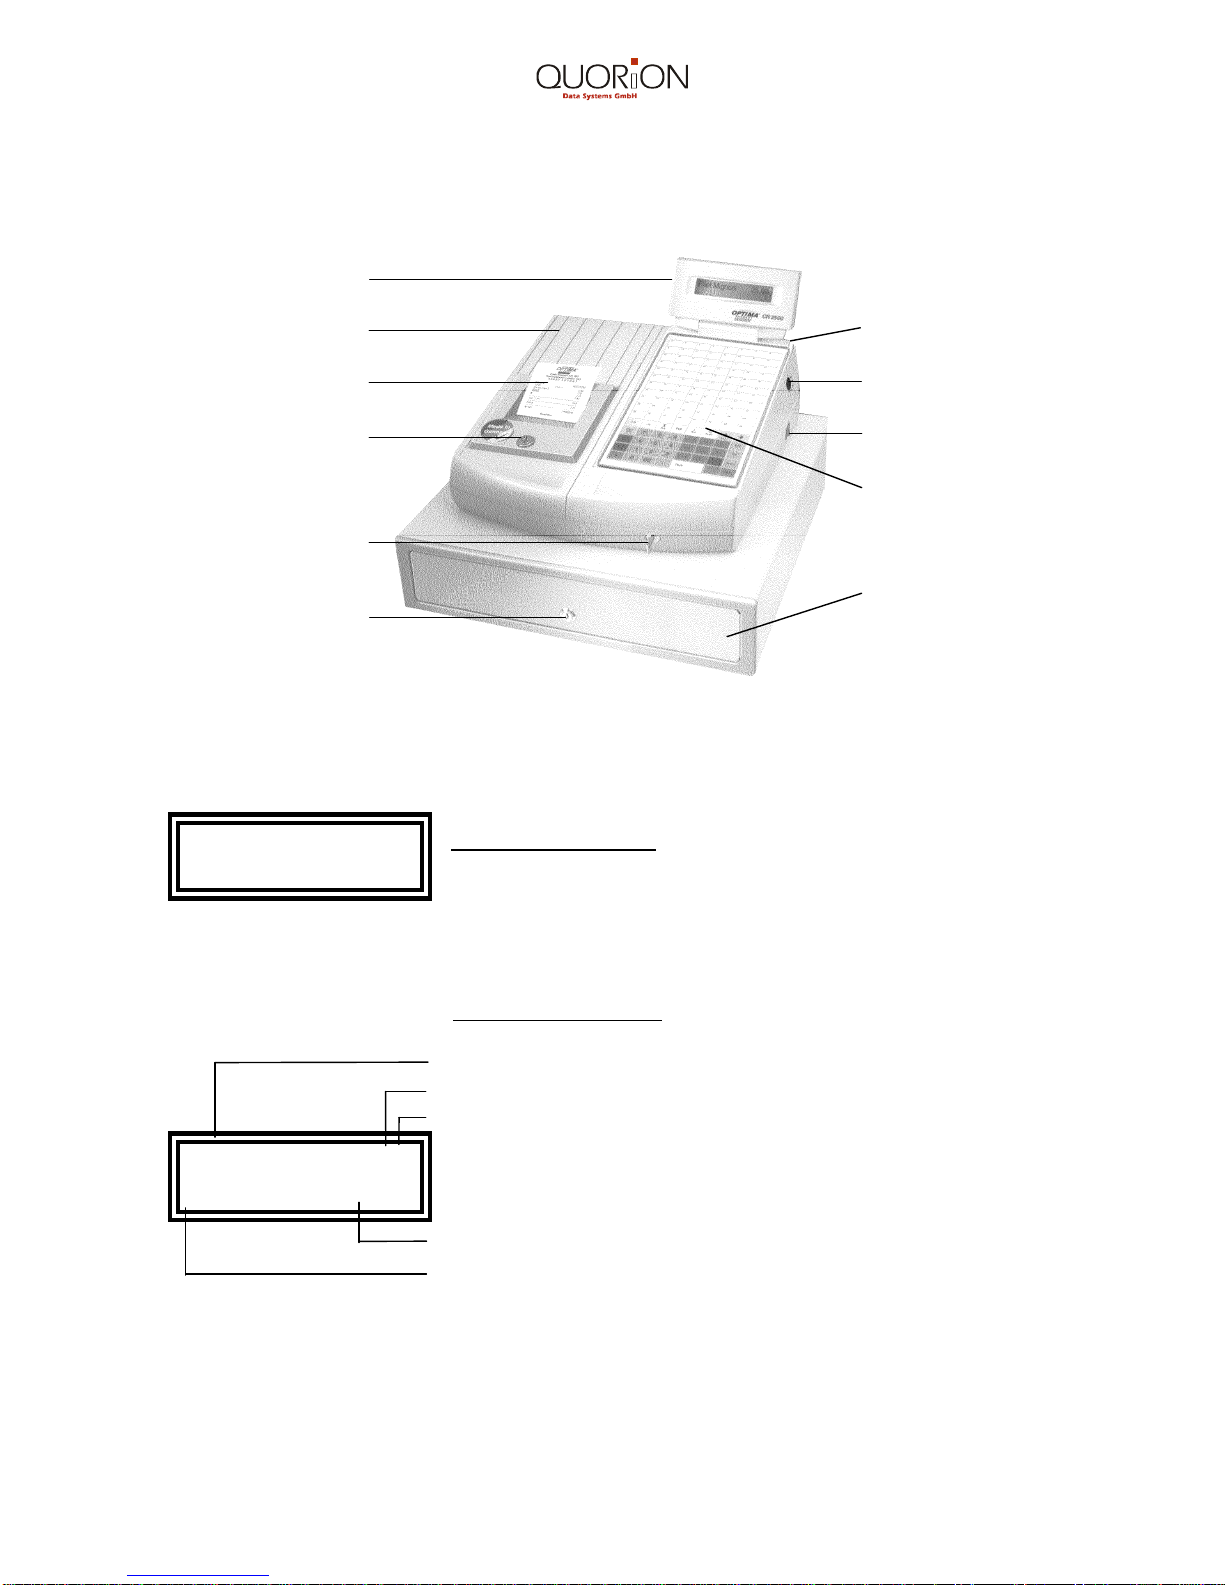
1.1 External View..............................................................................................................6
1.2 Displays......................................................................................................................6
1.3 General Precautions...................................................................................................7
1.4 Printer Precautions.....................................................................................................7
1.5 Setting up the Cash Register......................................................................................7
2. Installing the Cash Register .........................................................................................7
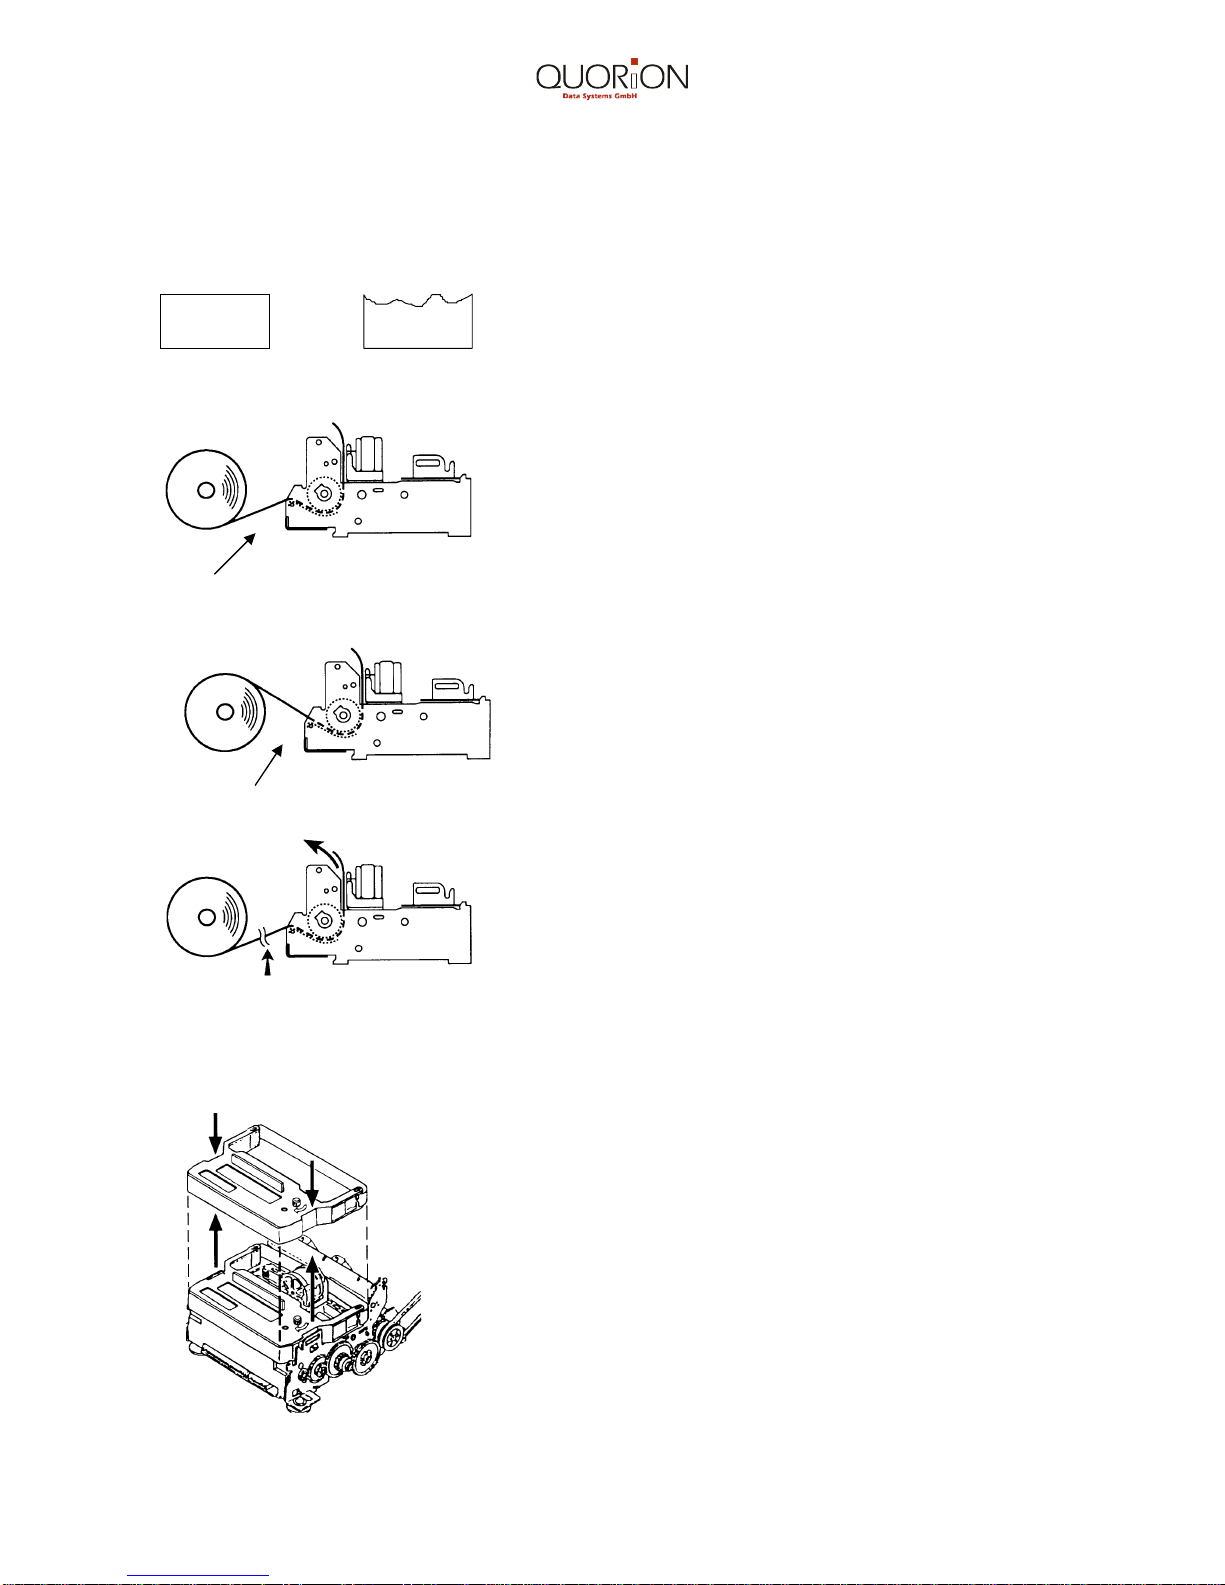
2.1 Installing paper rolls....................................................................................................8
2.2 Installing and replacing the ribbon cassette................................................................8
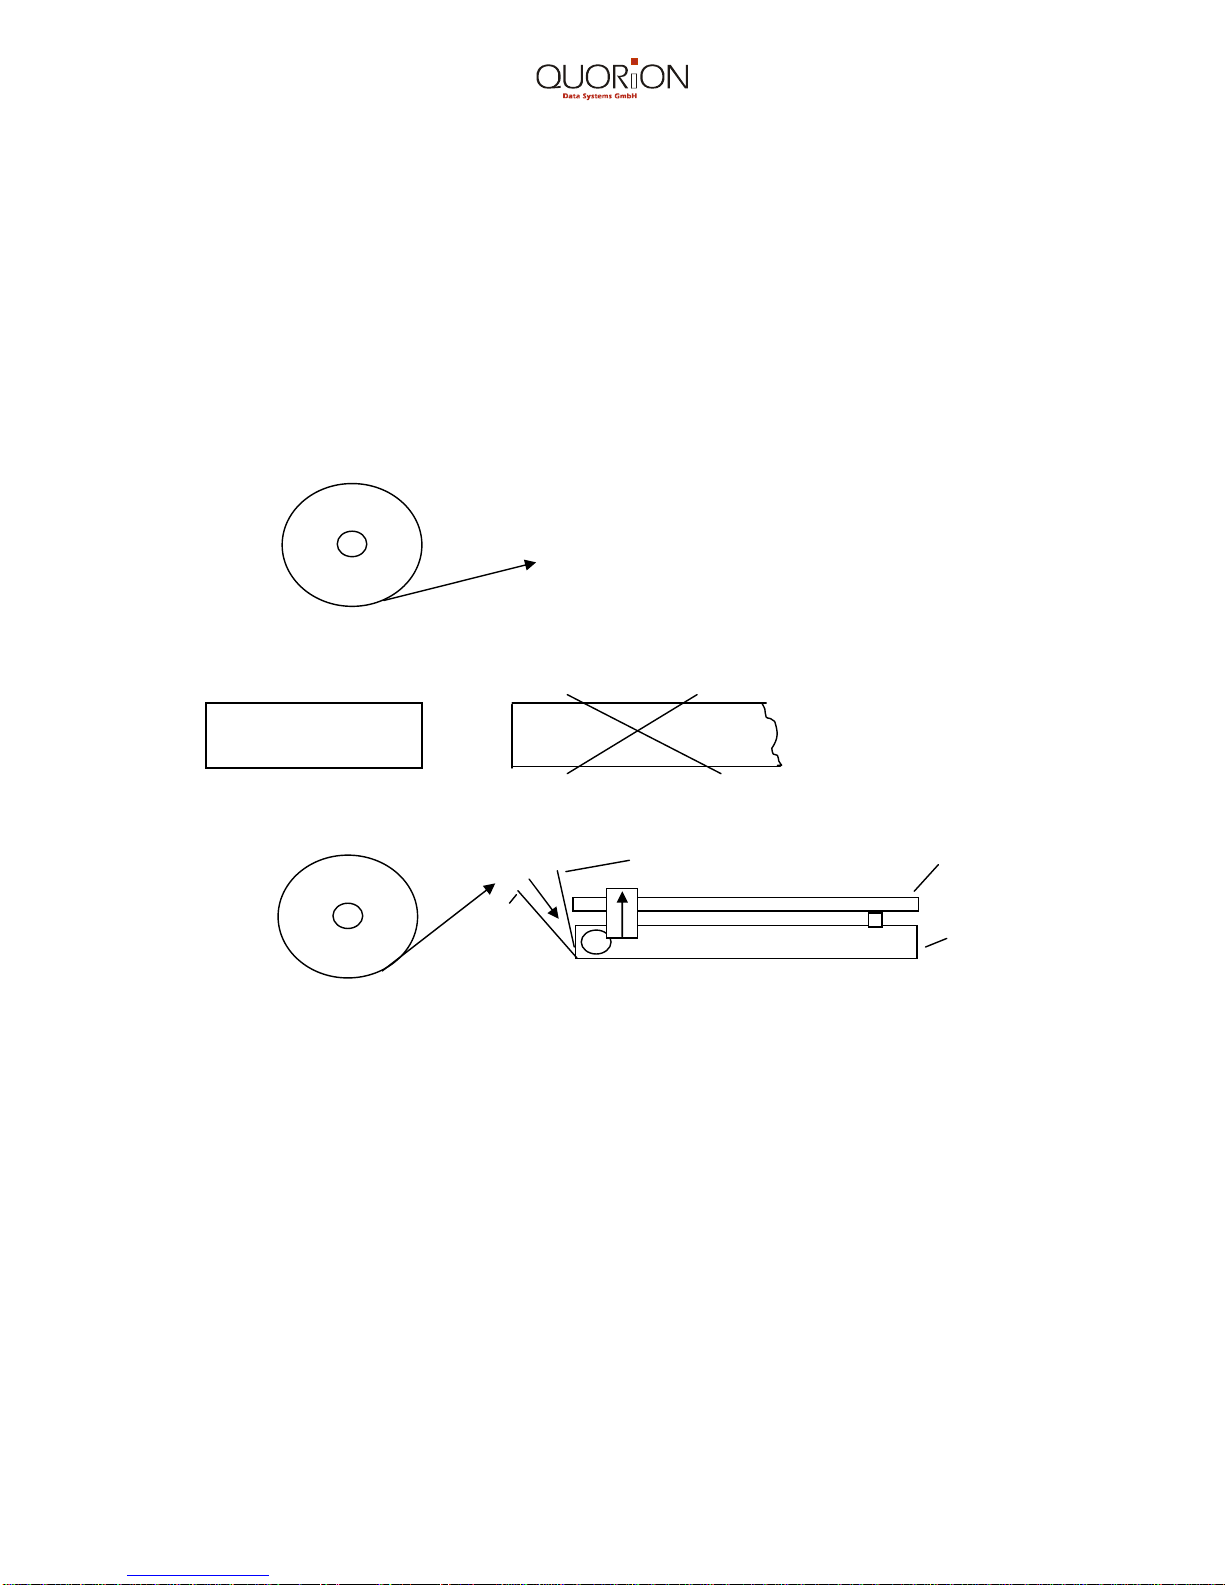
2.3 Thermal printer ...........................................................................................................9
2.3.1 Insert thermal paper ............................................................................................9
2.4 Keyboard ..................................................................................................................10
2.5 Control Lock and Control Lock Keys.........................................................................12
2.6 Key Names and their Function .................................................................................13
3. Programming ...............................................................................................................16
3.1 Programming of System Flags..................................................................................16
3.1.1 Reset/System CLEAR.......................................................................................16
3.1.2 Clearing the Electronic Journal..........................................................................16
3.1.3 Programming Hints............................................................................................17
3.1.4 Basic Program - System Flag Programming......................................................17
3.1.5 System Flags Printout .......................................................................................23
3.2 Department Programming ........................................................................................24
3.2.1 Department printout...........................................................................................25
3.2.2 Group Name Programming ...............................................................................25
3.3 PLU Programming....................................................................................................26
3.3.1 PLU Printout......................................................................................................27
3.3.2 Direct Key Programming....................................................................................27
3.4 Menu Programming..................................................................................................28
3.5 Tax Rate Programming.............................................................................................29
3.6 Clerk Programming...................................................................................................29
3.7 Programming of Restaurant Logo / Commercial Message.......................................30
3.8 Tendering names programming................................................................................31
3.9 Foreign Currency Exchange Programming (FCE)....................................................31
3.10 Percentage Rates Programming.............................................................................33
3.11 Macro Keys.............................................................................................................34
3.11.1 Printout of Macro Keys....................................................................................34
3.12 Programming text of extended guest invoice.........................................................34
3.13 Programming logo for external display ...................................................................35
4. Cash Register Operation.............................................................................................35
4.1 Registration (Sales-Mode)........................................................................................35
4.1.1 Electronic Journal Printout.................................................................................35
4.1.2 Clerk Sign-On....................................................................................................36

4
4.1.3 Assigned Clerk Area and Compulsory Invoice ..................................................36
4.1.4 Opening and Closing a Table............................................................................37
4.1.5 Entry Corrections...............................................................................................37
4.1.5.1 Correction of incorrect numbers..................................................................37
4.1.5.2 Deleting the last Entry (EC/Error Correction)..............................................37
4.1.5.3 Voiding earlier Entries.................................................................................37
4.1.5.4 Refund ........................................................................................................37
4.1.6 Re-opening a Table...........................................................................................38
4.1.7 Closing a Table with Guest Check Printing .......................................................38
4.1.8 Table Transfer...................................................................................................38
4.1.8.1 Separation of a registered Item...................................................................39
4.1.9 Tax Shift (Take out sales)..................................................................................39
4.1.10 Price Shift........................................................................................................39
4.1.11 Using the FCE Function ..................................................................................39
5. Management Reports ..................................................................................................40
5.1 Reports without Reset ..............................................................................................40
5.2 Reports with Reset ...................................................................................................41
5.3 Flash Reports . .........................................................................................................41
5.4 Clearing the Grand Total ..........................................................................................42
6. Accessories and Options............................................................................................42
6.1 Ribbon Cassettes .....................................................................................................42
6.2 Option PC Interface..................................................................................................42
7. Maintenance................................................................................................................42
7.1 Emergency Drawer Opening....................................................................................42
8. Information on the Electromagnetic Compatibility and Safety................................43
9. Error Messages............................................................................................................44
10. General Specifications..............................................................................................45
11. Peripheral Devices.....................................................................................................46
11.1 Activation of a Serial Interface RS 232...................................................................46
11.2 Using a Kitchen Printer...........................................................................................47

5
Introduction
This electronic Cash Register is designed to help you manage your business even more
efficiently and effectively.
Start-up is quick and easy. Customize the system according to your requirements by
taking advantage of the numerous programmable options.
Detailed financial and management reports will provide you with the information you need
to know to maximize your productivity.
Here are just a few of the Register’s many valuable features:
•24 departments allow you to efficiently categorize your merchandize.
•500 Price Look Up (PLU) allow for fast entry and registration of any item.
•16 Cashier names and codes are programmable.
•Large 16 x 2 characters operator display and 11 x 1 characters customer display for
easy viewing.
•Automatic tax computation for 4 different tax rates, including ADD ON and VAT.
•Electronic Journal
•Periodic management reports provide up to date sales analysis, including hourly
report, end-of-day, weekly or monthly totals.
•Memory protection maintains financial records during power outage.
•Cash Register automatically prints date, time, cashier’s name, cash register and
receipt numbers and records the number of transactions on the receipt.
•Training mode available for trainees.
•Customize the fully programmable keyboard to your requirements.
•Optional interfaces, PC programming, memory expansion and the connection of a wide
array of peripheral devices broaden the possibilities of your Cash Register.
•Inter-register communication with up to 25 Cash Registers.

6
1. Before Starting Operations
1.1 External View
1.2 Displays
Customer
AMOUNT
19.00
1 line 11 characters 7 Segment Display (VFD)
Operator
2 lines 16 characters Display (LCD)
display:
PLU’s, Menus, Departments name or No.
Price shift level 1 or 2
1
st
to 3
rd
Direct key shift levels
drinks 1 1
2 X 3.78
Amount, Sub Total, Total, Change Due
Quantity
Operator Display
Printer Cover
Receipt
Printer Cover Lock
Waiter Lock
Drawer Lock
Customer
Display
Control Lock
ON/OFF Switch
Keyboard
Cash Drawer

7
1.3 General Precautions
•In case of malfunction do not repair the Cash Register by yourself. Please contact your
nearest dealer or sales person.
•Do not insert any metal objects such as screwdriver, paper clips etc. into your Cash
Register. This may damage your Cash Register or subject you to electrical shocks.
•Clean your Cash Register from time to time with a soft, dry or slightly damp cloth.
•Never use water or any volatile chemicals, such as benzene for cleaning. This may
damage your Cash Register.
1.4 Printer Precautions
•Never use the printer without a ribbon or without paper rolls.
•Do not pull the paper out during the printing process.
•Only use good quality paper free of wood pulp.
•Do not to attempt to move gears or the printing head by hand or with a screwdriver.
•Immediately install new paper rolls when ”paper-near-end” is indicated.
•Change the cassette ribbon as soon as the print becomes faint.
•Thermal sensitive paper is necessary for thermal printers. The thermal paper has to
weigh between 55 gr. and 72 gr. and have a thickness of 65 µm to 125 µm. Good print
quality will be achieved with middle sensitivity.
1.5 Setting up the Cash Register
•Make sure the local voltage corresponds with the voltage indications on the serial
number plate of your Cash Register.
•To assure a proper charge of the protection circuit, it is recommended that the Cash
Register is recharged several hours prior to use.
•Place the Cash Register conveniently close to a standard wall outlet.
2. Installing the Cash Register
•Plug your Cash Register into a standard electrical wall outlet with the ON/OFF switch in
OFF position.
•Activate the power ON/OFF switch to power up your Cash Register.
•Insert the OWP key into the control lock and turn it to position ”T” (train mode).
•Install the ribbon cassette and paper rolls. Follow the instructions on page 7.
•You can now use the Cash Register for simulated operations without affecting the
memory.

8
2.1 Installing paper rolls
Cut the edge Do not try to feed
to be fed straight the paper if it is
like this like this
this way
not this way
cut the paper here
2.2 Installing and replacing the ribbon cassette
1. Lift up and remove the printer
cover.
2. Load the paper rolls into their
respective receptacles. The end of
the paper roll must feed from
below.
3. Feed the end of the paper roll into
the paper entrance of the printer.
Press and hold the “Journal Feed“
key and feed enough paper so it
can be inserted into the slot of the
take-up reel. Wind two or three
turns of paper around the reel.
4. Now feed the end of the receipt
paper roll into the printer. Press
and hold the “Receipt Feed“ key to
pass the paper through the printer.
5. Feed the paper from below
through the paper slot of the
printer cover and reinstall the
printer cover.
To remove a paper roll, cut as shown
and feed out the cut-off paper with the
respective “PAPER FEED“ key.
1. Lift up and remove the printer cover.
2. Fit the left side clip of the ribbon
cassette into its receptacle of the
cassette holder and press down on the
cassette for a proper fit. To remove a
used ribbon cassette push it to the left
and lift it out.
3. Reinstall the printer cover.

9
2.3 Thermal printer
Fehler! Textmarke nicht definiert.
2.3.1 Insert thermal paper
1. Remove the printer cover.
2. Switch on cash register
3. Load the paper rolls into their respective receptacles. The end of the paper roll must
feed from below.
4. Cut the end of the paper roll
5. Feed the end of the paper roll into the paper entrance of the printer.
Paper entrance Cutter
Printer
paper is pulled in automatically and severed.
6. Close printer cover
Removing Paper Roles
Note: Only remove the paper by pressing the Receipt key !
2.4 Keyboard
The keyboard of the CR 655 Series consists of 64 keys which are freely programmable.
The flat keyboard with 128 keys is used in the CR 2500 Series and is freely programmable
as well.

10
RECEIPT
CURSOR
CURSOR
CHARGE
1
A
2
B
3
C
4
D
EL.
JOURNAL
# NS
INVOICE
TAX
SHIFT
5
E
6
F
7
G
8
H
GUEST
INVOICE
TABLE
TRANS REL PLU
SHIFT
9
I
10
J
11
K
12
L
PLU
ENTER
X
TIME
PLU
13
M
14
N
15
O
16
P
REFUND
7
8
9
17
Q
18
R
19
S
20
T
VOID
4
5
6
21
U
22
V
23
W
24
X
EC
1
2
3
CLERK
I.D. Y
CARD
Z
SUB-
TOTAL
CHECK
CLEAR
0
00
.
TABLE #
CASH
Cover
Display
Keysheet
To change a keysheet, remove the cover no further then 5 cm from the Display.
You can place the cover over the display for easier handling.
Important: Do not remove the cover completely!

11
1
a
2
b
3
c
4
d
5
e
6
f
7
g
8
h
9
i
10
j
11
k
12
l
13
m
14
n
15
o
16
p
17
q
18
r
19
s
20
t
21
u
22
v
23
w
24
x
25
y
26
z
27
empty space
28
/
29 30 31 32
33 34 35 36 37 38 39 40
41 42 43 44 45 46 47 48
49 50 51 52 53 54 55 56
57 58 59 60 61 62 63 64
65 66 67 68 69 70 71 72
73 74 75 76 77 78 79 80
GUEST
INVOICE
PRICE
SHIFT CHARGE
PLU
SHIFT TAX
SHIFT P/O R/A FCE
+ % - %
X
TIME
PLU
SEPARATE
RECEIPT
CURSOR
CURSOR
REFUND
7 8 9
INVOICE
RECEIPT
ON/OFF #
NS CARD 2
VOID
4 5 6
PLU
ENTER EL.
JOURNAL
REL CARD 1
EC
1 2 3
CLERK
I.D. TABLE
TRANS
SUB-
TOTAL
CHECK
CLEAR
0 00 .
TABLE #
TABLE #
CASH
CASH

12
2.5 Control Lock and Control Lock Keys
The control lock has six different positions for the various
operation modes of your Cash Register. Each of the keys provide
access to specific modes.
Control Lock
The following keys are included:
OP - Operator key for modes: L - R - X
OW - Owner key for modes: L - R - X - Z - P
OWP - Owner Program key for modes: L - R - X - Z - P - T
Key
Pos.
Display Mode/Function
L
Lock Mode
Turns off the Cash Register and disables all operations.
All data is maintained in the memory.
R Sale Mode
Time: 13:45:46 Registration Mode
Registration, Transaction Mode.
Used for all registrations and transactions.
X X-REPORT 11
ACTIVE TABLE 00 Read Mode
Used to display and print reports at any time
without clearing the data.
Z Z-REPORT 11
ACTIVE TABLE 00 Reset Mode
Used to print reports at any time
and clearing the data.
P PROGRAM Program Mode
Used for any Cash Register programming.
T Train Mode Training Mode
Used for training new operators without registering the
simulated sales transactions.

13
2.6 Key Names and their Function
Key Label Key Name Function
0…9 Numeric Keys Entering amounts, quantities and programming.
PAPER
Receipt Feed
Key Advances the receipt paper.
CURSOR
Cursor Key Up Scrolling upwards through the PLU’s of a department or
through the transactions of an open table.
CURSOR
Cursor Key
Down Scrolling downwards through the PLU’s of a department
or through the transactions of an open table
EL.
JOURNAL Electronic
JOURNAL Key Used to print out transactions stored in the Electronic
Journal.
CLEAR CLEAR Key Clears incorrect entries before registration and stops the
error alarm.
EC Error Correct
Key Deletes the last registration immediately after
registration.
VOID VOID Key Voids the transaction indicated by the cursor.
REFUND REFUND Key Used for refund transactions.
CLERK
I.D. Clerk Sign-On
Key Used to enter a pre-set numeric clerk ID code.
PLU Price-Look-Up
Key Used to access pre-set PLU items.
PLU
ENTER PLU Enter Key Used to manually change a pre-set PLU price.
1...80 PLU/DEPT/
Menu Keys Used to access pre-set PLU’s or free price entering.
Used to register an item of a department or a menu.
PLU
SHIFT PLU/Department
Shift Key Used to switch shift levels for PLU’s and departments.
X
TIME Multiplication/
Time Key Used for multiplication and displaying of the current time.
#
NS No Sale Key Used to print a reference code number or open the cash
drawer.
SUB-
TOTAL Sub Total Key Displays the sub total during operations.
INVOICE Check Key
Used to print out a pro-forma invoice of a not yet
finalized table.
Used to enable the printout of the guest check
(compulsory guest check).
CHARGE Charge Key Used to finalize a registration on account.
CARD 1, 2 Credit Card Keys
Used to register payments made on credit cards.

14
Key Label Key Name Function
GUEST
INVOICE Guest Invoice
Key
Must be pressed before finalization of a table.
Used to print additional text lines at the bottom of a
receipt.
CASH Cash Key Used for finalization of all registrations and transactions,
change due is shown in the display and the cash drawer
is opened.
TABLE # Table Number
Key Used to open and close a table.
REL Release Key Used to cancel PLU price and enter a new one.
Used to cancel a department chosen in error.
Tax
SHIFT Tax Shift Key Used to shift to tax rat 2 e.g. take-out and in-
house sales.
PRICE
SHIFT
Price Shift Key Used to shift to the 2
nd
price level.
P/O Paid-Out Key Used for all cash paid out of the drawer.
R/A Received-On-
Account Used for all payments received in cash, by check or on
credit cards.
SEPARATE
Separation Key Used to transfer an item from one table to another.
RECEIPT
ON/OFF
Receipt On/Off
Key Used to switch receipt off/on.
FCE
Foreign
Currency
Exchange Key Used to calculate in foreign currency.
Direct Alphanumeric Name Programming
The Cash Register allows a direct programming of department, menu and PLU names,
logos etc. by using the keys 1...28.
The ”PLU SHIFT”
(direct key shift) key is used to switch to the capital letters in shift level 2 and special
characters in shift level 3.
Special Characters
Special characters can be programmed by using the hexadecimal codes (see character
code chart).

15
2.7 Character Code Chart
0
1
2
3
4
5
6
7
8
9
A
B
C
D
E
F
2
Space
! "# $ %
&
‘ ( ) * + , - . /
3
0 1 2 3 4 5 6 7 8 9 : ; < = > ?
4
@
A
B
C
D
E
F G
H
I J K
L M
N
O
5
P
Q
R
S
T U
V
W
X
Y Z [\]^_
6
`abcdefghijklm
no
7
p q r s t u v w
x y z {|}~Ä
8
III
III
↑↓
9
A
¡¢£¤¥¦§¨©
ª«¬-®
¯
B
°±²³´µ¶·¸¹º»¼
½
¾
¿
C
À
Á
Â
Ã
Ä
Å
Æ
Ç
ÈÉÊËÌÍÎÏ
D
Ñ
Ò
Ó
Ô
Õ
Ö
ר
Ù
Ú
Û
Ü
İÞß
E
àáâãäåæ
çèéêëìíîï
F
ð
ñòóôõö÷øùúûüýþÿ
Western Europe
Hexadecimal codes are used in shift level 3.
For entering digits 0...9 use numeric keys 0...9.
For hexadecimal codes A...F use the direct keys 1...6.
Example: Character ”A” = 41 (numeric keys 4, 1)
Character ”O” = 4F (numeric key 4, direct key 6

16
3. Programming
3.1 Programming of System Flags
3.1.1 Reset/System CLEAR
Control Lock Key Position: P
(Initialize your Cash Register by performing a System CLEAR)
No.
Key Description
1. 444
SUBTOTAL Enter 444. Press “SUBTOTAL“ key.
Display: CLEAR
2. SUBTOTAL Press “SUBTOTAL“ key to complete the initialization.
Note:
All programmed parameters and values will revert to the original factory defaults. The
electronic journal, all tables, and reports will be erased.
Entering a Uniform Price
No.
Key Description
1. 333
SUBTOTAL Enter 333. Press “SUBTOTAL“ key.
Display: DEFAULT
2a. 0...9 Through the use of the numeric keys, all departments and PLU’s can
be given a uniform price.
2b. SUBTOTAL Press the “SUBTOTAL“ key.
3.1.2 Clearing the Electronic Journal
(Programmed Flags will not be erased)
No.
Key Description
1. REFUND Press ”REFUND”.
2. VOID The electronic journal is erased.

17
3.1.3 Programming Hints
Use these keys to program the cash register.
Key Description
1
SUB TOTAL
The 1st Flag (date) of the system Flags is displayed.
SUB
TOTAL The ”SUB TOTAL” key confirms the changed Flag and advances to the
next Flag.
CASH The “CASH” key ends the programming.
Note: In the column “Digit Entry ” an enabled function is indicated with y (yes) and a
disabled function with n (no). The factory default (Default) is in bold print.
3.1.4 Basic Program - System Flag Programming
Press ”1” + "SUBTOTAL" key to enter the System-Flag programming mode. Enter the
Flag number + “Sub Total” which you wish to program. You may also just press “Sub
Total” and start with Flag 1.
No.
Display Description Digit Entry
1
Prog Sysflag
1 DATE: 11
010197
Date entry
(always enter in this order)
6 digits for day, month, year. 2 digits each
2
2 TIME 1158 Time entry
4 digits for hours, minutes. 2 digits each
3
3 CR-No. 00 Cash Register ID number. From 00 to 99
4
4 FEED 3397 Logo Lines / Receipt Advance.
1
st
Entry: Number of headers. 0 1 2 34 5 6 7 8 9
2
nd
Entry: Number of footers. 0 1 2 34 5 6 7 8 9
3
r
d
Entry: Paper advance
before header. 0 1 2 3 4 5 6 7 8 9
4
th
Entry: Paper advance after
footer. 0 1 2 3 4 5 6 78 9
5
5 NS/Shift 20 Receipt for NS / Department Shift.
1
st
Entry: 0 2
Intermittent Shift. n y
2
nd
Entry: always enter 0. 0

18
No.
Display Description Digit Entry
6
6 TAX 32 PRICE inclusive/exclusive of tax /
Date format.
1
st
Entry: 0 1 2 3
Price exclusive tax.
Price inclusive tax.
month/day/year (USA).
day/month/year (Europe).
y y n n
n n y y
y n y n
n y n y
2
nd
Entry: 0 1 23
Number of decimal places. y
7
7 ROUND #1
05 Tax symbol /price rounding.
1
st
Entry: 0 1 2
Print tax symbol.
Print tax in %. ny n
nn y
2
nd
Entry: 5
Rounding of tax. y
8
8 ROUND #2
55
Rounding of division /discount.
1
st
Entry: 5
Rounding of division. y
2
nd
Entry: 5
Rounding of discount. y
9
9 HEAD
00 Print tax and receipt format.
1
st
Entry: 0 1 2 3 4 5 6 7
Print tax.
Reset Grand Total with daily report
Partition lines.
yn y n y n y n
nn y y n n y y
yy y y n n n n
2
nd
Entry: 0 1 2 3 4 5 6 7
Print time.
Print clerk ID number.
Print CR ID no, receipt no. & date.
yn y n y n y n
yy n n y y n n
yy y y n n n n
10
10 REPORTS
02
Print format of ”Z” report & receipt.
1
st
Entry: 0 1 2 3 4 5 6 7
Print Grand Total.
Print Z-counter.
Consecutive receipt no. is reset to 0.
yn y n y n y n
yy n n y y n n
yy y y n n n n
2
nd
Entry: 0 1 23 4 5 6 7
Print % calculation of departments.
Reset Grand Total with periodicreport.
Print logo.
y n yn y n y n
y y n n y y n n
n n nn y y y y

19
No.
Display Description Digit Entry
11
11 TAB, WAIT
00 Compulsory clerk sign-on &
Compulsory table no.
1
st
Entry: 0 1
Compulsory entry of table no. n y
2
nd
Entry: 0 1
Compulsory clerk sign-on. ny
12
12 DISTR/RCPT
00 Enforced server area by table no. /
Compulsory guest check printing.
1
st
Entry: 0 1 2 3
Enforced server area in R mode
Enforced server area in X mode ny n y
n n y y
2
nd
Entry: 0 1
Compulsory guest check printing. ny
13
13
LOGO/BON 01 Logo lines / sorting courses on KP
1
st
Entry: 01 2 3
Print text logo lines.
Print graphic logo yn y n
y y n n
2
nd
Entry: 0 1
Sorting courses on KP. n y
14
14 KP/PLU
00 Kitchen printer / Slip printer / PLU.
1
st
Entry: 0 1 2 3 4 5 6 7
Kitchen printer on.
Slip printer on.
Print PLU’s on KP in sales mode
without table.
ny n y n y n y
nn y y n n y y
nn n n y y y y
2
nd
Entry:
Paper advance for slipprinter header 0 (From 0 to 9)
15
15 DIS/TAX
01 Display mode / print short or
complete tax information.
1
st
Entry: 0 1
Display mode (no print). yn
2
nd
Entry: 0 1 2 3
CR printer prints short tax
information.
CR printer prints complete tax
information with groups.
n yn y
n ny y

20
No.
Display Description Digit Entry
16
16 KP_
PLUstat
05
Print price, number, single price of
PLU on kitchen printer.
1
st
Entry: 01
Disable price-overwrite for direct
PLU's. ny
2
nd
Entry: 0 1 2 3 4 56 7
Print single PLU price.
Print PLU number.
Print sum of PLU prices.
n y n y n yn y
n n y y n ny y
n n n n y yy y
17
17 SL
-length
00
Number of lines which can be
printed on a pre-printed slip printer
receipt. 0...99
18
18 RCP/T
-Flag 00 Print “TRAIN” on receipt & kitchen
printer.
1
st
Entry: 0 1
Receipt on/off with Code - number ny
2
nd
Entry: 0 1 2 3
Print “TRAIN” on receipt.
Print “TRAIN” on kitchen printer. y n y n
y y n n
19
19 NoPrintNS
02 Do not print “NO SALE” on receipt &
on kitchen printer.
1
st
Entry: 0
2
nd
Entry: 0 1 23
Print “NO SALE” on receipt.
Print “NO SALE” on kitchen printer. y n yn
n n yy
20
20Price/TaxSh
00 Tax shift & price shift.
1
st
Entry: 0 1 2 3 4 5 6 7
Enable price shift .
Intermittent shift for each PLU.
Intermittent shift for transaction.
yn y n y n y
n
nn y y n n y y
nn n n y y y y
2
nd
Entry: 0 1 2
Enable tax shift.
tax shift only for 1 PLU yn y
nn y
21
21 Masterkey
00 Define one clerk as manager. All
restrictions are disabled. 0...99
22
22 TrainClerk
00 Define one clerk as trainee. No
report is maintained. 0...99
23
23 PLUShift
100 Off-set between PLU shift levels.
Factory default: 100. 0...999
24
24StartHappy
00 Start Happy Hour. 0...24
Table of contents
Other QUORION Cash Register manuals

QUORION
QUORION CR 1000 User manual

QUORION
QUORION QMP 50 Series User manual

QUORION
QUORION QMP 2000 series User manual

QUORION
QUORION QMP 5000 User manual

QUORION
QUORION CR 502 Owner's manual

QUORION
QUORION CR 1200 User manual

QUORION
QUORION CR-300 Owner's manual

QUORION
QUORION QMP 3396 User manual

QUORION
QUORION CR 20 User manual

QUORION
QUORION CR 20 User manual
Popular Cash Register manuals by other brands

Sharp
Sharp UP-600 instruction manual

Casio
Casio PCR-360 Operator's instruction manual

Casio
Casio PCR T265 - Electronic Cash Register quick start guide

Sam4s
Sam4s ER-230 Series Operation and programming manual

Sam4s
Sam4s ER-920 Operator's and programming manual

Olivetti
Olivetti NETTUN@3000 int'l quick guide