manuals.online logo
Brands
  1. Home
  2. •
  3. Brands
  4. •
  5. Remaco
  6. •
  7. Projection Screen
  8. •
  9. Remaco PRO-1515 User manual

Remaco PRO-1515 User manual

>
_
>
RF
Remote
Motor
Blue
Green
Brown
Red
Black
Brown
Blue
}
To 3-Cores
Power
Supply
}
To ESC-ip
Internally Shorted
Brown
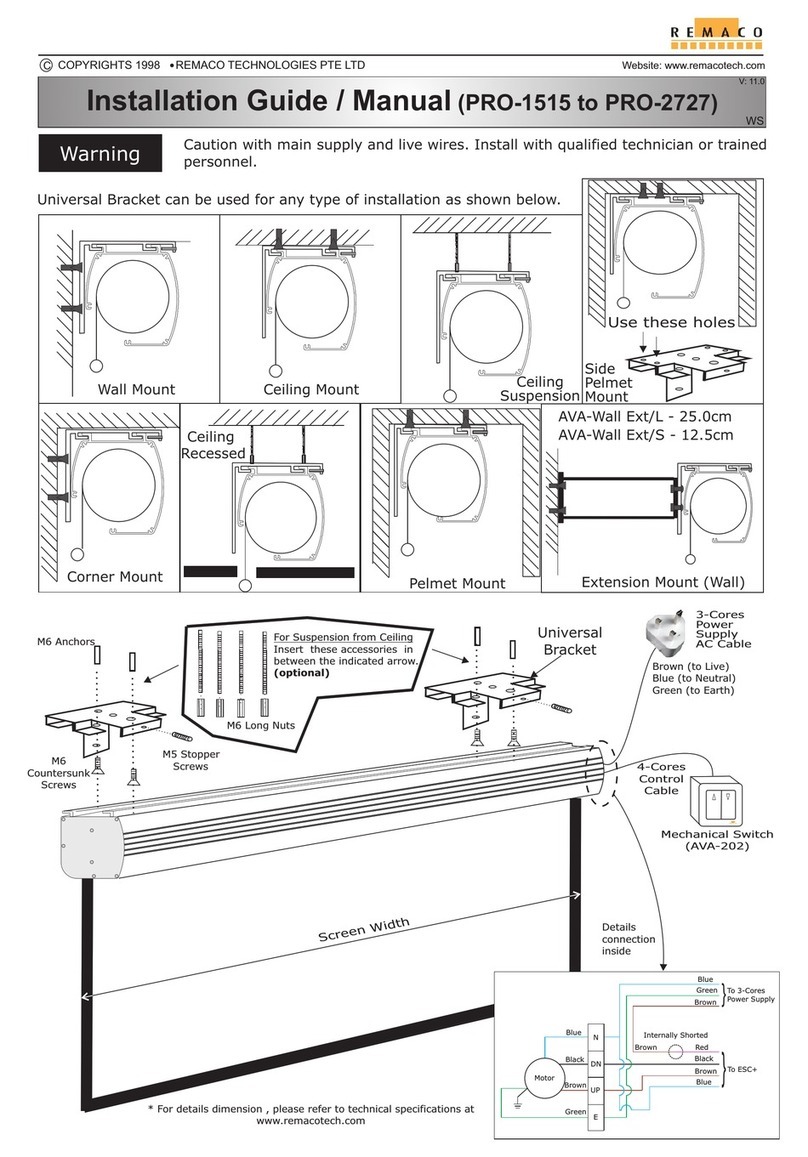
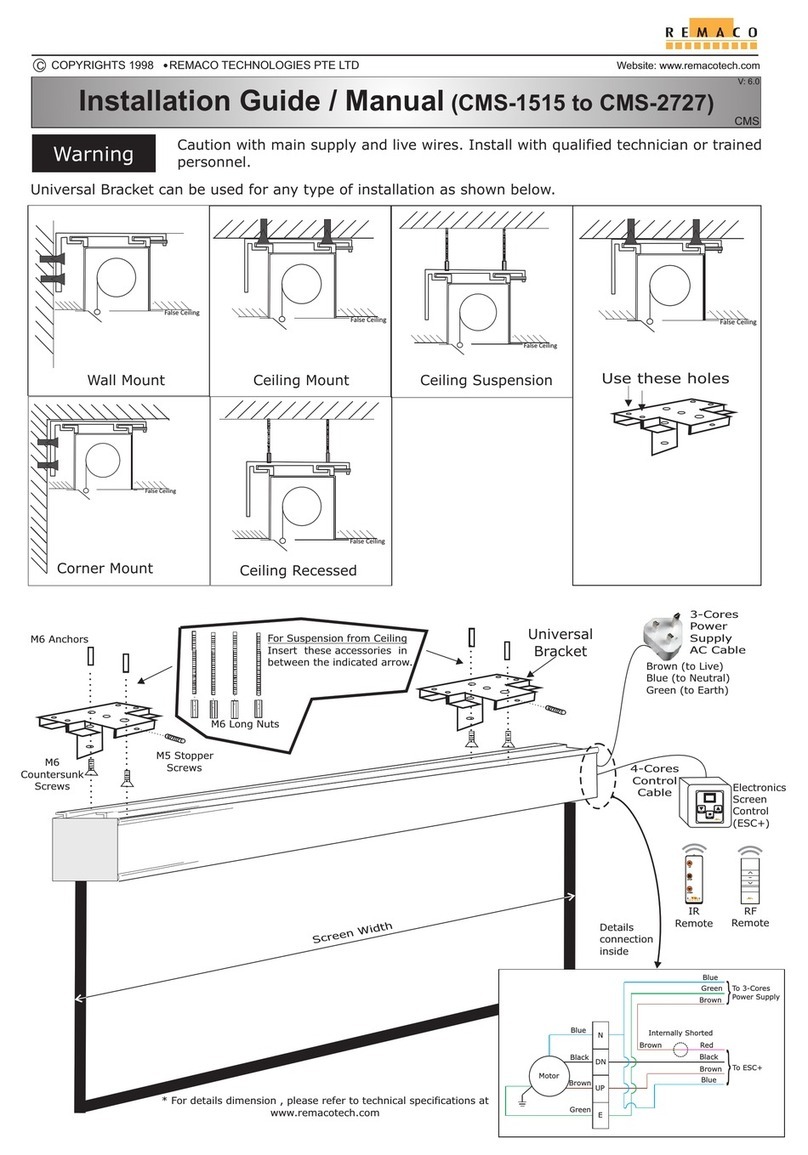
Warning Caution with main supply and live wires. Install with qualified technician or trained
personnel.
Installation Guide / Manual (PRO-1515 to PRO-2727)
ESC-ip
V: 11.0
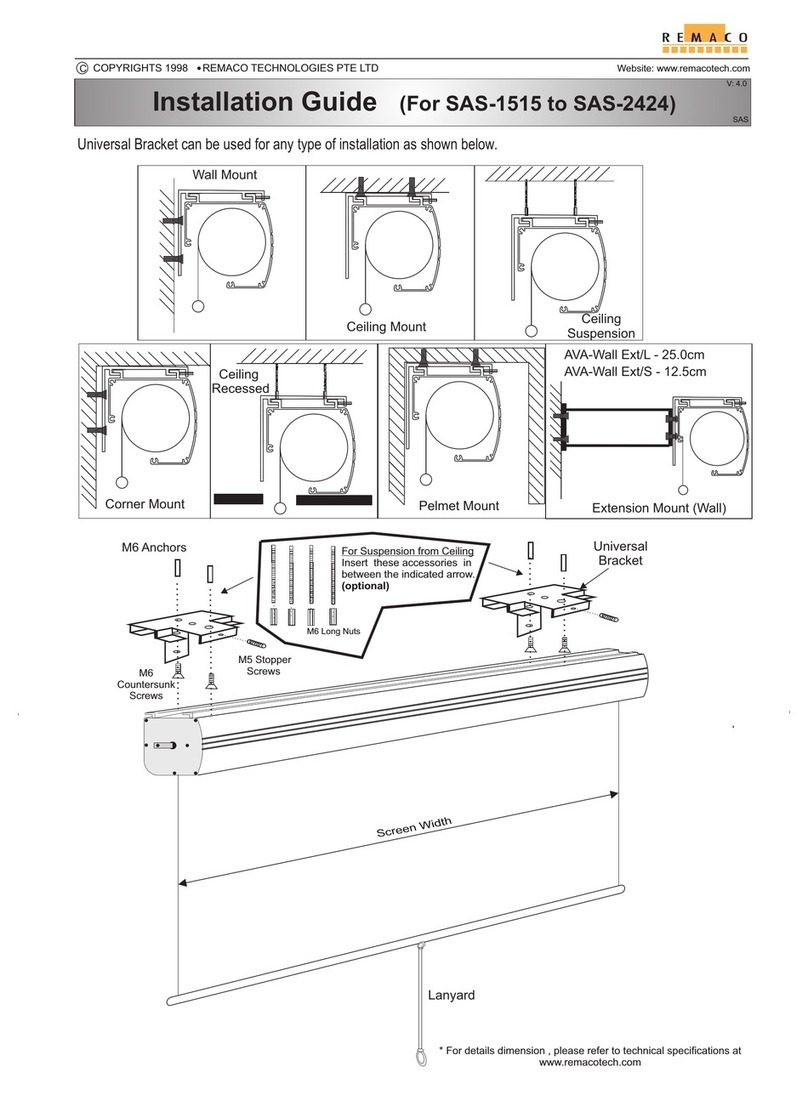
Universal Bracket can be used for any type of installation as shown below.
Use these holes
Wall Mount Ceiling Mount Ceiling
Suspension
Pelmet Mount
Side
Pelmet
Mount
Ceiling
Recessed
Corner Mount Extension Mount (Wall)
Screen Width
M6
Countersunk
Screws
M5 Stopper
Screws
M6 Anchors
M6 Long Nuts
For Suspension from Ceiling
Insert these accessories in
between the indicated arrow.
(optional)
Universal
Bracket
Brown (to Live)
Blue (to Neutral)
Green (to Earth)
3-Cores
Power
Supply
AC Cable
Details
connection
inside
AVA-Wall Ext/L - 25.0cm
AVA-Wall Ext/S - 12.5cm
* For details dimension , please refer to technical specifications at
www.remacotech.com
CCOPYRIGHTS 1998 REMACO TECHNOLOGIES PTE LTD Website: www.remacotech.com
.
4-Cores
Control
Cable
Electronics
Screen
Control
(ESC-ip)
UP
DOWN
STOP
UP
DOWN
ESC-ip
UP
DN
N
E
Green
Blue
Black
Brown
UP
DOWN
STOP
UP
DOWN
Down
button
Stop
button
UP
button
ESC-ip
Learn LED (D4)
Learn Switch (SW1)
Down
Up
Stop
Com
Down
Up
Neutral
Live
AC Power
Input
Motor
A/V Control System
(e.g. AMX / Creston)
AVA-200
Wall Switch
(Optional)
STOP UP
DOWN
Contact Closure
computer
Earth
J45 Ethernet Connection
AC Power
High Voltage
DC Voltage
Switch power supply
AC85V ~ 240V
433
RF module
AVA-ESC-ip Electronic Screen Control
Voltage AC (Volts)
230Vac 50Hz/60Hz
Power
1150 Watts
Frequency
RF : 433MHz
Sensitivity Range
RF : 40 metres
Temperature (Celsuis)
-20 C to -70 C
Specifications
Screen Frame
Universal Bracket
27
Power Drill Pin Punch Hammer
M6 Anchor
B) Drill Diameter 8mm Holes to a depth 27mm.
C) Insert M6 Anchor into the hole.
D) Use pin punch to expand the anchor.
A) Mark the bracket position with the help of universal bracket.
STEP 1
STEP 2 8mm Drill
Hook on (NOT slide in)
STEP 3
ELND
NU
P
R(by LAN Cable)
Momentary Contact closure connection (dry contact, normally open, voltage free).
Recommended to set close contact for 1.5sec for best working condition.
Any voltage above 3Vdc voltage will damage this ESC
Suitable to use with control systems (example: AMX, Crestron, Extron, ..etc)
**Warranty void if damaged is caused by inappropriate use
!
End
STEP 5
Important Note
The upper limit and lower limit of the screen had been preset in factory. Any adjustment to these 2 limit
switches may cause damages to the screen fabric. If adjusted, it will cause the following problems:
a) The screen will roll into the frame and stop by force and not by the Upper Limit switch.
This will cause overheating of motor which unable the screen to operate properly.
b) The depression of the bottom bar onto the fabric will cause horizontal mark on screen surface.
c) Adjusting the Lower Limit of the screen any lower than beyond the STOP sticker may cause the fabric
to drop off
Disclaimer
Any adjustment to these 2 limit switches will void the warranty for the screen and Remaco will hold
no responsibility for any damages to it. Please consult us if it is necessary to do any adjustment to the
limit switch.
Pairing ESC-ip with AVA-315 1-Ch
Learning Mode
Delete Mode
AVA-315
Radio Frequency Remote
To control screen by Internet Protocol address (IP address) connected through computer network.
Please visit our website ( ) and .www.remacotech.com click on “Downloads > Installation Guides > AVA-ESC-ip”
IP Control Configuration
Control by Radio Frequency Remote
OPTION-1
Step1. Press and Hold switch SW1 until LED (D4) flash slowly.
Step2. Release SW1 then press UP button on the RF remote, motor step-move again and stop.
Step3. LED (D4) off and “Learning” is completed successfully.
* NOTE: When pairing ensure ESC-ip and AVA-315 RF Remote within 20cm distance.
**NOTE: If nothing is pressed within 20seconds, the learning mode will disable and
back to normal mode.
Step1. Press and Hold SW1 until the LED (D4) flash fast.
Step2. Release SW1.
Step3. Press SW1 again within 7 seconds.
Step4. LED (D4) off, “Delete” mode is completed successfully.
Control by IP (Internet Protocol)
OPTION-2
STEP 4
E) To set screen to your desired “up” and “down” positions.
Bottom View
Lower Limit
Adjust “ - ” : screen roll away from frame
Adjust “ + ” : screen roll into the frame
Screen Frame
STOP
+
-
+
-
Red Knob
Upper Limit
White Knob
Allen Key (# 4mm) to set
limit switch know
Upper Limit
Lower Limit
Adjust “ - ” : less screen drop
Adjust “ + ” : more screen drop

This manual suits for next models

1

Other Remaco Projection Screen manuals

Remaco PRO Series User manual

Remaco

Remaco PRO Series User manual

Remaco CMS-L3030 User manual

Remaco

Remaco CMS-L3030 User manual

Remaco MAS-1818 User manual

Remaco

Remaco MAS-1818 User manual

Remaco WPS 1710W User manual

Remaco

Remaco WPS 1710W User manual

Remaco MAS-2424 User manual

Remaco

Remaco MAS-2424 User manual

Remaco PRO-1515 User manual

Remaco

Remaco PRO-1515 User manual

Remaco XXL Series User manual

Remaco

Remaco XXL Series User manual

Remaco FAS Series User manual

Remaco

Remaco FAS Series User manual

Remaco PRO-1515 User manual

Remaco

Remaco PRO-1515 User manual

Remaco TEN MXL Series User manual

Remaco

Remaco TEN MXL Series User manual

Remaco TEN XXL User manual

Remaco

Remaco TEN XXL User manual

Remaco CMS-1515 User manual

Remaco

Remaco CMS-1515 User manual

Remaco PLT-419C User manual

Remaco

Remaco PLT-419C User manual

Remaco SAS-1515 User manual

Remaco

Remaco SAS-1515 User manual

Remaco PRO-1515 User manual

Remaco

Remaco PRO-1515 User manual

Remaco BKT-M595 User manual

Remaco

Remaco BKT-M595 User manual

Remaco FIX-1612V User manual

Remaco

Remaco FIX-1612V User manual

Popular Projection Screen manuals by other brands

Rapidline A1515 Assembly instructions

Rapidline

Rapidline A1515 Assembly instructions

Reflecta Motor Silverline Series user manual

Reflecta

Reflecta Motor Silverline Series user manual

3M WallDisplay 8000PD Operator's guide

3M

3M WallDisplay 8000PD Operator's guide

Cirrus Screens Harbour 2 installation manual

Cirrus Screens

Cirrus Screens Harbour 2 installation manual

Exhibitor's Handbook ZOOM-FLX-OD-BB manual

Exhibitor's Handbook

Exhibitor's Handbook ZOOM-FLX-OD-BB manual

LP Morgan Rondo user manual

LP Morgan

LP Morgan Rondo user manual

Da-Lite CINEMA CONTOUR SCREEN Instruction book

Da-Lite

Da-Lite CINEMA CONTOUR SCREEN Instruction book

Oz Theatre Screens Majestic Series installation manual

Oz Theatre Screens

Oz Theatre Screens Majestic Series installation manual

Celexon INF200 operating instructions

Celexon

Celexon INF200 operating instructions

Mustang SC-E106D169 Specifications

Mustang

Mustang SC-E106D169 Specifications

Akia Screens EDGE FREE Series user guide

Akia Screens

Akia Screens EDGE FREE Series user guide

centor S2 installation instructions

centor

centor S2 installation instructions

DNP Supernova XL installation guide

DNP

DNP Supernova XL installation guide

Grandview CN Series instruction manual

Grandview

Grandview CN Series instruction manual

Vetra Systems MegaTouch USB- 802 Series User instructions

Vetra Systems

Vetra Systems MegaTouch USB- 802 Series User instructions

Grandview Fast Fold user manual

Grandview

Grandview Fast Fold user manual

Shopify MotoMask PRO user manual

Shopify

Shopify MotoMask PRO user manual

Dragonfly Ultra White installation manual

Dragonfly

Dragonfly Ultra White installation manual

manuals.online logo
manuals.online logoBrands
  • About & Mission
  • Contact us
  • Privacy Policy
  • Terms and Conditions

Copyright 2025 Manuals.Online. All Rights Reserved.