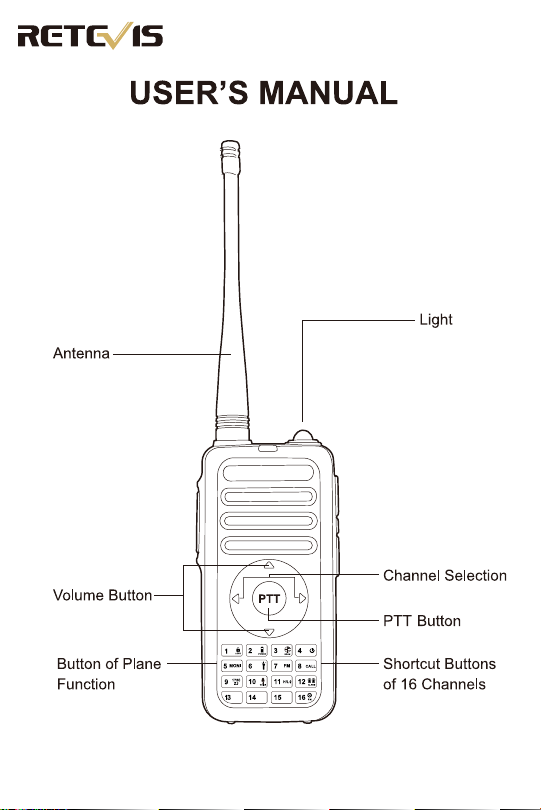
CHANNEL SELECTION
Press numeric button 1-16 or navigation buttons CH [left] [right] to select
the channel needed.
SETTINGS OF THE MAIN CHANNEL
1. Select a channel from 1 to 16 channels before pressing numeric button
[16] for 3 seconds. Settings of the main channel can also be done thro-
ugh compurter programming.
2. If the current channel is not the main channel, and there is no operation
within reset time of the main channel, the radio will automatically return
the main channel set currently.
3. Main channel reset time can be set by function setting in the
writing-frequency software(can be ser to 10 seconds, 20 seconds...600
seconds). Setting of the main channel can be by the setting function.
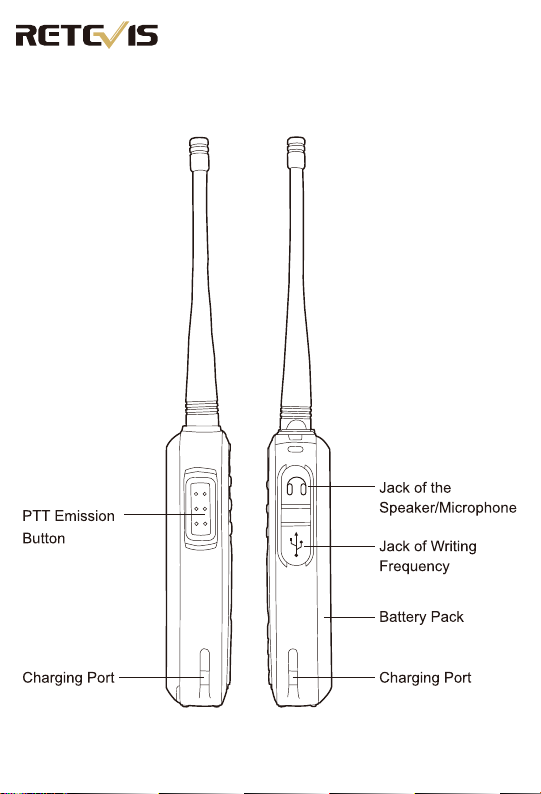
PTT EMISSION BUTTON
1. Before calling, hold the “PTT button” while talking to the microphone in
normal voice. Both side PTT emission button and navigation PTT button
can do normal emission.
2. Please keep 5-10 cm between lips and the microphone.
KEYBOARD LOCKOUT
Press numeric button [1] for 2 seconds, lock the keyboard, oprate it again,
and unlock the keyboard.
ELECTRICITY PROMPT
Press numeric button [2] for 2 seconds to get the current battery electricity
values.
SCANNING
Press numeric button [3] for 2 seconds and get the voice prompt of scan-
ning. At the moment, the radio conducts channel scanning from 1 to 16
channels in order. Exit the channel scanning by pressing any buttons.
ON AND OFF
Turn on/of the radio by pressing numeric button [4] for 3 seconds.
MONITORING
Change to monitoring mode by pressing numeric button [5] for 2 seconds.
LIGHT
Press numeric button [6] for 2 seconds, and the light turns on and it turns
off after another operation.
FM RADIO
Press numeric [7] for 2 seconds to the radio mode. Press CH [left] [right]
to search radio frequency automatically, quit the radio after another
operation.
CALL
By setting the dual tone multiple frequency (DTMF) signal, conduct the work
by pressing numeric button [8] for 2 seconds or sending code by PTT button.
EMITTING 1750 RELAY SIGNAL
Press numeric button [9] for 2 seconds. 1750 signal can be sent, which is
mainly used to open an emission signal in a European relay station. The
function is unavailable for domestic relay station.
VOICE CONTROL FUNCTION
Press 2 numeric button [10] for 2 seconds to enable the voice control
function of the current channel, and function disables after another
operation.
HIGH/LOW POWER
Press numeric button [11] for 2 seconds to switch high/low power of the
current channel.
WARNING
Press numeric button [12] for 2 seconds to enable warning function. The
radio in the same channel can receive the warning signal. Press PTT button
to quit warning function.
SETTING OF THE MAIN CHANNEL
Press numeric button [16] for 2 seconds to set the main channel. Adjust
the channel to the one needed, and press numeric button [16] for 2
seconds, then the main channel setting complete.
COMPUTER PROGRAMMING
Read the frequency within the radio with the computer, and the following
functions can be set by function settings:
1 . Voice Notification on/off
2 . Squelch
Adjust squelch to make it under better state without squelch disturbance.
3 . Power Saving Function
Enable the function, change to power saving mode after being under
standby state without signal receiving or emission for 10 seconds.
4 . Time-out time
Prevent any call with too long hold-up time. If it continuously emits longer
than programming time set, the radio may stop emitting and send out a
warning.
5 . Voice Control Gain Inversion Level
The function is to adjust voice control sensitivity.
6 . Scanning Mode Carrier Wave/Time
7 . Setting of the Main Channel
8 . Reset Time of the Main Channel
9 . Beep
After enabling the function, press the numeric button, and it beeps and
responding voice. Disable the function, there is no beep if press the
numeric button.
10. Warning Tone for Emission End
After enabling the function, there is a beep after emission and the voice
will be sent to the other party.
11. High/Low Power
12. Selection of Broadband/Narrow Band
Selection broadband for frequency space >25KHz and narrow band for
frequency space <25KHz.
13. Busy Channel Lockout
Enabling the function can prevent interference by other radios using the
same channel. If you press the [PTT] button during key channel occupa-
ncy, the radio may send out warning and cannot emit signals, and it retu-
rns to the receiving mode.
14. Scrambling/Companding
Scrambling/companding mode is available.
15. QT/DQT
1. Both 39 standard sets of continuous tone controlled squelch system
modules and 83 sets of continuous digital controlled squelch systems
(can be set by computer programming software KD-C21) are available.
2. Select random non-standard continuous tone controlled squelch
systems for frequency between 60Hz and 260Hz.
3. Select random non-standard continuous digital controlled squelch
systems for frequency between 000N and 777N, 000I and 777I.
16. PTT button code sending (PTT-ID) and dual tone multiple frequency (DTMF)
signal. The function can set the interphone to emit by pressing PTT button
or send dual tone multiple frequency voice after loosening. Set parameters
in the writing-frequency software, with specific operationg as follows:
1. Connect the computer with a writing-frequency line to read the
radio information. Click “edit” and “DTMF” in the toolvar, and set the
encoding in PTT-ID and DTMF codes.
2. After setting up, select “more” in the channel to set dual tone mult-
iple frequency for channel editing. Select DTMF optional signallings
in the PTT-ID options to select DTMF.
17. Stun and Kill
The function is usually used for leasing or losing. If leasing customers
do not return it overdue or it is lost, make it stun or kill to make it una-
vailable. It can be set by writing-frequency software, and scrambling
or companding can not be selected for the channel set the function.
08
0605
www.retevis.com www.retevis.com
www.retevis.comwww.retevis.com
................................................................................................................................................................. .................................................................................................................................................................
................................................................................................................................................................. .................................................................................................................................................................