Rexing V55 User manual

V55
Quick Start Guide
The information in this manual is subject to change without notice.
Rexing All Rights Reserved
www.rexingusa.com

Our support team will respond you as soon as possible.
Always a surprise in Rexing.
•https://www.facebook.com/rexingusa/
•https://www.instagram.com/rexingdashcam/
•https://www.rexingusa.com/support/registration/
•https://www.rexingusa.com/support/product-support/
1
Overview
Thank you for choosing REXING!
We hope you love your new products as much as we do. If you need assistance,
or have any suggestions to improve it, please contact us.
Check us out here
Facebook Instagram Site Product Support
(877) 740-8004

1.What’s in the box
1. Rexing V55 Dash Cam
2. Car Power Connector (12ft)
3. 3M Adhesive Mount
4. Cable Management Kit
5. Quick Start Guide
6. Safety Guide
5
12 3
64
2

2.Camera Overview
3
1. Power Button / Screen Toggle Button
2. Menu Button / Mode Button
3. Up Navigation Button / Emergency Lock Button
4. Down Navigation Button / Photo Taking Button
5. OK (Confirm) Button / Record Button
6. USB Charging Port
7. Micro SD Card Slot
8. Rear Camera Port (rear camera sold separately)
6
7
8
Reset
1 2 3 4 5

Screen Icons
4
06-09-2022 15:42:54
PWD:12345678
Rec
Flashing Red
While Recording
Recording Time
(Current Clip)
MIC (ON)
Recording Status
Recording (ON)
Time (24h)Current Date
(MM/DD/YYYY)
GPS Speed
Battery Charging
Video Resolution
GPS Signal Detected
Wi-Fi Signal
4K
SSID:WYK CARDV WIFI XXXXXX
000 mph -- 00:00:09

5
3.Installation
Step 1
Install the Dash Cam
Place the 3M tape on the mount and properly orient the mount square to the roof
and hood line of the vehicle.
Important! Ensure the T-interlock on the mount is oriented in the correct direction.
Firmly press the Mount onto the windshield. Wait at least 20 minutes before
mounting the camera.
On the illustration Orient the mount as shown.
Orient the mount as shown

6
Step 2
Insert the Memory Card
The Rexing V55accepts Class 10/UHS-3 or higher Micro SD memory cards up
to 256GB. You will need to insert a memory card before you can begin recording.
Before inserting or removing a memory card, first ensure you’ve powered
down the device. Gently push the memory card in until you hear a click, and
allow the spring release to push the card out.

7
Step 3
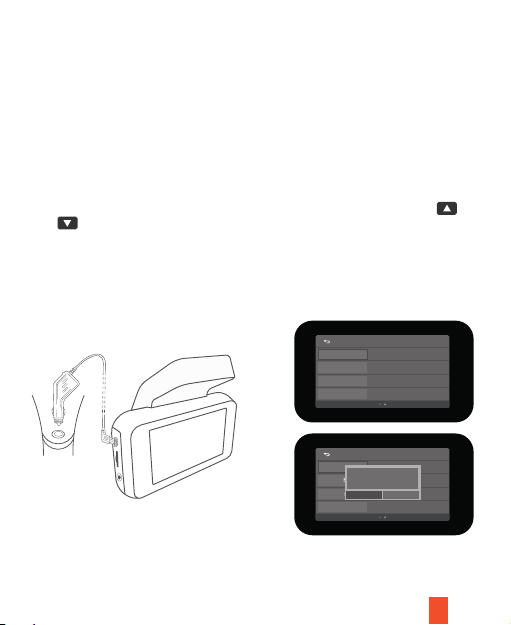
Power on the Camera and Format the Memory Card
Power on the camera by connecting the charger to the car cigarette lighter and
camera. To ensure the V55records to your memory card properly and without
error. Before you start using a new memory card, you must format the card within
the camera using the format function. Always backup important data stored on the
memory card before formatting.
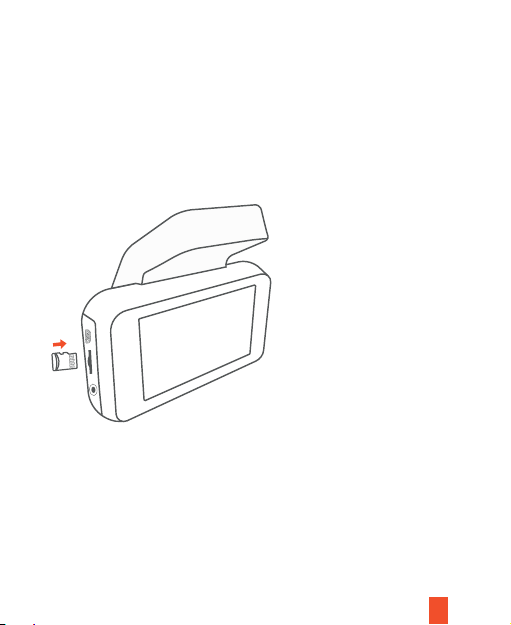
To format the memory card, make sure you have inserted your memory card, then
turn on the device by connecting to a power source. Press OK to stop recording.
Then press the MENU button twice to enter the System Setup Menu. Use the
and buttons and toggle to the Format setting. Press the OK button to confirm
the selection.
You may now disconnect from power. The camera will shut down after 3 seconds.
The camera should begin recording automatically the next time it is powered on.
General Setting
Format SD-Card
Reset Setup
FW Version
GPS Status
T50-1080p-20210525-V 1.0
General Settings
Format SD-Card
Reset Setup
FW Version
GPS Status
0525-v1.0
YES NO
Format Card?
All data will be deleted.

8
Step 4
Mount the Cabin/Rear Camera (optional)
Cabin/Rear cam needs to purchase separately.
Mount the rear camera as shown below. Use rear camera cable to connect
the rear camera to the V55camera.
front
cabin
rear

9
Step 5
Installing the Camera onto the Windshield
Place the camera on the mount and carefully route the power cable around the
windscreen and tuck in under the trim.
Plug the Car Charger Cable into a 12V DC power outlet or the car cigarette lighter.
Connect car charger to the camera. The camera will auto-start recording once
powered on.
Plug Mini USB Connector to the Dashcam
Plug charger into power outlet or cigarette lighter
Route power cable to the Dashcam

Reset
10
4.Basic Operation
Device Power
The device is automatically powered on when plugged into a 12V accessory
socket or cigarette lighter and received a charge (i.e. the vehicle is started).
To turn the device on manually, press and hold the Power button until the welcome
screen appears.
The camera will automatically start recording when power on.
Press and hold the Power button
to turn the device on manually
Menu Settings
Power the camera on. If the camera is recording, press the OK button to stop
recording.
Hold the MENU button and toggle to the desired mode. Press the MENU button
once to enter the settings menu for a Mode. Press the MENU button twice to enter
the System Settings (Set up).

11
The camera automatically starts
recording when powered on
Video Recording
The camera will automatically start recording when the device receives charge.
The LED lights and red dot will blink device when recording. Press the OK button
to stop recording.
Rec
EMR Mode (Locked Video)
To use the Emergency Record Mode, press the
button to manually record a
20 second video that is automatically saved and locked.
View EMR recordings by pressing the menu/playback button.
4K
Reset
SSID:WYK CARDV WIFI XXXXXX
PWD:12345678
06-09-2022 15:42:54 000 mph -- 00:00:09

12
To playback a video on the computer,
either use an SD card adapter or connect
the device to the computer directly using
the USB cable.
To playback a video using an SD card
adapter, remove the memory card and
insert it into an SD card adapter. Place
the adapter in the computer.
Video Playback
Playback of videos can be done on the device or a computer. To playback a video
on the device, toggle to the Playback mode. Use the and buttons to
toggle to the desired video. Press the OK button to play.
During playback use the OK (pause), (rewind) and (fast forward) buttons
to control the video playback.

13
Wi-Fi Connect
Step 1
With your dash cam powered on, hold the UP navigation button to enable the Wi-Fi
function. The Wi-Fi name (aka the SSID) and password for the dash cam should be
displayed on-screen.
Step 2
On your mobile device, navigate to your Wi-Fi settings. Connect to your dash cam's
Wi-Fi by tapping its name when it appears. Enter your dash cam's Wi-Fi password if
you are prompted to do so.
Note: On same mobile devices, you may have to try to connect more than once. To
ensure you've successfully connected, your mobile device's screen should resemble
the examples shown.

Step 3
Once you're connected to the dash cam, open the Rexing Connect app on your
mobile device.
Please select "Keep Trying Wi-Fi" if you see the notification on the right.
14
Step 4
In the app, hit the "Connect" button to connect to your dash cam, allowing
you to access live view and view/download your recordings.
Note: Hold to the UP button for 2 seconds to disconnect the Wi-Fi.

15
Rexing Connect App
Easily download the app by scanning the QR code below or search via the App
Store or Google Play.
Wi-Fi Connect Troubleshooting
If you bring up the Rexing connect app and cannot connect your phone to the
dash cam please go to
https://www.rexingusa.com/wifi-connect/
OR scan the QR code below.

15
GPS Logger
You can then access this information while playing back your recordings using the
GPS Video player (For Windows and Mac, available at rexingusa.com).
The dash cam will automatically search for the GPS signal once it’s connected to
the power source. Press the MENU button twice and go to System Settings. Toggle
the GPS Speed Unit setting, and select your favorite speed unit.
After a GPS signal is found, the screen icon will turn from red to green as per the
below icons. It will record the speed and location of your vehicle as you drive.
GPS function active GPS Signal (not found)
GPS Date-Time Troubleshooting
If your dash cam GPS date and time are incorrect please go to
https://www.rexingusa.com/gps-date-time/ OR scan the QR code below.

Parking Monitor (Parking Surveillance Mode)
Parking monitor provides surveillance on your parked vehicle. When the engine is
off, the hardwire kit is used to provide continuous power and protect your car
battery from being discharged.
Option 1: Vibration Detection
To enable the Parking Monitor, you'll need to connect it with a Smart Hardwire Kit
(sold separately).
This feature will allow the dash cam to switch to parking mode automatically
if the vehicle’s engine turns off and switch back to the normal recording after
the vehicle’s engine turns on.
ACC
Battery
Ground
Gravity Sensing Record:
The Gravity Sensing detects significant or sudden movement (such as an
impact or collision), it will trigger an event recording. We suggest setting the
"Gravity Sensing" to High sensitivity for Parking Mode Recording.
16

Note:
If you do not use the parking mode function, please change the Gravity Sensing
sensitivity to low. Otherwise, the video will easily be locked and the video cannot
be deleted by the loop recording function. This will cause the memory card to be
full of locked videos and cause the recorder to fail to work normally.
Please DO NOT ENABLE the Parking Monitor function in the settings of the
dash cam WITHOUT connecting a smart hardwire kit. They may cause a
malfunction.
Option 2: Motion Detection
To use this feature, you need to connect it with a Rexing Intelligent Hardwire Kit
(sold separately). Make sure that the Parking Mode is turned off on your dash
cam, otherwise it may cause a malfunction.
Once the sensor has detected MOTIONS. The intelligent hardwire kit will power
up the dash cam automatically and start recording until the MOTION is cleared.
Please go to
https://www.rexingusa.com/hwk-install/
to watch a video tutorial about the installation or scan the QR code below.
17

Taking Photos
To take a photo, stop video recording and hold the button.
To view a photo, stop video recording and hold on MENU button to the Playback Mode.
Press the and Buttons to toggle through your photos.
To delete a photo, stop video recording and toggle to the Playback Mode and toggle
through the videos and photos to the one you want to delete.
Press the MENU to toggle the Delete option.
Press the OK Button and select Delete Current or Delete All.
18
Toggle to the Delete optionToggle to the Playback mode and
select a photo to view
2022_0514_122149_071A.MP4
05/14/2022 12:22
FHD P30
Choose the desired option
Video Type
Camera ID
Delete
Protect
Playback
Normal
Front
Delete One Delete All
Delete
Table of contents
Other Rexing Dashcam manuals