manuals.online logo
Brands
  1. Home
  2. •
  3. Brands
  4. •
  5. RH
  6. •
  7. Indoor Furnishing
  8. •
  9. RH STACKED CANOPY BED User manual

RH STACKED CANOPY BED User manual

NO. ITEM DESCRIPTION QTY.
3Threaded Rod 5/16'' x 4-1/2"
12 PCS
Threaded Rod 5/16'' x 3"
1
2Allen Bolt 4 PCS
4
5
20 PCS
Hex Nut
24 PCS
Lock Washer
20 PCS
Curved Slotted Washer
2 PCS
Wrench
6
7
Allen Wrench 1 PC
9
Plain Washer
8 12 PCS
10 Screws 14 PCS
Page 1 of 4
D
A
C
E
F
G
BH
I
HARDWARE INCLUDED
10/1/18
PARTS INCLUDED
STACKED CANOPY BED INSTRUCTIONS
Thank you for choosing this quality product. Be sure to check all packaging materials carefully for small parts that may have
become loose during shipment and place all parts on a non-abrasive surface.
These bed parts can be cumbersome and heavy to some people, therefore the assistance of two or more people is
recommended in order to prevent personal injury and ensure the bed parts are not damaged during the assembly process.
8 PCS
HEADBOARD
FOOTBOARD
SIDE RAILS
POSTS
SHORT CANOPY RAILS
LONG CANOPY RAILS
CENTER SUPPORT SLAT
CENTER SUPPORT LEG
BED SLATS
[1]
[1]
[2]
[4]
[2]
[2]
[1]
[2]
[7]
A
B
C
D
E
F
G
H
I
FIGURE 01
FIGURE 01 - B
HEADBOARD
FOOTBOARD
Stacked Canopy Bed - Page 2 of 4
FIGURE 01 - A
FIGURE 01 - B
FIGURE 01 - A
FIGURE 01 - B
9
8
2
5
D
10/1/18
FIGURE 01 - A
ASSEMBLY INSTRUCTIONS
STEP 1:
Unpack each component and place on a flat, non-abrasive
surface.
STEP 2:
Lay the headboard (A) and post (D) on a working surface
with the hardware of the post facing inside. Secure the
threaded rods (1) to the fixed nuts of the post by simply
turning them manually. Bring the post against one end of the
headboard and align the threaded rod (1) to go through the
holes. Insert curved washers (6), lock washers (5) and hex
nuts (4) on threaded rods (1) and tighten the hex nuts (4) by
hand. Please see FIGURE 01.
STEP 3:
Insert the locator end of the short canopy rail (E) into the post
(D) and secure with Allen head bolt (2) provided. Please see
FIGURE 02.
STEP 4:
Repeat steps 2, 3 and 4 for footboard (B), post (D) and short
canopy rail (E) assembly.
FIGURE 02
MATTRESS HEIGHT OPTION LEG ASSEMBLY
LOWER OPTION HIGHER OPTION
FIGURE 03
G
H
F
D
C
C
Stacked Canopy Bed - Page 3 of 410/1/18
STEP 5:
Place the headboard (A) upright in the location you wish
the bed to be in when fully assembled. The headboard (A)
hardware should be facing the inside, toward the mattress.
Secure the threaded rods (2) to the fixed nuts in the
headboard (A) by simply turning manually. Raise the side
rail (C) and place the threaded rods (2) to align with the
holes on the end of the side rails (C). Position the side rails
(C) against the headboard (A) so the threaded rods (2) go
through the holes. Insert curved washers (6), lock washers
(5) and hex nuts (4) on threaded rods (2) and tighten with
Allen wrench (7) provided, as shown in FIGURE 02.
Note: At this stage do not tighten the bolts for the long
canopy rail (F).
STEP 6:
Repeat the above procedure with the other side rail (B) to
attach it to the headboard (A) and then repeat to connect
side rails (C) to the footboard (B).
STEP 7:
Using a ladder, install the long canopy rail (F) on top of the
post and secure it with Allen head bolt (B), lock washer (5)
and plain washers (8) provided.
Note: Tighten all the bolts to a snug fit.
MATTRESS HEIGHT OPTION: Before installing the slat
support (F), determine the desired height of the side rail
cleats and brackets on both headboard and footboard. The
cleats have been pre-installed to the lower position (box
spring level). Please see FIGURE 03.
For use with no box spring, remove the Allen head bolt and
re-attach the cleats and brackets into the higher set of
holes with insert nuts pre-installed. Please see FIGURE
03.
STEP 8:
Install the center support leg (H) on the center support
slat (G). Set the slat support (G) on the wooden
brackets of both headboard (A) and footboard (B).
Note: Leg (H) assembly must correspond to your
MATTRESS HEIGHT OPTION.
STEP 9:
On inside surface of both side rails (C) are cleats designed to hold individual bed slats (I). Set the individual bed slats (I) on
the cavities and secure this with screws (10) provided. Please see sketch below.
CARE INSTRUCTIONS
•Dust often using a clean, soft, dry lint-free cloth.
•Blot spills immediately, and wipe with a clean, damp, cloth.
•We do not recommend the use of chemical cleansers, or abrasive cleaners.
G
10
C
10/1/18 Stacked Canopy Bed - Page 4 of 4

Other RH Indoor Furnishing manuals

RH LUCIEN PARCHMENT CURVED MIRROR Programming manual

RH

RH LUCIEN PARCHMENT CURVED MIRROR Programming manual

RH Logic 400 User manual

RH

RH Logic 400 User manual

RH Focus User manual

RH

RH Focus User manual

RH ASPEN PARSONS User manual

RH

RH ASPEN PARSONS User manual

RH 18TH C. SPINDLE TURNED QUEEN BED User manual

RH

RH 18TH C. SPINDLE TURNED QUEEN BED User manual

RH INDIAN FORTRESS BED User manual

RH

RH INDIAN FORTRESS BED User manual

RH HESTON ROUND DINING TABLE User manual

RH

RH HESTON ROUND DINING TABLE User manual

RH Logic 400 User manual

RH

RH Logic 400 User manual

RH 40500333NATL User manual

RH

RH 40500333NATL User manual

RH EXTEND 100 User manual

RH

RH EXTEND 100 User manual

RH ST. JAMES User manual

RH

RH ST. JAMES User manual

RH Mereo User manual

RH

RH Mereo User manual

RH BECKMAN RECTANGULAR CHANDELIER 54 User manual

RH

RH BECKMAN RECTANGULAR CHANDELIER 54 User manual

RH PESARO User manual

RH

RH PESARO User manual

RH ASTON QUEEN BED User manual

RH

RH ASTON QUEEN BED User manual

RH Activ 200 User manual

RH

RH Activ 200 User manual

RH Focus User manual

RH

RH Focus User manual

RH CLOUD MODULAR RIGHT-CORNER CONSOLE TABLE User manual

RH

RH CLOUD MODULAR RIGHT-CORNER CONSOLE TABLE User manual

RH Secur24 User manual

RH

RH Secur24 User manual

RH APOLLO FLOOR LAMP User manual

RH

RH APOLLO FLOOR LAMP User manual

RH Mereo User manual

RH

RH Mereo User manual

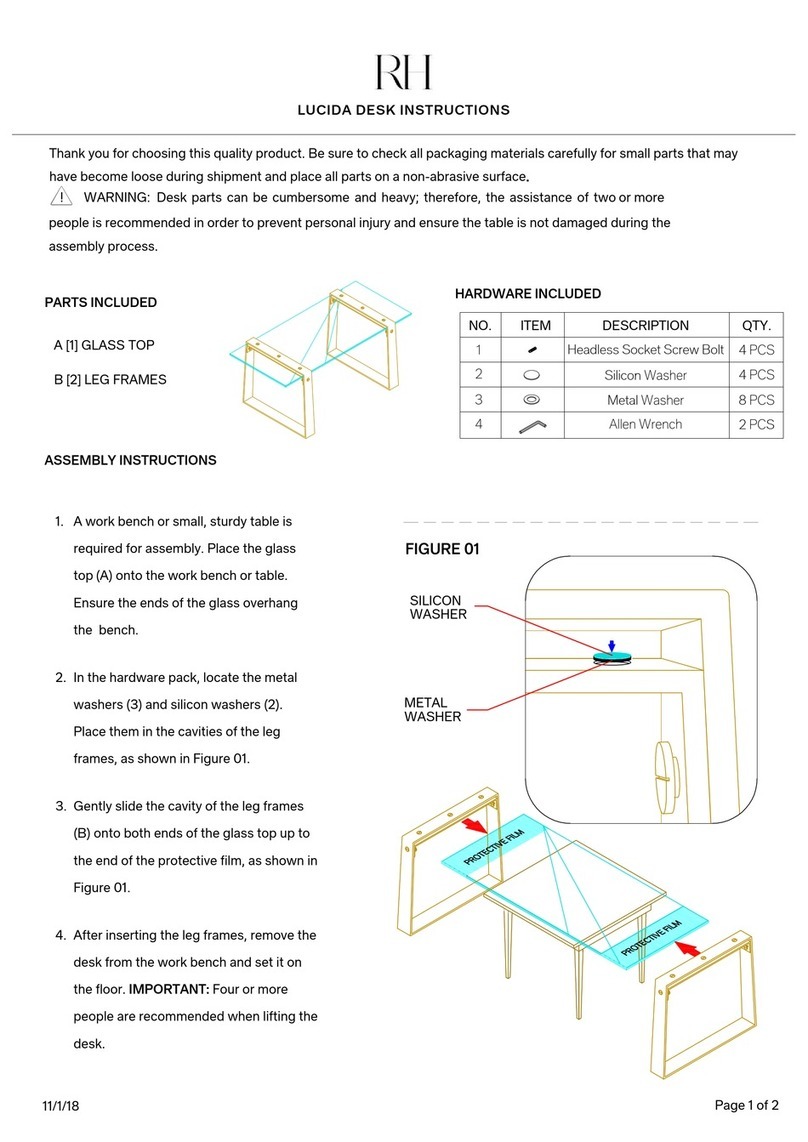
RH LUCIDA DESK User manual

RH

RH LUCIDA DESK User manual

RH WYETH SPLIT BAMBOO FLOATING ROUND ENTRY... User manual
RH

RH WYETH SPLIT BAMBOO FLOATING ROUND ENTRY... User manual

RH MAISON PANEL KING BED User manual

RH

RH MAISON PANEL KING BED User manual

Popular Indoor Furnishing manuals by other brands

tropitone 890851B Assembly instructions

tropitone

tropitone 890851B Assembly instructions

Thetford 639488 manual

Thetford

Thetford 639488 manual

VOGL SUNNY Assembly instructions

VOGL

VOGL SUNNY Assembly instructions

Home Decorators Collection JS-3418-C User and care guide

Home Decorators Collection

Home Decorators Collection JS-3418-C User and care guide

Furniture of America CM3195BN Assembly instructions

Furniture of America

Furniture of America CM3195BN Assembly instructions

Schuchmann MADITA MAXI Instructions for use

Schuchmann

Schuchmann MADITA MAXI Instructions for use

Howard Miller HEKMAN 79167P manual

Howard Miller

Howard Miller HEKMAN 79167P manual

Dormakaba TP/TA EASY Safe Mounting instructions

Dormakaba

Dormakaba TP/TA EASY Safe Mounting instructions

Naterial IDAHO 2023R09P01-0041 instruction manual

Naterial

Naterial IDAHO 2023R09P01-0041 instruction manual

OSP ES22 operating instructions

OSP

OSP ES22 operating instructions

HELD MOBEL Ventura manual

HELD MOBEL

HELD MOBEL Ventura manual

Polini Simple 3000 manual

Polini

Polini Simple 3000 manual

Costway JV10654 manual

Costway

Costway JV10654 manual

Amerock 700 Series installation instructions

Amerock

Amerock 700 Series installation instructions

Schildmeyer 734185 Assembly instructions

Schildmeyer

Schildmeyer 734185 Assembly instructions

Sareer Alexis 4' Bed Assembly instruction

Sareer

Sareer Alexis 4' Bed Assembly instruction

Costway HV10418 manual

Costway

Costway HV10418 manual

Desalto L45 Assembly instruction

Desalto

Desalto L45 Assembly instruction

manuals.online logo
manuals.online logoBrands
  • About & Mission
  • Contact us
  • Privacy Policy
  • Terms and Conditions

Copyright 2025 Manuals.Online. All Rights Reserved.