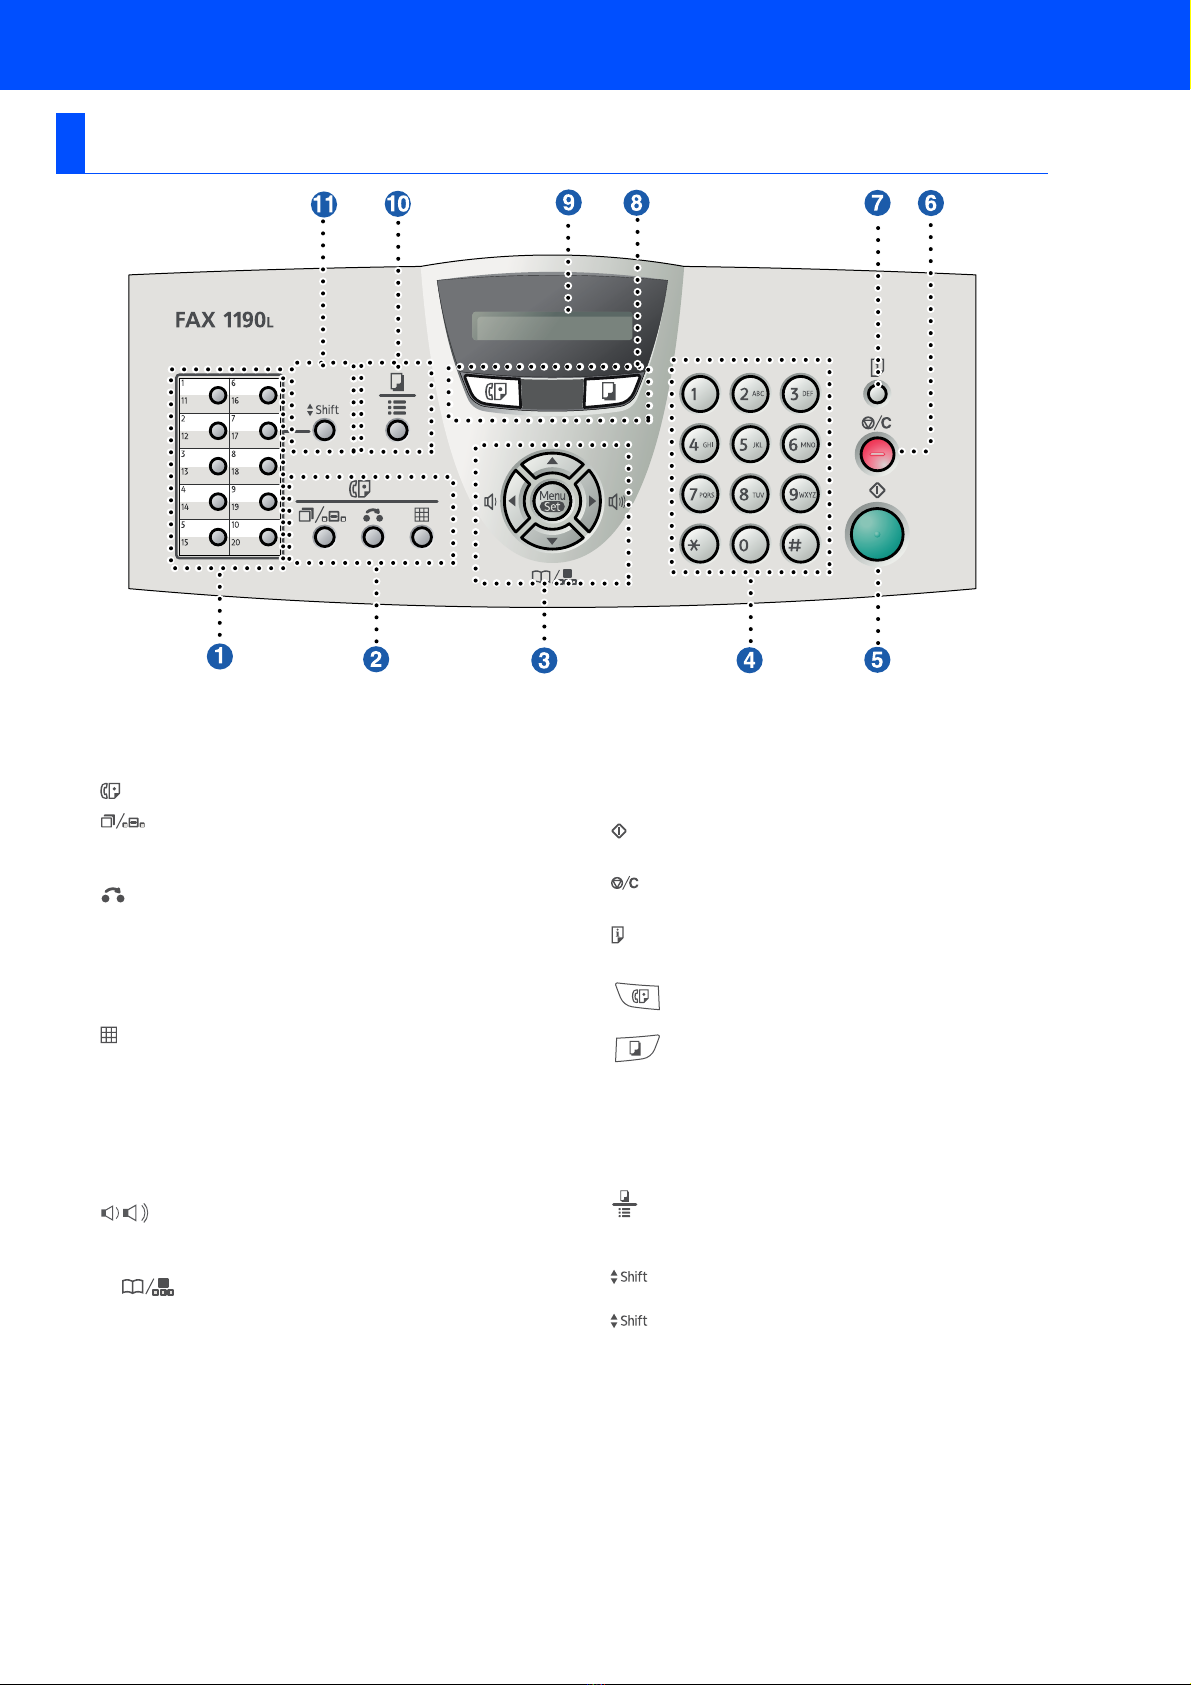
Ricoh FAX 1190L User manual

Before you can use the machine, you must set up the hardware.
Please read this “Quick Setup Guide” for the correct setup procedure.
Keep this “Quick Setup Guide” and User’s Guide in a convenient place for quick and easy
reference at all times.
Read this manual carefully before you use this product and keep it handy for future reference. For
safe and correct use, please be sure to read the Important Information in "User's Guide" before
using the machine.
Setting Up the Machine
Setup is Complete!
FAX 1190L
Quick Setup Guide

2
Warning
Plastic bags are used in the packaging of your machine. To avoid danger of suffocation, please keep these bags
away from babies and children.
Carton Components for EU
Quick Install Guide
Safety Booklet
Operation Panel Guide
CD-ROM
AC Power Cord
ADF Document Output
Support
Drum Unit Assembly
(including Toner Cartridge)
Telephone Line Cord
■The components included in the box may differ depending on your country.
■Save all packing materials and the box in case for any reason you must ship your machine.
■You must use an appropriate USB cable. If you donft have one, please purchase a USB cable that is
no longer than 2 metres.
USB cable
■DO NOT connect the interface cable at this time. Connecting the interface cable is done during
Multi-Function Suite installation process.
■When you use a USB cable, make sure you connect it to the USB port of your computer and not to a
USB port on a keyboard or non-powered USB hub.
■Carton components may differ from one country to another.
■Save all packing materials and the carton.
Warning Improper Setup Note User’s Guide
Indicates warnings that
must be observed to
prevent possible
personal injury.
Alerts you to devices and
operations that are not
compatible with the
machine.
Indicates notes and
useful tips to remember
when using the machine.
Indicates reference to the
User’s Guide.
1. Control Panel Cover
2. ADF Document Output Support
3. Manual Feed Slot
4. Paper Tray
5.PowerSwitch
6. Front Cover
7. Face-down Output Tray
Support Flap with Extension
8. Control Panel
9. Automatic Document Feeder
(ADF)
10. ADF Document Support
8
3
45
6
7
9
10
2
1
■Getting Started

3
Warning
Plastic bags are used in the packaging of your machine. To avoid danger of suffocation, please keep these bags
away from babies and children.
Carton Components for USA/Canada
Quick Install Guide
Safety Booklet
Operation Panel Guide
CD-ROM
Telephone Line Cord
ADF Document Output
Support
Drum Unit Assembly
(including Toner Cartridge)
Telephone Handset
Curled Handset Cord
■The components included in the box may differ depending on your country.
■Save all packing materials and the box in case for any reason you must ship your machine.
■You must use an appropriate USB cable. If you donft have one, please purchase a USB cable that is
no longer than 2 metres.
USB cable
■DO NOT connect the interface cable at this time. Connecting the interface cable is done during
Multi-Function Suite installation process.
■When you use a USB cable, make sure you connect it to the USB port of your computer and not to a
USB port on a keyboard or non-powered USB hub.
■Carton components may differ from one country to another.
■Save all packing materials and the carton.
Warning Improper Setup Note User’s Guide
Indicates warnings that
must be observed to
prevent possible
personal injury.
Alerts you to devices and
operations that are not
compatible with the
machine.
Indicates notes and
useful tips to remember
when using the machine.
Indicates reference to the
User’s Guide.
1. Telephone Handset
2. Control Panel Cover
3. ADF Document Output Support
4. Manual Feed Slot
5. Paper Tray
6.PowerSwitch
7. Front Cover
8. Face-down Output Tray
Support Flap with Extension
9. Control Panel
10. Automatic Document Feeder
(ADF)
11. ADF Document Support
9
1
2
3
4
56
7
8
10
11

4
Warning
Plastic bags are used in the packaging of your machine. To avoid danger of suffocation, please keep these bags
away from babies and children.
Carton Components for Asia/Oceania
Quick Setup Guide
User’s Guide
(For Asia Model only)
CD-ROM
AC Power Cord
ADF Document Output
Support
Drum Unit Assembly
(including Toner Cartridge)
Telephone Line Cord
■The components included in the box may differ depending on your country.
■Save all packing materials and the box in case for any reason you must ship your machine.
■You must use an appropriate USB cable. If you donft have one, please purchase a USB cable that is
no longer than 2 metres.
USB cable
■DO NOT connect the interface cable at this time. Connecting the interface cable is done during
Multi-Function Suite installation process.
■When you use a USB cable, make sure you connect it to the USB port of your computer and not to a
USB port on a keyboard or non-powered USB hub.
■Carton components may differ from one country to another.
■Save all packing materials and the carton.
1. Control Panel Cover
2. ADF Document Output Support
3. Manual Feed Slot
4. Paper Tray
5.PowerSwitch
6. Front Cover
7. Face-down Output Tray
Support Flap with Extension
8. Control Panel
9. Automatic Document Feeder
(ADF)
10. ADF Document Support
8
3
45
6
7
9
10
2
1
Warning Improper Setup Note User’s Guide
Indicates warnings that
must be observed to
prevent possible
personal injury.
Alerts you to devices and
operations that are not
compatible with the
machine.
Indicates notes and
useful tips to remember
when using the machine.
Indicates reference to the
User’s Guide.

5
Control Panel for EU model
1One-Touch Keys
These 10 keys give you instant access to 20 previously
stored dial numbers.
2Fax and telephone keys:
Redial/Pause
Redials the last number you called. It also inserts a
pause in quick dial numbers.
Tel/R
This key is used to have a telephone conversation after
picking up the external handset in F/T pseudo-ringing.
Also, use this key to gain access to an outside line, or
to transfer a call to another extension when it is
connected to a PABX (PBX).
Resolution
Sets the resolution when you send a fax.
3Navigation keys:
Menu/Set
The same key is used for Menu and Set operations.
Lets you access the Menu to program and store your
settings in the machine.
In standby mode you can press these keys to adjust the
ring volume.
▼Search/Speed Dial
Lets you look up numbers that are stored in the dialling
memory. It also lets you dial stored numbers by
pressing #and a three-digit number.
Press to scroll forward or backward to a menu selection.
▲or ▼
Press to scroll through the menus and options.
▲
▲
4Dial Pad
Use these keys to dial telephone or fax numbers and as
a keyboard for entering information into the machine.
The #key lets you temporarily switch the dialling mode
during a telephone call from Pulse to Tone.
5Start
Lets you start sending faxes or make copies.
6Stop/Exit
Stops an operation or exits from the menu.
7Reports
8Mode keys:
Fax
Lets you access Fax mode.
Copy
Lets you access Copy mode.
9Liquid Crystal Display (LCD)
Displays messages on the screen to help you set up
and use your machine.
@Copy key (Temporary settings):
Options
You can quickly and easily select temporary settings for
copying.
AShift
To access One-Touch numbers 11 to 20, hold down
Shift as you press the One-Touch key.

6
Control panel overview (For USA, Canada and
Asia/Oceania)
1One-Touch Keys
These 10 keys give you instant access to 20 previously
stored dial numbers.
2Fax and telephone keys:
Redial/Pause
Redials the last number you called. It also inserts a
pause in quick dial numbers.
Hook/Hold
Lets you dial telephone and fax numbers without lifting
the handset.
—OR—
Lets you place telephone calls on hold.
(for USA and Canada only)
Resolution
Sets the resolution when you send a fax.
3Navigation keys:
Menu/Set
The same key is used for Menu and Set operations.
Lets you access the Menu to program and store your
settings in the machine.
In standby mode you can press these keys to adjust the
ring volume.
—OR—
When using the handset, listening to the speaker in Fax mode
or on standby, you can press these keys to adjust the volume.
(for USA and Canada only)
▼Search/Speed Dial
Lets you look up numbers that are stored in the dialling
memory. It also lets you dial stored numbers by
pressing #and a three-digit number.
▲
▲
Press to scroll forward or backward to a menu selection.
▲or ▼
Press to scroll through the menus and options.
4Dial Pad
Use these keys to dial telephone or fax numbers and as
a keyboard for entering information into the machine.
The #key lets you temporarily switch the dialling mode
during a telephone call from Pulse to Tone. (Not
available in USA and New Zealand)
5Start
Lets you start sending faxes or making copies.
6Stop/Exit
Stops an operation or exits from the menu.
7Reports
Print the Transmission Verification Report, Help List,
Quick-Dial List, Fax Journal, User Settings
8Mode keys:
Fax
Lets you access Fax mode.
Copy
Lets you access Copy mode.
9Liquid Crystal Display (LCD)
Displays messages on the screen to help you set up
and use your machine.
@Copy key (Temporary settings):
Options
You can quickly and easily select temporary settings for
copying.
AShift
To access One-Touch numbers 11 to 20, hold down
Shift as you press the One-Touch key.
▲
▲

7
1Pull out the ADF Document Support.
2Open the control panel cover by lifting it
toward the back.
3Attach the ADF Document Output Support.
4Close the control panel cover.
1Open the front cover of the machine.
2Unpack the drum unit assembly.
3Gently rock it from side to side several times
to distribute the toner evenly inside the
assembly.
1
Attach the ADF
Document Output
Support
Control Panel Cover
ADF Document Output Support
2Install the Drum Unit
Assembly
Front Cover
Setting Up the Machine

8
4Put the drum unit assembly into the machine.
5Close the front cover of the machine.
1Connect the curled handset cord to the jack
on the machine marked and the other
end to the handset.
1Pull the paper tray completely out of the
machine.
2While pressing the paper guide release
lever, slide the adjusters to fit the paper
size. Check that the guides are firmly in the
slots.
3Fan the stack of paper well to avoid paper
jams and misfeeds.
3Install the Handset
4Load Paper in the Paper
Tray
Setting Up the Machine

9
4Put paper in the paper tray.
Check that the paper is flat in the tray and
below the maximum paper mark.
5Put the paper tray firmly back into the
machine and unfold the output paper tray
support flap before you use the machine.
1Make sure that the power switch is off.
Connect the AC power cord to the machine.
2Plug the AC power cord into an AC outlet.
Turn the power switch on.
3Connect one end of the telephone line cord
to the socket on the machine marked LINE
and the other end to a modular wall socket.
For details on supported paper
specifications, see “About paper” in Chapter
1 of the User’s Guide.
Maximum
paper mark
Output paper tray
support flap
5Install the Power Cord
and Phone Line

10
Warning
■The machine must be fitted with an earthed plug.
■Since the machine is grounded through the power
outlet, you can protect yourself from potentially
hazardous electrical conditions on the telephone
network by keeping the power cord connected to
your machine when you connect it to a telephone
line. Similarly, you can protect yourself when you
want to move your machine by disconnecting the
telephone line first and then the power cord.
Type A
For the countries such as Spain, Netherlands,
Portugal,Poland, Hungary,Czech, Norway, USA,
Canada and Asia/Oceania.
Type B
For the countries such as UK, France, Italy, Belgium,
Sweden, Denmark and Finland.
Type C
For Germany
Type D
For Switzerland
Type A
For the countries such as Spain, Netherlands,
Portugal,Poland, Hungary,Czech, Norway, USA,
Canada and Asia/Oceania.
Type B
For the countries such as UK, France, Italy, Belgium,
Sweden, Denmark and Finland.
If you are sharing one phone line with an
external telephone, connect it as shown
below.
If you are sharing one phone line with an
external telephone answering machine,
connect it as shown below.
Please set the receive mode to External
TAD.
For more details, see “Connecting an
external telephone answering device
(TAD)” in the Appendix of the User’s
Guide.
Setting Up the Machine

11
Type C
For Germany
Type D
For Switzerland
If you set up machine and turn on the power for the
first time, you are requested to set your country and
the display should look like this:
1Press Menu/Set.
2Press or to select the country.
(Make sure you select the country, not
language.)
(UK/Germany/France/Italy/Spain/
Netherlands/Belgium/Portugal/Switzerland/
Sweden/Denmark/Norway/Finland/
Hungary/Turkey/South Africa/Israel/
General 1/General 2).
Country names displayed on the LCD depend on the
models.
3Press Menu/Set when your country is
shown in display.
4The display prompts you to confirm your
country you selected.
5If the correct country is displayed, enter 1to
go to step 6.
⎯ OR ⎯
Enter 2to go back to Step 1to select
another country.
6After Accepted been shown in the display,
please wait.
The machine will restart automatically.
The display language will be changed to the
default language of the country you selected
after the restart of the machine.
6Set the country (not
language)
Set Country
Press Set Key
Accepted
UK
Select ▲▼& Set
UK ?
1.Yes 2.No

12
You can change the display language.
(English/Français/Deutsch/Italiano/Español/
Português/Nederlands/Dansk/Norsk./Svenska/
Suomi/POLSKI/Magyar/Cesky)
1Press Menu/Set, 0, 0.
2Press or to select the language,
and then press Menu/Set.
Languages displayed on the LCD depend
on the countries.
The machine displays the date and time, and prints it
on every fax you send.
1Press Menu/Set.
2Press 0.
3Press 2.
4Enter the last two digits of the year on the
dial pad, and then press Menu/Set.
(e.g. Enter 0, 5for 2005.)
5Enter the two digits for the month on the dial
pad, and then press Menu/Set.
(e.g. Enter 0, 3for March)
6Enter the two digits for the day on the dial
pad, and then press Menu/Set.
(e.g. Enter 0, 1.)
7Enter the time in 24-hour format on the dial
pad, and then press Menu/Set.
(e.g. Enter 1, 5, 2, 5for 3:25 P.M.)
8Press Stop/Exit.
You should store your name and fax number to be
printed on all fax pages that you send.
1Press Menu/Set.
2Press 0.
3Press 3.
4Enter your fax number (up to 20 digits) on
the dial pad, and then press Menu/Set.
5Enter your telephone number (up to 20
digits) on the dial pad, and then press
Menu/Set.
(If your telephone number and fax number
are the same, enter the same number
again.)
6Use the dial pad to enter your name (up to
20 characters), and then press Menu/Set.
7Press Stop/Exit.
7Setting the local
language
8Set the Date and Time
Year:2005
Month:03
Day:01
Time:15:25
If you make a mistake, press Stop/Exit
to start from Step 1.
9Set your Station ID
Fax:_
Tel:_
Name:_
■Refer to the following chart for entering
your name.
■If you need to enter a character that is on
the same key as the previous character,
press to move the cursor to the right.
Press
key
One
time
Two
times
Three
times
Four
times
2ABC2
3DEF 3
4GH I 4
5JKL5
6MNO 6
7PQRS
8TUV8
9WX Y Z
For more details, see “Entering Text” in
Appendix B of the User's Guide.
Setting Up the Machine

13
There are four possible receive modes; Fax Only,
Fax/Tel, Manual and External TAD.
Choose the Receive Mode which best suits your
needs.
1Press Menu/Set.
2Press 0.
3Press 1.
4Press or to select the mode.
Press Menu/Set.
5Press Stop/Exit.
You can change the contrast to help the LCD look
lighter or darker.
1Press Menu/Set.
2Press 1.
3Press 7.
4Press or to Light or Dark.
Press Menu/Set.
5Press Stop/Exit.
1Make sure that your computer is ON and
you are logged on with Administrator rights.
2Turn off and unplug the machine from the
AC outlet and disconnect it from your
computer, if you already connected an
interface cable.
10 Select a Receive Mode
Are you connecting an external telephone or external
telephone answering device to the machine?
Are you using the voice
message function of your
external telephone answering
device?
Fax Only
The machine
automatically answers
every call as a fax.
Do you want the
machine to answer fax
and telephone calls
automatically?
Fax/Tel
The machine controls
the line and
automatically answers
every call. If the call is
not a fax, the phone will
ring for you to pick up
the call.
Manual
You control the phone
line and must answer
every call yourself.
External TAD
Your external telephone
answering device (TAD)
automatically answers
every call. Voice
messages are stored on
the external TAD. Fax
messages are printed.
For more details, see “Setup Receive” in
Chapter 4 of the User's Guide.
Yes No
Yes
No
No
Yes
11 Set the LCD Contrast
12
Using the FAX as a
Printer or for PC-FAX
Send
■DO NOT connect the USB cable yet.
■If there are any programs running, close
them.
■The screen may differ depending on the
operating system.
■Update to the latest Windows®Service
Pack before installing Multi Function
Suite TYPE 1190.

14
1Put the supplied CD-ROM into your CD-
ROM drive.
2The language selection menu will appear.
Click your language.
3Click Install Multi-Function Suite.
4When the Software License Agreement
window appears, click Yes if you agree to
the Software License Agreement.
5Choose Standard Connection, (Local
Connection) and then click Next.
The installation continues.
6When this screen appears, go to the next
step.
13 Install Multi-Function
Suite
If the TYPE1190 screen does not appear
automatically, go to My Computer
(Computer), double-click the CD-ROM
icon, and then double-click Start.exe.
■If the installation does not continue
automatically, open the main menu
again by ejecting and then reinserting
the CD-ROM or double-click the
Start.exe program from the root folder,
and continue from step 3to install
Multi-Function Suite.
■For Windows Vista®and 7, when the
User Account Control screen
appears, click Allow or Yes.
For Windows Vista®and 7, when this
screen appears, click Install this driver
software anyway to complete the
installation correctly.
Setting Up the Machine

15
1Remove the label covering the USB
interface connector.
2Connect the USB cable to the USB
connector on the machine marked with the
symbol. Then connect the cable to your
computer.
1Plug the AC power cord into an AC outlet.
Turn the power switch on.
The installation will continue automatically.
The installation screens appear one after
another.
2Finish and restart.
Click Finish to restart your computer. After
restarting the computer, you must be logged
on with Administrator rights.
14 Connect the USB cable
■DO NOT connect the machine to a USB
port on a keyboard or a non-powered
USB hub.
■Connect the machine directly to your
computer.
15 Connect the power cord
DO NOT cancel any of the screens during
the installation. It may take a few seconds
for all screens to appear.

16
When the time comes to replace consumables, an error message will be indicated on the LCD.
Replacement Consumables
Drum Unit Toner
DRUM UNIT 1190 Toner Cartridge TYPE 1190
■Consumables

Trademarks
All brand and product names mentioned in this manual are registered trademarks of their respective
companies.
Copyright © 2010 Ricoh Co., Ltd. All Rights Reserved.

H558-6030 GB
Other manuals for FAX 1190L
3
Table of contents
Other Ricoh Fax Machine manuals

Ricoh
Ricoh Aficio 250 User manual

Ricoh
Ricoh Aficio FAX5000L User manual

Ricoh
Ricoh 5510L User manual

Ricoh
Ricoh 2000 User manual

Ricoh
Ricoh 3800C Series User manual

Ricoh
Ricoh J-CF User manual

Ricoh
Ricoh FAX3800L User manual

Ricoh
Ricoh 1195L User manual

Ricoh
Ricoh 1232 Series User manual

Ricoh
Ricoh FAX7000L Quick start guide

Ricoh
Ricoh FAX5510L Operating instructions

Ricoh
Ricoh fax180 User manual

Ricoh
Ricoh FAX3700l User manual

Ricoh
Ricoh FAX1180L User manual

Ricoh
Ricoh fax1900L User manual

Ricoh
Ricoh FAX2900L User manual

Ricoh
Ricoh FAX1400L User manual

Ricoh
Ricoh FAX07 Quick start guide

Ricoh
Ricoh 1000L Quick start guide

Ricoh
Ricoh MV310E User manual