manuals.online logo
Brands
  1. Home
  2. •
  3. Brands
  4. •
  5. Ricoh
  6. •
  7. Printer
  8. •
  9. Ricoh Aficio AP4510 User manual

Ricoh Aficio AP4510 User manual

Please read the Safety Information in the Setup Guide before using this machine. It
contains important information related to USER SAFETY and PREVENTING EQUIP-
MENT PROBLEMS.
QUICK INSTALLATION GUIDE
○○○○○○○○○○○○○○○○○○○○○○○○○○○○○○○○○○○○○○○○○○○○○○○○○○○○○○○○○○○○○○○○○○○○○○○○○○○○○○○○○○○○○○○○○○○○○○
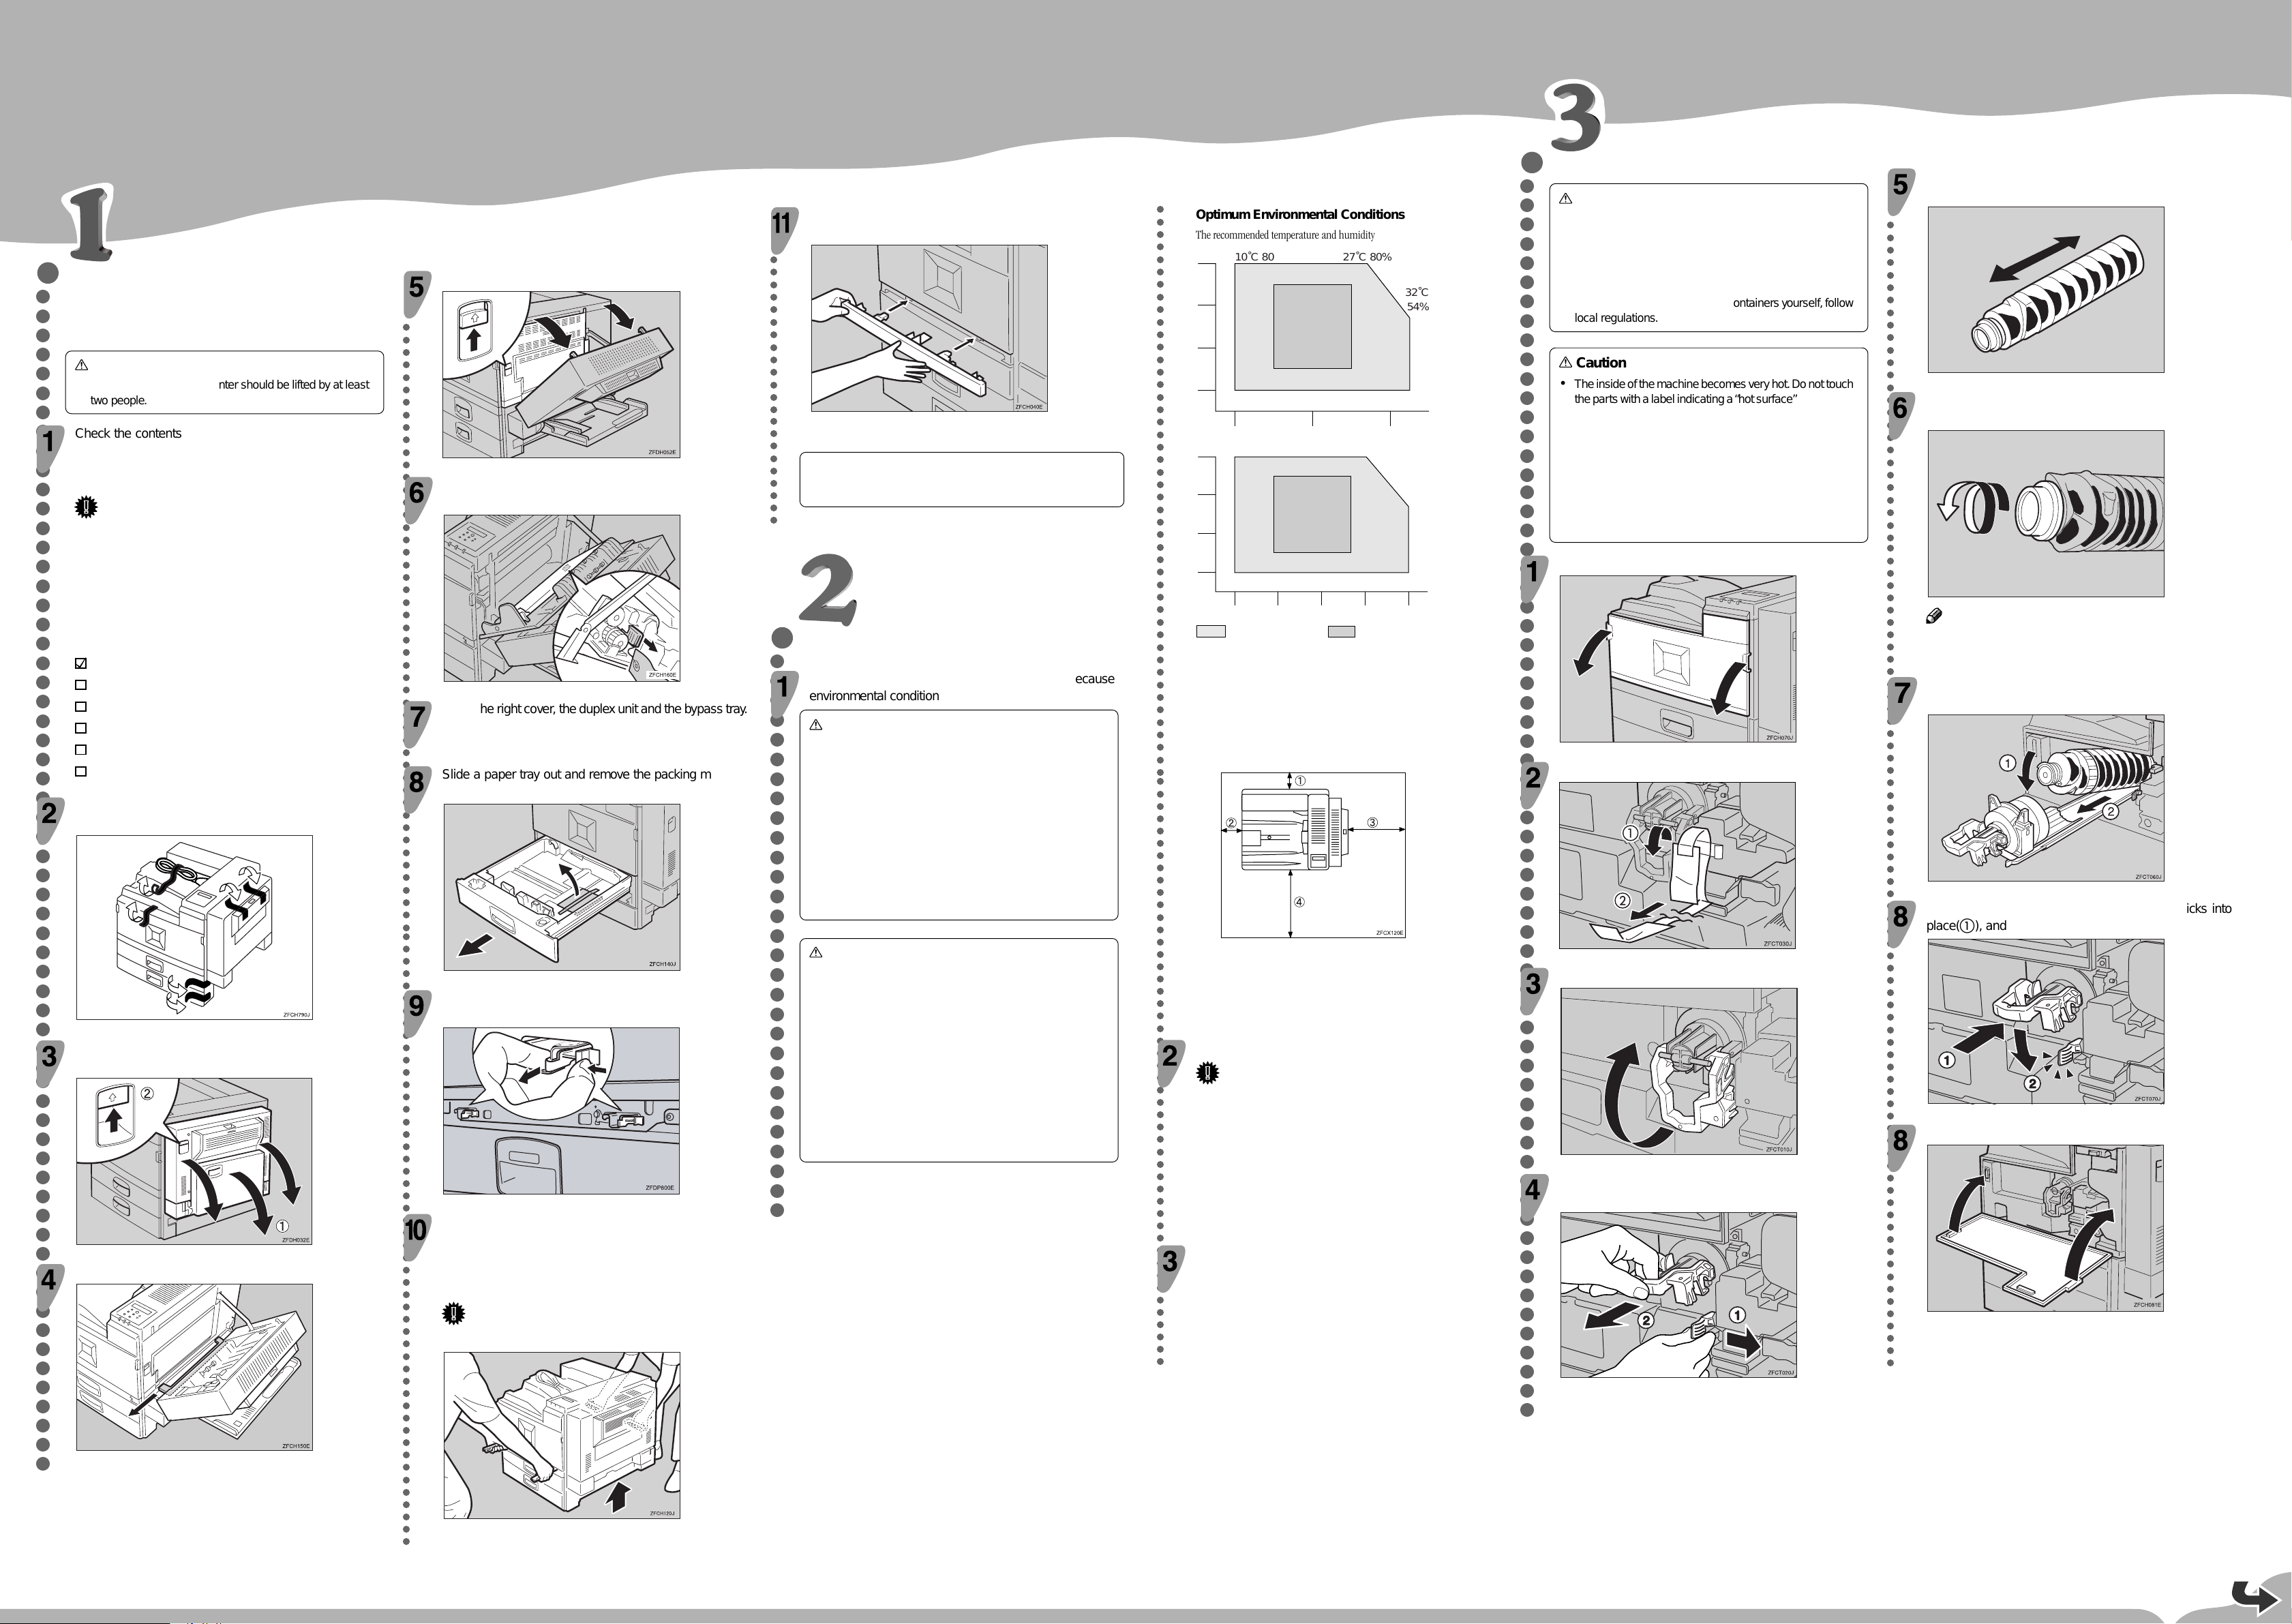
Optimum Environmental Conditions
The recommended temperature and humidity
32˚C
54%
27˚C 80%10˚C 80%
32˚C 20%10˚C 20%
%RH
80
60
40
20
10 20 30 ˚C
15˚C 70%
15˚C 30% 25˚C 30%
25˚C 70%
89.6˚F
54%
80.6˚F 80%50˚F 80%
89.6˚F 20%50˚F 20%
%RH
80
60
40
20
50 60 90 ˚F
59˚F 70%
59˚F 30% 77˚F 30%
77˚F 70%
70 80
Possible operation range Recommended range
The printer must be level within 5 mm, 0.2" both front to rear and left to right.
To avoid possible build-up of ozone, locate this printer in a large well ventilated
room that has an air turnover more than 30 m3/hr/person.
Space Required for Installing the Printer
Leave enough space around the printer. This space is necessary to operate the
printer. The recommended (or minimum) space requirement is as follows:
a: more than 10 cm (4.0")
b: more than 10 cm (4.0")
c: more than 40 cm (15.8")
d: more than 75 cm (29.6")
Environment to Avoid
Important
❒Locations exposed to direct sunlight or strong light
❒Dusty areas
❒Areas with corrosive gases
❒Areas excessively cold, hot, or humid
❒Locations near an air conditioner or humidifier
❒Locations near other electronic equipment
❒Locations where the printer might be subjected to frequent
strong vibration
Power Source
Connect the power cord to a power source with the following specifications:
❒220-240 V, 50/60 Hz, 8.0 A or more
<G065-8610>
○○○○○○○○○○○○○○○○○○○○○○○○○○○○○○○○○○○○○○○○○○○○○○○○○○○○○○○○○○○○○○
UNPACKINGTHE PRINTER AND
CHECKINGTHE CONTENTS OFTHE
BOX
Caution
•
To prevent injuries, this printer should be lifted by at least
two people.
Check the contents of the box using the following list. If
one or more items are missing, please contact your sales
or service representative.
Important
❒The interface cable is not supplied in the box. It is your
responsibility to provide the interface cable appropriate
for the computer that you are using.
❒The toner bottle is not included in the box. Consult your
sales or service representative about the toner bottle.
❒You will need the paper sensor if you install the Bridge
Unit Type 450. It is recommended that you keep the paper
sensor for future use.
Quick Installation Guide (this sheet)
Setup Guide
CD-ROMs (2)
Ferrite Core
Additional Documentation
Paper Sensor
Remove the adhesive tape from the printer as shown in
the illustration.
Open the bypass tray (
a
), and then open the duplex unit
by pushing the catch upwards (
b
).
Remove the packing material as shown in the illustration.
○○○○○○○○○○○○○○○○○○○○○○○○○○○○○○○○○○○○○○○○○○○○○○○○○○○○○○○○○○○○○○○○○○○○○○○○○○○○○○○○○○○○○○○○○○○○○○○○○○○
Open the right cover by pushing the catch upwards.
There is a red plastic wedge with a red tag attached to it.
Remove the wedge from the transfer unit.
Close the right cover, the duplex unit and the bypass tray.
Slide a paper tray out and remove the packing material.
Repeat this steps for all paper trays.
Remove the two red stoppers that hold the grips in place,
andthenpullout thegripsfrom thefront sideof theprinter.
Lift the printer and move it to the place where you want to
install it. When lifting the printer, use the pullout grips o
the front side and the inset grips on the rear side. After
that, push the grips into the printer.
Important
❒The printer should be held by at least two people.
○○○○○○○○○○○○○○○○○○○○○○○○○○○○○
Take out the cover insideTray 2 and attach it between the
paper tray and the front cover.
To install the paper bank PS430, see“Installing the Paper
Bank PS430” in the Setup Guide.
WHERETO PUTYOUR PRINTER
Your printer’s locationshould becarefully chosenbecause
environmental conditions greatly affect its performance.
Warning
•
Confirm that the wall outlet is near the machine and freely
accessible, so that in the event of an emergency, it can be
easily unplugged.
•
Only connect the machine to the power source described
on this sheet.
•
Avoid multi-wiring.
•
Do not damage, break or make any modifications to the
power cord. Do not place heavy objects on it, pull it hard
or bend it more than necessary. These actions could
damage the cord.A frayed or damaged cord might cause
an electrical and fire hazard.
Caution
•
Do not handle the plug with wet hands. Doing this might
cause an electric shock.
•
Keep the machine in an area that is within optimum
environmental conditions. Operating the machine in an
environment that is outside the recommended ranges of
humidity and temperature can cause an electrical or fire
hazard. Keep the area around the socket free of dust.
Accumulateddust can become an electricalor fire hazard.
•
Place the machine on a strong and level surface.
Otherwise, the machine might fall and injure someone.
•
If you use the machine in a confined space, confirm there
is a continuous turnover of air.
○○○○○○○○○○○○○○○○○○○○○○○○○○○○○○○○○○○○○○○○○○○○○○○○○○○○○○○○○○○○○○○○○
○○○○○○○○○○○○○○○○○○○○○○○○○○○○○○○○○○○○○○○○○○○○○○○○○○○○○○○○○○○○○○○○○○○○○○○○○○○○○○○○○○○○○○○○○○○○○
INSTALLINGTHETONER BOTTLE
Warning
•
Do not incinerate toner (used or unused) or toner
containers.Toner dust isflammableand might ignite when
exposed to an open flame.
•
Disposal should take place at an authorized dealer or
appropriate collection site.
•
Ifyoudispose ofthe used tonercontainers yourself, follow
local regulations.
Caution
•
Theinsideof the machine becomes veryhot.Do nottouch
theparts with alabel indicating a“hot surface”.Touchinga
“hot surface” could result in a burn injury.
•
Do not eat or swallow toner.
•
Keep toner (used or unused) and toner containers out of
reach of children.
•
Ourproducts areengineeredtomeetthe higheststandards
of quality and functionality.When purchasing expendable
supplies, we recommend using only those provided by an
authorized dealer.
Open the front cover.
Remove the tape with the red tag.
Lift the green handle.
While pushing the green lever to the right (
a
), hold the
handle and gently slide the toner holder out (
b
).
○○○○○○○○○○○○○○○○○○○○○○
Movethe newtonerbottlebackandforth about5 -6 times
as shown in the illustration.
TAPT040E
Remove the black cap of the new toner bottle by turning it
counterclockwise.
TAPT050E
Note
❒After removing the black cap from the bottle, toner can
scatter easily. Do not shake or jar the bottle.
Place the toner bottle on the toner holder (
a
), and then
pull its head toward you (
b
) to lock it in place .
Slide the toner holder into the printer until it clicks into
place(
a
), and then push down the green handle(
b
).
Close the front cover.
Copyright© 2001 G065-8610
Printed inThe Netherland
EE GB
○○○○○○○○○○○○○○○○○○○○○○○○○○○○○○○○○○○○○○○○○○○○○○○○○○○○○○○○○○○○○○○
CONNECTINGTHE PRINTER
Connecting the Printer to the Network
Important
❒The network cable is not supplied with the printer. It is your
responsibility to get a network cable that is appropriate for
the network.
❒The printer’s network connection is 10BASE-T/100BASE-TX.
It requires a 10BASE-T/100BASE-TX shielded twisted-pair
(STP) cable.
Turn off the power switch.
Loop the network cable and attach the ferrite core.
Note
❒The network cable loop should be about 5 cm(2”)(a) from
the end of the cable (on the end closest to the printer). The
ferrite core at the end of the cable should be a ring type
ferrite core.
Attach the network cable to the network cable connector
of the printer. Secure the cable.
Connect the other side of the cable to the network.Secure
the cable.
Turn on the power switch.
Check the LEDs on the ethernet port.
1 is lit when the printer is securely connected to the network.
2 is lit when 100BASE-TX is in use and not lit when 10BASE-T is in use.
○○○○○○○○○○○○○○○○○○○○○○○○○○○○○○○○○○○○○○○○○○○○○○○○○○○○○○○○○○○○○○○
INSTALLINGTHE PAPERTRAY
The default paper settings size are as follows:
Tray 1
•
Metric version: A4
K
(long-edge feed)
•
Inch version: 81/2" x 11"
K
(long-edge feed)
Tray 2
•
Metric version: A3
L
(short-edge feed)
•
Inch version: 11" x 17"
L
(short-edge feed)
For settingsother thanthe default papersize,see“Changing
Paper Size of the PaperTray”in the Setup Guide.
For more information on the paper sizes that can be set in
the paper tray, see “Paper and Other Media Supported by
Your Printer” in the Setup Guide.
For installing the bypass tray, see “Loading Paper in the
Bypass Tray” in the Setup Guide.
Slide the paper tray out until it stops.
Pinch the sides of the rear guide (
a
), and remove it (
b
).
1
21
Align all four sides of the paper stack and load it into the
tray.
Important
❒Confirm that the top of the stack is not higher than the
limit mark inside the tray.
❒To avoid paper skew, confirm that there is no space between
the side guides and the paper.
Whilelifting theleft sideof thepaper, attachthe rearguide.
○○○○○○○○○○○○○○○○○○○
Slide the tray into the printer until it stops.
Important
❒Be sure to insert the paper tray completely. Otherwise, paper
misfeeds might occur, or the front cover might touch the
paper tray.
CONNECTINGTHE POWER CORD
Caution
•
Do not handle the plug with wet hands. Doing this might
cause an electric shock.
Confirm that the printer power is turned off.If it is on, turn
it off.
On
Off
Insert the plug of the power cord securely into the wall
outlet.
○○○○○○○○○○○○○○○○○○○○○○○○○○○○○○○○○○○○○○○○○○○○○○○○○○○○○○○○○○○○○
SELECTINGTHE PANEL DISPLAY
LANGUAGE
Note
❒You can select one of the following languages:
English, German, French, Italian, Dutch, Swedish,
Norwegian, Danish, Spanish, Finnish, Portuguese, Czech,
Polish, or Hungarian.
❒The default setting is English.
❒If you want to use the English panel display, the following
procedure is not necessary.
❒The first time you turn the printer on after installation or
after replacing the photoconductor unit, it will make several
loud noises. This is due to the photoconductor unit
initializing and is perfectly normal.
Turn on the printer power.
On
Off
After the printer warms up, the ready message appears on the panel display.
Press the Menu
{ }
key.
The following message appears on the panel display.
Main Menu:
Sample Print
Press the
{▼}
or
{▲}
key until “Language” appears,
and then press the Enter
{ }
key.
Main Menu:
Language
Press the
{▼}
or
{▲}
key to display the language you
want to select, and then press the Enter
{ }
key.
List Print:
French
The following message appears on the panel display for two seconds, and the
panel display automatically returns to the previous menu .
List Print:
French
Press the Escape
{ }
key.
○○○○○○○○○○○○○○○○○○○○○○○○○○○○○○○○○○○
PRINTINGTHETEST PAGE
You can confirm that the printer works properly by printing
a test page (configuration page).
However, you cannot check the connection between the
printer and your computer by printing the test page.
Confirm that the printer power is turned on.
Press the Menu
{ }
key.
The following message appears on the panel display.
Main Menu:
Sample Print
Press the
{▼}
or
{▲}
key until the following message
appears on the panel display.
Main Menu:
List/Test Print
Press the Enter
{ }
key.
The following message appears on the panel display.
List Print:
Config. Page
Press the Enter
{ }
key.
In a short time, the test printing will start.
Important
❒If you cannot complete the test printing correctly, check if
an error message appeared on the panel display. For more
information on error messages, see “Troubleshooting”
in the Setup Guide.
○○○○○○○○○○○○○○○○○○○○○○○○○○○○○○○○○○○○○○○○○○○○○○○○○○○○○○○○○○○○○○○○○○○○
SETTING UP FOR PRINTING
Printing requires installation of a printer driver for your
operating system.
Reference
❒See “Printer Drivers for Your Printer” in the Setup Guide.
❒To install options, see “Installing Options” in the Setup
Guide.
○○○○○○○○○○○○○○○○○○○
○○○○○○○
Connecting the Printer to a Computer
Important
❒The parallel cable is not provided with the printer. It is
your responsibility to provided the parallel cable
appropriate for the computer that you are using.
❒The printer’s parallel connection is a standard bi-directional
interface. It requires a standard 36-pin parallel cable
compliant with IEEE 1284 and an available parallel interface
connector on the computer.
❒To avoid electrical interface, use a shielded cable.
Note
❒Do not use a parallel cable longer than 2.5 meters (8.2 feet).
Turn off the power switch.
Turn off the computer.
Attachthe parallelcable tothe parallelinterface connector
on the left side of the printer. Secure the cable with the
metal fittings as shown in the illustration.
Important
❒The rating voltage of the parallel port for the computer is;
DC 5V.
Attach the other end of the parallel cable to the parallel
interface connector of the computer. Secure the cable.

Other manuals for Aficio AP4510

7

Other Ricoh Printer manuals

Ricoh SP 6430DN User manual

Ricoh

Ricoh SP 6430DN User manual

Ricoh Aficio SP 3410DN User manual

Ricoh

Ricoh Aficio SP 3410DN User manual

Ricoh L5160 Installation guide

Ricoh

Ricoh L5160 Installation guide

Ricoh Aficio GX7000 User manual

Ricoh

Ricoh Aficio GX7000 User manual

Ricoh P800 User manual

Ricoh

Ricoh P800 User manual

Ricoh Aficio MP C2500 Series User manual

Ricoh

Ricoh Aficio MP C2500 Series User manual

Ricoh SP C440dn Quick start guide

Ricoh

Ricoh SP C440dn Quick start guide

Ricoh GX5050N - Aficio Color Inkjet Printer User manual

Ricoh

Ricoh GX5050N - Aficio Color Inkjet Printer User manual

Ricoh P C200W User manual

Ricoh

Ricoh P C200W User manual

Ricoh INFOPRINT COLOUR 1767 User manual

Ricoh

Ricoh INFOPRINT COLOUR 1767 User manual

Ricoh Aficio MP 2500SPF Owner's manual

Ricoh

Ricoh Aficio MP 2500SPF Owner's manual

Ricoh Pro C9500 Setup guide

Ricoh

Ricoh Pro C9500 Setup guide

Ricoh Pro C9500 Assembly instructions

Ricoh

Ricoh Pro C9500 Assembly instructions

Ricoh SP4100N - Aficio SP B/W Laser Printer User manual

Ricoh

Ricoh SP4100N - Aficio SP B/W Laser Printer User manual

Ricoh Pro C7100s User manual

Ricoh

Ricoh Pro C7100s User manual

Ricoh Ri 3000 User manual

Ricoh

Ricoh Ri 3000 User manual

Ricoh SP4100N - Aficio SP B/W Laser Printer User manual

Ricoh

Ricoh SP4100N - Aficio SP B/W Laser Printer User manual

Ricoh Pro C5200s User manual

Ricoh

Ricoh Pro C5200s User manual

Ricoh AFICIO AP306 User manual

Ricoh

Ricoh AFICIO AP306 User manual

Ricoh SP 1200S User manual

Ricoh

Ricoh SP 1200S User manual

Ricoh InfoPrint 1764 User manual

Ricoh

Ricoh InfoPrint 1764 User manual

Ricoh Aficio SP 3300DN User manual

Ricoh

Ricoh Aficio SP 3300DN User manual

Ricoh LS3000 User manual

Ricoh

Ricoh LS3000 User manual

Ricoh 220-240 V Quick start guide

Ricoh

Ricoh 220-240 V Quick start guide

Popular Printer manuals by other brands

SWIZ PP-38T5 user manual

SWIZ

SWIZ PP-38T5 user manual

Tally T8106 user guide

Tally

Tally T8106 user guide

Panduit COUGAR LS9Q Operator's manual

Panduit

Panduit COUGAR LS9Q Operator's manual

Telpar MTP-1500 user manual

Telpar

Telpar MTP-1500 user manual

Astro Machine ASTROJET 2650P quick start guide

Astro Machine

Astro Machine ASTROJET 2650P quick start guide

WOOSIM PORTI-W40 Operator's manual

WOOSIM

WOOSIM PORTI-W40 Operator's manual

Epson TM-T20 Quick reference guide

Epson

Epson TM-T20 Quick reference guide

Schulze PRETREATmaker LINE Maintenance manual

Schulze

Schulze PRETREATmaker LINE Maintenance manual

Epson TM-P80 manual

Epson

Epson TM-P80 manual

Canon iP6700D - PIXMA Color Inkjet Printer Specifications

Canon

Canon iP6700D - PIXMA Color Inkjet Printer Specifications

FutureLogic GEN2 Guide

FutureLogic

FutureLogic GEN2 Guide

QMS Magicolor 2 Desklaser install guide

QMS

QMS Magicolor 2 Desklaser install guide

Jolimark bp-900kll user manual

Jolimark

Jolimark bp-900kll user manual

Brother RuggedJet RJ-3050 user guide

Brother

Brother RuggedJet RJ-3050 user guide

SATO CT 400 parts list

SATO

SATO CT 400 parts list

Reiner jetStamp 1025 operating manual

Reiner

Reiner jetStamp 1025 operating manual

Epson SureColor F6470H user manual

Epson

Epson SureColor F6470H user manual

Macherey-Nagel NANOCOLOR UV/VIS II user manual

Macherey-Nagel

Macherey-Nagel NANOCOLOR UV/VIS II user manual

manuals.online logo
manuals.online logoBrands
  • About & Mission
  • Contact us
  • Privacy Policy
  • Terms and Conditions

Copyright 2025 Manuals.Online. All Rights Reserved.