Ritchie Thrifty King for Swine HG 2 User manual

Installation Instructions for
Thrifty King for Swine
Fountains
Congratulations, you have just purchased the finest watering
fountain on the market. This unit is built to give you excellent
service when properly installed and maintained. Please follow
instructions carefully. Read and understand all instructions
before installing
Ritchie Industries, Inc.
800-747-0222 Part # 11904
www.ritchiefount.com 17 April, 2014

Models HG2 and HG4
Fountain Installation Instructions
Thrifty King fountains are intended to be energy free, however, a number of factors must be met for this to be the
case:
There must be at least 10-12 animals that have the Thrifty King fountain as their only source of water.
There must be a good seal against wind between the concrete platform and base of the unit.
The supply water temperature must be at least 42oF. (This may be an issue for rural or municipal water
supplies.)
Ritchie Thermal Tubes are recommended.
If these factors are not met, supplemental heat is recommended. Please see Supplemental Heat section of
this manual, page 3 for specific recommendations.
A. Location - Putting the fountain
in a location that offers protection
from the wind will enhance the
performance of the fountain.
Livestock will tend to gather in this
protected area, enticing them to
drink more. If possible, the side that
supply line enters the fountain
should be opposite of prevailing
winter wind to give additional
protection to the supply line.
B. Water Supply Line – The horizontal underground water line (#1) should be sized to account for pressure
drop, relating to distance, at least 3/4” (1” recommended) in diameter and 1’ below normal frost depth. A 3/4” (1”
recommended) vertical supply pipe (#2) is recommended. A shut-off valve (#3) may be installed under the
fountain for easier servicing. For optimum serviceability a stop and waste valve can be installed below frost level
to drain water back when unit is not in use. Flush water supply line thoroughly before connecting to fountain.
Water supplies with foreign material such as sand, rust, etc. may require a filter to keep valve working properly.
C. Riser Tube – Install a riser tube (#4) around pipe to provide room for
plumbing and to accommodate optional shut-off valve. Ensure that the water
supply line is centered in the riser tube. Do not add any insulation in the riser tube,
as it provides a path for frost. For optimum water line protection, use the insulated
Ritchie Thermal Tube. Use whatever combination of Thermal Tubes is required to
reach at least 1' below frost line.
Ritchie Thermal Tube
Part # Description
18158 1’ Top Section
16417 2’ Top Section
16612 4’ Top Section
16416 2’ Extension
1”
Thrifty King Swine Instruction Manual
1
17 April, 2014

NOTE: The supply line touching the riser tube is the most common cause of the supply line freezing.
Do not surround the supply line with insulation, wood, or other foreign material. Use only the foam hose
insulation provided around the supply line. Any foreign material in the tube may cause frost to migrate
to the supply line causing it to freeze.
D. Electrical Connection (Optional): Although Thrifty King fountains are designed to be electric free, there are
circumstances where supplemental heat may be required. If electricity is available, it is a good management
decision to run the electrical line for future use in the event your operation changes and no longer meets the
requirements for electric free. Any electrical service must be installed and maintained by a qualified electrician.
E. Mounting Platform – A concrete platform should be provided for all fountains. It should be at least 4” thick
and large enough to accommodate fountain. An additional 4” high step 18” out from each side of the unit will
protect the unit from manure handling equipment, as well as discouraging animals from defecating in the
fountain. Extending the platform provides animals a place to stand while drinking, consider the size of your
animals when determining the dimensions of your platform. Slope the platform away from the fountain for
drainage. A rough broom finish on the concrete surface provides better footing for animals.
F. Preparing the Bottom - Apply the foam weather stripping to the bottom of the unit, around the outside edge
of the fountain. Use additional foam weather stripping provided to create a seal between the outside edge of the
riser tube and access opening on the bottom of the fountain.
G. Hold-Downs - Thrifty King for Swine Fountains are provided with four (4) stainless steel hold down angle
brackets to anchor unit securely to concrete. Use of Ritchie stainless steel anchor bolts (not included) is
recommended for concrete installations. Anchor bolts are available from Ritchie, part #14261 (package of 2
bolts).
H. Position Fountain – Remove the fountain cover. Connect hose to the top of the supply line, or the customer
supplied shutoff valve at the top of the concrete. Slide foam rubber hose insulation down over the hose. Place
fountain on the concrete pad over the riser tube so the supply hose is centered in riser tube. Bring the supply hose
up through the access opening in bottom of fountain – cut the hose to the length required to connect to the valve.
NOTE: Unit should be level to insure proper operation.
I. Hose Connection –Slip the end of the hose onto the barb fitting of the valve assembly. Clamps and fittings
are furnished to secure the connection. Slide hose insulation toward valve as far as possible, and fasten with nylon
tie wrap. The insulation will cover part of the valve when properly positioned.
J. Drain Plug –Install pre-assembled drain plugs from outside of trough.
Wetting the plug can aid proper installation. NOTE: To drain the unit, grasp
eyebolt to pull plug.
K. Float Adjustment - Turn on water supply, check for and correct any leaks,
and adjust float levels. The water surface should be even with the mounting
screws on the valve bracket.
Thrifty King Swine Instruction Manual
2
17 April, 2014

L. Install Cover - Replace the top cover and secure to base. Do not over tighten bolts.
M. Seal the Base - After the unit is completely installed, apply a bead of caulking around the base of the fountain
to ensure no wind enters through the base of the unit. NOTE: sealing the bottom of the unit from cold air
is an important aspect of the unit's thermal performance.
Supplemental Heat
In some cases you may wish to add supplemental heat to the Thrifty King. Immersion heater part #16311 should
be placed flat on the bottom of the valve chamber. Ensure that the placement of the heater and its power cable do
not interfere with the motion of the float assembly. Supply line heat cable part #16276 should wrap around the
valve, and follow the supply line down the riser tube. Use nylon ties to anchor the heat cable to the supply line.
NOTE: Serial number or date code is found on underneath side of top red valve cover. This
information will be needed for warranty.
Ritchie Valves
Ritchie valves come in three pressure ratings as shown. The
Thrifty King for swine uses the smaller 1/2" valves. A red
valve is standard with all Thrifty King for Swine units. This
valve accommodates most common operating pressures, and
provides more than adequate water flow rates for the number
of animals that could be drinking at any one time from these
troughs.
Your individual situations may require a change from the standard valve supplied with your fountain, see your
Ritchie Dealer if this is needed.
1/2” Part # GPM Pressure Range
White 12574 4.8 Low, 5-40 psi
Red 12575 3.4 Moderate, 40-60 psi
Green 13597 1.45 High, 60-80 psi
Thrifty King for Swine Product Specifications
HG 2 HG 4
Drink Height 8 8
Width 20 31.25
Length 31.25 31.25
Shipping Weight 50 70
Operating Capacity 2 Gallons 5.2 gallons
Herd Capacity 80 Hogs 160 Hogs
Thrifty King Swine Instruction Manual
3
17 April, 2014

ThriftyKingforSwineHG2
Part#16259
Item Part # Description Qty Item Part # Description Qty
1 13775 SS Hold Down Angles. (4/Pkg) 1 Pkg. 12 14866 Weather Stripping 10 ft Roll 1
2 16324 Hinge Rod – TKHG2 2 13 18219 Drain #11 Plug Pkg. 1 Pkg.
3 18071 ¼-20x½ Truss Head Screw6/Pkg. 1 Pkg. 14 16264 Guard – Lid TK Hog 2
4 13613 Float W/ Short Arm 1 Pkg. 15 16265 Guard – Base TK Hog 2
5 12575 ½” Red Valve Pkg. 1 Pkg. 16 15155 ¼-20 x ½ Hex Head Screw 10/Pkg. 1 Pkg.
6 11515 ½” Valve Bracket Pkg. 1 Pkg. 17 16577 Foamed Base 1
7 16266 Lifting Lid-TKHG W/Guard 2 NS 15930 3/8” Hose Clamp Pkg. SS 1 Pkg.
8 18066 10-24 x ¾ Hex Head Screw SS 6/Pkg. 1 Pkg. NS 12420 Hose – 3/8” x 25 ft 1
9 18069 3/8”-16 x 1-1/4 Bolt SS 6/Pkg. 1 Pkg. NS 14859 Pipe Insulation TK 1
10 18073 3/8” Flat Washer SS 6/Pkg. 1 Pkg. NS 16263 Complete Accessory Pkg. 1 Pkg.
11 16267 Access Cover TKHG2 W/Seal 1 NS 14261 3/8” Anchor Bolt SS-Not Included 2Pkg.
NS = Not Shown Italicized text = Not Included or optional configuration add-ons
Thrifty King Swine Instruction Manual
4
17 April, 2014

ThriftyKingforSwineHG4
Part#16260
Item Part # Description Qty Item Part # Description Qty
1 13775 SSHold Down Angles. (4/Pkg) 1 Pkg. 12 14866 Weather Stripping 10’ Roll 2
2 16325 Hinge Rod – TKHG4 2 13 18219 Drain #11 Plug Pkg. 1 Pkg.
3 18071 ¼-20 x ½ Truss Head Screw 6/Pkg. 1 Pkg. 14 16264 Guard – Lid TK Hog 4
4 13613 Float W/ Short Arm 1 Pkg. 15 16265 Guard – Base Hog 4
5 12575 ½” Red Valve Pkg. 1 Pkg. 16 15155 ¼-20 x ½ Hex Head Screw 10/Pkg. 1 Pkg.
6 11515 ½” Valve Bracket Pkg. 1 Pkg. 17 16579 Foamed HG4 Base 1
7 16266 Lifting Lid-TKHG W/Guard 4 NS 15930 3/8” Hose Clamp Pkg. SS 1 Pkg.
8 18066 10-24 x ¾ Hex Head Screw SS 6/Pkg. 1 Pkg. NS 12420 Hose – 3/8” x 25 ft 1
9 18069 3/8-16 x 1-1/4 Bolt SS 6/Pkg. 1 Pkg. NS 14859 Pipe Insulation TK 1
10 18073 3/8” Flat Washer SS 6/Pkg. 1 Pkg. NS 16263 Complete Accessory Pkg. 1 Pkg.
11 16268 Access Cover TKHG 4 W/Seal 1 NS 14261 3/8” Anchor Bolt SS-Not Included 2Pkg.
NS = Not Shown Italicized text = Not Included or optional configuration add-ons
Thrifty King Swine Instruction Manual
5
17 April, 2014

Troubleshooting
Problem Solution
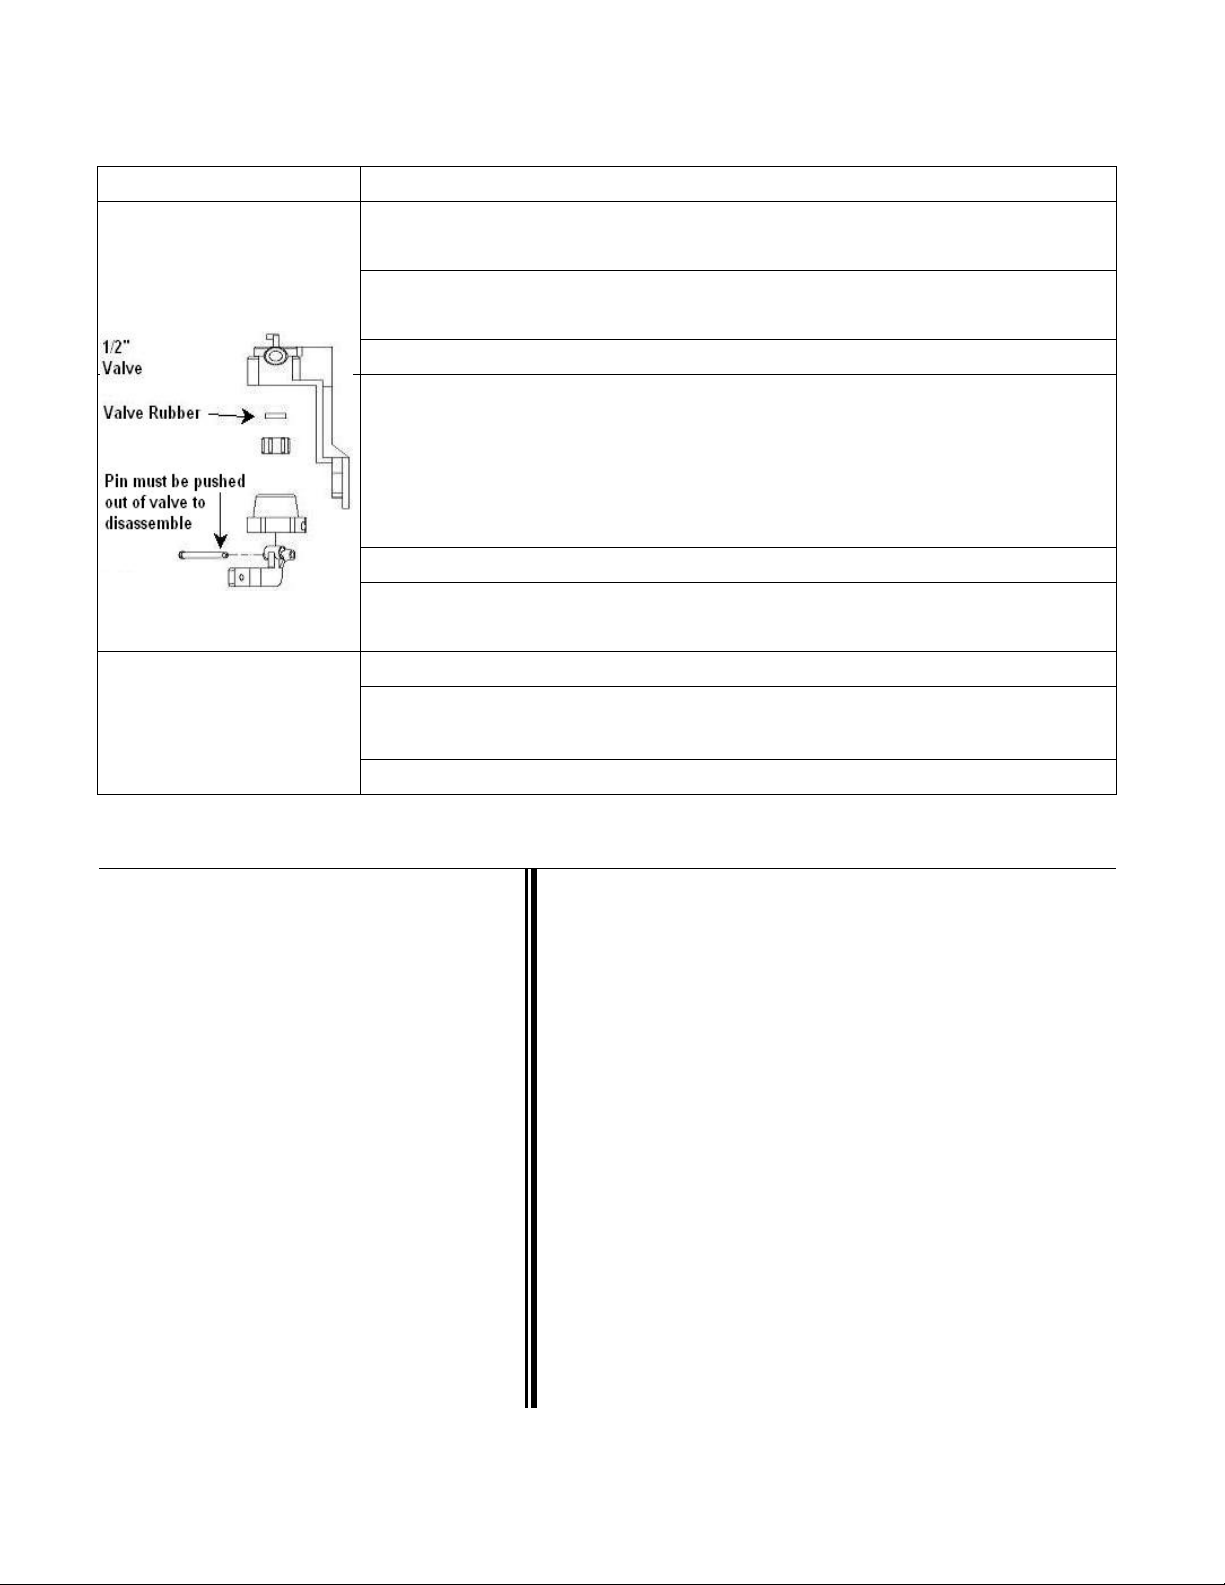
Water Freezing in the
Valve, Supply Line, or
Drink Area
Make sure the fountain is sealed from wind between the concrete platform and
bottom of unit
Make sure there are at least 10 animals drinking from only this fountain. (No other
source of water available.)
Make sure incoming water is at least 42oF
Make sure supply line is appropriately insulated:
Foam rubber insulation around supply line
Riser tube with supply line centered, and air space between riser tube
and supply line. Ritchie Thermal Tubes are recommended as they
have optimum inside and outside diameter to maximize insulation (see
part listing page 3)
Horizontal supply line is at least 1 foot below frost line
Turn valve rubber over and re-assemble
If the above conditions cannot be met, use supplemental heat as described on page
3
Low Water Flow
Check that valve inlet is not plugged or supply hose is not kinked.
Check system pressure from supply hose by installing a tee and pressure gauge in
front of the valve to check pressure drop when valve is open. A severe pressure
drop indicates a restriction or undersized supply system.
Check that shut off valves are fully open.
Ritchie Limited Warranty Effective September 2012
Ritchie Industries, Inc. warrants its products to
be free of defective materials and workmanship.
Defective part(s) will be repaired or replaced at the
option of Ritchie Industries. This warranty
specifically excludes all labor and shipping
charges.
This warranty does not apply to any appearance
items, to any product whose exterior has been
damaged or defaced, to any product that has been
improperly installed, to any product subjected to
misuse, abnormal service or handling, and to any
products altered or repaired with other than original
equipment or manufacturer’s parts.
This warranty gives you specific legal rights,
and you may also have other rights which may vary
from state to state.
All warranty claims must be processed through
an Authorized Ritchie Dealer/ Distributor. Proof of
purchase is required. The period of warranty begins
at original date of purchase as follows:
Poly Units
Base, top and ball closures
10 year limited against manufacturing defect. 100% first five
years, then declining 20% per year for the remaining five years.
Stainless Steel Units
Stainless trough and stainless valve chamber frame:
Ten years against manufacturing defect or corrosion. 100% all
ten years.
Casing and cover:
10 year limited against manufacturing defect. 100% first year,
then declining 10% per year for the remaining nine years.
Component Parts
All component parts, such as floats, valves, heating elements:
One year from the date of purchase against manufacturing defect,
100%.
Hydrants
All component parts:
One year from the date of purchase against manufacturing defect,
100%.
Thrifty King Swine Instruction Manual
6
17 April, 2014
This manual suits for next models
3
Table of contents
Other Ritchie Farm Equipment manuals