Rohnson R-2857 User manual

Air Fryer
Instruction Manual
Model: R-2857

General description
1. Basket handle
2. Basket
3. Frying tray
4. Power-on/off icon
5. Pause/re-start icon
6. Temperature adjustment icon (80-200℃)
7. Timer adjustment icon (1-60mins)
8. Touch screen- 6 cooking functions
9. Screen display
10. Air inlet
11. Air outlet openings
12. Mains cord
Significance
Please read this manual carefully before using the appliance as damage may occur
under incorrect operations. Pls keep this manual for future reference.
Danger
- Do not immerse the housing in water or rinse under the tap due to the multi-electrical
and heating components.
- Do not let liquid enter the appliance to prevent electric shock or short-circuit.
- Keep all ingredients in the basket to prevent any contact from heating elements.
- Do not cover the air inlet and the air outlet when the appliance is working.
- Filling the basket with oil may cause a fire hazard.
- Do not touch the inside of the appliance while it is operating.
Warning
- Check if the voltage indicated on the appliance fits the local power voltage.
- Do not use the appliance if there is any damage on plug, power cord or other parts.
- Do not go to any unauthorized person to replace or fix a damaged power cord.
- Keep the appliance and its power cord out of the reach of children
- Keep the power cord away from hot surfaces.
- Do not plug the appliance or operate the control panel with wet hands.
- Always make sure that the plug is inserted into the wall socket properly.
- Do not connect appliance to an external timer switch.
- Do not place the appliance on or near combustible materials such as a tablecloth or
curtain.
- Do not place the appliance against a wall or against other appliance. Leave at least
10cm free space on the back and sides and 10cm free space above the appliance.

- Do not place anything on top of the appliance.
- Do not use the appliance for any other purpose than described in this manual.
- Do not leave the appliance unattended.
- During hot air frying, hot steam is released through the air outlet openings. Keep
your hands and face at a safe distance from the steam and from the air outlet
openings. Also be careful of hot steam and air when you remove the pan from the
appliance. Any accessible surfaces may become hot during use.
- Immediately unplug the appliance if you see dark smoke coming out of the appliance.
Wait for the smoke emission to stop before you remove the pan from the appliance.
Caution
- Ensure that appliance in placed on a horizontal, even and stable surface.
- This appliance is designed for household use only. It is not suitable to be safely used
in environments such as staff kitchens, farms, motels, and other non-residential
environments.
- The warranty is invalid if the appliance is used for professional or semi-professional
Purposes, or it is not used according to instructions. (Never use the appliance when
the plug is damaged.)
- The appliance needs approximately 30 minutes to cool down before it is safe to
handle or clean.
Automatic switch-off
The appliance has a built-in timer, it will automatically shut down the appliance when
count down reaches zero. You can manually switch off the appliance by pressing off
button, it will automatically shut down the appliance in 20 seconds.
Electromagnetic fields (EMF)
The appliance complies with all standards regarding Electro-Magnetic fields (EMF).
Under proper handling there is no harm for human body based on available scientific
evidence.
Before first use
1. Remove all packaging materials and stickers or labels.
2. Clean the basket and cooking tray with hot water, with some washing liquid and a
non-abrasive sponge. These parts are safe to be cleaned in dishwasher.
3. Wipe inside and outside of the appliance with a clear cloth. And there is no need to
fill the basket with oil and frying fat as the appliance works on hot air.

Using the appliance
1. Connect the mains plug into an earthed wall socket.
2. Carefully pull the basket out of the air fryer.
3. Put the tray into the basket.
4. Place the ingredients in the basket.
5. Slide the basket into the air fryer.
Note: Do not exceed the MAX indication (see section “settings” in this chapter), as it
may affect the cooking quality of the food.
Caution: Do not touch the basket during and in short-time after use, as it gets very
hot. Only hold the basket by the handle.
Do not fill the basket with oil or any other liquid.
6. Finger touch Power on/off.
7. Finger touch Menu to choose functions (totally 6 functions).
Control panel presentation
Menu presetting
Temperature
℃
Timer
Min
Preset menu temperature/ Timetable (℃-Min)
Default
Chicken
Steak
Fish
Shrimp
Cake
Fries
80 - 200
1 - 60
180 ℃
15 Min
200 ℃
30 Min
180 ℃
15 Min
160 ℃
20 Min
160 ℃
20 Min
160 ℃
30 Min
200 ℃
15 Min
Notes: 6 functions are provided: Chicken, Steak, Fish, Shrimp, Cake and Fries.
Finger touch each recipe icon to choose and change the cooking function. More
flexible time & temperature setting can be adjusted, and adjustment can be made
easily by touching corresponding icons. When you want to adjust time, kindly press
the word TEMP icon, then adjust by the up/down arrows. Increase/Decrease 1 minute
per a press or increase/decrease rapidly in the unit of 1 minute by long pressing.
When you want to adjust temperature, kindly press the word TIME icon, then adjust by
the up/down arrows. Increase/Decrease 5 degrees per a press or increase/decrease
rapidly in the unit of 5 degrees by long pressing.

8. After choosing the function, please finger touch Power icon to start cooking.
Note: During the hot air frying process, the LED lamp will be running. If you want to
change to another cooking recipe, first press pause icon , then you can choose
other recipe, then press this icon again, now it acts as re-start function.
During cooking process, if you want to adjust Timer/ Temp., you can easily adjust by
touch the arrows up/down the timer or temperature icons.
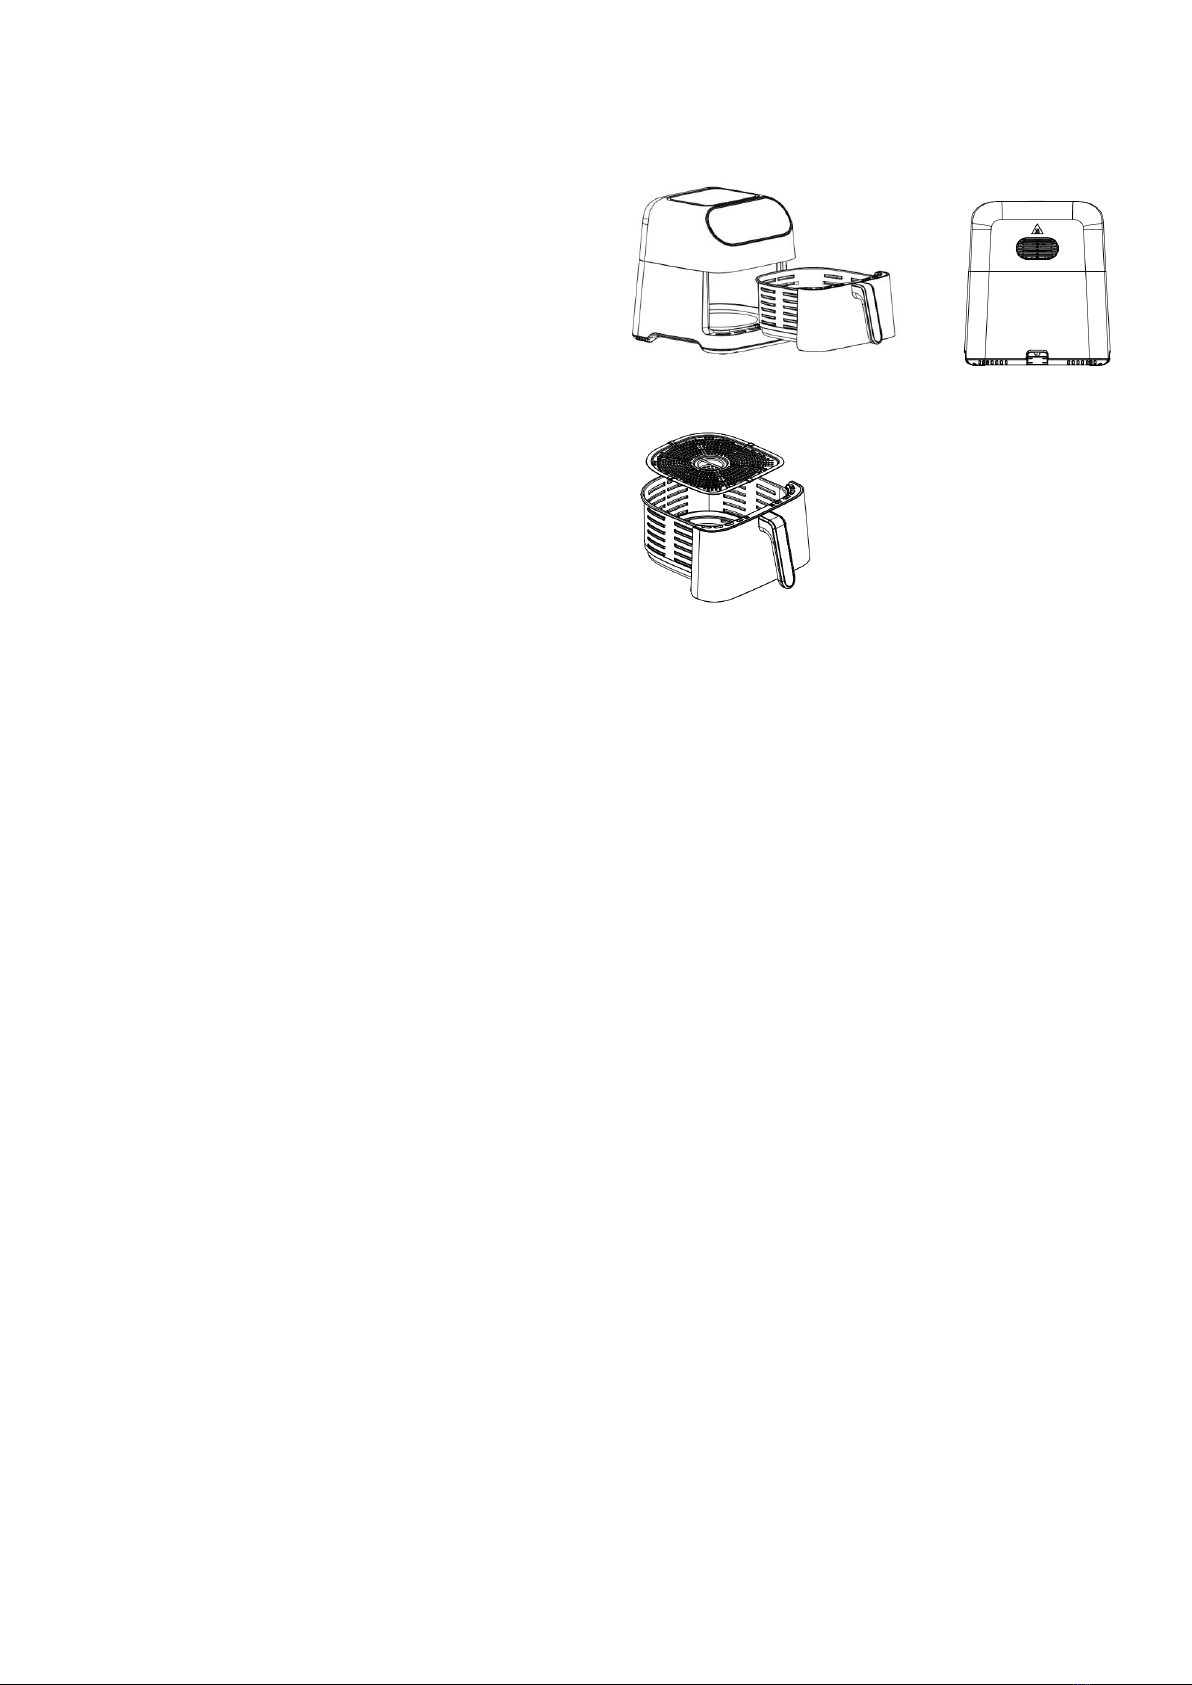
9. Some ingredients require to shake halfway during the preparation time (see section
'settings' in this chapter). By this way, pull the basket out of the appliance by the
handle and shake it. Then slide the basket back into the air fryer.
10. Machine will have Auto ready bell after cooking. When you hear bell for 5 times,
this means the cooking cycle is finished. Pull the basket out of the appliance and
place it on the heat-resistant holder.
Note: After the time ends, the heating element stops working, but the fan will continue
to run about 20 seconds to blow away the hot air as safety. Finally, the timer bell will
ring for 5 times as the ending alarm.
11. Check if the ingredients are ready.
Note: If the ingredients are not ready yet, simply slide the basket back into the
appliance. Press the temperature control knob to adjust Temperature setting and
press the Timer control knob to adjust time setting. And then press the Start knob to
run the appliance.
12. To remove ingredients, (e.g. beef, chicken, meat, any ingredients with original oil
and will have excess oil from ingredients collected on the bottom of the basket),
please use tongs to pick ingredients one by one.
Note: Do not turn the basket over, the oil collected on the bottom of the basket will
leak onto the ingredients.
13. To remove ingredients (e.g. chips, vegetable or ingredients with no excess oil from
the ingredients), please turn off the basket, and pour ingredients to tableware.
Tip: To remove large or fragile ingredients, lift the ingredients out of the basket by a
pair of tongs.
14. When a batch of ingredients is ready, the fryer is instantly ready for preparing
another batch.
Settings
This table below will help you to select the basic settings for the ingredients.
Note:Keep in mind that these settings are indications. As ingredients differ in origin,
size, shape and brand, we cannot guarantee the best setting for your ingredients.
Because the Rapid Air technology reheats the air inside the appliance instantly, pull
the pan briefly out of the appliance during hot air frying barely disturbs the process.

Min-Max (g)
Time (Min)
Temp
℃
Shake
Remark
French fries
Thin frozen fries
300-700
9-16
200
Y
Thick frozen fries
300-700
11-20
200
Y
Home-made fries
(8X8mm)
300-800
10-16
200
Y
Add 1/2 tbsp of
oil
Homemade potato
wedges
300-800
18-22
180
Y
Add 1/2 tbsp of
oil
Home-made potato
cubes
300-750
12-18
180
Y
Add 1/2 tbsp of
oil
250
15-18
180
Y
Potato gratin
500
15-18
200
Y
Steak
100-500
8-12
180
Meat chops
100-500
10-14
180
Hamburger
100-500
7-14
180
Sausage roll
100-500
13-15
200
Drumsticks
100-500
18-22
180
Chicken breast
100-500
10-15
180
Snacks
Spring rolls
100-400
8-10
200
Y
Use oven-ready
Frozen chicken
nuggets
100-500
6-10
200
Y
Use oven-ready
Frozen fish fingers
100-400
6-10
200
Use oven-ready
Frozen bread
crumbed
100-400
8-10
180
Use oven-ready
Stuffed vegetables
100-400
1-10
160
Cake
300
20-25
160
Use baking tin
Quiche
400
20-22
180
Use baking
tin/oven dish
Muffins
300
15-18
200
Use baking tin
Sweet snacks
400
1-20
160
Use baking
tin/oven dish
Tips
- Small ingredients usually require a slightly shorter preparation time than larger
ingredients.
- A larger amount of ingredients only requires a slightly longer preparation time.
- A smaller amount of ingredients only requires a slightly shorter preparation time.
- Shaking smaller ingredients halfway during the preparation time optimizes the result
and can help prevent unevenly fried ingredients.
- Add some oil to fresh potatoes and fry your ingredients for another few minutes then

for a crispy result.
- Do not prepare extremely greasy ingredients such as sausages in the air fryer.
- Snacks can be prepared in an oven can also be prepared in the air fryer.
- The optimal amount for prepare crispy fries is 500 grams.
- Use pre-made dough to get snacks quickly and easily. Pre-made dough also
requires a shorter preparation time than home-made dough.
- Please a baking tin or oven dish in the fryer basket if you want to bake a cake or
quiche or if you want to fry fragile ingredients or filled ingredients.
- You can also use the air fryer to heat ingredients. To heat ingredients, set the
temperature to 150℃for up to 10 minutes.
Making home-made fries
To make home-made fries, follow the steps below:
Make the potatoes peel and slice.
Wash the potato sticks thoroughly and dry them with kitchen paper.
Pour 1/2 tablespoon of olive oil in a bowl, put the sticks on top and mix until the sticks
are coated with oil.
Remove the sticks from the bowl with your fingers or a kitchen utensil so that excess
oil stays behind in the bowl. Put the sticks in the basket.
Fry the potato sticks according to the instructions in this chapter.
Cleaning
Clean the appliance after every use.
Do not clean the tray, basket and the inside of the appliance by metal kitchen utensils
or abrasive cleaning materials, as this may damage the non-stick coating of them.
Remove the mains plug from the wall socket to make the appliance cool down.
Note: Remove the basket to let the fryer cool down more quickly.
Wipe the outside of the appliance with a moist cloth.
Clean the tray and basket with hot water, some washing-up liquid and a non-abrasive
sponge. You can remove any remaining dirt by degreasing liquid.
Note: The tray and basket are dishwasher-proof.
Tip: If dirt is stuck to the basket or the bottom of the pan, fill the basket with hot water
with some washing-up liquid. Put the tray in the basket and let them soak for about 10
minutes.
Clean the inside of the appliance with hot water and non-abrasive sponge.
Clean the heating element with a cleaning brush to remove any food residues.
Storage
1. Unplug the appliance and let it cool down thoroughly.
2. Make sure all parts are clean and dry.

Troubleshooting
Problem
Possible cause
Solution
The AIR FRYER does not
work.
The appliance is not plugged in.
Put the mains plug in an earthed wall socket.
You haven't pressed the start
button.
Press the start/power button after you set the
temp&time or choose the quick recipe.
The ingredients fried with
the AIR FRYER are not
done.
The amount of ingredients in the
basket is too big.
Put smaller batches of ingredients in the basket.
Smaller batches are fried more evenly.
The set temperature is too low.
Set the temperature to the required Temperature
setting.
The ingredients are fried
unevenly in the AIR
FRYER.
Certain types of ingredients need
to be shaken halfway through the
preparation time
Ingredients that lie on top of or across each other
(e.g. fries) need to be shaken halfway through the
preparation time.
Fried snacks are not
crispy when they come
out of the AIR FRYER.
You used a type of snacks meant
to be prepared in a traditional deep
fryer.
Use oven snacks or lightly brush some oil onto the
snacks for a crisper result.
I can't slide the basket
into the appliance
properly.
There are too many ingredients in
the basket.
Do not fill the basket beyond the MAX indication.
White smoke comes out
from the appliance.
You are preparing greasy
ingredients.
When you fry greasy ingredients in the AIR fryer, a
large amount of oil will leak into the basket. The oil
produces while smoke and the basket may heat up
More than usual. This does not affect the appliance
or the end result.
The basket still contains grease
residues from previous use.
White smoke is caused by grease heating up in the
basket. Make sure you clean the basket properly
after each use.
Fresh fries are fried
unevenly in the AIR
FRYER.
You did not use the right potato
type.
Use fresh potatoes and make sure that they stay
firm during frying.
You did not rinse the potato sticks
properly before you fried them.
Rinse the potato sticks properly to remove starch
from the outside of the sticks.
Fresh fries are not crispy
when they come out of
the AIR FRYER.
The crispiness of the fries depends
on the amount of oil and water in
the fries.
Make sure you dry the potato sticks properly before
you add the oil.
Cut the potato sticks smaller for a crispier result.
Add slightly more oil for a crisper result.

IMPORTANT INFORMATION FOR CORRECT DISPOSAL OF THE PRODUCT IN
ACCORDANCE WITH EC DIRECTIVE 2012/19/EU.
At the end of its working life, the product must not be disposed of as urban waste. It
must be taken to a special local authority differentiated waste collection center or to a
dealer providing this service. Disposing of a household appliance separately avoids
possible negative consequences for the environment and health, deriving form
inappropriate disposal and enables the constituent materials to be recovered to obtain
significant savings in energy and resources. As a reminder of the need to dispose of
household appliances separately, the product is marked with a crossed-out wheeled
dustbin.
Table of contents
Other Rohnson Fryer manuals

Rohnson
Rohnson R-2846 User manual

Rohnson
Rohnson R-2839 User manual

Rohnson
Rohnson R-2817 User manual

Rohnson
Rohnson R-2833 User manual

Rohnson
Rohnson R-2836 User manual

Rohnson
Rohnson R-2825 Quick guide

Rohnson
Rohnson R-2832 Quick guide

Rohnson
Rohnson R-2828 User manual

Rohnson
Rohnson R-2803 User manual

Rohnson
Rohnson R-2823 User manual