manuals.online logo
Brands
  1. Home
  2. •
  3. Brands
  4. •
  5. Ronstan
  6. •
  7. Winch
  8. •
  9. Ronstan ORBIT WINCH 30QT User manual

Ronstan ORBIT WINCH 30QT User manual

Line EntryOutput Drive
DETERMINE WINCH MOUNTING POSITION
Position the winch in the desired location. Ensure the surface is flat and the
line entry angle is acceptable (3-8º as shown below).
INSTALLATION
QUICK REFERENCE GUIDE
Ensure the Drive gear is aligned to the line entry as per the orientation on
the template.
STEP 2
Pull back the spring-loaded release latch on the self-tailing arm with a fingertip (1), then
rotate the arm slightly in an anti-clockwise direction (2) until it can be lifted clear of the
winch (3).
STEP 5
Apply sealant under the base of the centre stem around the mounting holes, ensuring
that the drainage channels remain clean and free of sealant. For mounting on metal
surfaces, the base must also be completely isolated from the mounting surface to
prevent galvanic corrosion. Isolation is also recommended for installation on raw
carbon fibre surfaces.
Download the drilling template and complete Product Manual for this winch from ronstan.com/orbitwinch for detailed instructions regarding installation, operation, service and maintenance.
STEP 1
Clean the mounting surface and tape the drilling template in position so that it
matches the desired winch mounting position and orientation.
ROPE ENTRY
RA6302 MOUNT TEMPLATE
SCALE 1:1
FASTENERS: 5 x M6 (1/4") CSK
THIS DRAWING /LIBRARY HAS BEEN PRODUCED FOR USE IN DECK PLANS ONLY; SOME DETAILS HAVE BEEN OMITTED.
SHOULD ACCURATE DIMENSIONS BE REQUIRED SUCH AS HOLE SPACING, LENGTHS, ETC.
PLEASE CONTACT RONSTAN FOR FURTHER INFORMATION.
ROPE ENTRY
RA6302 MOUNT TEMPLATE
SCALE 1:1
FASTENERS: 5 x M6 (1/4") CSK
THISDRAWING /LIBRARY HAS BEEN PRODUCED FOR USE IN DECK PLANS ONLY; SOME DETAILS HAVE BEEN OMITTED.
SHOULDACCURATE DIMENSIONS BE REQUIRED SUCH AS HOLE SPACING, LENGTHS, ETC.
PLEASECONTACT RONSTAN FOR FURTHER INFORMATION.
STEP 4
With the template in place, drill the Ø6.5mm holes for the M6 mounting bolts (or
9/32” holes for 1/4” bolts).
Remove the template, clean away any debris from the holes, and clean the deck
thoroughly to ensure deck sealant can adhere properly.
STEP 3
Pull upward on the drum to remove it from the centre stem. Place the centre stem on
the template with mounting hole positions aligned, to check that orientation of rope
entry in relation to Output Drive Gear is correct.
STEP 6
Fit the winch to the deck using large washers (or backing plate) and locking nuts
below deck. Apply Tef-Gel™ under the head of each mounting fastener to isolate it
from the aluminium centre stem. To avoid wearing the anodised surface of the stem,
use a hex key to prevent the fastener from turning and use a spanner to tighten the nuts
from below.*
*
5x M6 or 1/4” Grade 316 countersunk stainless steel fasteners. Use of A4-70 DIN7991 hex socket
CSK
screws is recommended, installed at a torque setting of no more than 7.1Nm as per
industry standards.
Tef-Gel™ is a trademark of Ultra Safety Systems, Inc.
RA6302 Specifications
Power ratio: 1st speed: 8:1
2nd speed: 30:1
Line dia.: 7-12mm (9/32" - 1/2")
Weight: 3.1 kg (6.8 lb)
MWL: 700 kg (1540 lb)
!
Incorrect line entry
Mounting surface not flat
1
2
3
3-8°
Download the complete Product Manual for
this winch from ronstan.com/orbitwinch for
detailed instructions regarding installation,
operation, service and maintenance.
ORBIT WINCH™
30QT
RA6302 Two Speed, Self-tailing Winch with QuickTrim™
996127—Rev.1
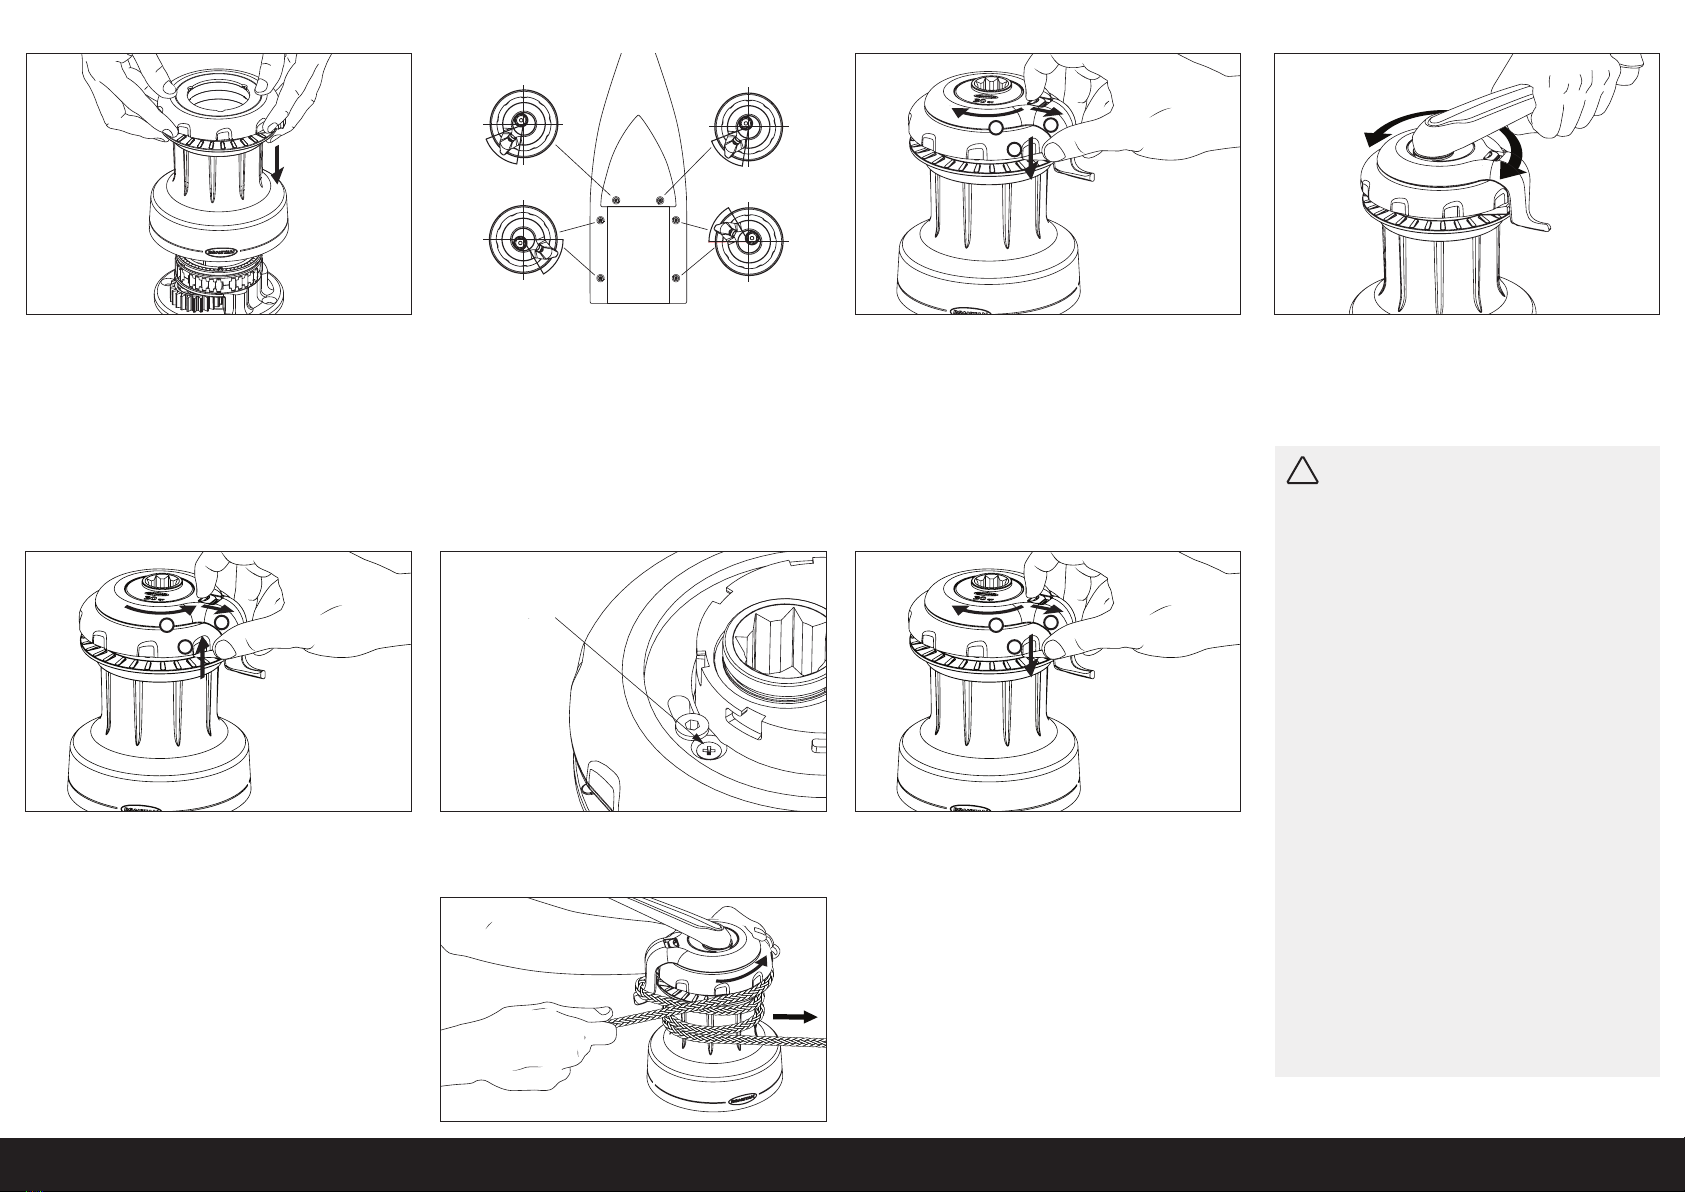
REASSEMBLING THE WINCH
ENABLING QUICKTRIM™ FUNCTION
QUICKTRIM™
A patented innovation in self-tailing winches that allows rapid easing of line tension without having to remove the line from the self-tailer. Orbit Winches™are delivered with the self-tailer locked, operating as a traditional two-speed self-tailing winch.
The QuickTrim™ function is enabled by following the instructions below.
STEP 1
Lift the drum assembly over the centre stem , then slide it fully down into position.
ARM ORIENTATION
The image above can be used as a guide to the orientation of the self-tailing arm in
typical locations on the deck.
STEP 2
Rotate the self-tailing arm to its desired position, ensuring that the rope splitter is in
position. Pull back the spring-loaded release latch on the self-tailing arm with a
fingertip (1), then rotate the arm slightly in a clockwise direction (3), and listen for
the audible "click" indicating it is locked in position (2).
STEP 3
Check that the drum turns smoothly when rotated by hand in a clockwise direction,
and is not able to turn in an anti-clockwise direction. Insert a winch handle in the
socket of the central drive shaft. Turning the handle in a clockwise direction should
drive the drum in fast speed; turning the handle in an anti-clockwise direction should
drive it in slow speed.
STEP 2
Locate and remove the countersunk cross-head screw.
USING QUICKTRIM™
To release line tension, first hold the tail of the rope in one hand whilst placing your
other hand on the top cover of the self-tailer.
Use the palm of your hand to grip and rotate the top cover anti-clockwise against the
spring pressure and maintain it in that position. The self-tailer is now able to turn
beneath the cover, allowing the line to be eased off the drum in a controlled manner.
For more information and a demonstration on using QuickTrim
TM
visit:
ronstan.com/winches
STEP 1
Remove the self-tailer arm, closing plate and closing washer and set these parts aside
for now.
STEP 3
Reassemble the winch as per instructions above.
Read All Safety Notices and Product Manuals
Do not install or operate this winch before reading and fully understanding the
contents of the Product Manual.
Stay Alert When Operating
Winches are very powerful and have the potential to cause significant damage
and/or serious injury if used improperly or without due caution and vigilance.
Operators Must Be Trained
Help prevent significant damage and/or serious injury by ensuring any person
operating a winch has a thorough understanding of its proper operation and is
aware of the potential hazards involved. As a minimum, all winch operators
must read and understand the Safety Notices included in this Quick
Installation Guide and the Product Manual.
Particular attention is drawn to the following points:
• Children and others not qualified to operate a winch must be kept at a safe
distance from the winch and any rigging or fittings that are under load.
• Long hair and/or loose clothing must be tied back to avoid being caught in
the winch.
• In the event of a line override or other fault with an electric winch, stop the
winch and turn off power before attempting to resolve the problem.
Avoid Accidental Operation
Remove winch handles when not in use, and turn off power to electric winches
to help avoid unsupervised
or unintentional operation. Failure to do so could
result in significant damage and/or serious injury.
Maintenance
Turn off power to an electric winch before performing any maintenance or
service tasks. Failure to do so could result in significant damage and/or serious
injury.
SAFETY NOTICES
Slow
Fast
Download the complete Product Manual for this winch from ronstan.com/orbitwinch for detailed instructions regarding installation, operation, service and maintenance.
!
0°
90°
180°
270°
0°
90°
180°
270°
0°
90°
180°
270°
0°
90°
180°
270°
REMOVE SCREW TO
ACTIVATE QUICKTRIM
™
1
3
2
1
3
2
1
2
3

This manual suits for next models

1

Other Ronstan Winch manuals

Ronstan ORBIT WINCH 20ST User manual

Ronstan

Ronstan ORBIT WINCH 20ST User manual

Ronstan ORBIT WINCH RA6402 40QT User manual

Ronstan

Ronstan ORBIT WINCH RA6402 40QT User manual

Ronstan Andersen 28ST FS User manual

Ronstan

Ronstan Andersen 28ST FS User manual

Ronstan Andersen 40ST User manual

Ronstan

Ronstan Andersen 40ST User manual

Ronstan ANDERSEN Classic 10 User manual

Ronstan

Ronstan ANDERSEN Classic 10 User manual

Ronstan BB Orbit Block 20 Series User manual

Ronstan

Ronstan BB Orbit Block 20 Series User manual

Ronstan Andersen Compact Motor 46ST User manual

Ronstan

Ronstan Andersen Compact Motor 46ST User manual

Ronstan ORBIT Series User manual

Ronstan

Ronstan ORBIT Series User manual

Ronstan Andersen 34ST User manual

Ronstan

Ronstan Andersen 34ST User manual

Ronstan Compact Motor 68/72ST User manual

Ronstan

Ronstan Compact Motor 68/72ST User manual

Ronstan Andersen Compact Motor 68ST User manual

Ronstan

Ronstan Andersen Compact Motor 68ST User manual

Ronstan ORBITBLOCKS User manual

Ronstan

Ronstan ORBITBLOCKS User manual

Ronstan ANDERSEN Compact Motor 58ST User manual

Ronstan

Ronstan ANDERSEN Compact Motor 58ST User manual

Ronstan Andersen Compact Motor 52ST User manual

Ronstan

Ronstan Andersen Compact Motor 52ST User manual

Ronstan Andersen 18ST FS User manual

Ronstan

Ronstan Andersen 18ST FS User manual

Ronstan Andersen 28ST User manual

Ronstan

Ronstan Andersen 28ST User manual

Ronstan Andersen 12ST User manual

Ronstan

Ronstan Andersen 12ST User manual

Ronstan ORBIT WINCH 40QT User manual

Ronstan

Ronstan ORBIT WINCH 40QT User manual

Popular Winch manuals by other brands

Paccar Winch BRADEN H20R Installation maintenance and service manual

Paccar Winch

Paccar Winch BRADEN H20R Installation maintenance and service manual

BorMann BWR5190 user manual

BorMann

BorMann BWR5190 user manual

HADEF 108/22-EX Installation, Operating and Maintenance Instruction

HADEF

HADEF 108/22-EX Installation, Operating and Maintenance Instruction

SuperATV WN-3500 Guide

SuperATV

SuperATV WN-3500 Guide

bell marine Viper S Series user guide

bell marine

bell marine Viper S Series user guide

Tajfun Planina EGV 45AHK operating instructions

Tajfun Planina

Tajfun Planina EGV 45AHK operating instructions

Champion Power Equipment 11051 Owner's manual & operating instructions

Champion Power Equipment

Champion Power Equipment 11051 Owner's manual & operating instructions

Berger & Schroeter 31440 owner's guide

Berger & Schroeter

Berger & Schroeter 31440 owner's guide

Reese 70646 quick guide

Reese

Reese 70646 quick guide

Harken 53.2ST E/HY Parts Installation

Harken

Harken 53.2ST E/HY Parts Installation

Thule 552000 instructions

Thule

Thule 552000 instructions

Portable Winch PCW3000 Operating/safety instructions

Portable Winch

Portable Winch PCW3000 Operating/safety instructions

Portable Winch PCW3000 user guide

Portable Winch

Portable Winch PCW3000 user guide

CUSTOM TRUCK LOAD KING user manual

CUSTOM TRUCK

CUSTOM TRUCK LOAD KING user manual

Quick AL3 ALEPH Series user manual

Quick

Quick AL3 ALEPH Series user manual

Andersen Compact Motor 58-62ST product manual

Andersen

Andersen Compact Motor 58-62ST product manual

AL-KO 352 681 manual

AL-KO

AL-KO 352 681 manual

Comeup CAP-9s manual

Comeup

Comeup CAP-9s manual

manuals.online logo
manuals.online logoBrands
  • About & Mission
  • Contact us
  • Privacy Policy
  • Terms and Conditions

Copyright 2025 Manuals.Online. All Rights Reserved.