manuals.online logo
Brands
  1. Home
  2. •
  3. Brands
  4. •
  5. Ruckus Wireless
  6. •
  7. Wireless Access Point
  8. •
  9. Ruckus Wireless Unleashed H320 User manual

Ruckus Wireless Unleashed H320 User manual

Copyright © 2017 Ruckus Wireless, Inc. Page 1 of 4
Published July 2017, Part Number 800-71475-001 Rev B
Unleashed H320 Access Point
Quick Setup Guide
This Quick Setup Guide provides step-by-step instructions on how
to set up your Ruckus Wireless Unleashed H320 Dual Band
802.11ac Wave 2 Wall Switch Access Point. After completing the
steps described in this guide, you will be able to access the
Access Point (AP) and begin providing wired and wireless network
access to users.
The Unleashed H320 has many options:
• It can be mounted on a standard USA- or EU-style single-
gang wall outlet box.
• Provides two stream, dual-band 11ac Wave 2 Wi-Fi (5 GHz -
2x2:2; 2.4 GHz - 1x1:1).
• Includes one 10/100/1000 uplink port and two 10/100 access
ports.
• It can be powered by a customer-supplied IEEE 802.3af- or
802.3at-compliant PoE switch or injector.
THIS GUIDE IN OTHER LANGUAGES
•请从以下网站获得该指南的简体中文版
https://support.ruckuswireless.com
• Vous trouverez la version française de ce guide à l'adresse
suivante https://support.ruckuswireless.com
•こ の ガ イ ド の⽇本語版は https://support.ruckuswireless.com
でご覧く ださい
•이가이드의 한국어 버전은 웹사이트
(https://support.ruckuswireless.com)에서 확인하시기 바랍니
다
• Veja a versão em português (Brasil) deste guia em
https://support.ruckuswireless.com
• Puede ver la versión en español (América Latina) de esta guía
en https://support.ruckuswireless.com
BEFORE YOU BEGIN
Before deploying Ruckus Wireless products, please check for the
latest software and the release documentation.
• User Guides and Release Notes are available at
http://support.ruckuswireless.com/documents
• Software Upgrades are available at
http://support.ruckuswireless.com/software
• Open Source information is available at
http://opensource.ruckuswireless.com
• Software License and Limited Warranty are available at
http://support.ruckuswireless.com/warranty
PACKAGE CONTENTS
• Unleashed H320 Wall Switch Access Point
• Mounting bracket
• Two 6mm M3x0.5 thread Torx flat head machine screws
• Two 1” 6-32 thread Phillips pan head machine screws
• Product warranty statement
• Regulatory flyer
• Declaration of Conformity, if required
•ThisQuick Setup Guide
STEP 1: COLLECTING TOOLS AND SETUP
REQUIREMENTS
• No. 2 Phillips screwdriver and T10 Torx driver for the mounting
bracket screws
• A standard USA- or EU-style single-gang wall outlet box
• One of the following:
• Customer-supplied IEEE 802.3af/at-compliant PoE switch
• Customer-supplied IEEE 802.3af/at-compliant PoE
injector
• An Ethernet cable (Cat5e, or better) supplying PoE power and
network connectivity run through the wall from your LAN to the
wall outlet box
• A computer with an Ethernet port and a Wi-Fi network adapter
STEP 2: CONNECTING THE UNLEASHED H320 TO
POWER AND YOUR NETWORK
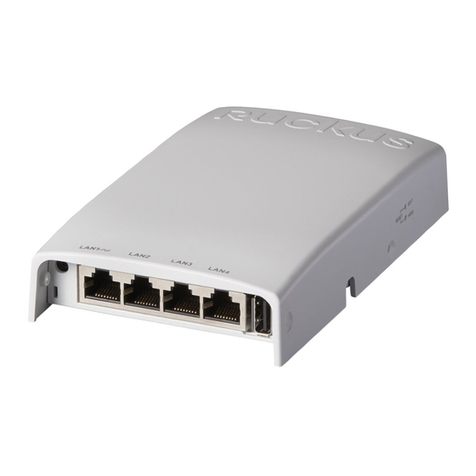
Figure 1: Front view
1After removing your Unleashed AP from its package, connect
it to your network switch or router using an Ethernet cable.
2Using an AC adapter (sold separately), connect the AP 12VDC
port to a protected power source.
• Alternatively, connect the PoE port to a PoE injector or
PoE switch for both power and network connections.
3Verify that the PWR LED on the rear of the enclosure is a
steady green.
Figure 2: Rear and bottom view
Note: The Unleashed H320 does NOT support Mesh.
Note: If you will be using PoE, then you will need a Cat5e (or
better) Ethernet cable to connect the AP to the PoE injector or
switch.
Copyright © 2017 Ruckus Wireless, Inc. Page 2 of 4
Published July 2017, Part Number 800-71475-001 Rev B
STEP 3: ATTACHING THE MOUNTING BRACKET TO
AN OUTLET BOX
Figure 3: Mounting bracket
1Use either the original wall outlet box screws or the factory-
supplied 1” Phillips pan head machine screws to attach the
H320 mounting bracket to a single-gang wall outlet box.
2Pull the uplink Ethernet cable for the H320 through the wall
outlet box.
3When you have extra bypass cables (one or two) that are to
bypass the H320, pull them through the wall outlet box.
Note: The bypass cables can be Ethernet, coax, or any other
type of cable, as required.
4Drape the bypass cables across one of the upper hooks on
either side of the mounting bracket.
5Continue with Step 4: Attaching the H320 to the Mounting
Bracket.
STEP 4: ATTACHING THE H320 TO THE MOUNTING
BRACKET
1Make sure that the mounting bracket is securely fastened as
described in Step 3: Attaching the Mounting Bracket to an
Outlet Box.
2If you have bypass cables (usually one or two, if any), then
make sure that they are draped across one of the two upper
hooks on the mounting bracket.
Figure 4: Attaching the H320 to the Mounting Bracket
3Pull the uplink Ethernet cable from your LAN through the outlet
box, and plug it into the back of the H320.
4The mounting bracket has two lower hooks that fit into slots
on the bottom of the H320. Rest the bottom of the H320 on
those hooks, and then tilt the H320 until it is up against the
mounting bracket.
Note that any optional bypass cable(s) should slide smoothly
into the slots on the sides of the H320.
5Use a T10 Torx driver to screw the factory-supplied Torx flat
head machine screws through the H320 screw holes into the
threaded inserts on the sides of the mounting bracket.
6Continue with Step 5: Log In and Run the Setup Wizard.
STEP 5: CONFIGURE YOUR UNLEASHED NETWORK
Unleashed can be deployed using either a Mobile App, available for both iOS and
Android, or using your PC’s web browser. Refer to the relevant section depending on
which method you prefer to use:
•Step 5a: Setup Using the Unleashed Mobile App
•Step 5b: Setup Using a Web Browser
Step 5a: Setup Using the Unleashed Mobile App
To perform setup using the Unleashed Mobile App, download the iOS or Android app
from the app store.
1As soon as the Unleashed AP is powered on and connected
to the local network, it boots up and begins broadcasting a
temporary unencrypted WLAN named “Configure.Me-
[xxxxxx]” from both radios.
2Using your client’s Wi-Fi connection settings, select and
associate to the “Configure.Me-[xxxxxx]” WLAN.
3Launch the app, and follow the on-screen instructions to
configure your Unleashed network(s).
Figure 5. Unleashed Mobile App for iOS and Android
Note: The H320 mounting bracket has four hooks that face UP.
Make sure that the hooks are facing up when attaching the
mounting bracket to the wall outlet box.
Copyright © 2017 Ruckus Wireless, Inc. Page 3 of 4
Published July 2017, Part Number 800-71475-001 Rev B
Figure 6. Configuring Unleashed from the Mobile App
Step 5b: Setup Using a Web Browser
1As soon as the Unleashed AP is powered on and connected
to the local network, it boots up and begins broadcasting a
temporary unencrypted WLAN named “Configure.Me-
[xxxxxx]” from both radios.
2Using your client’s Wi-Fi connection settings, select and
associate to the “Configure.Me-[xxxxxx]” WLAN.
3Launch a web browser and enter the following into the
browser’s URL bar: unleashed.ruckuswireless.com, and press
Enter.
4You will be redirected to the Setup Wizard. Complete the
steps in the Setup Wizard and click Finish.
Figure 7. Complete the Setup Wizard to set up your Unleashed network
5Once the Setup Wizard is finished, a “Configuring system
settings and rebooting” progress screen appears. Wait until
the process is complete.
6Connect to the WLAN that you configured in the Setup
Wizard, and click OK to reconnect. You will be redirected to
the Unleashed login screen.
7Enter your Admin Name and Password to login.
Figure 8. The Login page
8Upon successful login you will be presented with the
Unleashed Dashboard, which displays an overview of your
Ruckus Unleashed network.
Figure 9. The Unleashed Dashboard
9Click OK to save your changes.
Your changes are put into effect immediately. Continue with Step 6: Customize
Your Wireless LANs.
STEP 6: CUSTOMIZE YOUR WIRELESS LANS
Once the Unleashed Master AP has been initialized, you can
fine-tune the settings of your first WLAN (that you created
during the setup wizard), and create any additional WLANs
needed prior to attaching additional Unleashed member APs.
Then, when you deploy additional member APs in whatever
order you prefer, they will automatically retrieve all WLAN
configuration settings (and any other settings you have
configured) from the Unleashed Master AP.
1From the Dashboard, click anywhere in the WiFi Networks
section to expand the display of your deployed WLANs.
2On the left side of the screen, select the WLAN box for the
WLAN you would like to configure, and click the Edit
button to edit the configuration; or click Create to create a
new WLAN.
3If you made any changes to the original WLAN, you will be
disconnected and will need to reconnect once the changes
have been deployed on the AP radios.
Congratulations! Your Unleashed network is now configured
and ready for use. You may now proceed to Step 7: Deploy
Additional Unleashed Access Points.
STEP 7: DEPLOY ADDITIONAL UNLEASHED
ACCESS POINTS
Deploying additional Unleashed member APs is simply a matter
of connecting them to the same Layer 2 network (subnet) and
providing power. They will discover the Unleashed Master and
join automatically. No additional steps are necessary.
STEP 8: TESTING THE H510 OPERATION
After a short pause to re-establish the Internet connection, you can
test the H510.
1Using any wireless-enabled computer or mobile device,
search for and select the wireless network you previously con-
figured.
2If you can connect, open a browser and navigate to any public
website.
3Using any wired computer or other device and an Ethernet
cable, plug into an Ethernet port on the bottom of the H510.
4Open a browser and navigate to any public website.
5Repeat Step 3 and Step 4 for the rest of the Ethernet ports on
the bottom of the H510.
6Verify that all connected PoE-powered devices and USB
devices are working correctly.
FOR MORE INFORMATION
For more information on managing your Unleashed network,
refer to the Ruckus Wireless Unleashed Access Point Online
Help, available from https://docs.ruckuswireless.com/unleashed/.
Copyright © 2017 Ruckus Wireless, Inc. Page 4 of 4
Published July 2017, Part Number 800-71475-001 Rev B

Other Ruckus Wireless Wireless Access Point manuals

Ruckus Wireless ZoneFlex series User manual

Ruckus Wireless

Ruckus Wireless ZoneFlex series User manual

Ruckus Wireless R560 User manual

Ruckus Wireless

Ruckus Wireless R560 User manual

Ruckus Wireless ZoneFlex H500 User manual

Ruckus Wireless

Ruckus Wireless ZoneFlex H500 User manual

Ruckus Wireless C500 User manual

Ruckus Wireless

Ruckus Wireless C500 User manual

Ruckus Wireless C110 User manual

Ruckus Wireless

Ruckus Wireless C110 User manual

Ruckus Wireless ZoneFlex 7962 User manual

Ruckus Wireless

Ruckus Wireless ZoneFlex 7962 User manual

Ruckus Wireless ZoneFlex 2741 User manual

Ruckus Wireless

Ruckus Wireless ZoneFlex 2741 User manual

Ruckus Wireless C110 User manual

Ruckus Wireless

Ruckus Wireless C110 User manual

Ruckus Wireless Q910 User manual

Ruckus Wireless

Ruckus Wireless Q910 User manual

Ruckus Wireless ZoneFlex 7762 User manual

Ruckus Wireless

Ruckus Wireless ZoneFlex 7762 User manual

Ruckus Wireless ZoneFlex 7321-U User manual

Ruckus Wireless

Ruckus Wireless ZoneFlex 7321-U User manual

Ruckus Wireless T300 Installation instructions manual

Ruckus Wireless

Ruckus Wireless T300 Installation instructions manual

Ruckus Wireless ZoneFlex 7352 User manual

Ruckus Wireless

Ruckus Wireless ZoneFlex 7352 User manual

Ruckus Wireless ZoneFlex 2942 User manual

Ruckus Wireless

Ruckus Wireless ZoneFlex 2942 User manual

Ruckus Wireless ZoneFlex 7441 User manual

Ruckus Wireless

Ruckus Wireless ZoneFlex 7441 User manual

Ruckus Wireless ZoneFlex 7942-OT User manual

Ruckus Wireless

Ruckus Wireless ZoneFlex 7942-OT User manual

Ruckus Wireless ZF7762-AC User manual

Ruckus Wireless

Ruckus Wireless ZF7762-AC User manual

Ruckus Wireless ZoneFlex R710 User manual

Ruckus Wireless

Ruckus Wireless ZoneFlex R710 User manual

Ruckus Wireless T310d User manual

Ruckus Wireless

Ruckus Wireless T310d User manual

Ruckus Wireless ZoneFlex R710 User manual

Ruckus Wireless

Ruckus Wireless ZoneFlex R710 User manual

Ruckus Wireless T300 User manual

Ruckus Wireless

Ruckus Wireless T300 User manual

Ruckus Wireless E510 User manual

Ruckus Wireless

Ruckus Wireless E510 User manual

Ruckus Wireless R610 User manual

Ruckus Wireless

Ruckus Wireless R610 User manual

Ruckus Wireless ZoneFlex 7982 User manual

Ruckus Wireless

Ruckus Wireless ZoneFlex 7982 User manual

Popular Wireless Access Point manuals by other brands

NETGEAR WNHDE111-100NAS installation guide

NETGEAR

NETGEAR WNHDE111-100NAS installation guide

ZyXEL Communications NWA-1100 -  V1.00 quick start guide

ZyXEL Communications

ZyXEL Communications NWA-1100 - V1.00 quick start guide

Ubiquiti PowerBeam AC PBE-5AC-620 quick start guide

Ubiquiti

Ubiquiti PowerBeam AC PBE-5AC-620 quick start guide

Allied Telesis AT-WA7500 Installation and user guide

Allied Telesis

Allied Telesis AT-WA7500 Installation and user guide

Technicolor media access tg233 Quick installation guide

Technicolor

Technicolor media access tg233 Quick installation guide

RTS ROAMEO quick start guide

RTS

RTS ROAMEO quick start guide

Ruijie RG-AP810-I Hardware  installation and reference guide

Ruijie

Ruijie RG-AP810-I Hardware installation and reference guide

AirTies Air 4410 Quick installation guide

AirTies

AirTies Air 4410 Quick installation guide

D-Link DAP-1160 user manual

D-Link

D-Link DAP-1160 user manual

Ubiquiti Bullet M5 HP quick start guide

Ubiquiti

Ubiquiti Bullet M5 HP quick start guide

Proxim Tsunami Multipoint MP-820-BSU-100 installation guide

Proxim

Proxim Tsunami Multipoint MP-820-BSU-100 installation guide

Tenda AX3000 user guide

Tenda

Tenda AX3000 user guide

Westermo Ibex-RT-220 Series user guide

Westermo

Westermo Ibex-RT-220 Series user guide

Bluesocket BlueSecure 1800 installation guide

Bluesocket

Bluesocket BlueSecure 1800 installation guide

BridgeWave FLEX4G-LITE USER INTERFACE MANUAL

BridgeWave

BridgeWave FLEX4G-LITE USER INTERFACE MANUAL

Technicolor OWA3111 Quick setup guide

Technicolor

Technicolor OWA3111 Quick setup guide

D-Link DAP-2553 - Wireless N Dual Band Gigabit Access... user manual

D-Link

D-Link DAP-2553 - Wireless N Dual Band Gigabit Access... user manual

ADTRAN NetVanta 150 Series Hardware installation guide

ADTRAN

ADTRAN NetVanta 150 Series Hardware installation guide

manuals.online logo
manuals.online logoBrands
  • About & Mission
  • Contact us
  • Privacy Policy
  • Terms and Conditions

Copyright 2025 Manuals.Online. All Rights Reserved.