Certificato da consegnare allegato
all’utensile unitamente al documento
fiscale di acquisto in caso
di riparazione in garanzia.
Certificate to be returned
with the tool and the purchase
invoice in case of guarantee repair.
Certificat à envoyer ensemble
avec l’outil et la facture d’achat
en cas de réparation sous garantie.
Bei Garantiereparatur, diese Karte
zusammenmit dem Gerät und der
beim Kauf erhaltenen Rechnung
aushändigen bzw. einsenden.
Certificado a enviar adjunto
a la herramienta y la factura
d’adquisición en caso de reparación
en garantia.
Bewijs dat samen met het aankoopbe
wijs bij het gereedschap gevoegd
moet worden in geval van reparatie
tijdens de garantieperiode.
Сертификат, прилагаемый
к инструменту вместе с
товарным чеком в случае
гарантийного ремонта.
COD. ART. 9.2565 - LUGLIO 2010
SOLO LA COMPLETA COMPILAZIONE DI QUESTO CERTIFICATO DÀ DIRITTO ALL’EVENTUALE GARANZIA .
AFTER THE COMPLETE FILL-IN OF THIS CERTIFICATE YOU ARE ENTITLED TO OBTAIN GUARANTEE.
APRÈS LA COMPLETE COMPILATION DE CET CERTIFICAT ON PEUT OBTENIR À LA GARANTIE.
EINE EVENTUELLE GARANTIELEISTUNG IST NUR MÖGLICH, WENN DIESE GARANTIEKARTE VOLLSTÄNDIG AUSGEFÜLLT IST.
DESPUÉS LA COMPLETA COMPILACIÓN DET ESTE CERTIFICADO SE PUEDE OBTENER LA GARANTIE.
ALLEEN ALS DEZE GARANTIEKAART VOLLEDIG INGEVULD IS HEEFT U RECHT OP GARANTIE
ТОЛЬКО ПОЛНОЕ ЗАПОЛНЕНИЕ ЭТОГО СЕРТИФИКАТА ДАЕТ ПРАВО НА ГАРАНТИЙНОЕ ОБСЛУЖИВАНИЕ.
Nome
Name
Nom
Name
Apellido
Naam
Hазвание
Utensile
Tool
Outil
Werkzeug
Herramienta
Gereedschap
Инструмент
Rivenditore
Reseller
Revendeur
Handler
Revendedor
Verkoper
Продавец
Indirizzo
Address
Adresse
Adresse
Dirección
Adres
Адрес
Data
Date
Date
Datum
Fecha
Datum
Дата
RUPES S.p.A.
Via Marconi, 3A
20080 VERMEZZO (Mi) - Italy
Tel. 02/946941
Fax 02/94941040
Uff. Vendite e assistenza clienti
Tel. 02/94694312
web: http://www.rupes.com
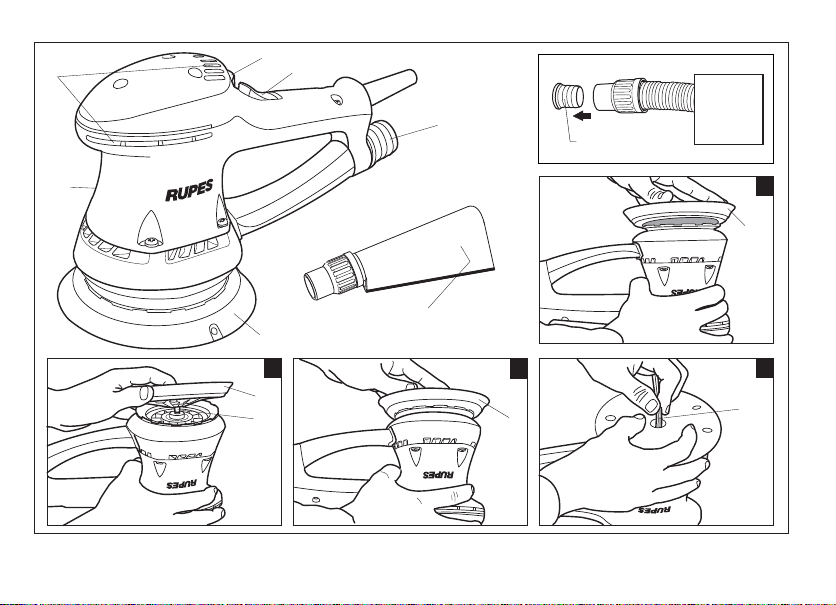
ER03TE - ER05TE
Levigatrici rotorbitali con aspirazione incorporata
Random-orbital sanders with integral dust extraction
Ponceuses rotorbitales avec aspiration intégrée
Exzenterschleifer mit eingebauten Absaugsystem
Lijadoras rotorbitales con aspiración incorporada
Roterend excentrische schuurmachine
met geïntegreerde stofafzuiging
Вращательно-орбитальные шлифовальные машины
с вмонтированным пылеудалением
ISTRUZIONI ORIGINALI PER L'USO E LA MANUTENZIONE
ORIGINAL OPERATING AND MAINTENANCE INSTRUCTIONS
NOTICE ORIGINAL D'EMPLOI ET D'ENTRETIEN
ORIGINAL-BEDIENUNGS-UND WARTUNGSANLEITUNG
INSTRUCCIONES ORIGINAL DE USO Y MANUTENCION
AANWIJZINGEN VOOR HET GEBRUIK EN HET
ONDERHOUD ORIGINEEL
ИНСТРУКЦИЯ ПО ЭКСПЛУАТАЦИИ И
ОБСЛУЖИВАНИЮ
1
ОРИГИНАЛЬНЫЙ
4
8
12
16
20
24
28
Leggere tutte queste istruzioni prima di azionare il
presente prodotto
.
Indicazioni importanti per la sicurezza dell’utilizzatore
Lesen Sie zuerst die folgenden Anweisung bevor Sie das
Gerät bedienen.
Wichtige Sicherheitsangaben
Antes de accionar este producto es necesario leer todas
estas instrucciones
Indicaciones importantes para la seguridad del usuario
Lees de volgende instructie voor u het product gebruikt
Belangrijke veiligheids instructies
Следует прочитать все эти инструкции прежде, чем
приводить овку.
Важные указания для безопасности пользователя
Lire toutes ces instructions avant d’actionner
le présent produit.
Indications importantes pour la sécurité de l’utilisateur
Read the following instruction first before operate
the product
Important safety indications
ISTRUZIONI ORIGINALI PER L'USO
E LA MANUTENZIONE
ORIGINAL OPERATING AND MAIN-
TENANCE INSTRUCTIONS
NOTICE ORIGINAL D'EMPLOI ET
D'ENTRETIEN
ORIGINAL-BEDIENUNGS-UND
WARTUNGSANLEITUNG
INSTRUCCIONES ORIGINAL DE
USO Y MANUTENCION
AANWIJZINGEN VOOR HET GE-
BRUIK EN HET ONDERHOUD ORI-
GINEEL
ИНСТРУКЦИЯ ПО ЭКСПЛУАТАЦИИ
И ОБСЛУЖИВАНИЮ1
ОРИГИНАЛЬНЫЙ
op ER03TE-ER05TE cop IMQ:Layout 1 26/07/2010 9.50 Pagina 1