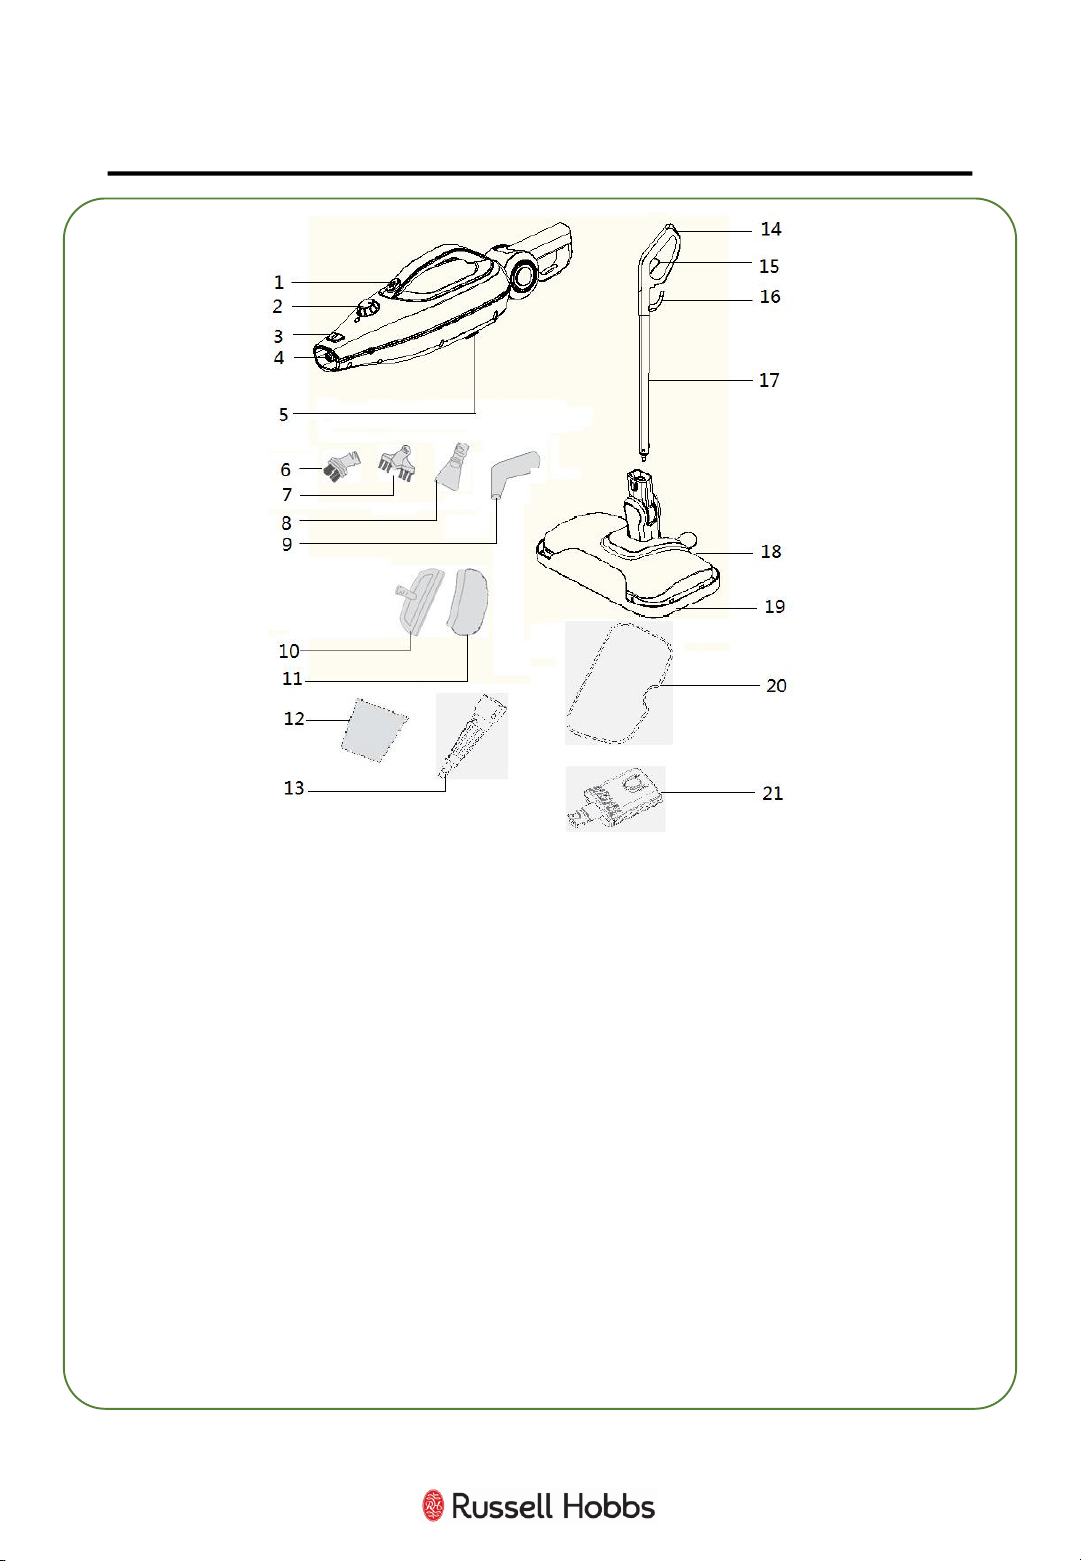
Russell Hobbs NEPTUNE User manual

Model Number: RHMSM3101
NEPTUNE
11 in 1 Steam Mop
For Customer Services & Spare Parts please call0345 2097461
Opening times: Monday -Friday 8am –8pm & Saturday 9am –1pm
Or visit us at www.productcare.co.uk
PLEASE RETAIN
FOR FUTURE REFERENCE

Page(s)
Safety instructions
3-6
Steam mop feature diagram
7
Steam
mop assembly 8-9
Filling the water tank
10
Using your
steam mop 11-12
Storing your steam
mop 13
Cleaning and care
14-16
Problem solving
17-18
Guarantee and customer services
19
Connection to the mains supply
20-21
Notes
22-23
Disposal information
24
CONTENTS
2
For Customer Services & Spare Parts please call 0345 209 7461
Opening times: Monday - Friday 8am –8pm & Saturday 9am –1pm
Or visit us at www.productcare.co.uk
Thank you for purchasing your Russell Hobbs Neptune Steam Mop.
To get the best from your new mop, take a few moments to read these
instructions, and keep them in a safe place for future reference.
Should you require any further assistance, our friendly Product Care team will
be happy to help.

3
SAFETY INSTRUCTIONS
IMPORTANT SAFETY INSTRUCTIONS
READ CAREFULLY AND KEEP FOR FUTURE REFERENCE
WARNING:
•It is hazardous for anyone other than a competent person
to carry out any service or repair operation that involves
the removal of a cover which gives protection against
exposure to electrical parts.
•If the supply cord is damaged, it must be replaced by the
manufacturer, its service agent or similarly qualified
persons in order to avoid a hazard.
•This product is intended for household use only.
Do not use outdoors.
•This appliance can be used by children aged from 8 years
and above and persons with reduced physical, sensory or
mental capabilities or lack of experience and knowledge
IF they have been given supervision or instruction
concerning use of the appliance in a safe way and
understand the hazards involved. Children shall not play
with the appliance. Cleaning and user maintenance shall
not be made by children unless they are older than 8 and
supervised. Keep the appliance and its’ cord out of reach
of children less than 8 years.
•Do not operate this appliance for anything other than its
intended use. This product is intended for household use
only. Do not use outdoors.
•Do not immerse in water or other liquids for cleaning.

4
SAFETY INSTRUCTIONS
IMPORTANT SAFETY INSTRUCTIONS
READ CAREFULLY AND KEEP FOR FUTURE REFERENCE
WARNING:
•Do not direct steam at people, animals, electrical outlets,
or equipment containing electrical components.
•Unplug from power outlet when not in use. Do not leave
steam mop unattended while plugged in.
•Do not use with damaged cord or plug.
•Do not use steam mop if it has been dropped, damaged,
left outdoors or dropped into water.
•Keep the steam mop away from water; do not allow it to
get wet. If unit is wet, do not plug unit into wall socket or
turn unit on.
•Do not handle steam mop with wet hands.
•Do not pull or carry by cord, use cord as a handle, close
door on cord, pull cord around sharp corners or edges, or
expose cord to heated surfaces.
•Do not unplug by pulling on cord.
•To protect against electrical shock do not immerse cord,
plug, or appliance in water or other liquid.
•Unplug from the mains outlet when not in use, before
putting on and taking off parts, and before cleaning.

5
SAFETY INSTRUCTIONS
IMPORTANT SAFETY INSTRUCTIONS
READ CAREFULLY AND KEEP FOR FUTURE REFERENCE
WARNING:
•The use of accessory attachments not recommended by
the appliance manufacturer may cause fire, electric shock
or injury. Only use the accessories supplied by the
manufacturer.
•Do not let the cord hang over the edge of the worktop, or
touch hot surfaces.
•Never remove parts from the appliance such as the
screws and so on.
•The filling aperture must not be opened during use.
•Do not use appliance in an enclosed space filled with
vapor given off by oil-based paint, paint thinner, some
moth proofing substances, flammable dust, or other
explosive or toxic vapors.
•Do not use on leather, wax polished furniture or floors,
synthetic fabrics, velvet or other delicate, steam-sensitive
materials.
•Do not immerse unit in water or other liquids.
•Never put descaling, aromatic or alcoholic products into
the steam mop, as this may damage the unit. Descale the
product regularly with a mixture of 50% natural white
vinegar & 50% water to maintain its performance, and
allow the mixture to steam through the product.

Symbol IEC 60417-5597 (2002-10) is used on the unit to
indicate that this unit operates with hot water vapour
(steam). To avoid scalding and burns take extra care when in
use.
6
SAFETY INSTRUCTIONS
IMPORTANT SAFETY INSTRUCTIONS
READ CAREFULLY AND KEEP FOR FUTURE REFERENCE
WARNING:
•Close attention is necessary when used near children.
•Do not store with a wet mop pad still attached.
•Using distilled or demineralized water will maximize the
performance of your steam mop.
•Use extra care when cleaning on stairs.
•Do not use steam for space heating purposes; household
use only.
•Use on waxed or some unwaxed floors may diminish
glossiness. Do not use on unsealed wood floors. Test in
an inconspicuous area or check the care instructions from
your flooring manufacturer.
•Quality testing during the manufacturing process may
result in water droplets remaining within the water tank.
•If you shake this product the water cut-off valve will make
a rattling noise. This is normal and is not a defect.
For Customer Services & Spare Parts please call 0345 209 7461
Opening times: Monday - Friday 8am –8pm & Saturday 9am –1pm
Or visit us at www.productcare.co.uk

7
STEAM MOP FEATURE DIAGRAM
For Customer Services & Spare Parts please call 0345 209 7461
Opening times: Monday - Friday 8am –8pm & Saturday 9am –1pm
Or visit us at www.productcare.co.uk
1
Steam Button
9
Detail Nozzle
17
Aluminium Handle
2
Steam Adjust Dial
10
Window/ Upholstery
Tool
18
Floor
head
3
Release
Button
11
Upholstery
Pad
19
Carpet Glider
4
Steam Outlet
12
Filling
Jug
20
Microfibre
Pad
5
Hard Water Filter
13
Jet
Nozzle
21
Accessory Joint
6
Small Brush
14
Handle
7
Grout Brush
15
Trigger
8
Scraper Tool
16
Cord
Hook

8
STEAM MOP ASSEMBLY
Before using your steam mop:
Remove all packaging and lay out the separate components.
Check the steam mop after unpacking for any visual damage such as:
•Misaligned or damaged parts
•Damage to the main body and separate components
•Damage to the plug or cable.
If you can see any damage do not use the steam mop and refer page 19.
Handle assembly
Note: Before assembling/disassembling any parts of the product make sure
the unit is unplugged and has cooled sufficiently.
The handle comes in 2 parts:
•Handle top
•Handle tube
1. Fit the handle top onto the handle tube, applying a small amount of
pressure until you hear it ‘click’ into place.
2. Once this is secure, put the assembly into the top of the main unit with
the cord hook parallel to the back of the unit. Push the tab on the base to
allow the handle to fully insert and secure. This should ‘click’ into place.
3. If you wish to remove the handle, simply push the release button on the
back of the unit and lift the assembly upwards. The release button on the
handle top allows you to disassemble the handle parts if required.

9
STEAM MOP ASSEMBLY
Microfibre mop pad attachment
The steam mop should never be operated
without the mop pad attached.
To attach the pad, place it on the floor with the
velcro facing upwards and removal lip to the
back. Lift the mop above the pad and align the
head with the mop pad. Lower the pad and rest
the mop on it to secure the velcro to the head.
To remove the pad, secure your foot on the
protruding piece of cloth and lift the mop away.
Carpet glider attachment
The mop can be used with the carpet glider
attachment to refresh carpets and rugs.
To attach the carpet glider, lift the mop over the
glider and lower the front of the mop head
under the two plastic ribs. Next, lower the back
end of the head. This should secure the head in
place.
To remove the glider, place your foot on the
protruding plastic and lift the mop upwards.

10
FILLING THE WATER TANK
Note: Before filling/re-filling the water tank, unplug the steam mop.
Do not touch any hot parts before allowing them to cool sufficiently.
1. Lay the steam mop horizontally.
2. Pull open the cap on the water tank.
3. Fill the provided measuring jug with water, being careful not to spill any
liquid.
Note: It is recommended to use treated water in your steam mop, especially in
hard water areas. Water can be treated using water filters. Using untreated
hard water can reduce the performance and life span of your product. Never
use boiled water in your steam appliance. This is harmful as the boiled water
that has not turned to steam contains solely the hard water minerals that
should be avoided.
4. Use the jug to fill the tank to the ‘MAX’ fill line.
5. Close the cap on the tank so that it is secure. Lift the mop upright.
A full tank should provide approximately 15 minutes steam time. The mop will
not steam if you do not turn on the power and wait sufficient time for the
water to heat.
NOTE: The tube which transfers
water from the Water Tank to
the boiler is weighted down
with a brass ball. This is an
intentional design to improve
efficiency of water usage. It is
normal for this ball to create a
rattling sound inside of Water
Tank during use.
IF you think brass ball has come
loose from tube, refer to
Troubleshooting Guide for
directions to reconnect it.

11
USING YOUR STEAM MOP
Preparing for use
After all required parts are assembled, make sure your floors are
vacuumed/swept before using the steam mop.
Using
1. Pull and twist the cord release, plug the steam mop into a mains socket and
switch the power on.
2. Make sure the water tank is filled, following instructions on page 10.
3. Turn the steamdial clockwise from the ‘OFF’ to the ‘ON’ position.
4. The power light should be illuminated red. Wait approximately 30 seconds
for the water to heat sufficiently and the steam mop is ready to use.
5.. Tilt the steam mop backwards, approximately 45°, depress the trigger, and
it will begin to steam. When trigger is released the steam will automatically
stop. Switch off when not in use.
6. Move the steam mop forwards and backwards over the areas you wish to
steam clean.
Note: When using the steam mop, do not leave it over a particular area for
more than 30 seconds. This could cause damage.
If the steam flow slows down or stops the unit may need refilling with water.
To refill the water tank: unplug the unit and allow to cool, then follow
instructions on page 10.

12
USING YOUR STEAM MOP
Using the Multi Functions
Your Neptune steam mop comes supplied with attachments for at least 11
different uses such as handheld cleaning, grout, and windows.. To change
between attachments, you must use the provided connecting joint.
Firstly, disconnect the floorhead by pressing the button on the front of the
machine. Insert the attachment tool, and then attach the desired function tool
by twisting onto the end.
SAFETY WARNING
DO NOT aim steam at any person, animal, or on any part of your body.
For grout, use the attached brush to scrub grime.
Only use the attachments on suitable surfaces, the coarse brushes may cause
damage to stainless steel appliances if used incorrectly.
Do not use on any one location for more than 30 seconds as this may cause
irreperable damage.

13
STORING YOUR STEAM MOP
After use
1. When you require a break or have finished steam cleaning, tilt the steam
mop forwards so that it is stood vertical. This will stop the unit from
steaming.
2. Turn the steam dial to the ‘off’ position.
3. Switch the power off at the plug socket and remove the plug.
4. Allow the mop pad to fully cool and then carefully remove from the mop
head.
Note: Do not install or remove the mop pad while steam is emitting.
5. Empty any remaining water from the water tank before storing.
6. Wrap the power cord around the upper and lower cord hooks.
Store upright in a protected, dry area.

14
CLEANING AND CARE
Before you clean the appliance, disconnect the mains plug from the wall
socket.
To clean the exterior of the device, use a damp, soft cloth and mild detergent.
NEVER IMMERSE THE STEAM MOP IN WATER.
When wiping off the main body, do not allow moisture in the area around the
indicator light.
Wash non-electrical accessories in warm soapy water and allow to dry
thoroughly before next use.
If the steam mop is damaged, contact the customer service helpline using the
details at the bottom of this page.
Care of your microfibre cleaning pads
Wash pads in warm water, no more than 40 degrees.
Wash separately. Do not use fabric softener and do not tumble dry.
Dry on a line.
Should there be any loose threads on the microfibre pad, carefully cut the
threads with scissors.
Do not try to pull any threads or cut any threads at the base.
For Customer Services & Spare Parts please call 0345 209 7461
Opening times: Monday - Friday 8am –8pm & Saturday 9am –1pm
Or visit us at www.productcare.co.uk

15
CLEANING AND CARE
Changing the Hard Water Filter
Your Neptune steam mop has been provided with a Hard Water Filter that
will need periodically changing. These can be ordered from
www.productcare.co.uk, and it is recommended only to use genuine
manufacturer supplied parts.
If replacing after use, turn off, unplug and wait 5 minutes for the unit to cool
before attempting to replace. Press the clips to both sides and remove the
filter from the unit. Replace with a new genuine filter by pushing back into
the slot.
SAFETY WARNING
DO NOT attempt to replace whilst unit is on or still hot, this could cause
serious injury and harm.
For Customer Services & Spare Parts please call 0345 209 7461
Opening times: Monday - Friday 8am –8pm & Saturday 9am –1pm
Or visit us at www.productcare.co.uk

16
CLEANING AND CARE
Removing Mineral Build Up
In hard water areas, mineral build up and limescale may limit the
performance of your Neptune Steam Mop.
The best way to minimize mineral build-up is to use distilled or de-
mineralized water when using your Neptune Steam Mop. In addition, it is
recommended that the cleaning procedure below be followed at least once a
month in order to remove any deposits. This will help to extend the life of
your Neptune Steam Mop and keep it functioning at its maximum potential.
Unplug your Neptune Steam Mop and wait 5 minutes for it to cool. Remove
all accessories, then remove the water tank cap and drain into a sink. Insert
tip of Cleaning Pin into opening of Steam Nozzle to remove mineral build-up
in nozzle. This may also be done to clean accessories such as the Jet Nozzle.
Use Measuring Cup to make a mixture of approximately 100mL. distilled
water and 50mL. vinegar.
Slowly pour water-vinegar solution into the water tank, then replace Water
Tank Cap.
Plug in the power cord, set Steam Control Dial to HIGH, and spray full
contents of Water Tank into a sink or tub.
Once Water Tank is drained, turn the unit off and refill Tank with 350ml. of
fresh distilled water. Set Steam Control Dial back to HIGH and repeat. If you
used a water-vinegar solution, you may need to repeat this until vinegar odor
dissipates.
Replace Water Tank Cap, unplug power cord, and store Neptune Steam Mop
as usual.
SAFETY WARNING
TAKE CARE not to come in contact with any water whilst descaling as this may
cause injury or harm.
For Customer Services & Spare Parts please call 0345 209 7461
Opening times: Monday - Friday 8am –8pm & Saturday 9am –1pm
Or visit us at www.productcare.co.uk

17
PROBLEM SOLVING
PROBLEM POSSIBLE PROBLEM POSSIBLE SOLUTION
Reduced steam/no
steam is coming out
1. Water tank may not be
filled.
1. Make sure the water tank is filled. Refer to page
10 of
the instruction manual provided.
2. The unit may not be
plugged in properly/the
fuse or breaker may not
be working.
2. Verify the unit is plugged into an approved electrical
outlet and that the fuse or breaker is functioning properly.
Ensure you have waited at least 30 seconds for the water
to heat up.
3. Power dial is not
turned to ‘on’.
3. Ensure the power
dial is turned to the ‘ON’ position.
The
indicator
light is
not working
1. The unit may not be
plugged in properly/the
fuse
or breaker
may not
be working.
1. Verify the unit is plugged securely into an approved
electrical outlet and that the fuse or breaker is functioning
properly
. Ensure the power dial is switched to ‘ON’.
There is a peculiar
smell coming from the
unit
1. First time using
product.
1. If
this is the first time you are using the mop, continue
using the product. The smell may be due to new parts
being heated up for the first time
.
2. This is not the first
time the product has
been used.
2. Discontinue use if problem persists and contact
Customer
Services using the details on the next page.
There is a
‘clicking/bubbling/rat
tle’ noise coming from
the steam mop when
in use
1. This is
a normal occurrence due to the construction of
the product and its operational functionality.
There
is a puddle of
water/the mop pad is
not picking up dirt
1. The mop pad is
saturated
and needs
changing.
1. Wash
the mop pad, following cleaning and care
instructions provided on page 13 of the manual.
Parts have
broken/need
replacing
1. Either the
mop pad,
carpet glider,
measuring
jug
or handle have
broken or been lost.
1. Call customer services or visit the website detailed at
the bottom of
the next page.
2. None of the above
have broken but another
part has.
2. Discontinue use and contact customer services using
the details on the bottom of
the next page.

18
PROBLEM SOLVING
PROBLEM POSSIBLE PROBLEM POSSIBLE SOLUTION
I have lost the
instruction manual
provided
1. The instruction manual
has been lost or
misplaced.
1. It is important to have a copy of the instruction manual.
Visit
www.productcare.co.uk
or contact customer services
using the details provided on the bottom of this page.
The brass ball has
disconnected from the
water tank
The connection has come
loose and come away
form the tank
Simply reattach it by snapping it back onto black nozzle at
end of tube.
We’re here should you need us.
For Customer Services & Spare Parts please call 0345 209 7461
Opening times: Monday - Friday 8am –8pm & Saturday 9am –1pm
Or visit us at www.productcare.co.uk

19
GUARANTEE AND CUSTOMER SERVICES
At Russell Hobbs, we take all our customer feedback seriously.
Feel free to contact our Product Care Team, on 0345 209 7461
Monday –Friday: 8am-8pm & Saturday: 9am –1pm,
who will be more than happy to assist you.
This product is guaranteed for 12 months from the date of the
original purchase. If any defect arises due to faulty materials or
workmanship, the faulty product must be returned to the place of
purchase.
Refund or replacement is at the discretion of the retailer.
The following conditions apply:
•The product must be returned to the retailer with the original
proof of purchase.
•The product must be installed and used in accordance with the
instructions contained in this instruction guide and any other
instructions for use which are supplied.
•It must be used for domestic purposes only and for its intended
use.
•This warranty does not cover wear and tear, damage, misuse
or consumable parts.
This does not affect your statutory rights.
For Customer Services & Spare Parts please call 0345 209 7461
Opening times: Monday - Friday 8am –8pm & Saturday 9am –1pm
Or visit us at www.productcare.co.uk

20
CONNECTION TOTHE MAINS SUPPLY
WARNING-THIS APPLIANCE MUST BE EARTHED
This appliance is designed to operate from a mains supply of
220-240V~50Hz.
Check that the voltage marked on the product corresponds
with your supply voltage.
This product is fitted with a 13A plug complying with BS1363.
If this plug is unsuitable or needs to be replaced, refer to customer
services.
Important: The wires in the mains lead are coloured in
accordance with the following code:
GREEN/YELLOW –EARTH
BLUE - NEUTRAL
BROWN –LIVE
This manual suits for next models
1
Table of contents
Other Russell Hobbs Steam Cleaner manuals

Russell Hobbs
Russell Hobbs RHGS01 Installation guide

Russell Hobbs
Russell Hobbs 20570 User manual

Russell Hobbs
Russell Hobbs 20570-56 User manual

Russell Hobbs
Russell Hobbs Steam & Clean Lite User manual

Russell Hobbs
Russell Hobbs Steam & Clean User manual

Russell Hobbs
Russell Hobbs RHSM1001 User manual

Russell Hobbs
Russell Hobbs RHSM1001-G User manual

Russell Hobbs
Russell Hobbs Steam & Clean RHMSM3002 Manual

Russell Hobbs
Russell Hobbs RHC410 Installation instructions manual

Russell Hobbs
Russell Hobbs STEAM & CLEAN RHSM1001BP-G User manual