2
English
OPERATION
APPLICATIONS
You may use this product for the following purposes:
■Charging compatible Ryobi 14.4 Volt and 18 Volt
battery packs.
BATTERY PROTECTION FEATURES
Ryobi One+ 18 V and 14.4 V lithium-ion batteries are
designed with features that protect the lithium-ion cells
and maximize battery life.
If the tool stops during use, release the trigger to reset
and resume operation. If the tool still does not work, the
battery needs to be recharged.
CHARGING THE BATTERY PACK
Use only Ryobi One+ 18 V and 14.4 V battery packs
with this charger:
Battery packs for this tool are shipped in a low charge
condition to prevent possible problems. Therefore, you
should charge them until the green LED on the front of
the charger stays on.
CHARGING A BATTERY PACK
If the charger does not charge the battery pack under
normal circumstances, return both the battery pack and
charger to your nearest Authorized Service Center for
electrical check.
■Charge the battery pack only with the charger
provided.
■Make sure the power supply is normal household
voltage, 220V-240V, 50-60Hz, AC only.
■Make sure the latches on each side of the battery
pack snap into place and the battery pack is secured
in the charger before beginning operation.
■Connect the charger to the power supply.
■Place the battery pack in the charger aligning raised
rib on the battery pack with the groove in the charger.
■Press down on the battery pack to be sure contacts
on the battery pack engage properly with contacts in
the charger.
NOTE: After charging is complete, the green LED will
remain on until the battery pack is removed from the
charger or charger is disconnected from the power
supply.
■The battery pack will become slightly warm to the
touch while charging. This is normal and does not
indicate a problem.
■Do not place the charger and battery pack in an
area of extreme heat or cold. They will work best
at normal room temperature.
NOTE: The charger and battery pack should be
placed in a location where the temperature is
more than 10°C but less than 38°C.
■When batteries become fully charged, unplug the
charger from the power supply and remove the
battery pack.
■To remove the battery pack from the charger, depress
the latches on each side of the battery pack.
CHARGING A HOT BATTERY PACK
When using a tool continuously, the batteries in the
battery pack will become hot. You should let a hot battery
pack cool down for approximately 30 minutes before
attempting to recharge.
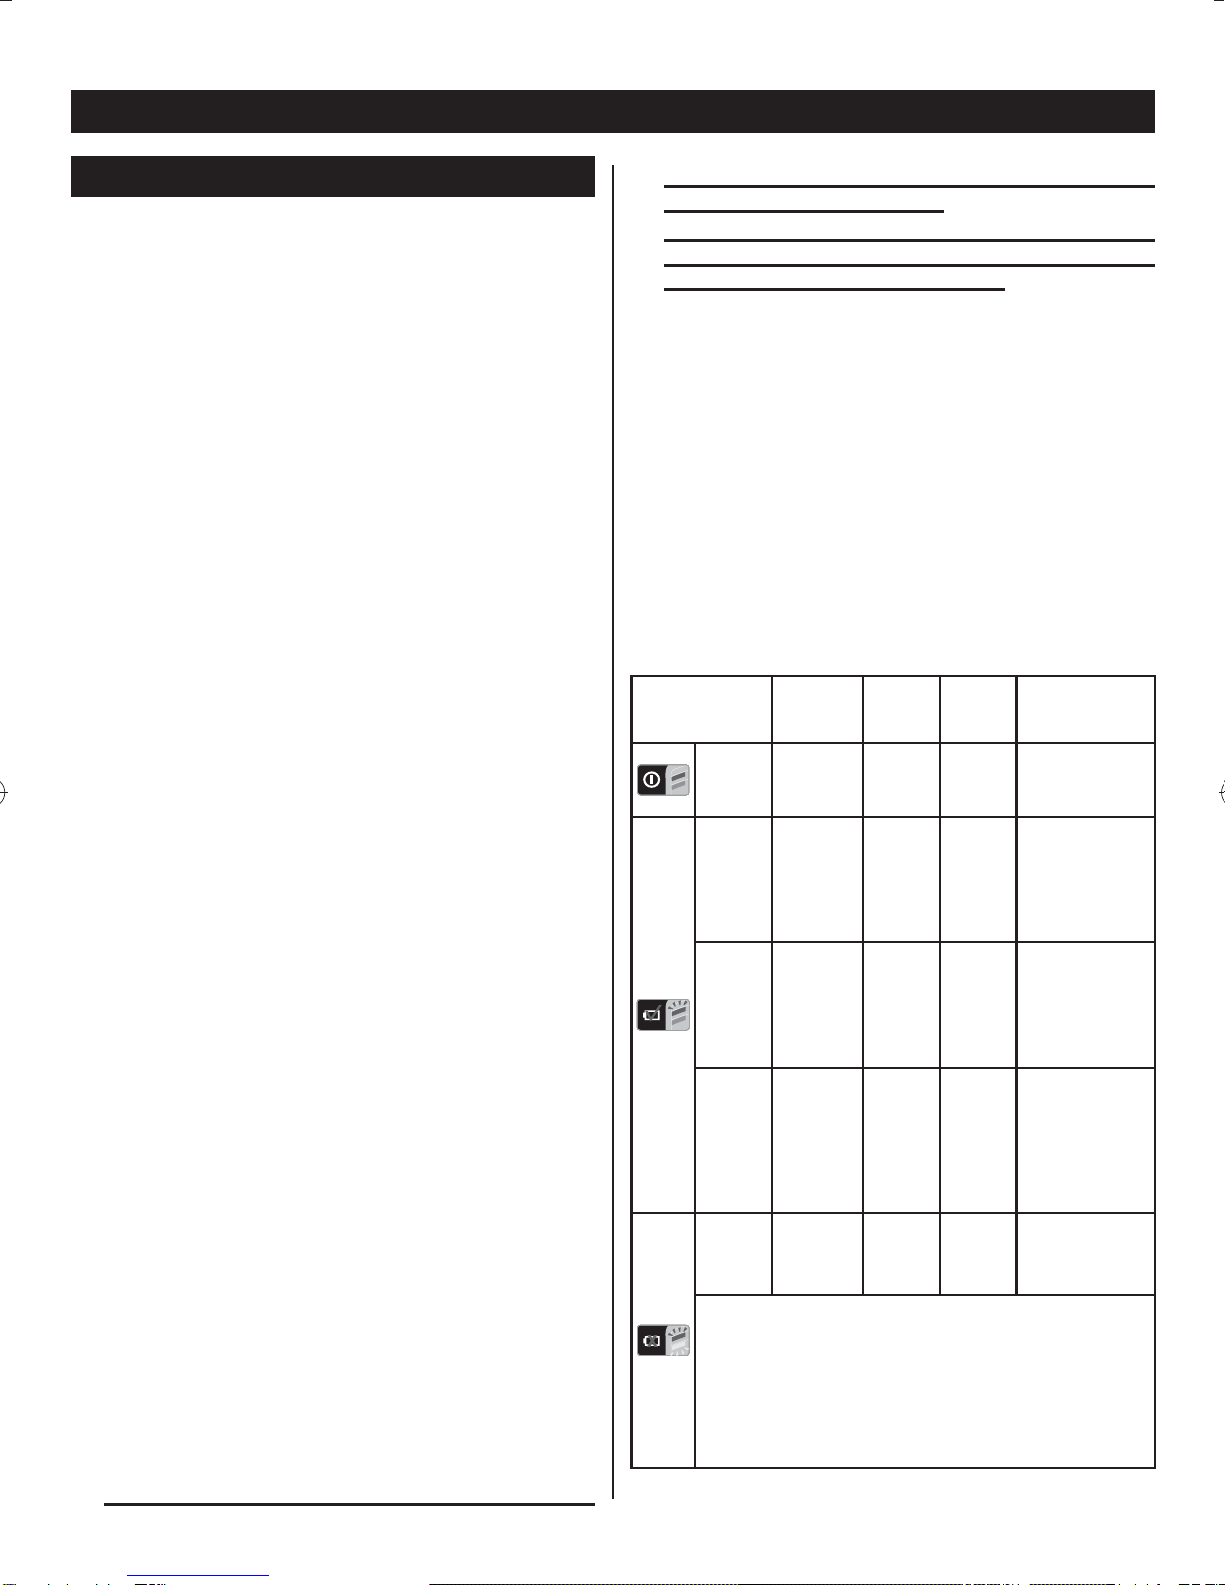
LED FUNCTION
CHARGER LED
INDICATOR
BATTERY
PACK
STATUS
RED
LED GREEN
LED ACTION
Power
Without
battery
pack
ON OFF Ready to charge
battery pack.
Evaluate Hot battery
pack Flashing OFF
When battery
pack reaches
cooled
temperature,
charger begins
fast charge mode.
Evaluate
Cold
battery
pack
Flashing OFF
When battery
pack reaches
warmed
temperature,
charger begins
fast charge mode.
Evaluate Deeply
discharged Flashing OFF
Charger pre-
charges battery
until nomal
voltage is
reached, then
begins fast
charge mode.
Defective Defective Flashing Flashing
Battery pack
or charger is
defective.
• If defective, try to repeat the conditions a second time by
removing and reinstalling the battery pack. If the LED status
repeats a second time, try charging a different battery.
• If a different battery charges normally, dispose of the
defective pack (see Maintenance section).
• If a different battery also indicates "Defective," the charger
may be defective.