S&C IntelliRupter PulseCloser R3 User manual

Table of Contents
Section Page Section Page
Introduction
Qualified Persons ........................... 2
Read this Instruction Sheet ................... 2
Retain this Instruction Sheet. . . . . . . . . . . . . . . . . . . 2
Proper Application .......................... 2
Special Warranty Provisions................... 3
Safety Information
Understanding Safety-Alert Messages........... 4
Following Safety Instructions .................. 4
Replacement Instructions and Labels ........... 4
Safety Precautions ......................... 5
Overview................................... 6
Communication Module Removal ............ 7
Communication Module Retrofit
Tools Required ............................. 8
Removing the Radio Tray ..................... 8
Removing the R0 Wi-Fi/GPS Module............ 9
Installing the R3 Wi-Fi/GPS Module.............10
Reinstalling the Radio Tray....................12
Setting the R3 Communication Module to
Ethernet IP Configuration ...................13
Inserting the Communication Module
Into the Base ...............................15
Wi-Fi/GPS Board Configuration Details.......16
Wiring Diagrams............................18
R3 Communication Module
Retrot and Conguration
May 9, 2022
© S&C Electric Company 2020-2022, all rights reserved Instruction Sheet 766-526
IntelliRupter®PulseCloser®Fault Interrupter
Outdoor Distribution (15.5 kV, 27 kV, and 38 kV)

Qualified Persons WARNING
The equipment covered by this publication must be installed, operated, and
maintained by qualified persons who are knowledgeable in the installation,
operation, and maintenance of overhead electric power distribution equipment
along with the associated hazards. A qualified person is one who is trained and
competent in:
• The skills and techniques necessary to distinguish exposed live parts from
nonlive parts of electrical equipment
• The skills and techniques necessary to determine the proper approach distances
corresponding to the voltages to which the qualified person will be exposed
• The proper use of the special precautionary techniques, personal protective
equipment, insulating and shielding materials, and insulated tools for working
on or near exposed energized parts of electrical equipment
These instructions are intended only for such qualified persons. They are not
intended to be a substitute for adequate training and experience in safety
procedures for this type of equipment.
Read this
Instruction Sheet NOTICE
Read this instruction sheet thoroughly and carefully before installing or operating
your IntelliRupter PulseCloser Fault Interrupter. Familiarize yourself with the
Safety Information and Safety Precautions on pages 4 and 5. The latest
version of this publication is available online in PDF format at sandc.com/en/
support/product-literature/.
Retain this
Instruction Sheet This instruction sheet is a permanent part of your IntelliRupter®fault interrupter.
Designate a location where it can be easily retrieved for reference.
Proper Application
Introduction
WARNING
The equipment in this publication is only intended for a specific application. The
application must be within the ratings furnished for the equipment. Ratings for the
IntelliRupter fault interrupter are listed in the ratings table in S&C Specification
Bulletin 766-31.
2 S&C Instruction Sheet 766-526

Introduction
Special Warranty
Provisions
The standard warranty contained in S&C’s standard conditions of sale, as set forth in
Price Sheets 150 and 181, applies to the IntelliRupter fault interrupter, except that the
rst paragraph of the said warranty is replaced by the following:
(1) General: The seller warrants to the immediate purchaser or end user for a period of
10 years from the date of shipment that the equipment delivered will be of the
kind and quality specified in the contract description and will be free of defects
of workmanship and material. Should any failure to conform to this warranty
appear under proper and normal use within 10 years after the date of shipment,
the seller agrees, upon prompt notification thereof and confirmation that the
equipment has been stored, installed, operated, inspected, and maintained in
accordance with the recommendations of the seller and standard industry prac-
tice, to correct the nonconformity either by repairing any damaged or defective
parts of the equipment or (at the seller’s option) by shipment of necessary replace-
ment parts. The seller’s warranty does not apply to any equipment that has been
disassembled, repaired, or altered by anyone other than the seller. This limited
warranty is granted only to the immediate purchaser or, if the equipment is pur-
chased by a third party for installation in third-party equipment, the end user of
the equipment. The seller’s duty to perform under any warranty may be delayed,
at the seller’s sole option, until the seller has been paid in full for all goods pur-
chased by the immediate purchaser. No such delay shall extend the warranty
period.
Replacement parts provided by the seller or repairs performed by the seller
under the warranty for the original equipment will be covered by the above
special warranty provision for its duration. Replacement parts purchased
separately will be covered by the above special warranty provision.
For equipment/services packages, the seller warrants for a period of one
year after commissioning that the IntelliRupter fault interrupter will provide
automatic fault isolation and system reconfiguration per agreed-upon service
levels. The remedy shall be additional system analysis and reconfiguration of the
IntelliTeam® SG Automatic Restoration System until the desired result is
achieved.
Warranty of the IntelliRupter fault interrupter is contingent upon the installa-
tion, configuration, and use of the control or software in accordance with S&C’s
applicable instruction sheets.
This warranty does not apply to major components not of S&C manufacture, such
as batteries and communication devices. However, S&C will assign to immediate
purchaser or end user all manufacturer’s warranties that apply to such major
components.
Warranty of equipment/services packages is contingent upon receipt of adequate
information on the user’s distribution system, sufficiently detailed to prepare a
technical analysis. The seller is not liable if an act of nature or parties beyond
S&C’s control negatively impact performance of equipment/services packages;
for example, new construction that impedes radio communication, or changes to
the distribution system that impact protection systems, available fault currents,
or system-loading characteristics.
S&C Instruction Sheet 766-526 3

Understanding
Safety-Alert Messages
Several types of safety-alert messages may appear throughout this instruction sheet
and on labels attached to the IntelliRupter PulseCloser Fault Interrupter. Familiarize
yourself with these types of messages and the importance of these various signal words:
DANGER
“DANGER” identifies the most serious and immediate hazards that will likely
result in serious personal injury or death if instructions, including recommended
precautions, are not followed.
WARNING
“WARNING” identifies hazards or unsafe practices that can result in serious
personal injury or death if instructions, including recommended precautions, are
not followed.
CAUTION
“CAUTION” identifies hazards or unsafe practices that can result in minor personal
injury if instructions, including recommended precautions, are not followed.
NOTICE
“NOTICE” identifies important procedures or requirements that can result in
product or property damage if instructions are not followed.
Following
Safety Instructions
If you do not understand any portion of this instruction sheet and need assistance,
contact your nearest S&C Sales Ofce or S&C Authorized Distributor. Their telephone
numbers are listed on S&C’s website sandc.com, or call the S&C Global Support and
Monitoring Center at 1-888-762-1100.
NOTICE
Read this instruction sheet thoroughly and carefully
before installing or operating your IntelliRupter
PulseCloser Fault Interrupter.
Replacement
Instructions and Labels
If additional copies of this instruction sheet are needed, contact your nearest S&C Sales
Ofce, S&C Authorized Distributor, S&C Headquarters, or S&C Electric Canada Ltd.
It is important that any missing, damaged, or faded labels on the equipment
be replaced immediately. Replacement labels are available by contacting your
nearest S&C Sales Office, S&C Authorized Distributor, S&C Headquarters, or
S&C Electric Canada Ltd.
Safety Information
4 S&C Instruction Sheet 766-526

Safety Precautions
DANGER
IntelliRupter PulseCloser Fault Interrupters operate at high voltage. Failure to
observe the precautions below will result in serious personal injury or death.
Some of these precautions may differ from your company’s operating procedures
and rules. Where a discrepancy exists, follow your company’s operating procedures
and rules.
1. QUALIFIED PERSONS. Access to an IntelliRupter
fault interrupter must be restricted only to qualified
persons. See the “Qualified Persons” section on
page 2.
2. SAFETY PROCEDURES. Always follow safe
operating procedures and rules.
3. PERSONAL PROTECTIVE EQUIPMENT. Always
use suitable protective equipment, such as rubber
gloves, rubber mats, hard hats, safety glasses, and
flash clothing, in accordance with safe operating
procedures and rules.
4. SAFETY LABELS. Do not remove or obscure any of
the “DANGER,” “WARNING,” “CAUTION,” or
“NOTICE” labels.
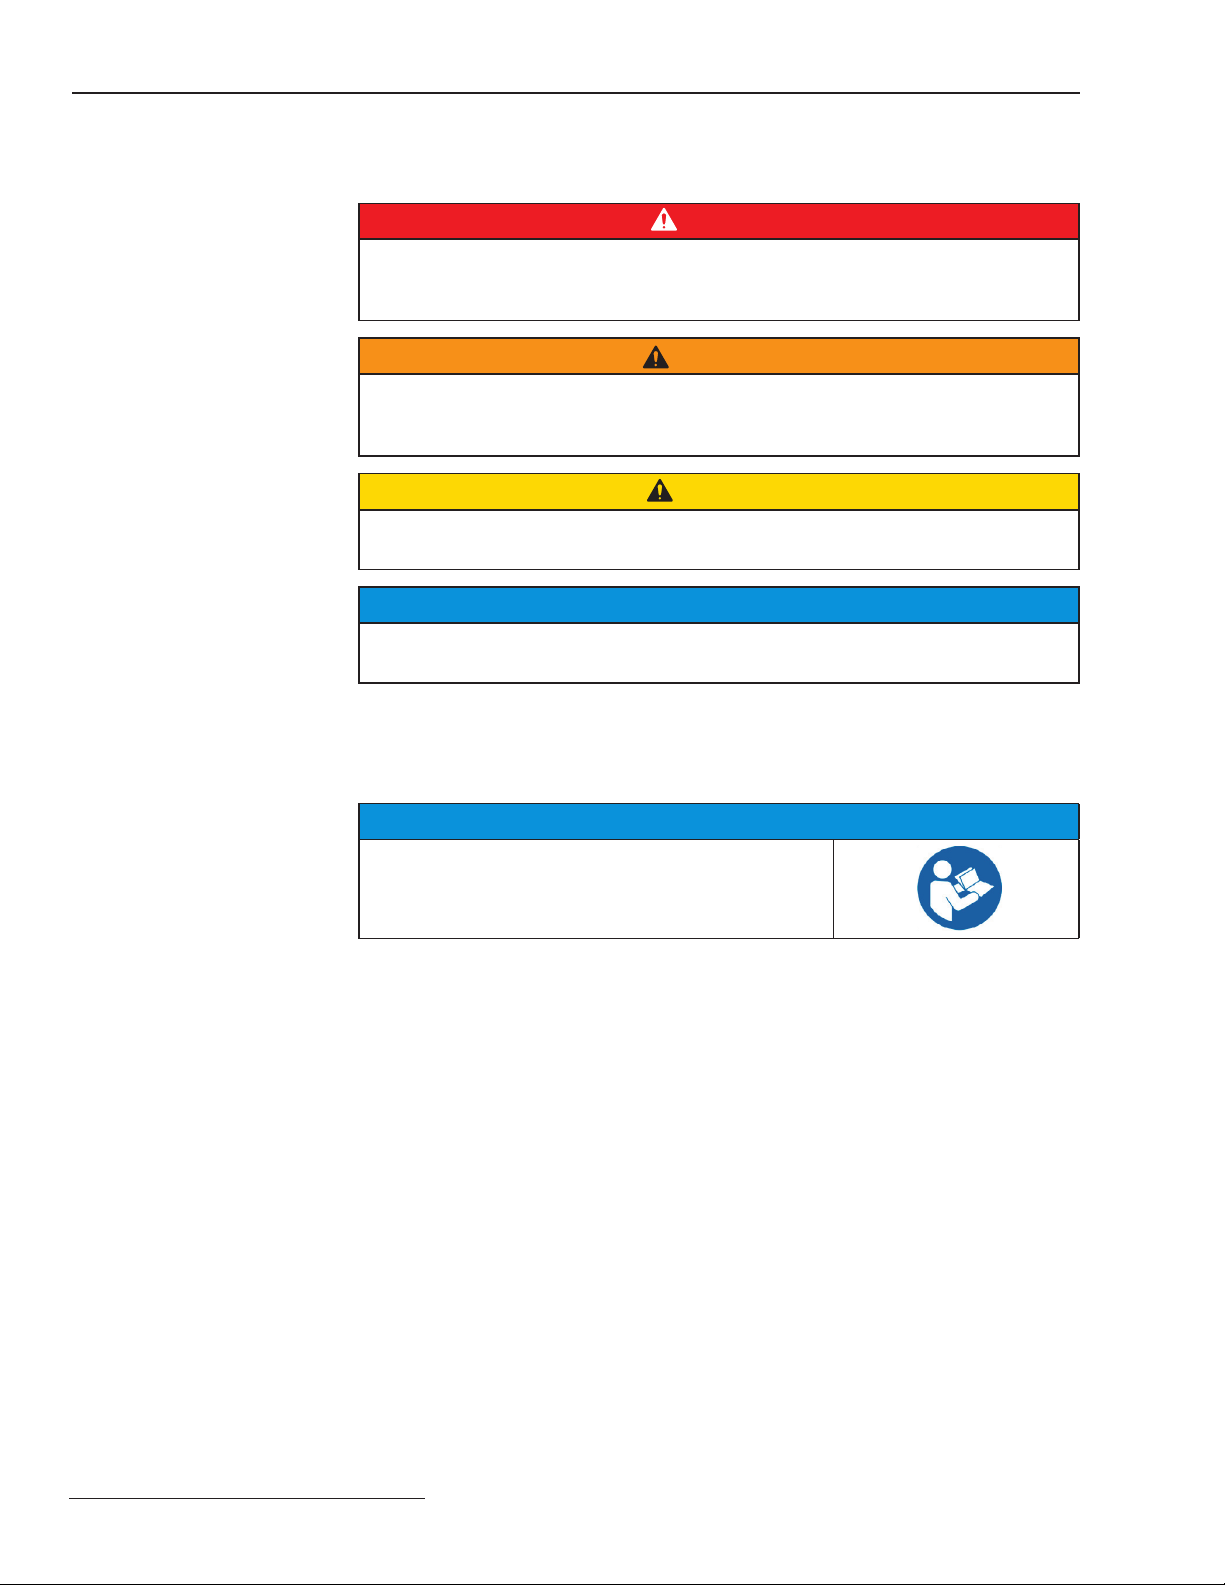
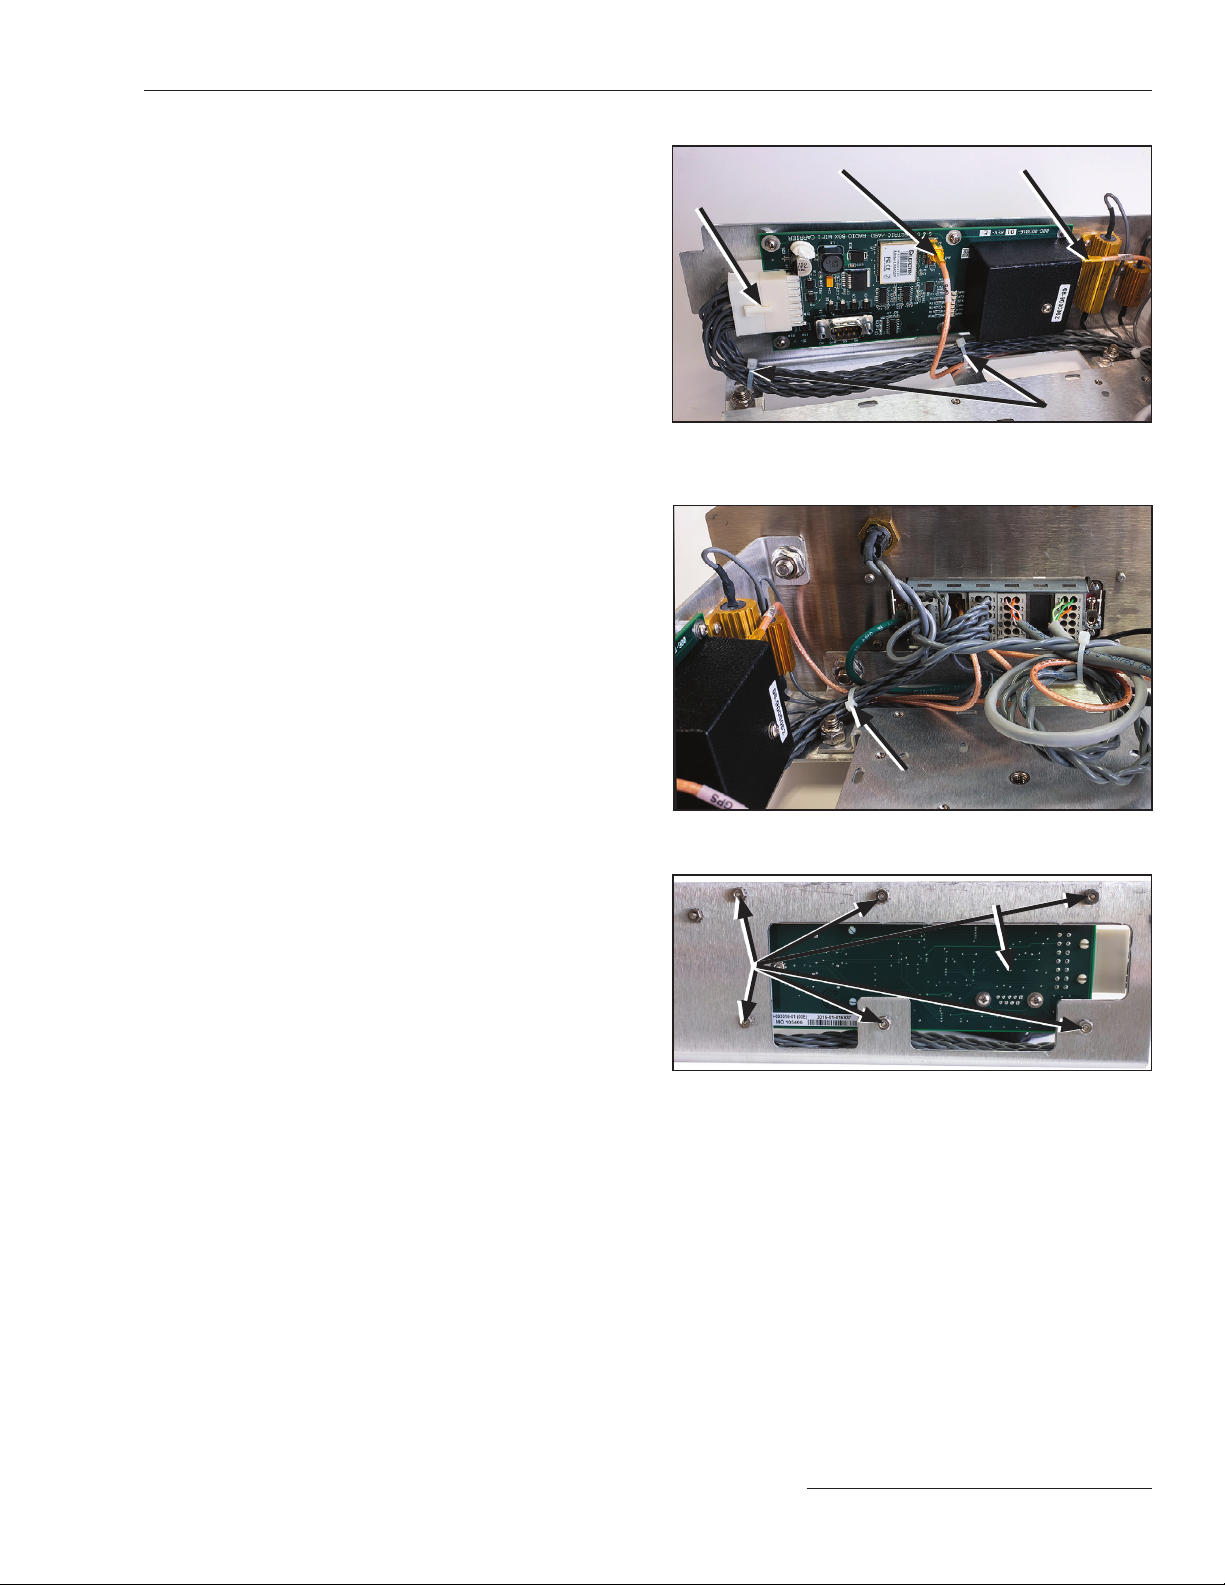
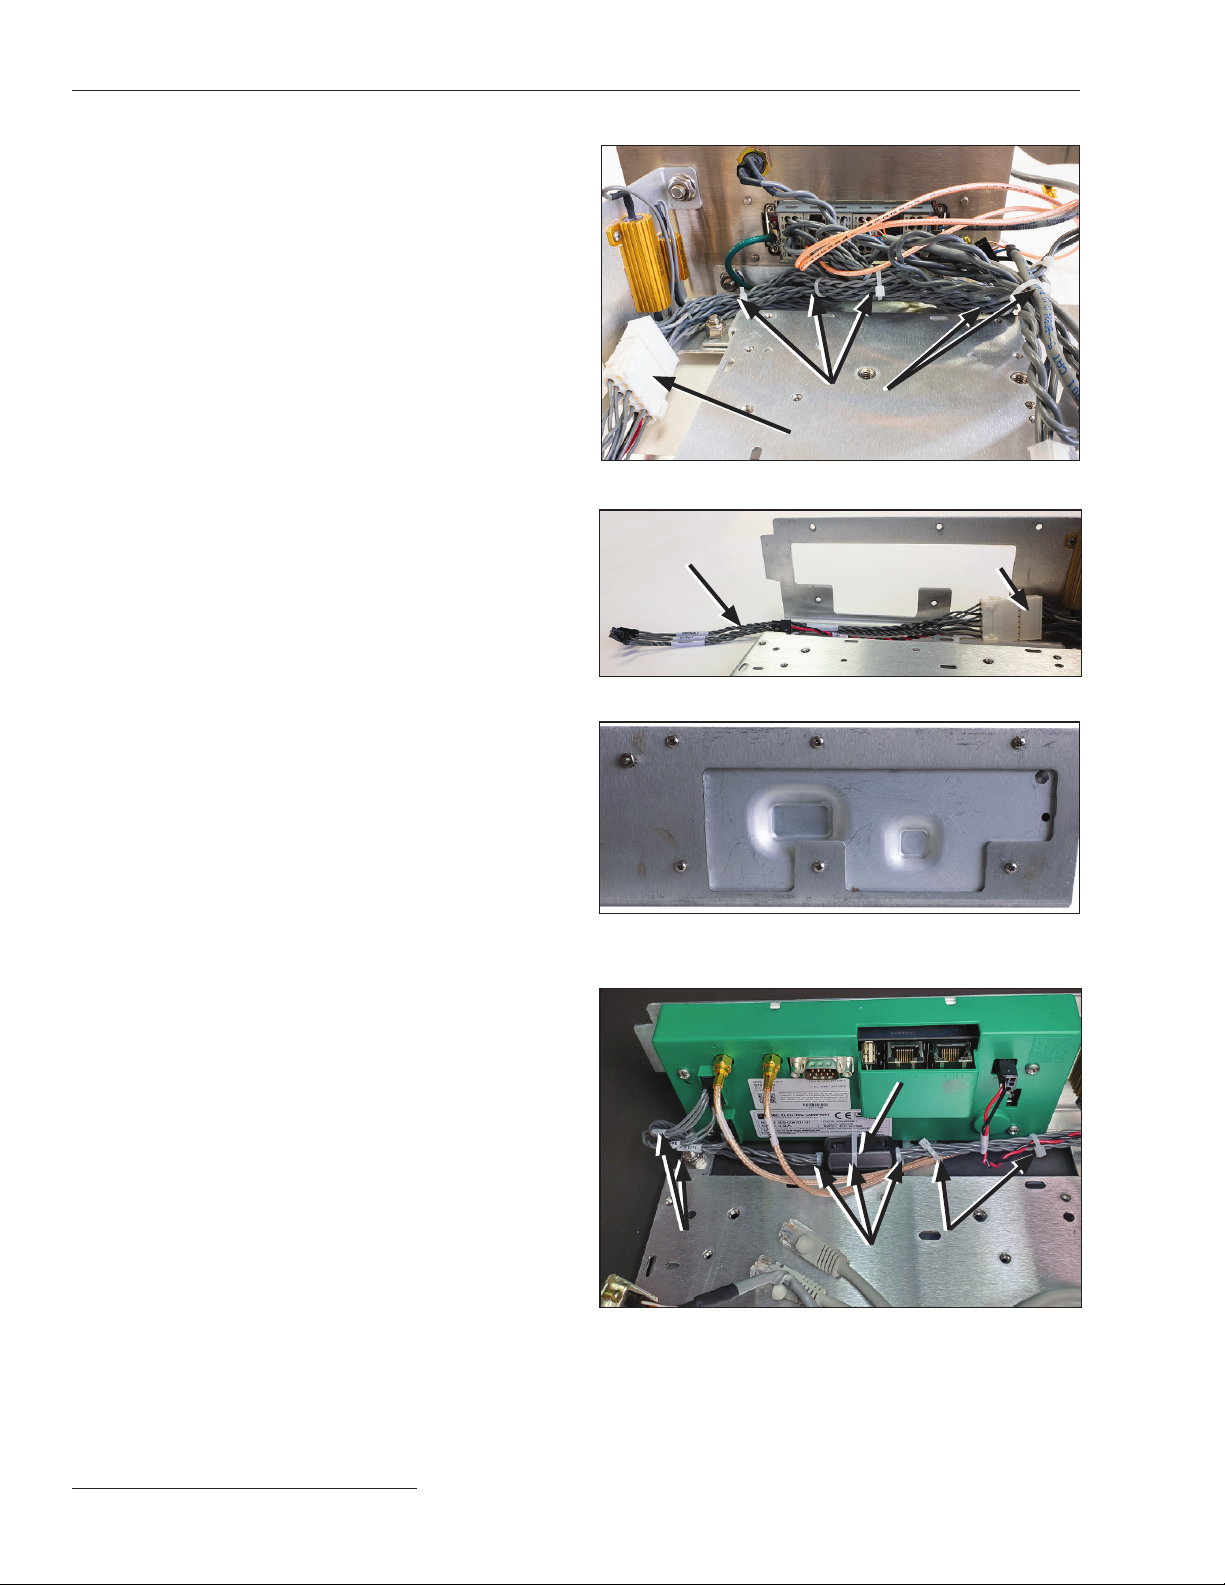
5. OPERATING MECHANISM AND BASE.
IntelliRupter fault interrupters contain fast-moving
parts that can severely injure fingers. Do not
remove or disassemble operating mechanisms or
remove access panels on the IntelliRupter fault
interrupter base unless directed to do so by
S&C Electric Company.
6. ENERGIZED COMPONENTS. Always consider all
parts live until de-energized, tested, and grounded.
The integrated power module (IPM) contains
components that can retain a voltage charge for
many days after the IntelliRupter fault interrupter has
been de-energized and can derive a static charge
when in close proximity to a high-voltage source.
Voltage levels can be as high as the peak line-to-
ground voltage last applied to the unit. Units that
have been energized or installed near energized
lines should be considered live until tested and
grounded.
7. GROUNDING. The IntelliRupter fault interrupter
base must be connected to a suitable earth ground
at the base of the utility pole, or to a suitable building
ground for testing, before energizing an IntelliRupter
fault interrupter, and at all times when energized.
• The ground wire(s) must be bonded to the system
neutral, if present. If the system neutral is not
present, proper precautions must be taken to
ensure the local earth ground, or building ground,
cannot be severed or removed.
8. VACUUM INTERRUPTER POSITION. Always
confirm the Open/Close position of each interrupter
by visually observing its indicator.
• Interrupters, terminal pads, and disconnect
blades on disconnect-style models may be
energized from either side of the IntelliRupter fault
interrupter.
• Interrupters, terminal pads, and disconnect
blades on disconnect style models may be
energized with the interrupters in any position.
9. MAINTAINING PROPER CLEARANCE. Always
maintain proper clearance from energized
components.
S&C Instruction Sheet 766-526 5

Overview
S&C products may be revised to add new features to an
existing assembly. The revision information is listed after
the catalog number with “R” and the revision number. Parts
required for a specic revision are also refered to with the
same Rx designation.
An existing R0 Communication Module can be upgraded
to R3 functionality by installing the R3 Wi-Fi/GPS
transceiver and harnesses.
• S&C Power Systems Solutions can train utility
personnel to do the R3 retrot.
• The retrot must be done indoors at an electrostatic-
discharge (ESD) protected workbench.
• The SCADA radio can be congured in the shop for a
installation at a specic site.
• The R3 Communication Module can be easily installed
at the site by a line crew.
Note: The IntelliRupter fault interrupter remains fully
operational during the communication module swap.
There will be no service interruption.
Note: When establishing a rotation procedure to swap
communication modules at the site, each SCADA radio
must be configured in the shop for the specific site at
which it will be installed.
NOTICE
These instructions are intended for use only by
personnel trained by S&C Power Systems Solutions.
Electrostatic-discharge procedures must be followed
because components are sensitive to electrostatic-
discharge damage.
Use of an SCS 8501 Static Dissipative Mat and
Wrist Groundstrap or a static protected workbench
is required.
NOTICE
The R3 retrofit must be done indoors in a laboratory or
shop environment on a static-controlled workbench.
NOTICE
Installation of the R3 retrofit kit without proper training
will void the warranty. Contact S&C to arrange for
training provided by S&C Power Systems Solutions.
6 S&C Instruction Sheet 766-526

Figure 1. Inserting the handling fitting into the module latch.
Figure 2. Removing the communication module from the base.
Communication Module Removal
The communication module can be easily removed and
replaced from a bucket truck using a hookstick.
NOTICE
To prevent contamination of the connectors, never
place the connector on the ground without some form
of protection from dirt and mud.
Removing the communication module can be done
from a bucket truck with the module handling fitting,
catalog number 4450, attached to a suitable hookstick.
CAUTION
The communication module is heavy, weighing
more than 26 pounds (12 kg). S&C does not
recommend removal and replacement from the
ground using an extendostick. This may cause minor
injury or equipment damage.
Remove and replace the communication module
from a bucket truck using the module handling fitting
attached to a suitable hookstick.
Follow these steps to remove the communication
module:
STEP 1. Insert the handling tting into the module latch
and push up on the hookstick. Rotate the tting
90 degrees counterclockwise (as viewed from
the underside of the base) to open the latch.
See Figure 1.
STEP 2. Remove the communication module from the
base. See Figure 2. Pull very hard to disengage
the wiring connectors.
STEP 3. Remove the handling tting from the module
latch by pushing in on the hookstick while
rotating it 90 degrees clockwise. Place the
communication module on a clean, dry surface.
See Figure 3.
Figure 3. The rear of a communication module removed from
the IntelliRupter fault interrupter base.
S&C Instruction Sheet 766-526 7

Communication Module Retrot
Tools Required:
• Nut driver, ¼-inch
• Nut driver, ⅜-inch
• Phillips screwdriver, medium
• Flat-head screwdriver, medium
• Diagonal wire cutter (to cut or trim cable ties)
• SCS 8501 Static Dissipative Mat
Removing the Radio Tray
Follow these steps to remove the radio tray assembly from
the communication module:
STEP 1. Loosen the battery compartment cover locking
screw and open the battery compartment cover.
See Figure 4.
STEP 2. Remove the ve ¼–20 bolts that attach the
radio tray assembly using a ⅜-inch nut driver.
Retain the bolts. See Figure 4.
STEP 3. Slide the radio tray out of the communication
module. See Figure 5.
STEP 4. Place the radio tray on a static dissipative mat or
static grounded workbench. See Figure 6.
Figure 4. Removing the radio tray bolts.
Figure 5. Removing the radio tray assembly.
Figure 6. The SCS 8501 Field Service Kit.
NOTICE
Handling the R3 Wi-Fi/GPS module without effective
electrostatic protection will void the product warranty.
To effectively protect the R3 Wi-Fi/GPS module,
use the SCS 8501 Field Service Kit. The kit can be
purchased online or through S&C Electric Company
using part number 904-002511-01.
Note: When performing only the Ethernet configuration
change, go to the “Setting the R3 Communication Module
for Ethernet IP Configuration” section on page 12.
Radio tray
mounting bolts
Locking screw
Battery
cover
8 S&C Instruction Sheet 766-526

Communication Module Retrot
Removing the R0 Wi-Fi/GPS Module
The R0 Wi-Fi/GPS module, with connections for power,
data, and antenna, is mounted on the side of the radio
tray. See Figure 7.
Follow these steps to remove the R0 Wi-Fi/GPS module
circuit board. See Figure 7.
STEP 1. When a SCADA radio is installed:
(a) Disconnect all cables from the radio.
(b) Use a Phillips screwdriver to remove the
screws attaching the radio mounting plate
to the radio tray.
(c) Save the screws and remove the radio and
radio mounting plate.
STEP 2. Disconnect the two antenna cables. They are
labeled GPS and Wi-Fi for correct reinstallation.
STEP 3. Disconnect the connector at the left side.
STEP 4. Cut the two indicated cable ties. See Figure 7.
STEP 5. Cut the cable tie indicated in Figure 8.
STEP 6. Remove the six standoff mounting nuts (will not
be reused), and remove the circuit board.
See Figure 9.
Figure 7. The R0 Wi-Fi/GPS module connections with no SCADA
radio installed.
Figure 8. The indicated cable tie must be cut.
Cable tie
Figure 9. The R0 mounting nuts.
Wi-Fi antenna cable
Cable
ties
Connector
GPS antenna cable
Circuit board
Mounting
nuts
S&C Instruction Sheet 766-526 9

Figure 10. The rebundled cable harness and cable ties.
Figure 11. The new harness connected to the existing connector.
Figure 12. The six new screws that secure the R3 Wi-Fi/GPS
module mounting plate.
Installing the R3 Wi-Fi/GPS Module
Follow these steps to install the R3 Wi-Fi/GPS module.
STEP 1. Fold the harness that was connected to the R0
circuit board as shown in Figure 10 and secure
it with the indicated cable ties.
STEP 2. Plug the new harness into the existing harness
connector. See Figures 10 and 11.
STEP 3. Install the R3 Wi-Fi/GPS module mounting
plate to the side of the radio tray with the six
screws provided. See Figures 12 and 13.
STEP 4. Install the ferrite choke around the gray cables
and install the three cable ties at the ferrite. See
Figure 13.
STEP 5. Install two cable ties near the connector and
two cable ties near the gray cable plugs. See
Figure 13.
Existing connector
New harness
Figure 13. The ferrite choke and cable ties installed on the
new harness.
Cable ties
New harness
connector
Ferrite
choke
2 cable
ties
3 cable
ties
2 cable
ties
Communication Module Retrot
10 S&C Instruction Sheet 766-526

STEP 6. Attach cables to the Wi-Fi/GPS module. See
Figure 14.
(a) The two antenna connectors are marked for
“GPS” and “Wi-Fi.” Connect them as
indicated.
(b) The three gray cables are marked for the
appropriate connector. Connect them from
top to bottom in this order: J18, J17, and J16.
Connector J15 is not used.
Communication Module Retrot
Figure 14. The R3 Wi-Fi/GPS module connections, with no communication device installed.
GPS antenna
Ethernet 1
Ethernet 2
USB connector
(not used)
Polarized power
connector
Serial
Wi-Fi antenna
J18
J17
J16
J15
S&C Instruction Sheet 766-526 11

Figure 17. The new “R3” label on the front panel.
Reinstalling the Radio Tray
STEP 9. Reinstall the radio tray in the communication
module enclosure.
(a) Insert the radio tray into the communication
module. See Figure 15.
(b) Install the ve existing ¼–20 bolts that
attachthe radiotray assemblyusinga ⅜-inch
nut driver. See Figure 16.
(c) Close the battery compartment cover and
tighten the cover locking screw.
STEP 10. Install the new “R3” label on the front plate in
the recess at the right as indicated in Figure 17.
STEP 11. If the Ethernet IP conguration has been set,
install the “-E” label on the front panel recess.
Figure 15. Removing the radio tray assembly.
Figure 16. Removing the radio tray bolts.
Radio tray
mounting bolts
Locking screw
Connecting the cables as instructed in this
step emulates operation of the R0 Communica-
tion Module, which is a serial communication
configuration. For Ethernet IP configuration,
go to the “Setting the R3 Communication Mod-
ule for Ethernet IP Configuration” section on
page 13.
STEP 7. Reinstall the SCADA radio and mounting plate
with the existing Phillips screws.
STEP 8. Reconnect the radio power cable, the antenna
cable, and the serial and/or Ethernet cables.
Communication Module Retrot
12 S&C Instruction Sheet 766-526

Setting the R3 Communication Module to Ethernet IP Conguration
NOTICE
Proper grounding with a wrist strap connected to
ground is required when touching any components
within the communication module or contacts on the
R3 Communication Module connector.
The R3 Communication Module is shipped from the
factory with a serial communication configuration.
See the wiring diagram in Figure 26 on page 18. This
section instructs configuring the module to use the
Ethernet IP configuration, which allows remote access
to the WiFi/GPS user interface, enables remote firmware
updates, and allows use of advanced security features
available in the R3 Communication Module firmware
version 3.0.00512. See the wiring diagram in Figure 27 on
page 19.
To configure the R3 Communication Module for
Ethernet IP wiring, WAN traffic must be routed through
the Wi-Fi/GPS module. Follow these steps to convert the
R3 Communication Module from the serial communica-
tion configuration wiring to the IP configuration module
wiring:
STEP 1. See page 9 for R3 Communication Module
removal.
STEP 2. At the communication device, unplug the RJ45
cable that runs between the communication
device and the control module. See Figure 14 on
page 11.
STEP 3. At the Wi-Fi/GPS module, plug the RJ45 cable
from the control into Ethernet 1 on the Wi-Fi/
GPS module. See Figure 18
STEP 4. Locate the Ethernet patch cord provided with
the R3 Communication Module and plug one
end into Ethernet 2 on the Wi-Fi/GPS module
and the other into the Ethernet port on the
communication device. See Figure 19.
STEP 5. Install the DB-9 cable to the eld communica-
tion device so Wi-Fi can communicate with that
device. See S&C Instruction Sheet 766-528
with module rmware version 3.0.00512, or
Instruction Sheet 766-524 for other rmware
versions. See Figure 19.
STEP 6. Follow instructions in the the “Reinstalling the
Radio Tray” section on page 12.
Figure 18.The RJ45 cable from the control plugged into Ethernet 1.
Ethernet 1
Figure 19. The Ethernet patch cord plugged into Ethernet 2.
Ethernet 2
DB-9 cable to
comm device
S&C Instruction Sheet 766-526 13

Setting the R3 Communication Module to Ethernet IP Conguration
STEP 7. Use the R3 Communication Module Web
interface to reassign the existing IntelliRupter
fault interrupter control module IP address
setpoint to the R3 Communication Module
Ethernet 2 interface Static IP address setting.
See S&C Instruction Sheet 766-528, when using
communication module rmware version
3.0.00512 and later, and S&C Instruction Sheet
766-524 for earlier rmware versions. See
Figure 20.
STEP 8. Use IntelliLink®Setup Software to change the
IntelliRupter fault interrupter control module
IP address setpoint to 192.168.1.2. See S&C
Instruction Sheet 766-530 for information about
setting the IntelliRupter fault interrupter IP
address. This will be a private IP address. The
R3 Communication Module performs network-
address translation to hide this private
address.
Figure 20. The firmware version 3.0.00512 Interfaces screen.
14 S&C Instruction Sheet 766-526

Inserting the Communication Module Into the Base
Figure 22. Inserting the communication module into the base.
The communication module can be installed from a bucket
truck with the module handling tting, catalog number
4450, attached to a suitable hookstick.
CAUTION
The communication module is heavy, weighing
more than 26 pounds (12 kg). S&C does not
recommend removal and replacement from the
ground using an extendostick. This may cause minor
injury or equipment damage.
Remove and replace the communication module
from a bucket truck using the module handling fitting
attached to a suitable hookstick.
Follow these steps to install the communication
module:
STEP 1. Inspect the wiring connectors and insertion
guides of the communication module and
communication module bay for damage. See
Figure 21.
STEP 2. Push the handling tting into the module latch
and simultaneously turn the tting 90 degrees
counterclockwise.
STEP 3. Position the communication module so the
alignment arrows line up, and insert the module
into the left bay of the base as shown in
Figure 22. Push very hard to engage the
connectors.
STEP 4. While pushing up on the hookstick, rotate the
handling tool 90 degrees clockwise (as viewed
from the underside of the base) to close the
latch. Then, remove the tting.
Figure 21. A communication module removed from the
IntelliRupter fault interrupter base.
S&C Instruction Sheet 766-526 15

Wi-Fi/GPS Board Conguration Details
Figure 23. Wi-Fi/GPS Module input locations.
J15 - Not Used
J17 - GPS pulse
J16 - Wi-Fi serial
J15 - serial
J12 - GPS antenna coax to control
J11 - Wi-Fi antenna coax to control
J9 - DB9 Connector(optional) –
Wi-Fi/GPS board to radio
J13 - Not Used
J6 - RJ45 Ethernet 2 - Wi-Fi/GPS board to radio
J1 - RJ45 Ethernet 1 - Wi-Fi/GPS board to control
J2 - Power
Blue LED - power on
Amber LED - uP pulse
Yellow LED - bootup pulse
A
B
C
D
E
F
G
H
I
J
K
L
M
N
A
B
C
D
E F GHIJ
K
L
M
N
Interface Pinouts
The RS-232 Radio Maintenance Port of the R3
Communication Module is congured as data-terminal
equipment. See Figures 23 and 24.
Figure 24. The R3 Communication Module RS-232 interface
pinout.
Pin Function Description
1NC No connection
2RX from radio RS-232 receive
3TX to radio RS-232 transmit
4NC No connection
5TX to Radio GND Signal ground
6NC No connection
7RTS to radio Request to send
8CTS to radio Clear to send
9NC No connection
16 S&C Instruction Sheet 766-526

Wi-Fi/GPS Board Conguration Details
Figure 25. The R3 Communication Module RJ-45 interface
pinout.
The R3 Communication Module Ethernet ports use
RJ-45 connectors with the pinout shown in Figure 25. They
are auto-sensing for assignment of transmit and receive
lines (no crossover cables required) and auto-negotiate
for 10-Mbps or 100-Mbps data rates, as required by the
connected device. Pin Function Description
1TXD+ Transmit
2TXD- Transmit
3RXD+ Receive
4NC No connection
5NC No connection
6RXD- Receive
7NC No connection
8NC No connection
S&C Instruction Sheet 766-526 17

Wiring Diagrams
Figure 26. The wiring diagram before Ethernet IP configuration.
18 S&C Instruction Sheet 766-526

Wiring Diagrams
Figure 27. The wiring diagram after Ethernet IP configuration.
S&C Instruction Sheet 766-526 19
Table of contents
Other S&C Industrial Equipment manuals