S&C PME Pad-Mounted Gear User manual

Instruction Sheet 665-506
June 22, 2009© S&C Electric Company
S&C Manual PME Pad-Mounted Gear
Outdoor Distribution (14.4 kV and 25 kV)
Installation of Arc-Resistant Models
Table of Contents
Section Page Section Page
Introduction
QualifiedPersons..............................2
Read this Instruction Sheet. . . . . . . . . . . . . . . . . . . . . . . 2
Retain this Instruction Sheet......................2
ProperApplication .............................2
General ......................................2
Warranty .....................................3
Safety Information
Understanding Safety-Alert Messages ..............4
Following Safety Instructions . . . . . . . . . . . . . . . . . . . . . 4
Replacement Instructions and Labels. . . . . . . . . . . . . . . 4
Inspection and Handling
Packing ......................................5
Inspection ....................................5
Handling.....................................5
Installation
AccesstoInterior..............................6
Placement....................................8
Cable Terminations ............................12
FaultIndicators ..............................13
Completing the Installation . . . . . . . . . . . . . . . . . . . . . 14
Dielectric Testing ............................. 15
Specifications
OptionalFeatures ............................16

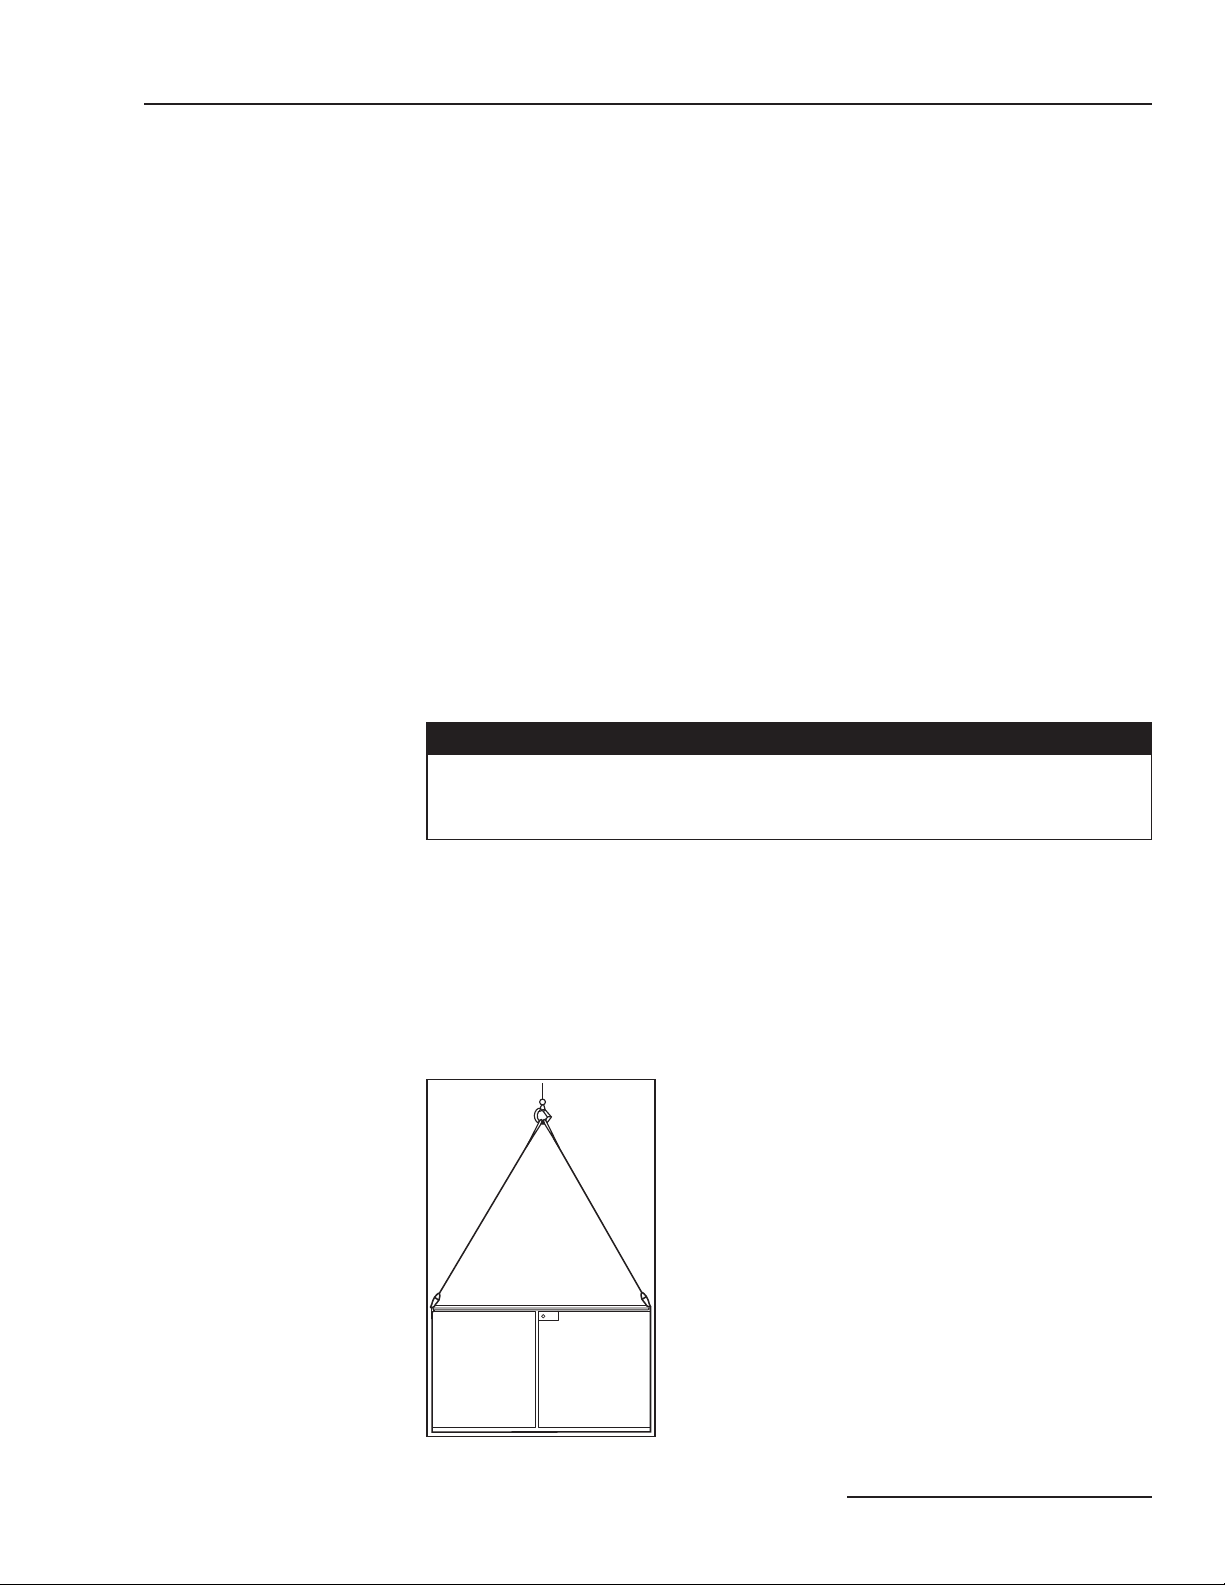
2S&C Instruction Sheet 665-506
Introduction
Qualified Persons ÇWARNING
The equipment covered by this publication must be installed, operated, and
maintained by qualified persons who are knowledgeable in the installation, operation,
and maintenance of overhead electric power distribution equipment along with the
associated hazards. A qualified person is one who is trained and competent in:
The skills and techniques necessary to distinguish exposed live parts from non-•
live parts of electrical equipment.
The skills and techniques necessary to determine the proper approach distances•
corresponding to the voltages to which the qualified person will be exposed.
The proper use of the special precautionary techniques, personal protective•
equipment, insulating and shielding materials, and insulated tools for working
on or near exposed energized parts of electrical equipment.
These instructions are intended only for such qualified persons. They are not
intended to be a substitute for adequate training and experience in safety procedures
for this type of equipment.
Read this
Instruction Sheet
Read this instruction sheet thoroughly and carefully before installing or operating
your S&C Manual PME Pad-Mounted Gear. Familiarize yourself with “Safety Information”
on page 4.
Retain this
Instruction Sheet
This instruction sheet is a permanent part of your S&C Manual PME Pad-Mounted Gear.
These instructions should be stored in the low-voltage connection enclosure, using the
instruction manual holder.
Proper Application ÇCAUTION
The equipment in this publication is only intended for a specific application. The
application must be within the ratings furnished for the equipment. Ratings for this
gear are listed on the ratings label on the interior of the doors (right-hand door only
for double-door models.)
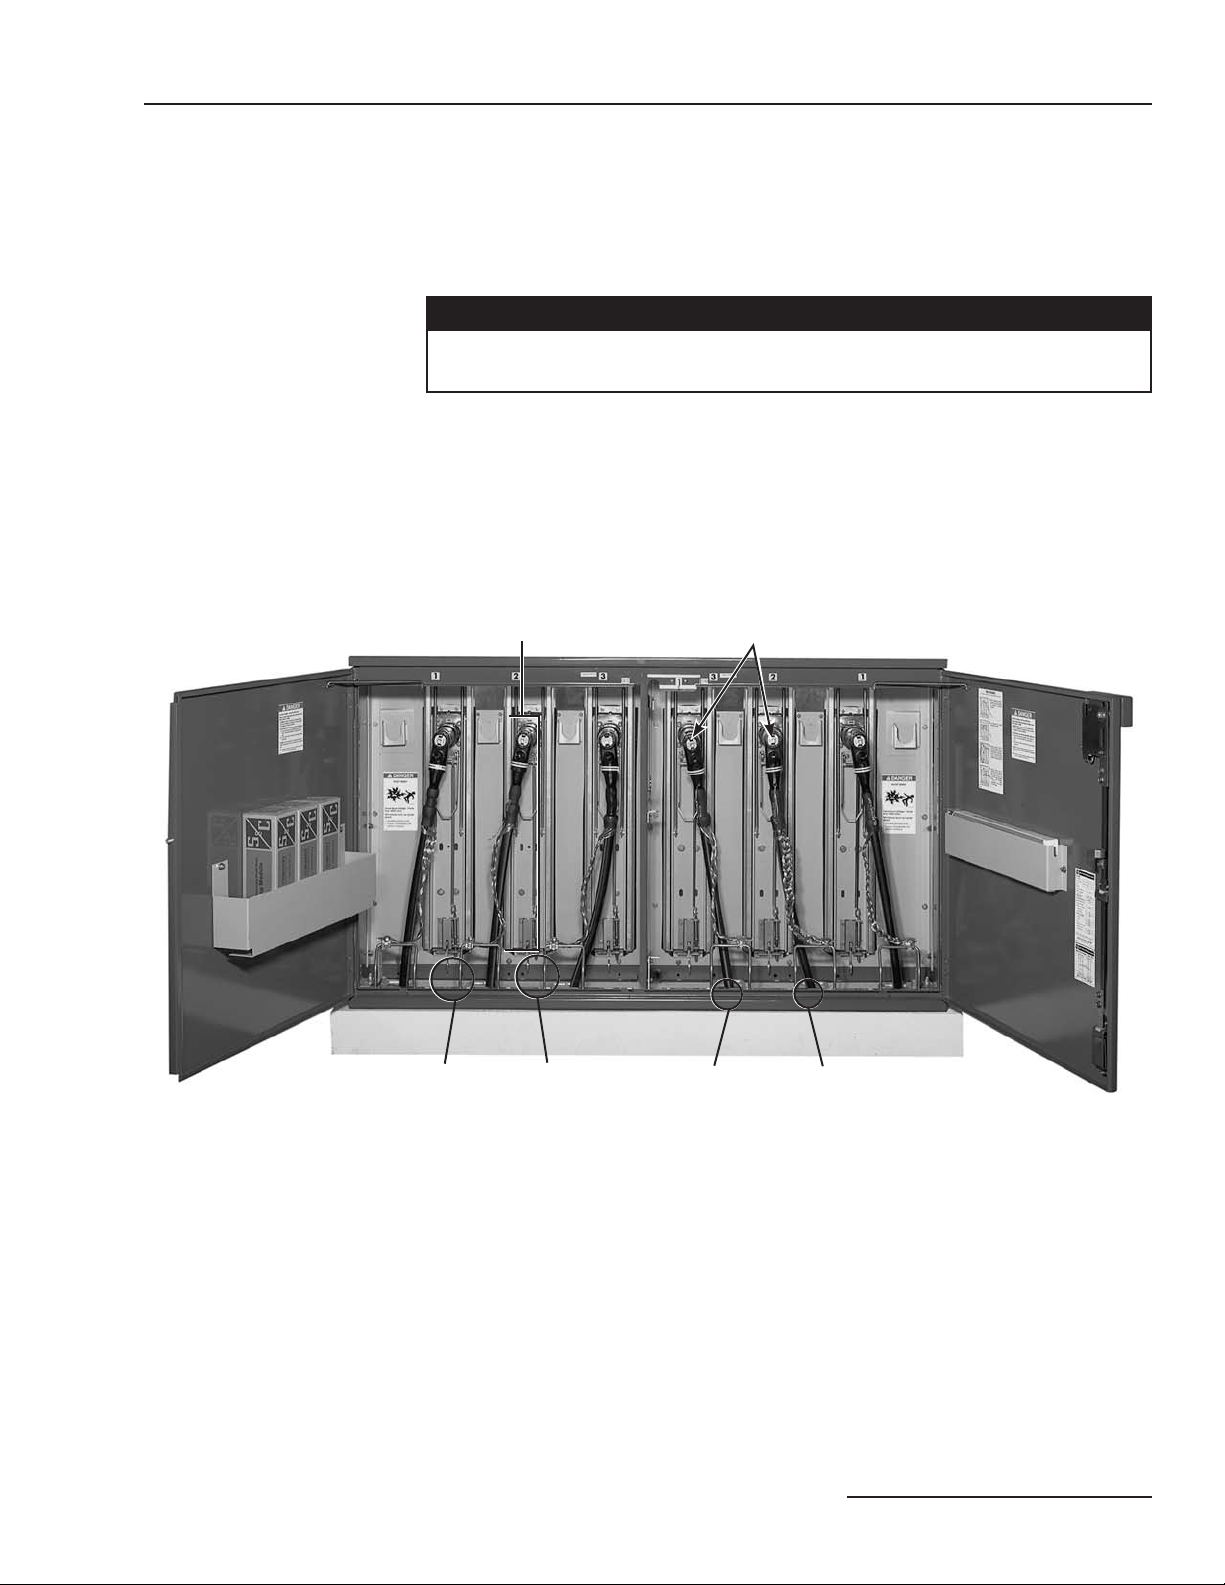
General The following instructions cover installation of arc-resistant models of S&C Manual PME
Pad-Mounted Gear which features elbow-connected encased components and is available
in ratings of 14.4 kV and 25 kV. Switch terminals are equipped with 600-ampere-rated
bushings and fuse terminals are equipped with 200-ampere-rated bushing wells. Bushing
and bushing-well interfaces are in accordance with ANSI/IEEE Standard 386 to accept
all standard separable insulated connectors and inserts. Parking stands are provided
adjacent to each bushing and bushing well.
Refer to S&C Instruction Sheet 665-610 for instructions regarding operation of Manual
PME Pad-Mounted Gear. The instruction sheets, along with a catalog dimensional drawing
showing cable-locating and anchor-bolt dimensions, are included in the “Installation and
Operation Information Kit” provided with the gear. Wiring diagrams for the gear and
associated options are also provided in the kit. All personnel involved with the installation
and operation of the equipment should be thoroughly familiar with the contents of the
information kit.
The catalog number stamped on the nameplates affixed to the outside of the doors
of the pad-mounted gear is suffixed with letter-number combinations. These suffixes
indicate the inclusion of optional features, such as key interlocks (Catalog Number Suf-
fix “-C1”, “-C3”, or “-C4”). Refer to “OPTIONAL FEATURES” on page 16 for a complete
listing of the available options for the gear.

S&C Instruction Sheet 665-506 3
Introduction
Warranty The warranty and/or obligations described in S&C’s standard conditions of sale, as set
forth in Price Sheet 150, plus any special warranty provisions, as set forth in the applicable
product-line specification bulletin, are exclusive. The remedies provided in the former
for breach of these warranties shall constitute immediate purchaser’s or end user’s
exclusive remedy and a fulfillment of all seller’s liability. In no event shall seller’s liability
to immediate purchaser or end user exceed the price of the specific product which gives
rise to immediate purchaser’s or end user’s claim. All other warranties whether express
or implied or arising by operation of law, course of dealing, usage of trade or otherwise,
are excluded. The only warranties are those stated in Price Sheet 150, and THERE ARE
NO EXPRESS OR IMPLIED WARRANTIES OF MERCHANTABILITY OR FITNESS FOR
A PARTICULAR PURPOSE. ANY EXPRESS WARRANTY OR OTHER OBLIGATION
PROVIDED IN PRICE SHEET 150 IS GRANTED ONLY TO THE IMMEDIATE PURCHASER
AND END USER, AS DEFINED THEREIN. OTHER THAN AN END USER, NO REMOTE
PURCHASER MAY RELY ON ANY AFFIRMATION OF FACT OR PROMISE THAT RELATES
TO THE GOODS DESCRIBED HEREIN, ANY DESCRIPTION THAT RELATES TO THE
GOODS, OR ANY REMEDIAL PROMISE INCLUDED IN PRICE SHEET 150.
The seller’s warranties are contingent upon the installation and adjustment of PME
pad-mounted gear in accordance with S&C’s applicable instruction sheets, data sheets,
and/or data bulletins.
The standard warranty contained in seller’s standard conditions of sale (as set forth
in Price Sheet 150) does not apply to S&C Manual PME Pad-Mounted Gear where fuse
units, fuse-unit end fittings, holders, refill units, or switch blades of other than S&C
manufacture are used in conjunction with S&C SME Mountings. Nor does it apply to S&C
Manual PME Pad-Mounted Gear where other than Fault Fiter Electronic Power Fuses,
S&C Switch Blades, or selected current-limiting fuses are used in conjunction with Fault
Fiter Electronic Power Fuse Mountings and S&C Holders designed therefor, or when
current-limiting fuses are applied other than as set forth under “Current-Limiting Fuses
for Use in S&C PME Pad-Mounted Gear,” in S&C Instruction Sheet 665-510.

4S&C Instruction Sheet 665-506
Safety Information
Understanding
Safety-Alert Messages
There are several types of safety-alert messages which may appear throughout this
instruction sheet as well as on labels attached to the S&C Manual PME Pad-Mounted
Gear. Familiarize yourself with these types of messages and the importance of the various
signal words, as explained below.
ÇDANGER
“DANGER” identifies the most serious and immediate hazards which will likely
result in serious personal injury or death if instructions, including recommended
precautions, are not followed.
ÇWARNING
“WARNING” identifies hazards or unsafe practices which can result in serious
personal injury or death if instructions, including recommended precautions, are
not followed.
ÇCAUTION
“CAUTION” identifies hazards or unsafe practices which can result in minor personal
injury or product or property damage if instructions, including recommended
precautions, are not followed.
NOTICE
“NOTICE” identifies important procedures or requirements that can result in product
or property damage if instructions are not followed.
Following
Safety Instructions
If you do not understand any portion of this instruction sheet and need assistance, contact
your nearest S&C Sales Office or S&C Authorized Distributor, or call S&C Headquarters
at (773) 338-1000, Monday through Friday between 8:30 AM and 5:00 PM Central Standard
Time. (In Canada, call S&C Electric Canada Ltd. at (416) 249-9171, Monday through Friday
between 8:00 AM and 5:00 PM Eastern Standard Time.)
ÇDANGER
Read this instruction sheet thoroughly and carefully
before installing or operating your S&C Manual PME
Pad-Mounted Gear.
Replacement
Instructions
and Labels
If you need additional copies of this instruction sheet, contact your nearest S&C Sales
Office, S&C Authorized Distributor, S&C Headquarters, or S&C Electric Canada Ltd.
It is important that any missing, damaged, or faded labels on the equipment be
replaced immediately. Replacement labels are available by contacting your nearest
S&C Sales Office, S&C Authorized Distributor, S&C Headquarters, or S&C Electric
Canada Ltd.

S&C Instruction Sheet 665-506 5
Inspection and Handling
Packing S&C Manual PME Pad-Mounted Gear is fastened to a wood skid for shipment. Any
components specified, such as fuses, refill units, fuse holders, end fittings, etc., are packed
separately and, insofar as practicable, are shipped within the enclosure.
At the first opportunity, remove all packing materials (cardboard, paper, foam padding,
etc.) from the outside of the gear. This will prevent the finish from being damaged by
rainwater absorbed by the packing materials and will also prevent wind-induced abrasion
from loose cardboard.
Inspection Examine the shipment for external evidence of damage as soon after receipt as possible,
preferably before removal from the carrier’s conveyance. Check the bill of lading to make
sure that all shipping skids, crates, and containers listed thereon are present.
If there is visible loss and/or damage:
Notify the delivering carrier immediately.1.
Ask for a carrier inspection.2.
Note condition of shipment on all copies of the delivery receipt.3.
File a claim with the carrier.4.
If concealed damage is discovered:
Notify the delivering carrier within 15 days of receipt of shipment.5.
Ask for a carrier inspection.6.
File a claim with the carrier.7.
Also notify S&C Electric Company in all instances of loss and/or damage.
Handling ÇWARNING
When handling the gear with an overhead hoist, observe standard lifting practices as
well as the general instructions below. Failure to follow these precautions can
result in serious personal injury or equipment damage.
Make sure that the lifting tabs are securely bolted to the enclosure before lifting the1.
gear.
Use 6-foot or longer hoist slings of equal length to prevent overstressing the enclosure2.
during lifting. (Four-foot hoist slings are acceptable for two-compartment pad-mounted
gear models: PME-4 and -5.)
Arrange the hoist slings so as to distribute the lifting forces equally between the3.
lifting tabs. See Figure 1.
Avoid sudden starts and stops.4.
Figure 1. Hoisting arrangements.

6S&C Instruction Sheet 665-506
Installation
Access to Interior Step 1 TO OPEN DOORS: Access to the interior of S&C Pad-Mounted Gear is controlled
by the S&C Penta-Latch® Mechanism, which must be opened with a pentahead socket
wrench or tool except when hexhead actuators (Catalog Number Suffix “-B1” or “-B2”)
are specified. The latching mechanism is coordinated with the provisions for padlocking
such that the mechanism can be unlatched only after the padlock has been removed, and
the padlock can be installed only after the door has been securely closed and completely
latched.
Use a pentahead socket wrench or tool (a hexhead socket wrench or tool when Cata-
log Number Suffix “-B1”or “-B2” is specified) to unlatch the Penta-Latch Mechanism by
rotating the actuator counterclockwise approximately 60º against spring resistance until
a distinct “click” is heard and the actuator reaches its stop. Refer to Figure 2. This single
motion unlatches the mechanism and recharges the latching spring for the subsequent
closing operation. Pull the door open and secure it with the door holder.
NOTICE
Do not force doors open. Forcing a door open can damage the latching
mechanism.
If optional key interlocks are furnished, correctly position the interlocks so the
doors can be opened.
For double-door models of pad-mounted gear, the left-hand door is secured closed
by a rotating latch and is overlapped by the right-hand door which is equipped with the
Penta-Latch Mechanism. The left-hand door can be opened after opening the right-hand
door and disengaging the rotating latch. To disengage the latch, rotate it upward. See
Figure 3 on page 7.
Unlatching Penta-Latch Mechanism
with pentahead socket wrench—a dis-
tinct click indicates the mechanism is
unlatched and recharged.
Opening door. Closing door—firmly push door, mecha-
nism latches automatically when all
latching points are engaged.
Figure 2. Penta-Latch Mechanism operation.

S&C Instruction Sheet 665-506 7
Installation
TO CLOSE DOORS: Close the left-hand door, where applicable, and secure it with the
latch by rotating the latch downward over the stop on the outer edge of the door. See
Figure 3. The right-hand door of double-door models of pad-mounted gear is equipped with
the Penta-Latch Mechanism which latches automatically when the door is closed. To close
a door equipped with the Penta-Latch Mechanism, place one hand at the midpoint of the
door-front near the edge and firmly push the door closed. See Figure 2 on page 6. When
the latch points are positively engaged, the spring mechanism will trip to latch the door.
Pull outward on the cover of the Penta-Latch Mechanism to verify that the door has
latched securely. If it has not, use a pentahead (or hexhead, when applicable) socket
wrench or tool to rotate the actuator counterclockwise until a distinct “click” is heard
and the actuator reaches its stop. If the actuator will not rotate counterclockwise, the
mechanism was already charged for closing but was not closed properly. Close the door
again, making sure that all latch points engage completely and simultaneously. Once the
door is securely latched, a padlock may be inserted into the hasp.
Rotating latch secures left-hand-door of
double-door models closed.
Rotate latch upward to disengage left-hand
door as shown above. To secure left-hand
door closed, rotate latch downward over stop
on outer edge of door.
Figure 3. Left-hand door retainer.

8S&C Instruction Sheet 665-506
Installation
Placement Step 2 At the installation site, remove all separately packaged components shipped
within the pad-mounted gear enclosure, including the steel deflectors. Two-compartment
models are furnished with two large deflectors; four-compartment models are furnished
with four large deflectors and two small deflectors. Set these items aside in a protected
area.
Open the doors to the interior of the gear and secure them with the door holders.
Refer to the catalog dimensional drawing and verify that the enclosure compartments
are positioned correctly for this installation; reposition the gear if necessary. Unbolt the
enclosure from its skid.
The pad-mounted gear enclosure will be bolted directly to the mounting pad using
user-furnished B\,-inch diameter anchor bolts and supplied hardware. Refer to the anchor
bolt detail in Figure 4. Anchor brackets and hold-down clamps must not be used.
Figure 4. Anchor bolt detail.
ÇCAUTION
To be arc-resistant, the pad-mounted gear enclosure must be securely attached to
the mounting pad in accordance with the anchor bolt plan shown on the catalog
dimensional drawing.
Following the precautions given under “Handling” on page 5, lift the unit a few feet in
the air and caulk along the entire underside of the enclosure bottom flange using room-
temperature vulcanizing (RTV) silicon-rubber compound. The RTV is to be applied directly
to the gasket. The enclosure can now be lifted onto the mounting pad and secured fol-
lowing the instructions on page 9.
Four B\,-diameter anchor bolts
(by user)
Gasket (by S&C)
Concrete pad
Enclosure
1Z\x minimum

S&C Instruction Sheet 665-506 9
Installation
If excess lengths of direct-buried cable are to be fed into the termination compartments
as the unit is lowered, special attention must be paid to the cable position in the fuse
termination compartments. Open the doors and secure them with the door holders, to
allow the cable to be fed over the door stiles. Then, as the enclosure is being lowered into
place, feed the cables for connection to the fuse terminals between the horizontal cable
guides, as shown in Figure 5 and the cable-training tag affixed to the enclosure.
NOTICE
To avoid interference with the TransFuser™ Mountings, the cables to be connected
to the fuse terminals must be fed between the horizontal cable guides.
Special cable training is not required in the switch termination compartments.
Make sure all compartment doors open and latch closed without binding.
Figure 5. Cables in fuse-termination compartments must be trained between horizontal cable guides as shown to prevent
interference with operation of the TransFuser Mounting.
TransFuser Mounting (shown in closed position)
rotates to open position for access to isolated,
de-energized fuse
Ground tabs for grounding bushing well inserts
Ground bails are mounted vertically Cable guides are mounted horizontally, extend
toward TransFuser Mounting

10 S&C Instruction Sheet 665-506
Installation
After mounting the enclosure to the mounting pad, the deflectors are to be assembled
to the unit. First, bolt one of the large deflectors to the bottom of a switch or fuse compart-
ment frame using the supplied B\zn-inch serrated nuts. Refer to Figures 6, 7, and 8. Repeat
for the other compartment(s).
Figure 6. Large deflector.
Figure 7. Deflector assembly.
Figure 8. Close-up of deflector assembly.

S&C Instruction Sheet 665-506 11
On four-compartment models, install the two small deflectors. Refer to Figure 9. Each
small deflector is installed behind the two large deflectors. Then bolt the small deflector
into place using the supplied B\zn-inch serrated nuts.
Confirm that the complete deflector assembly installation matches Figure 7 on
page 10.
Figure 9. Small deflector.
ÇCAUTION
To be arc-resistant, the pad-mounted gear enclosure deflectors must be properly
installed.
Installation

12 S&C Instruction Sheet 665-506
Installation
Cable Terminations Step 3
ÇDANGER
Before energizing the gear, replace the shipping caps on all bushings and bushing wells
with elbows or insulated protective covers or plugs. Failure to replace the shipping
caps can result in a flashover and serious personal injury or death.
Switch terminals are equipped with 600-ampere-rated bushings, and fuse terminals are
equipped with 200ampere-rated bushing wells. Bushing and bushing-well interfaces conform
to ANSI/IEEE Standard 386 to accept all standard separable insulated connectors—
“elbows”—and inserts. Appropriate elbowsmand inserts must be supplied and installed by
the user. Before installing elbows and inserts, remove the shipping covers from bushings
and bushing wells. Ground each insert by connecting a short ground wire from the insert
to the ground tab directly above the bushing well. See Figure 9 on page 11.
mSwitch-termination compartments cannot accommodate 600-ampere elbows manufactured by Blackburn
when piggybacked.
Figure 10. Bushings for Mini-Rupter® Switches are available with and without studs to accommodate all 600-ampere elbows.
Viewing windows allow visual verification of switch position
Ground rods extend full width of compartment
600-ampere bushings without studs are
furnished when Catalog Number Suffix “-M1”
is specified

S&C Instruction Sheet 665-506 13
Installation
ÇDANGER
When grounding inserts, minimize the length of the ground wire. Use of a longer
ground wire can result in a flashover to energized parts inside the component
compartment and serious personal injury or death when the TransFuser
Mounting is rotated to the closed position.
Verify that cables in termination compartments for fuses are correctly positioned
between the cable guides. Then terminate the cables with the elbows, following the elbow
manufacturer’s instructions.
NOTICE
Do not allow solvents used to clean cables prior to termination to contact the viewing
windows. The solvent can permanently etch the polycarbonate material.
The 600-ampere bushings supplied in S&C Manual PME Pad-Mounted Gear are
equipped with a stud as standard. Bushings are available without studs (Catalog Number
Suffix “-M1”) to accommodate 600-ampere elbows that do not require a stud. See Figure 9
on page 12.
Step 4 Connect the cable concentric-neutral ground wires to the ground bails and rods
provided, making sure that cables have sufficient mobility to allow the elbows to be moved
from bushings to parking stands. Connect the ground pads inside the pad-mounted gear
enclosure to the system ground facility in accordance with the user’s standard grounding
practice. Use the equivalent of 4/0 copper cable (or cable sized in accordance with the
user’s standard practice) in either a single or multiple connection to realize the maximum
momentary rating of the gear. For a multiple connection, cables smaller than 1/0 copper or
equivalent should not be used. Note: Concentric-neutral ground wires must be positioned
so that they will not interfere with TransFuser Mounting operation when the elbows
are on the parking stands.
Fault Indicators Step 5 Optional mounting provisions for fault indicators (Catalog Number Suffix “-F1”
or “-F2”) are available. Fault indicators are to be furnished by the user and installed in
accordance with the manufacturer’s instructions. If mounting provisions are specified,
mount the fault indicators on the mounting brackets and attach the associated sensors
to the cables below the cable terminators.

14 S&C Instruction Sheet 665-506
Installation
Completing the
Installation
Step 6 Check functional operation of key interlocks, if furnished.
ÇWARNING
An extra set of keys is provided with pad-mounted gear that has optional key
interlocks. These keys are for use only during installation. After installation, either:
(1) destroy the extra set of keys or (2) make them accessible only to authorized
persons. This will maintain the integrity of the key-interlock scheme.
NOTE: Key interlocks are not security locks and are not a substitute for
padlocks.
NOTICE
Do not force doors open. Forcing a door open can damage the latching
mechanism.
If optional key interlocks are furnished, correctly position the interlocks so the
doors can be opened.
Step 7 Make sure that doors open and close without binding. To complete the instal-
lation, caulk around the bottom of the enclosure using room-temperature vulcanizing
(RTV) silicone-rubbber compound applied with a standard caulking gun. Apply a suitable
compound to fill the spaces between the cable and the conduit, and cap all empty conduits
to prevent the entry of moisture or rodents.
Step 8
Remove the lifting tabs and replace the bolts to plug the blind-tapped holes.1.
Check the interior of the pad-mounted gear. Remove all foreign materials and tools2.
that may have been mislaid, and sweep the interior clear of debris.
Store spare SMU-20 Fuse Units, SM-4 Refill Units, or Fault Fiter Interrupting Modules3.
(as applicable) in the fuse-storage racks inside the fuse-compartment doors.
Wipe down the exterior of the enclosure with a clean, damp cloth. To preserve the4.
integrity of the surface, refinish any scratches or abrasions with S&C touch-up finish
and red-oxide primer which are available in aerosol spray cans. Order Catalog Number
9999-058 for olive-green finish, 9999-080 for light gray finish, and 9999-061 for red-oxide
primer. No other finish or primer is approved. The area to be touched up should be
cleaned to remove all oil and grease. Sand the area, removing any traces of rust that
may be present, and make sure that all edges are feathered before applying primer.
Labels indicating the area around the pad-mounted gear that must be kept clear so that5.
work on the gear can be done safely are provided in the “Installation and Operation
Information Kit.” These labels (or equivalent labels) should be affixed to the exterior
of the gear.
Upon completion of these installation instructions, refer to S&C Instruction6.
Sheet 665-510 for operating instructions.

S&C Instruction Sheet 665-506 15
Dielectric Testing
For the convenience of users who normally perform electrical tests on system components
such as pad-mounted gear, appropriate withstand test values are given in the table
below:
RATINGS AND INSULATION TEST VALUES
Voltage Rating, kV Test Voltage Withstand, kV
Nom Max160-Hertz, RMS2Dc34 Impulse (BIL)
14.4
25
25
17.0
27f
29l
36
60
60
50
70
70
95
125
125
1Maximum voltage ratings are lower than the values listed when current-limiting fuses are used. Consult the
appropriate current-limiting fuse manufacturer for complete fuse ratings.
2Ac withstand tests made on this equipment after shipment by S&C should be conducted at no more than
0.75 times the values shown. When making ac tests, the time duration for application of the test voltage should
be limited to less than 10 seconds.
3The column headed “Dc” is given as a reference only for those making dc tests and represents values
believed to be appropriate and approximately equivalent to the corresponding power-frequency withstand
test values specified for components of this voltage class. The presence of this column in no way implies any
requirement for a dc withstand test on these components.
4Dc withstand tests made on this equipment after shipment by S&C should be conducted at no more than
0.75 times the values shown. When making dc tests, the test voltage should be raised in discrete steps—one
minute per step.
fWith S&C SME-20 or SME-4Z Power Fuses.
lWith Fault Fiter Electronic Power Fuses or without fuses.

16 S&C Instruction Sheet 665-506
Specifications
1When this optional feature is specified, the entire exterior of the
enclosure is fabricated from 11-gauge Type 304 stainless steel.
2Fuse assemblies (fuse holders or fuse units with end fittings) are
not included. For units equipped with Fault Fiter Electronic Power Fuse
Mountings, only two spare Fault Fiter Electronic Power Fuse Holders or
two spare current-limiting fuse holders can be accommodated in each
compartment.
aWhen optional feature “-B1,” “-B2,” “-C6,” through “-C11,” or “-F2” is
ordered for use with a stainless-steel enclosure, the suffix designation is
increased by 10; for example “-B11” is specified instead of “-B1.”
OPTIONAL FEATURES
Item
Suffix to be
Added to
Pad-Mounted Gear
Catalog Number
Light Gray Outdoor Ultradur® Finish instead of Olive Green -A2
Stainless-Steel Enclosure1With Olive Green Outdoor Ultradur Finish -A10
With Light Gray Outdoor Ultradur Finish -A12
Hexhead Actuator for use in lieu of pentahead actuator on all Penta-Latch
Mechanisms
For use except when option suffix “-F2” is specified -B1a
For use when option suffix “-F2” is also specified -B2a
Key Interlocks to prevent paralleling of switches in Compartments 1 and 2 -C1
Key Interlocks to prevent opening fuse termination-compartment doors unless all switches are locked open -C3
Key Interlocks. Combines functions of options “-C1” and “-C3” above -C4
Fuse-Storage Feature for three spare fuse assemblies per compartment2
Located in Compartment 1 -E1
Located in Compartment 2 -E2
Located in Compartments 1 and 2 -E3
Mounting Provisions for a Fault Indicator in each switch compartment
Note: Accommodates three-phase indicator with single-phase sensors
Without viewing window in door -F1
With viewing window in door -F2a
600-Ampere Bushings Without Studs, at switch terminals -M1
Printed in U.S.A.
Table of contents
Other S&C Industrial Equipment manuals
Popular Industrial Equipment manuals by other brands

Stieber Clutch
Stieber Clutch RSXM Series Assembly and maintenance manual

ABB
ABB HT843223 Operation manual

Lennox
Lennox TSA S4 Series manual

PCB Piezotronics
PCB Piezotronics 1403-13A Installation and operating manual

ASCO Numatics
ASCO Numatics 453 Installation and maintenance instructions

LPKF
LPKF ZelFlex QR Step By Step User Guide