manuals.online logo
Brands
  1. Home
  2. •
  3. Brands
  4. •
  5. Sanuvox
  6. •
  7. Air Cleaner
  8. •
  9. Sanuvox Quattro User manual

Sanuvox Quattro User manual

QUATTRO
INSTALLATION
MANUAL
Follow all safety codes.
Wear safety glasses and work gloves.
Before installing or performing maintenance or service on the purier, turn
off unit and disconnect from power source. Electrical shock can cause
injury or death. There may be more than one disconnect switch.
Never expose eyes or skin to ultraviolet light from any source. The purier
MUST BE DISCONNECTED from power source before performing
maintenance or service. Personal injury may result.
Do not touch lamp glass without gloves. Reduced performance of lamp
may result. Clean lamp after handling.
The UV lamp contains a small quantity of mercury. If a lamp breaks, clean
and dispose of with care.
Use only specied replacement lamps with your purier. Use of an
incorrect lamp can result in damage to the purier and/or lamp.
UV rays may destroy certain types of lters (polymer or plastic), please
keep unit away from shining directly on plastic.
Serial Number# _____________________
Date Installed: ______________________
Installed By: ________________________
Installers’ Contact Info.: ______________
___________________________________
___________________________________
UV lamp can be disposed/recycled after use as for any other uorescent bulb.
WARNING
PLEASE SAVE FOR YOUR RECORDS
NOTICE SANUVOX TECHNOLOGIES INC. © 2020
1-888-SANUVOX www.sanuvox.com
Congratulations on the purchase and installation of your new Sanuvox ultraviolet air purier. Sanuvox UV air puriers are the most
advanced air purication systems available having been proven to destroy up to 99.999% of biological and chemical contaminants
that circulate throughout your home or facility. Sanuvox’ systems have been tested by the EPA (Environmental Protection Agency),
the National Homeland Security Research Center, medical universities and lndependent 3rd party laboratories.
THIS BOX CONTAINS
(1) QUATTRO
(4) 18" Straight UV Lamps
A. Vacuum Sensor Elbow
B. Adjustable Clutch
Litterature Package
(1) Lamp Date Decal
(1) Warranty Card
Drill
Pair of Snips Saw
OR
(1) Pair of Gloves
(12) Self Taping
Sheet Metal Screws
TOOLS REQUIRED
EXTENDS ASSEMBLY
AIRFLOW
A
A
B
B
B
QUATTRO
INSTALLATION
MANUAL
SAFETY PRECAUTIONS
Installation and servicing of air-conditioning equipment can be hazardous due to system pressure and electrical components. Only trained and
qualied service personnel should install, repair or service air conditioning equipment.
Untrained personnel can perform basic maintenance functions such as
changing lamps. Any other operations should be performed by trained
service personnel. When working on air-conditioning equipment,
observe precautions in the literature, tags, labels attached to the unit
or accessory, and other safety precautions that may apply.
Follow all safety codes. Wear Safety glasses and work gloves.
GENERAL
The Sanuvox QUATTRO residential / commercial ultraviolet air
purier is designed to destroy biological and *chemical (*GX models)
contaminants such as mold, bacteria, viruses, *chemicals, *VOCs and
*odors that may be transmitted through the HVAC ventilation system.
The Sanuvox QUATTRO is installed in the RETURN (preferred) or
SUPPLY plenum of the HVAC equipment treating 100% of the air
owing through the air-stream. The actual percentage destruction is
based on the duct size, percentage of fresh air, velocity and the specic
contaminants to be treated. Depending on the variables above, more
than one QUATTRO may be required for commercial applications.
INSTALLATION
IMPORTANT: The QUATTRO is energized from a pressure differential caused by airow through the duct. On variable speed fan applications,
airow at LOW setting may not be sufcient to energize the air purier. The vacuum switch is factory set to a differential of 0.03". lnsure that
there is sufcient differential to activate the switch. As well, take into account that the differential will decrease as the air lter loads.
The QUATTRO must be installed in a vertical plain for the vacuum sensor to function properly. If the QUATTRO is to be installed in a horizontal
position (see Figure C.), or the differential is not sufcient, the vacuum sensor must be bypassed and the QUATTRO is to be wired into the fan
circuit. To bypass the vacuum sensor, disconnect the two leads on the pressure switch and joining them together with a wire nut and wiring the
QUATTRO into the fan circuit or the EAC terminal.
Make sure the site can be supplied with the necessary power requirements. The QUATTRO has a power consumption of 160 watts and
requires a 110/220V, 50-60 Hz power source. Ensure that there is adequate clearance for service. If a humidier is present, the air purier
should be installed in the air-stream before the humidier (preferred). Any plastic components should be shielded from direct UV exposure.
The suggested temperature range is 40 to 150°F. Operating the QUATTRO outside this
range will result in decreased performance. NOTE: The QUATTRO is not weatherproof. If
installing outdoors, the QUATTRO must be installed in a watertight enclosure (please allow
for adequate air circulation).
1. Turn off all power to the HVAC equipment.
2. Remove the QUATTRO from its packaging. Use caution as all lamps are fragile.
3. Ultraviolet light may damage plastic or exposed wiring (Sanuvox
wire set is teon coated which is resistant to UV exposure).
If any plastic or wiring is exposed to direct UV exposure, wrap exposed material(s) with
aluminum tape or metal conduit.
4. OPTIONAL: You may want to line the inside of the duct with reective material to increase
UV effectiveness. Sheets of aluminum or aluminum foil may be used.
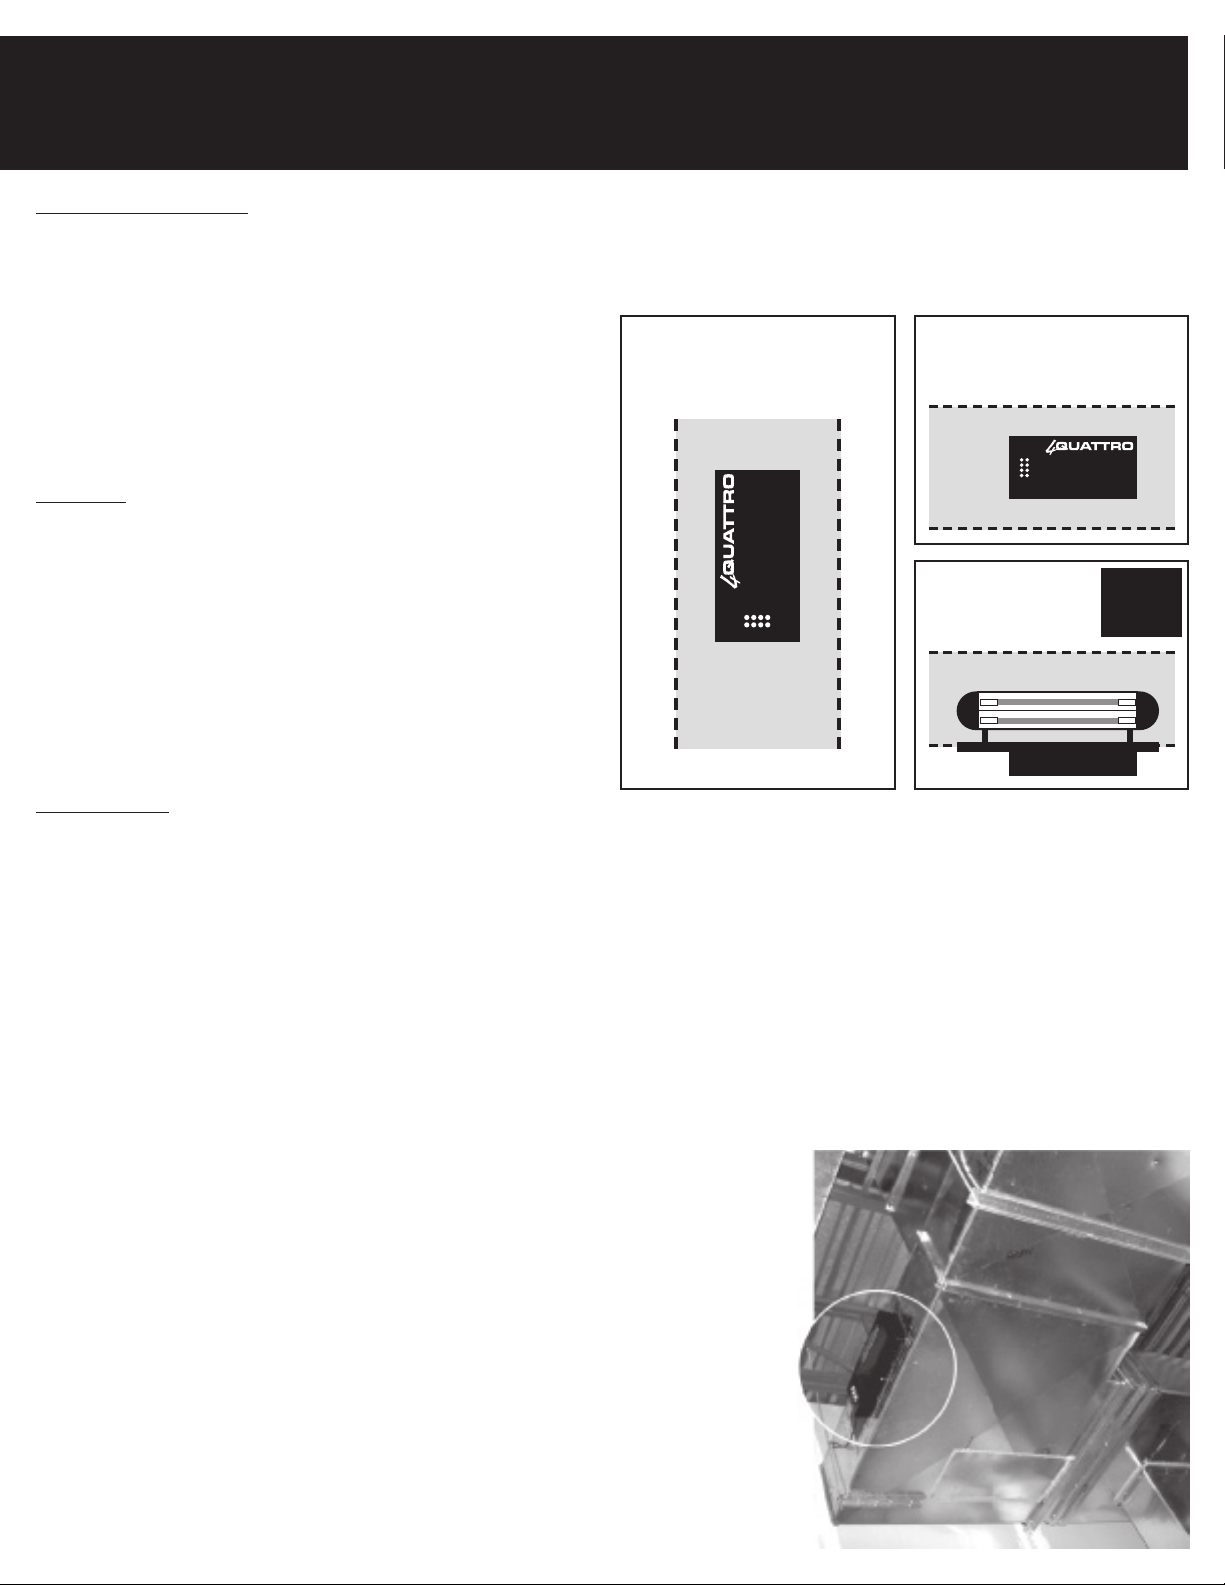
5. The air sensor (vacuum sensor) is located inside the QUATTRO cover. The "elbow" tube
mounted to the backplate which "reads" the vacuum must be positioned in the same
orientation as the airow (see Figure A.).
CONTROL BOX
Figure C.
Vertical
to the
Floor or Ceiling
Horizontal
(on its side)
Control Box Horizontal
Facing the Floor or Ceiling
The vacuum sensor must be bypassed.
BYPASS
VACUUM
SENSOR
QUATTRO
INSTALLATION
MANUAL
RETURN OR SUPPLY PLENUM INSTALLATION
1 Cut a 5-1/2" W x 22" H opening in the duct-work at the desired installation location.
2. OPTIONAL: lnstall the added reectivity if desired.
3. Adjust the UV lamp assembly so it will be positioned in the middle of the duct. The arms that support the lamp assembly have an
adjustable clutch which allows the lamp and extrusion to be set at a distance from 10 to 15 inches from the backplate. To adjust
the assembly, loosen the clutch by turning it counter-clockwise (see Figure B.). The Lamps and extrusion can then be positioned
to the desired distance from the backplate. Rotate the clutch clockwise to tighten.
4. Place the QUATTRO in the duct opening in the correct position. Mount to duct-work with 12 self taping sheet metal screws
provided.
5. Plug in the power cord.
OPERATION
The QUATTRO has an ON-OFF toggle switch and a circuit breaker located at the bottom of the front cover. To operate, press the
toggle switch to the "ON" position. The switch has a red light to indicate that there is power. If the switch does not illuminate, check
the outlet for power and check the QUATTRO circuit breaker. Start the HVAC fan. The QUATTRO detects airow with the vacuum
switch. The QUATTRO will only operate when the fan is ON (airow through the plenum) and there is a pressure differential of at
least 0.04".
When operating, the LED lights on the front cover will be lit. There are two LED lights corresponding to each of the 4 UV Lamps. The
AMBER LED indicates the UV lamp is functioning. The RED LED indicates the ballast is ON. If the UV lamp is defective, the RED
LED will be lit corresponding to the BALLAST being ON and AMBER LED will be OFF corresponding to lamp out. If both LED lights
are OFF, the ballast is not functioning. If none of the 8 LED lights are lit, then there is not enough of a vacuum differential to activate
the vacuum switch, or the vacuum switch is defective.
Fiberglass or paper lter media are recommended for operation of HVAC when lters are exposed to direct line of sight with the
ultraviolet light. Polyester or cotton lters are subject to ultraviolet degradation and are nor recommended.
MAINTENANCE
Disconnect all power before performing any maintenance or service. Lamps need periodic replacement to maintain design
specications.
ln residential applications, replace UV after 3 years of operation. ln commercial applications, replace lamps after 2 years of operation.
The following UV lamps are used with the following QUATTRO models:
• QUATTRO G: (4) LMPHGS180 UV germicidal only
• QUATTRO GX: (3) LMPHGS180 UV germicidal only + (1) LMPHGXS180 UV germicidal / oxidizing
Other Lamps may plug into the QUATTRO but should not be used.
CHECKING THE UV LAMP
Sanuvox ultraviolet lamps are built to the highest standards. If the Red LED (ballast) is lit and the Amber LED (lamp) is not lit, it
is important to check the lamp to insure that it is not a defect in the lamp sensing circuit in the ballast. This is done by using an
ohmmeter to check the two laments on the lamp.
Disconnect the socket from the lamp.
Placing the probe of the ohmmeter to one of the four pins on the end of the lamp, touch the other probe of the ohmmeter to each
of the other pins until you nd the matching pin. The ohmmeter will read approximately 3 ohms (almost a short). This indicates
that the lament is good. Check the other two pins. If both sets of laments test OK, the lamp is functioning. If one or both sets
of laments read an open circuit (innity) on resistance, the lamp is defective.
Questions? Call 1-888-SANUVOX

Other manuals for Quattro

2

Other Sanuvox Air Cleaner manuals

Sanuvox SANUVAIR S100GX User manual

Sanuvox

Sanuvox SANUVAIR S100GX User manual

Sanuvox P900 User manual

Sanuvox

Sanuvox P900 User manual

Sanuvox S300 User manual

Sanuvox

Sanuvox S300 User manual

Sanuvox S300 User manual

Sanuvox

Sanuvox S300 User manual

Sanuvox VP900 User manual

Sanuvox

Sanuvox VP900 User manual

Sanuvox SANUVAIR S300 OZD User manual

Sanuvox

Sanuvox SANUVAIR S300 OZD User manual

Sanuvox SRMax Programming manual

Sanuvox

Sanuvox SRMax Programming manual

Sanuvox FOODSAFE IL User manual

Sanuvox

Sanuvox FOODSAFE IL User manual

Sanuvox S300FX User manual

Sanuvox

Sanuvox S300FX User manual

Sanuvox S300 User manual

Sanuvox

Sanuvox S300 User manual

Sanuvox Quattro User manual

Sanuvox

Sanuvox Quattro User manual

Sanuvox SR MAX User manual

Sanuvox

Sanuvox SR MAX User manual

Sanuvox HRV6 User manual

Sanuvox

Sanuvox HRV6 User manual

Sanuvox R MAX User manual

Sanuvox

Sanuvox R MAX User manual

Sanuvox Quattro User manual

Sanuvox

Sanuvox Quattro User manual

Sanuvox SANUVAIR S600 User manual

Sanuvox

Sanuvox SANUVAIR S600 User manual

Sanuvox S300 User manual

Sanuvox

Sanuvox S300 User manual

Sanuvox VP900 User manual

Sanuvox

Sanuvox VP900 User manual

Sanuvox BIOPUR User manual

Sanuvox

Sanuvox BIOPUR User manual

Sanuvox SRMax User manual

Sanuvox

Sanuvox SRMax User manual

Sanuvox SANUVAIR S100 User manual

Sanuvox

Sanuvox SANUVAIR S100 User manual

Sanuvox SANUVAIR S1000 CRO User manual

Sanuvox

Sanuvox SANUVAIR S1000 CRO User manual

Sanuvox GC S300-G2 User manual

Sanuvox

Sanuvox GC S300-G2 User manual

Sanuvox BIOPUR User manual

Sanuvox

Sanuvox BIOPUR User manual

Popular Air Cleaner manuals by other brands

proWIN AIR BOWL Directions for using

proWIN

proWIN AIR BOWL Directions for using

Essick M.E.G.A. 043129-107373 Features

Essick

Essick M.E.G.A. 043129-107373 Features

EdenPURE OxiLeaf XL100 owner's manual

EdenPURE

EdenPURE OxiLeaf XL100 owner's manual

Philips 2000i Series quick start guide

Philips

Philips 2000i Series quick start guide

Advanced PureAir Air Shield owner's manual

Advanced PureAir

Advanced PureAir Air Shield owner's manual

Air Quality Engineering AutoClean manual

Air Quality Engineering

Air Quality Engineering AutoClean manual

Steba LR 10 Plasma Instructions for use

Steba

Steba LR 10 Plasma Instructions for use

REPA PLH-E100 instruction manual

REPA

REPA PLH-E100 instruction manual

INNOLIVING PROFESSIONAL XL INN-560 user manual

INNOLIVING

INNOLIVING PROFESSIONAL XL INN-560 user manual

UVONAIR CD-1000-1 manual

UVONAIR

UVONAIR CD-1000-1 manual

Honeywell HFD-120 Series user manual

Honeywell

Honeywell HFD-120 Series user manual

Trion 73 Series Installation, operation & service

Trion

Trion 73 Series Installation, operation & service

Field Controls UV-AIRE UV-1500C manual

Field Controls

Field Controls UV-AIRE UV-1500C manual

Welov P100 Mini user manual

Welov

Welov P100 Mini user manual

AllerAir AirMedic + Vocarb Technical specifications

AllerAir

AllerAir AirMedic + Vocarb Technical specifications

Sharp FP-P35CX - HEPA Air Purifier Operation manual

Sharp

Sharp FP-P35CX - HEPA Air Purifier Operation manual

Duux Air Purifier user guide

Duux

Duux Air Purifier user guide

Nikken KenkoAir operating manual

Nikken

Nikken KenkoAir operating manual

manuals.online logo
manuals.online logoBrands
  • About & Mission
  • Contact us
  • Privacy Policy
  • Terms and Conditions

Copyright 2025 Manuals.Online. All Rights Reserved.