SATO MB200 User manual

Barcode Printer
MB200
Operator's Manual

2
Introduction
Thank you for your purchase of the SATO barcode printer
MB200.
This manual helps first time users understand the basics of
the printer in a short period of time.
To get the most out of the functions of the printer, make sure
to read this manual carefully.
Warning!
1. This manual may not be reproduced whole or in part
without prior consent from SATO.
2. The information in this manual is subject to change with-
out notice.
3. Despite this manual has been created to be as accurate
as possible, contact the shop or the dealer where you
purchased this product if you find any errors or mistakes.
Caution
This printer is a Class A Information Technology Equipment
based on VCCI standards. There may be a risk of interfer-
ence when used at home, in which case the user may need
to take necessary countermeasures.

3
Features of MB200
With compact and lightweight body combined with high per-
formances, this printer prints barcodes clearly on various
types of thermal paper.
•Excellent Printing Performance
Not only does this printer print barcodes clearly, but it
can also enlarge and print various types of fonts and
Kanji characters in a free layout.
•Durable and Easy to Use
This printer is also superb in durability, as it has been
designed with the premises of printing barcodes. Also,
special consideration has been taken so that the printer
can be easily cleaned everyday.
•Dispenser Function
As a portable printer, this printer can easily print and dis-
pense labels to enable the application of labels at site.

4
Table of Contents
1. Safety Precautions .......................................................5
Markings and Symbols............................................. 5
Precautions in Use..................................................13
2. Unpacking ..................................................................14
3. Part Names ................................................................15
Name and Function of Operating Parts ..................17
4. Before Starting ...........................................................18
Charging the Battery Pack ......................................18
Installing and removing the Battery Pack................20
Using the AC Adapter .............................................22
Setting Labels .........................................................23
Continuous Mode....................................................23
Dispense Mode .......................................................25
Changing Roll Width ...............................................26
5. Turning the Power on and off .....................................27
6. Starting the Printer .....................................................28
Procedures for On-line Operation ...........................29
On-line Operation....................................................31
Test Printing Mode ..................................................37
7. Trouble Shooting ........................................................38
8. Everyday Maintenance...............................................40
9. Reference...................................................................41
Options....................................................................41
Ordering Repairs.....................................................45
Basic Specifications ...............................................46
After service ............................................................48
Preparation
Operation
Trouble
Shooting
Reference Maintenance
5
1
Safety Precautions
1. Safety Precautions
In this section, safety precautions about printer operation are
explained to ensure proper care and usage. Make sure to
read these carefully before using your printer.
Markings and Symbols
The following symbols or markings are used in this User’s
Guide and on the printer so that you can properly use the
printer, and to prevent any damage to property, harm or
injury to yourself and others. Make sure to read their
explanations carefully to familiarize yourself with their
meanings.
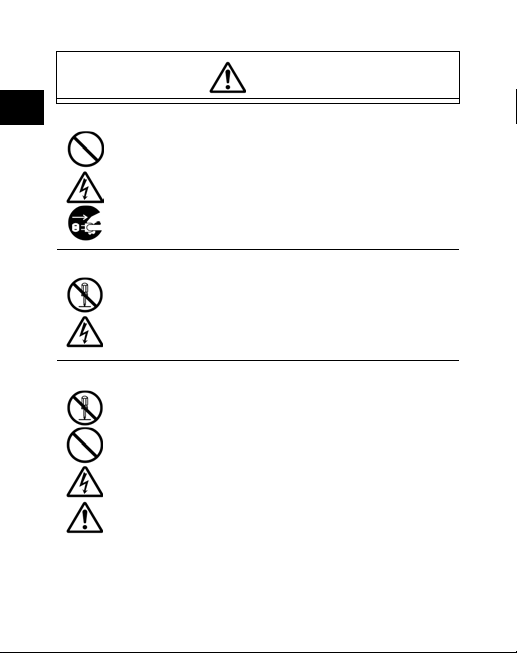
Warning
This symbol indicates information that, if
ignored or applied incorrectly, creates
the danger of death or serious personal
injury.
Caution This symbol indicates information that, if
ignored or applied incorrectly, creates
the possibility of personal injury or
property damage.

6
1
Safety Precautions
Symbol example
The triangle ( ) indicates something you should
take absolute care when doing. The cautions are
indicated concretely within the symbol. The symbol
on the left indicates caution with electric shock.
A diagonal line within a circle ( ) indicates
something you should not do. The symbol on the left
indicates you should not try to take the unit apart.
A black circle ( ) indicates something you need to
do. The symbol on the left indicates you should
unplug the unit from the wall outlet.

7
1
Safety Precautions
Warning!
Liquids
Do not place any containers with water or chemicals,
such as flower vases or cups, as well as small metallic
objects near the printer. If any of these should fall into
the printer, immediately turn off the power and contact
your nearest dealer or service center. Continued use
creates the danger of fire or electrical shock.
Foreign Matter
Do not drop or insert metallic or flammable objects
into the openings on the printer (such as outlets for
cables). If any of these should fall into the printer,
immediately turn off the power and contact your
nearest dealer or service center. Continued use
creates the danger of fire or electrical shock.
Dropping and Damage
Should the printer ever fall or otherwise become
damaged, immediately turn off the power and contact
your nearest dealer or service center. Continued use
creates the danger of fire or electrical shock.
8
1
Safety Precautions
Abnormal Conditions
Continued use of the printer while it is emitting smoke
or strange odor, creates the danger of fire or electrical
shock. Immediately turn off the power and contact
your nearest dealer or service center for repairs. Do
not try to service the printer by yourself.
Disassembly
Never try to take the unit apart or modify it in any way.
Doing so creates the danger of fire or electrical shock.
Contact your nearest dealer or service center for
checkups, tuning and repairs.
Battery Pack
•Never try to take apart the battery pack or modify it
in any way such as with a solder.
•Never expose the battery to direct flame, throw it
into fire, or take any actions that may lead to
shorting.
•When charging the battery pack, make sure to use
the specified battery charger.
Warning!

9
1
Safety Precautions
AC Adapter / Battery Charger (Optional)
•Use only the specified voltage. Using a different
voltage may create the danger of fire or electrical
shock.
•Never use the battery charger with any other
battery pack except for the specified one. Doing so
can rupture the battery, cause leakage, fire or
electrical shock.
•Never cut, damage or modify the power cord. Also,
never place heavy objects on, set fire to or pull the
power cord, as it can damage the cord and create
the danger of fire or electrical shock.
•Should the power cord ever become seriously
damaged (internal wiring exposed or shorted),
contact your nearest dealer or service center.
Continued use of such a cord creates the danger of
fire or electrical shock.
•Never modify, excessively bend, twist, or pull the
power cord. Doing so creates the danger of fire or
electrical shock.
Warning!

10
1
Safety Precautions
Caution!
Location
Do not locate the printer in areas subjected to high
humidity or dew. If dew forms inside the printer,
immediately turn off the power and do not use it until it
has dried up. Continued use creates the danger of
electrical shock.
Power
Never operate the power switch, replace the battery
pack or unplug the AC adapter or battery charger with
wet hands. Doing so creates the danger of electrical
shock.
Other manuals for MB200
4
Table of contents
Other SATO Barcode Reader manuals

SATO
SATO MB400I User manual

SATO
SATO PV3 User manual

SATO
SATO ARGOX AS-9400DC User manual

SATO
SATO MB 200i User manual

SATO
SATO GL 4xxe Series User manual

SATO
SATO VP208 User manual

SATO
SATO ARGOX AS-9400BT User manual

SATO
SATO PV3 Assembly instructions

SATO
SATO CL6NX User manual

SATO
SATO Argox D4 Series User manual

SATO
SATO Argox D4 Series User manual

SATO
SATO CT4-LX1 User manual

SATO
SATO CL4e Series User manual

SATO
SATO Argox D4 Series User manual

SATO
SATO ARGOX AS-9400 User manual

SATO
SATO ARGOX GPIO User manual

SATO
SATO CL4NX RIDF User manual

SATO
SATO WS408TT-STD User manual

SATO
SATO ARGOX AS-9400DC User manual

SATO
SATO CL4NX Plus User manual


