manuals.online logo
Brands
  1. Home
  2. •
  3. Brands
  4. •
  5. Scosche
  6. •
  7. Automobile Accessories
  8. •
  9. Scosche HA1563B User manual

Scosche HA1563B User manual

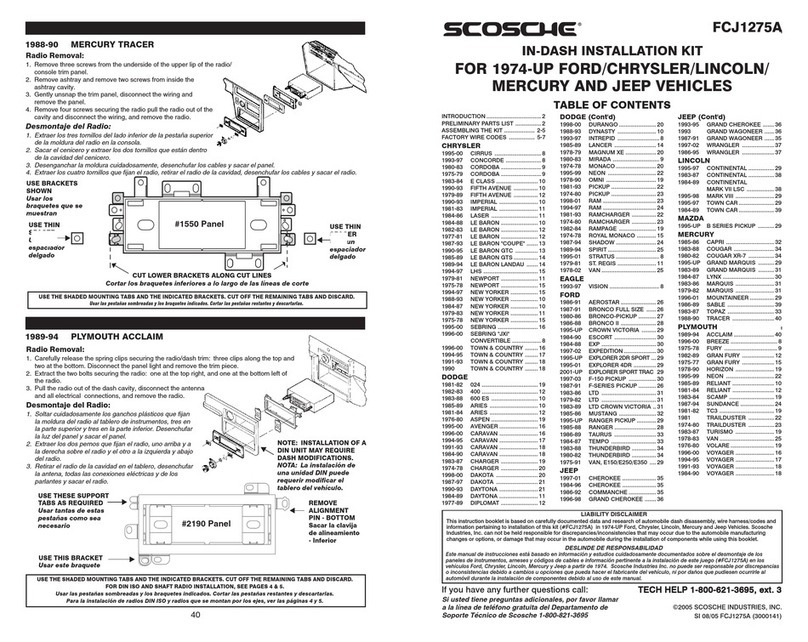
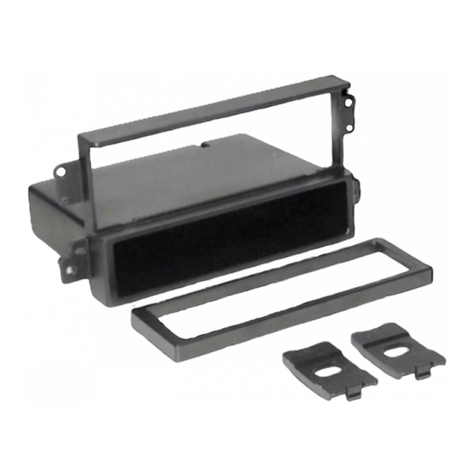
1990-06 ACURA/HONDA/ISUZU KIT
HA1563B
ACURA
1994-01 INTEGRA ..... 2
1990-93 INTEGRA ..... 3
1992-95 LEGEND ...... 3
1992-94 VIGOR ......... 3
HONDA
1998-02 ACCORD ..... 3
1994-97 ACCORD ..... 3
1990-93 ACCORD ..... 3
2006-UP CIVIC ........... 3
1999-00 CIVIC ........... 4
2002-04 CRV ............. 4
1997-01 CRV ............. 4
1999-04 ODYSSEY .... 4
1995-98 ODYSSEY .... 4
1997-01 PRELUDE .... 4
1992-96 PRELUDE ... .4
ISUZU
1996-98 OASIS .......... 4
LIABILITY DISCLAIMER
This instruction booklet is based on carefully documented data and research of automobile dash disassembly, wire
harness/codes and information pertaining to installation of this kit in the listed vehicles. Manufacturer cannot be held
responsible for discrepancies/inconsistencies that may occur due to the automobile manufacturing changes or options,
or damage that may occur in the automobile during the installation of components while using this booklet.
INTRODUCTION
NOTES:
•See your vehicle’s instructions for any special tools your installation might require.
•Read all instructions accompanying your car stereo/cassette player for proper wiring and mounting instructions.
This premium installation kit is for 1990-06 select Acura, Honda and Isuzu vehicles. Included are all the parts you need to mount your
car stereo/cassette, or CD player into your vehicle’s dash. Refer to the individual instruction in this manual to remove your vehicle’s
factory radio and assemble the kit.
VEHICLES APPLICATIONS
4
1999-00 Honda Civic
RADIO REMOVAL:
1. Extract (2) screws from center panel below radio.
2. Extract (4) screws from driver's side underdash panel, and unsnap to remove.
3. Extract (2) screws from left side of center dash panel.
4. Open glove box, push stoppers inward to let glove box hang all the way open.
5. Extract (2) screws from right side of center dash panel.
6. Pull the center dash panel down, unplug lighter socket and remove panel.
7. Looking up into dash from underneath, extract (4) screws securing the radio/pocket assembly.
8. Carefully pull out complete center console/radio/climate control assembly.
9. Unplug all control, radio, antenna, and remove entire assembly.
See Illustration "G"
2002-04 Honda CRV
RADIO REMOVAL:
1. Remove (2) screws from under the center dash air vents.
2. Using a panel removal tool pry out the dash bezel around the radio.
3. Remove (4) screws securing the radio. Disconnect and remove.
1997-01 Honda CRV
RADIO REMOVAL:
1. Unsnap push-pin fasteners from bottom of center console and remove bottom panel.
2. Extract (4) screws from bottom edge of bezel. Extract (4) screws from inside dash below pocket. Pull cup holder/pocket assembly out of dash and
remove.
3. Open glove box and remove stoppers. Extract (2) screws from right side of center dash bezel.
4. From below steering wheel extract (2) screws from bottom edge or panel, unsnap upper edge of panel, unplug, and remove.
5. Unsnap top edge or center lower bezel, unplug, and remove.
6. Extract (2) screws from sides of pocket.
7. Unsnap radio/AC control dash bezel, unplug, and remove
8. Extract (4) screws from each side of the radio bracket assembly to remove radio from dash/AC bezel.
See Illustration "E"
1995-98 Honda Odyssey
1996-98 Isuzu Oasis
RADIO REMOVAL:
1. Open glovebox and unsnap glove box’s rubber stoppers at the sides and remove (1) screw at restraining arm at the right side to let glove box
open all the way down.
2. Extract (2) screws from right side of center console assembly.
3. Extract (2) screws from bottom of center console near carpet.
4. Open console storage compartment and extract (2) screws from near top.
5. Extract (2) screws from driver’s side underdash panel and pop out the right side of panel only to access (1) screw holding center console
assembly.
6. Carefully pull back on the lower center console assembly to unsnap, unplug, and remove.
7. Extract (2) screws from each side of slide out cup holder and remove cup holder.
8. From underneath, extract (2) 8mm screws holding back edge of radio/pocket to dash structure.
9. Slide radio out of dash unplug connectors, antenna and remove.
See Illustration "A" and "E"
1997-01 Honda Prelude
RADIO REMOVAL:
1. Carefully unsnap radio/AC control trim bezel and remove.
2. Extract (4) screws from radio/pocket assembly, unplug radio, and remove.
1992-96 Honda Prelude
RADIO REMOVAL:
1. Carefully reaching behind the console, access and untighten the 8mm bolt securing the rear of the radio.
2. Carefully pull the unit from the cavity, unplug all connectors and remove.
See Illustration "D"
See Illustration "A"
See Illustration "A" and "F"
1999-04 Honda Odyssey
RADIO REMOVAL:
NOTE: The Factory Radio is a Double Din/ISO. An installation kit is necessary when using an Aftermarket radio. We recommend the use of a
Scosche HA1560 or HA1562.
1. Unsnap bezel, lift away, unplug and remove
See Illustration "H"
FACTORY WIRING CODES
CAR STEREO CONNECTORS
PROVIDE EASY CONNECTION OF YOUR CAR
STEREO TO FACTORY WIRING HARNESS.
HA02B
1996-UP Honda/Acura
HA08
1998-UP Honda
RADIO’S
SUPPLIED
TRIMPLATE
RADIO
SLEEVE
REAR
SUPPORT
STRAP
BEND
TABS
OUTWARD
5439
MOUNTING
PANEL
DIN RADIO
Slide the mounting sleeve (metal shroud) into the
panel's radio opening and bend all available
mounting tabs outward (see inset). Slide the
radio into the mounting sleeve once it has been
fastened to the kit panel until the radio locks into
place.
MOUNTING THE RADIO
DIN RADIO INSTALLATION
(DETACHABLE FACE/PULLOUT)
NOTE:
REAR SUPPORTING THE
RADIO ADDS TO THE
INSTALLATIONS
STRUCTURAL INTEGRITY.
5125
POCKET
5699R
RIGHT
BRACKET
1888B
SPACER
(PRESS IN)
5438
REAR
SUPPORT
BRACKET
5324
REAR SUPPORT
BRACKET
5439
KIT PANEL
5699L
LEFT
BRACKET
1888
REAR
SUPPORT
BRACKET
6027
REAR
SUPPORT
BRACKET
HA10
2006-UP Honda Civic Power/4 Speaker Conn.
No photo available
HA10B
HA02B HA08B
1992-94 Acura Vigor
RADIO REMOVAL:
1. Extract the cover cap in between the heater control sliding adjuster controls and extract the screw behind.
2. Pull the heater controls assembly out of the dash, disconnect the connector and remove.
3. Extract the (2) screws securing the top of the radio assembly located in the heater controlcavity.
4. Remove the ashtray and extract the (2) screws from this location.
5. Remove the cover caps located at the front of the console on each side of the console and extract the screw behind each.
6. Lift up and remove the carpet, insert piece located in the console pocket.
7. Extract the (2) screws from the console pocket under the previously removed piece of carpet.
8. Carefully lift up on the console and slide it back away from the radio.
9. Pull the radio dash bezel assembly away from the dash, unplug all connectors (see caution) and remove.
10. Extract the (2) rear support bolts securing the rear of the radio to the subframe assembly structure and remove the radio from the front of the
dash bezel.
CAUTION: THIS RADIO IS OF THE ANTI-THEFT DESIGN, INCORPORATING A CODE SYSTEM PREVENTING
THE RADIO FROM FUNCTIONING WHEN POWER IS DISCONNECTED AND THEN RECONNECTED. TO RESTORE PROPER FUNCTION IT IS
NECESSARY TO ENTER THE SPECIFIC ACCESS CODE FOR THE RADIO. CHECK TO MAKE SURE THAT THE ACCESS CODE IS READILY
AVAILABLE BEFORE DISCONNECTING THE RADIO.
See Illustration "A"
2
A. ATTACHING THE REAR BRACKET:
Align the two (2) screw emboss locations to the
matching locations on pocket. When aligned,
slide the bracket together. Screw the two (2)
supplied acrews to screw emboss locations.
B. ATTACHING THE POCKET:
Align the pocket to the snaps of kit panel. Snap
the pocket into place on the back of kit panel.
SIDE VIEW
HEAD UNIT
1888 REAR
SUPPORT/
BRACKET
MOUNTING PANEL
FRONT VIEW
USE
THESE
Illustration "A" Illustration "B"
3
POCKET ASSEMBLY
Read above
for kit assembly.
A
B
5439
KIT PANEL
5125
POCKET
1998-02 Honda Accord
RADIO REMOVAL:
1. Extract (2) screws from the bottom of the radio dash bezel.
2. Carefully pop out the hazard switch/clock assembly and extract (1) screw from behind.
3. Carefully pry up on radio trim bezel to release from the dash, unplug climate controls and remove the dash bezel.
NOTE: The factory provision is for a Double DIN style stereo or stereo/pocket assembly. An installation kit is not necessary for aftermarket
installations if a stereo with ISO side mounting holes is used along with the factory equipped or similar style pocket.
1992-95 Acura Legend
RADIO REMOVAL:
1. Extract the (2) screws below the ashtray securing the dash bezel to the dash.
2. Using a panel removal tool carefully release the metal clip fasteners from around the parameter of the dash bezel and remove.
3. Extract the (2) bolts securing the rear of the radio to the sub-dash structure from under the radio in the ash tray cavity.
4. Pull the radio out of the cavity, unplug all connectors and remove.
See Illustration "C"
1990-93 Acura Integra
RADIO REMOVAL:
NOTE: Floorboard access - view from the rear of the console.
1. Locate and loosen the (2) chrome/silver 8mm bolts securing the rear support of the radio, pull the radio, pull the radio assembly from the dash.
Disconnect the antenna and other connectors, then remove the radio assembly.
NOTE: A 1/4" socket drive assembly with a 6" extension will make the job easier.
See Illustration "A"
1990-93 Honda Accord
RADIO REMOVAL:
1. Extract the (2) screws - one from each side of the console. Lift off the console (for manual transmissions remove the shift lever boot first).
2. Pull out the ashtray and extract the (2) screws securing the ashtray light and side housing.
3. Remove the (2) screws securing the rear of the radio (screws are located to the rear of the dash cavity, in the support bracket of the radio).
4. Pull the radio/pocket assembly out of the sash, flex the trim panel for radio support bracket clearance.
NOTE: For added bracket clearance, remove (2) screws that secure the bottom/backside of the radio trim - (1) from each side of the panel,
located just below where the rear radio support screws were removed, then remove (2) screws from the panel just above the radio location.
Disconnect the connectors and remove the assembly.
See Illustration "C" and "D"
1994-97 Honda Accord
RADIO REMOVAL:
1. Remove the ashtray and extract the screw located in the ashtray cavity securing the radio dash bezel to the dash.
2. Remove the cup holder located in front of the console storage compartment and extract the screw from inside the cavity securing the console.
3. Carefully pry up on the cover panel located in the console storage pocket with a small screwdriver and extract the (2) screws securing the
console.
4. Carefully slide the console back far enough to access and remove the (2) screws behind the shifter securing the radio dash bezel.
5. Using a panel removal tool carefully pry up on the parameter of the radio trim bezel starting around the shifter to release the fastening clips
securing it to the dash, unplug all connectors and remove the bezel.
6. Extract the (2) bolts securing the rear support of the radio to the dash below the radio/pocket assembly, pull the radio out of the dash cavity,
unplug all connectors and remove the radio.
See Illustration "C" and "D"
USE THE SHADED BRACKETS & THE INDICATED HOLE LOCATIONS. CUT OFF THE REMAINING BRACKETS AND DISCARD.
BRACKET ASSEMBLY
A. REMOVING SIDE TABS
Remove all side tabs from kit panel making
sure to have a smooth surface.
B. ATTACHING THE BRACKETS:
Next, snap brackets into place from the inside
of kit.
REMOVE SHADED
TABS
ATTACH BRACKETS
A
B
BACK VIEW OF
THE MOUNTING PANEL
HA1563
KIT PANEL 5125 POCKET
Illustration "C"
MOUNTING PANEL
USE THESE TABS
FRONT VIEW
Illustration "D"
Illustration "H"
See Illustration "H"
5125
POCKET
HA1563
KIT PANEL
REAR SUPPORT
ASSEMBLY
BACK VIEW OF THE
MOUNTING PANEL
FRONT
VIEW
USE
THESE
TABS
MOUNTING PANEL
FRONT
VIEW
USE
THESE
TABS
MOUNTING PANEL
FRONT
VIEW
USE
THESE
TABS
Illustration "E"
MOUNTING PANEL
Illustration "F" Illustration "G"
USE
THESE
TABS
MOUNTING PANEL
Illustration "I"
FRONT VIEW
1994-01 Acura Integra
RADIO REMOVAL:
1. Remove the ashtray and extract the (2) screws securing the ashtray and lighter assembly to the dash, pull the assembly from the dash,
unplug the connectors and remove the assembly.
2. Reach in behind the radio and loosen the (2) 8mm bolts securing the rear of the radio to the sub-dash structure.
3. Pull the radio out of the dash, unplug all connectors and remove the radio.
NOTE: A 1/4" socket drive assembly with a 6" extension or a Scosche Skewdriver set will make the job easier.
See Illustration "A" and "B"
2006-Up Honda Civic
RADIO REMOVAL:
1. Using a panel removal tool, unsnap panel located beneath radio inside storage compartment.
2. Extract two 8mm bolts from behind panel, securing factory radio to dash chassis.
3. The panel closest to foot pedal will have a release knob that will have to be turned counter clockwise to release panel; unsnap the remaining
attached portion of the panel.
4. Using a panel removal tool, unsnap knee guard under steering wheel.
5. Extract (1) Phillips head screw securing dash bezel located at the left of the steering wheel.
6. Using panel removal tool, unsnap the parameter of the top dash surrounding radio and instrument cluster.
7. Radio is attached to the dash bezel.
8. Lift away, disconnect harness, and remove.
See Illustration "I" and "C2"
5125
POCKET
HA1563
KIT PANEL
REAR SUPPORT
ASSEMBLY
Illustration "C2"
Get top quality Scosche car audio products on our website.

Other Scosche Automobile Accessories manuals

Scosche S3TA03 User manual

Scosche

Scosche S3TA03 User manual

Scosche MAGICMOUNT MAG12V User manual

Scosche

Scosche MAGICMOUNT MAG12V User manual

Scosche TA2121B User manual

Scosche

Scosche TA2121B User manual

Scosche HAQ03 User manual

Scosche

Scosche HAQ03 User manual

Scosche MAGICMOUNT PRO User manual

Scosche

Scosche MAGICMOUNT PRO User manual

Scosche DO2110 User manual

Scosche

Scosche DO2110 User manual

Scosche GOBAT 2600 PBC71 User manual

Scosche

Scosche GOBAT 2600 PBC71 User manual

Scosche TA1467 User manual

Scosche

Scosche TA1467 User manual

Scosche motorMOUTH IIBTAXM User manual

Scosche

Scosche motorMOUTH IIBTAXM User manual

Scosche CR1277 User manual

Scosche

Scosche CR1277 User manual

Scosche TIQ01 User manual

Scosche

Scosche TIQ01 User manual

Scosche BTFREQ BTFM User manual

Scosche

Scosche BTFREQ BTFM User manual

Scosche MAGICMOUNT MPQ2V User manual

Scosche

Scosche MAGICMOUNT MPQ2V User manual

Scosche GOBAT 2600 User manual

Scosche

Scosche GOBAT 2600 User manual

Scosche SC-3300 User manual

Scosche

Scosche SC-3300 User manual

Scosche STUCKUP IUHW9R User manual

Scosche

Scosche STUCKUP IUHW9R User manual

Scosche BT1200 User manual

Scosche

Scosche BT1200 User manual

Scosche BT1000 User manual

Scosche

Scosche BT1000 User manual

Scosche IPFMRDS User manual

Scosche

Scosche IPFMRDS User manual

Scosche SC-3000 User manual

Scosche

Scosche SC-3000 User manual

Scosche FT4276B User manual

Scosche

Scosche FT4276B User manual

Scosche MAGIC GRIP MGQWDDP User manual

Scosche

Scosche MAGIC GRIP MGQWDDP User manual

Scosche VQ2M User manual

Scosche

Scosche VQ2M User manual

Scosche BTFREQ BTFM5 User manual

Scosche

Scosche BTFREQ BTFM5 User manual

Popular Automobile Accessories manuals by other brands

Monster MDP 700 user guide

Monster

Monster MDP 700 user guide

Bestop Supertop NX Twill installation instructions

Bestop

Bestop Supertop NX Twill installation instructions

Rival Drivetech 4x4 DT-2D18121 installation manual

Rival

Rival Drivetech 4x4 DT-2D18121 installation manual

SVC GROUP TREK A-1 Mounting instructions

SVC GROUP

SVC GROUP TREK A-1 Mounting instructions

Mazda 0000-8L-L2 installation instructions

Mazda

Mazda 0000-8L-L2 installation instructions

Front Runner RRAC242 manual

Front Runner

Front Runner RRAC242 manual

Toyota PT922-12170 manual

Toyota

Toyota PT922-12170 manual

Thule Rapid System Kit 1708 instructions

Thule

Thule Rapid System Kit 1708 instructions

Connect IT CI-504 user manual

Connect IT

Connect IT CI-504 user manual

GROM Audio Wirelinq user manual

GROM Audio

GROM Audio Wirelinq user manual

INTERVOX CARVOX IE Series installation manual

INTERVOX

INTERVOX CARVOX IE Series installation manual

Whispbar K375W Fitting instructions

Whispbar

Whispbar K375W Fitting instructions

POOL-LINE BO0018 Assembly instructions

POOL-LINE

POOL-LINE BO0018 Assembly instructions

SSV Works WP-RZ304 quick start guide

SSV Works

SSV Works WP-RZ304 quick start guide

Thule 1025 instructions

Thule

Thule 1025 instructions

CNTECH CR7 installation manual

CNTECH

CNTECH CR7 installation manual

iSi iSi-HM-AL-690 installation guide

iSi

iSi iSi-HM-AL-690 installation guide

Whispbar K492W Fitting instructions

Whispbar

Whispbar K492W Fitting instructions

manuals.online logo
manuals.online logoBrands
  • About & Mission
  • Contact us
  • Privacy Policy
  • Terms and Conditions

Copyright 2025 Manuals.Online. All Rights Reserved.