manuals.online logo
Brands
  1. Home
  2. •
  3. Brands
  4. •
  5. Sealey
  6. •
  7. Paint Sprayer
  8. •
  9. Sealey SSG401.V2 Firmware update

Sealey SSG401.V2 Firmware update

Ideal for applying base coats. Features adjustable paint flow and fan width controls. Supplied with
aluminium cam action suction feed pot. Suitable for use with waterborne paints. Alternative set-ups
available separately.
INSTRUCTIONS FOR:
SUCTION FEED
REFINISHING GUN
MODEL No: SSG401.V2
Thank you for purchasing a Sealey product. Manufactured to a high standard this product will, if used according to these instructions and
properly maintained, give you years of trouble free performance.
Standard Set Up: .................................. 1.5mm
Available Set ups:...................1.2, 1.8, 2.0, 2.2 & 2.5mm
Nominal Operating Air Pressure: ....................... 50psi
Nominal Air Consumption: . . . . . . . . . . . . . . . . . . . . . . . . 5 - 11cfm
Pot Capacity .........................................0.8l
Air Connection ...................................1/4"BSP
2. INTRODUCTION & SPECIFICATIONS
IMPORTANT: PLEASE READ THESE INSTRUCTIONS CAREFULLY. NOTE THE SAFE OPERATIONAL REQUIREMENTS,
WARNINGS AND CAUTIONS. USE THE PRODUCT CORRECTLY AND WITH CARE FOR THE PURPOSE FOR WHICH IT IS
INTENDED. FAILURE TO DO SO MAY CAUSE DAMAGE AND/OR PERSONAL INJURY AND WILL INVALIDATE THE
WARRANTY. PLEASE KEEP INSTRUCTIONS SAFE FOR FUTURE USE.
1. SAFETY INSTRUCTIONS
Familiarise yourself with the application and limitations, as well as the potential hazards of the spray gun.
 WARNING!Disconnect the spray gun from the air supply before changing accessories, servicing or performing any maintenance.
 Maintain the spray gun in good condition (use an authorised service agent).
Replace or repair damaged parts. Use recommended parts only. Unauthorised parts may be dangerous and will invalidate the warranty.
Locate the spray gun in a suitable work area, keep area clean and tidy and free from unrelated materials, ensuring that there is
adequate ventilation and lighting.
Keep the spray gun clean for best and safest performance.
Ensure the air system has sufficient output for the spray gun air consumption (see specification).
 Wear approved respiratory protection, safety eye goggles and skin protection.
Remove ill fitting clothing. Remove ties, watches, rings and other loose jewellery and tie back long hair.
Keep children and unauthorised persons away from the work area.
When gun is not in use ensure the air supply is disconnected.
 Avoid unintentional operation.
 DO NOT paint were there is any source, or possible source, of ignition as paint mist is extremely flammable.
 DO NOT point spray gun at yourself or at other persons or animals.
 DO NOT carry the by the air hose, or yank the hose from the air supply.
 DO NOT use the spray gun for any purpose other than for which it is designed.
 DO NOT allow untrained persons to operate the spray gun.
 DO NOT get the spray gun wet or use in damp or wet locations or areas where there is condensation.
 DO NOT operate gun if any parts are missing or damaged as this may cause failure and/or personal injury.
 DO NOT direct air from the air hose at yourself or others.
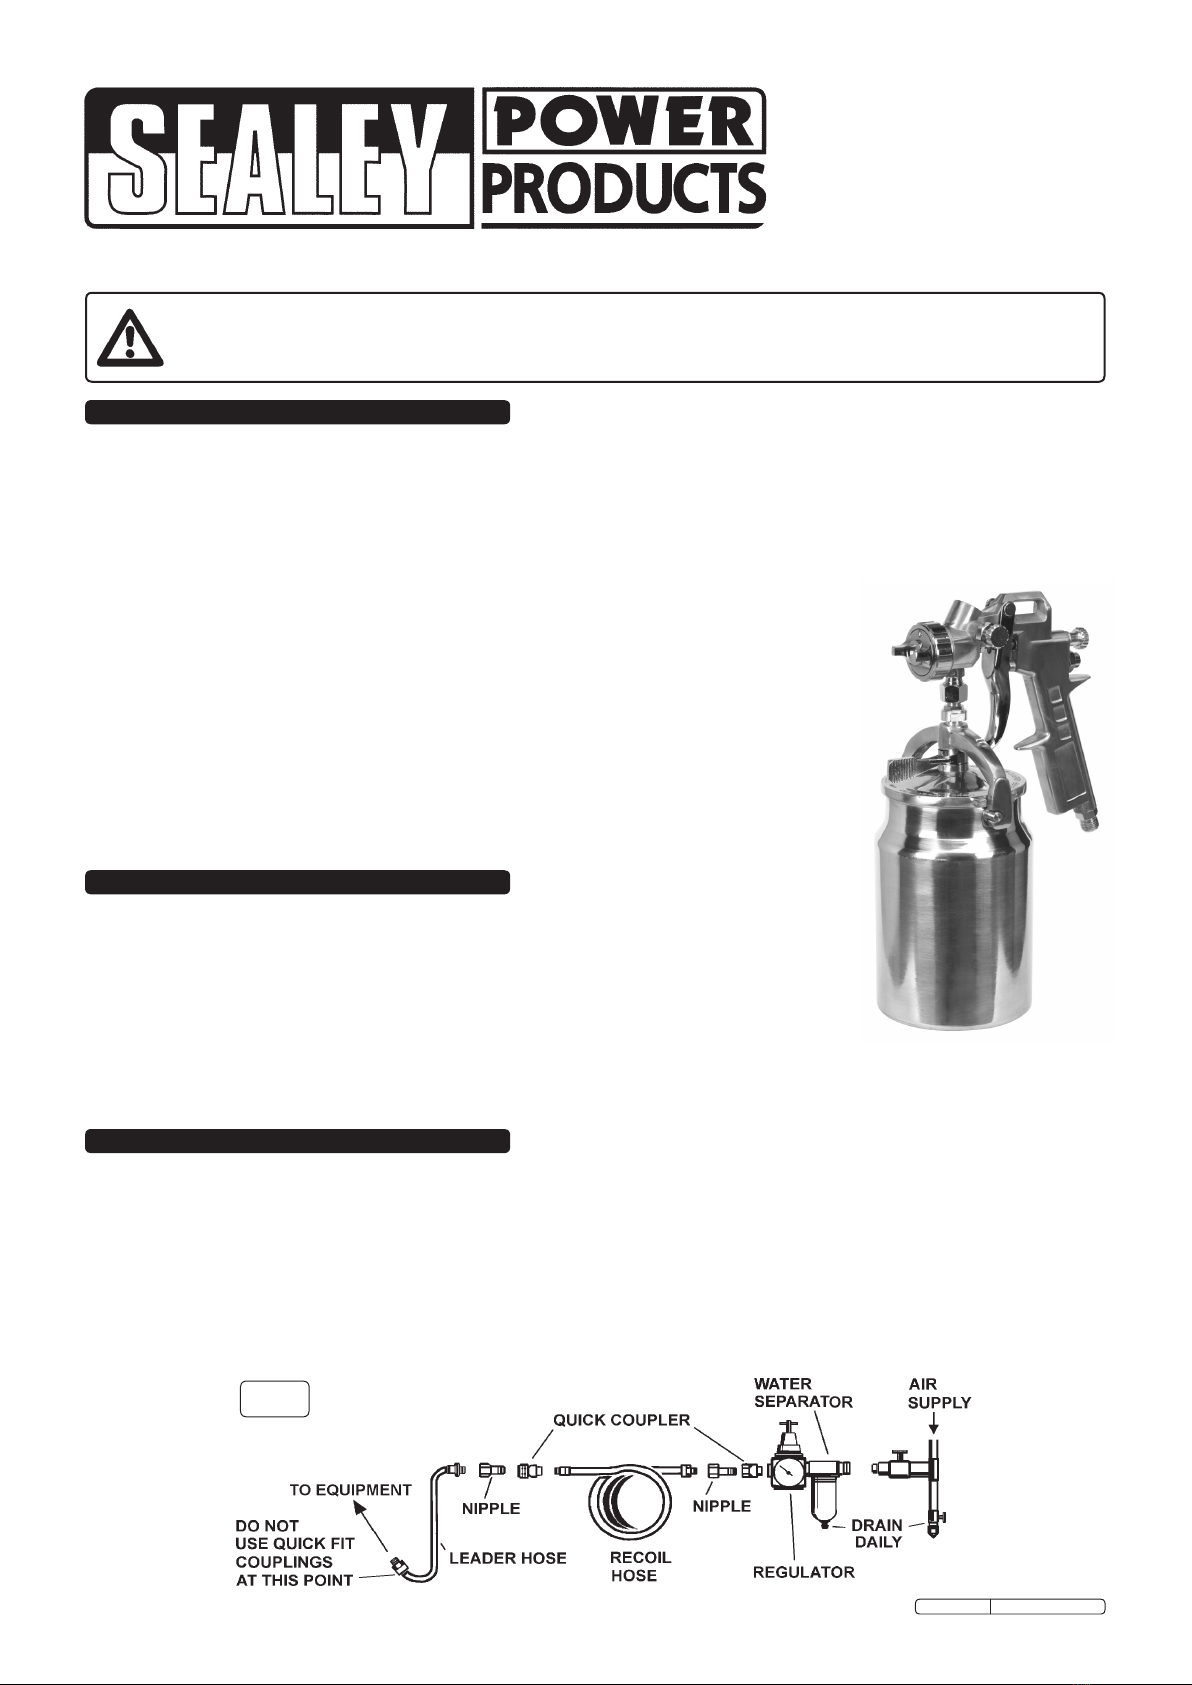
3. AIR SUPPLY CONNECTION
3.1. For recommended hook-up, see diagram (fig.1).
3.2. Ensure the trigger is in the "off" position before connecting to the air supply.
3.3. You will require an air supply capable of providing a pressure 50psi and an air volume of 11cfm to operate the gun.
3.4. WARNING! Ensure the air supply is clean and is regulated to a maximum of 50psi. Too high an air pressure and unclean
air will shorten the life of the gun due to excessive wear and may be dangerous, causing damage and/or personal injury.
3.5. Drain the air supply tank and pressure regulator daily. Water in the air line will damage the gun and contaminate the paint.
3.6. Clean the compressor air inlet filter weekly.
3.7. Line pressure should be increased to compensate for unusually long air hoses (over 8 metres). The minimum hose diameter should be
10mm (3/8") I.D. and fittings must have the same inside dimensions.
3.8. Keep hose away from heat, oil and sharp edges. Check hoses for wear and make certain that all connections are secure.
fig.1
Original Language Version SSG401.V2 Issue: 2 - 18/01/10
IT IS VERY IMPORTANT TO ENSURE THAT THE GUN IS CORRECTLY CLEANED AFTER EACH USE.
Disconnect from the air supply before attempting any cleaning, other than flushing, or maintenance.
5.1. Cleaning the gun
5.1.1 Clean out pot with clean solvent.
5.1.2 Flush the gun thoroughly with solvent and clean the nozzle with solvent and a brush. DO NOT immerse/soak the nozzle in solvent.
5.1.3 DO NOT immerse the entire gun in solvent. This will cause lubricants to dissolve and packing to dissolve or dry out.
5.1.4 Wipe the outside of the gun with a solvent-dampened rag.
5.1.5 If you need to clear blocked orifices, only use a non metallic probe that is softer than brass.
5.2. Maintenance
5.2.1 Lubricate the fluid needle packing, air valve packing and trigger pivot point daily with a light machine oil.
5.2.2 If you change the nozzle size, ensure the complete nozzle set is exchanged. Insert paint nozzle before putting the paint needle in.
NOTE: Take care when re-assembling. Screw parts hand tight to avoid cross-threading. If a part cannot easily be turned by hand, check that
you have the correct part, or unscrew, realign and try again. DO NOT use excessive force when re-assembling.
5. CLEANING & MAINTENANCE
4. OPERATING INSTRUCTIONS
Ensure that you have read and understood the Safety Instructions in Section 1
4.1. For best results the gun must be handled and operated correctly. It should be held perpendicular to the surface being sprayed and
moved parallel to it. Start the stroke before squeezing the trigger and release the trigger before finishing the stroke. This will enable
you to accurately control the gun and paint (fig. 2).
4.2. Spray from a distance of about 150 (6") to 250mm (10") depending on the material and the atomizing pressure. The paint deposited
should always be even and wet. Each stroke must overlap the preceding stroke to obtain a uniform finish. To reduce over-spray and
obtain maximum efficiency, spray with the lowest effective atomizing air pressure.
4.3. Controlling the fan spray and the paint:
a) Use the paint control knob (fig. 3.A) to increase or decrease the paint flow.
b) Fig. 3.B is the air input control and should be set to the lowest effective flow.
c) Turn the air cup (fig. 4.1) to achieve a horizontal or vertical fan spray. Lock the cup with retaining ring (fig. 4 2).
d) In normal operation, the wings on the cup are horizontal as fig. 4. This provides a vertical fan-shaped pattern (fig. 5) which gives
the optimum coverage when moving the gun back and forth, parallel to the work surface.
fig.2
fig.3 A
B
fig.4
fig.5
Original Language Version SSG401.V2 Issue: 2 - 18/01/10
Dried material in a dirty side port restricts
passage of air. Greater flow of air from the
cleaner side port forces the fan pattern in the
direction of the clogged side.
Dried material around the outside of the fluid
nozzle tip restricts the passage of atomizing air at
one point through the centre opening of the air
cup and results in the pattern shown.
This pattern can also be caused by a loose air
cup.
A split spray or one that is heavy at each end of
the fan pattern and weak in the middle is usually
caused by too high an atomization air pressure or
by attempting to get too wide a spray with thin
paint.
1. Worn needle packing permits air to get
into the fluid passageway. This results in
spitting.
2. Dirt between the paint nozzle seat and body
or a loose paint nozzle will cause the gun to
spit.
3. A loose or defective joint between the pot
and gun can cause spitting.
Dissolve material in the side ports with solvent, then
blow the gun clean.
Do not poke the orifice with a metal instrument.
Remove the air cup and wipe off fluid tip using a rag
dampened with solvent.
Tighten the air cup.
Check supply pressure and reduce if over 50psi.
Adjust the air atomisation valve to reduce pressure and
adjust paint needle if required.
Check spray pattern on a test panel.
1. Tighten the packing screw or, in severe cases,
replace the packing.
2. Remove the fluid nozzle, clean the back of the
nozzle and the nozzle seat in the gun body using a
rag dampened with solvent.
3. Tighten or replace.
VIEW OF PROBLEM POSSIBLE REASON FOR PROBLEM SOLUTION
A faulty spray is usually caused by improper cleaning or dried material around the fluid nozzle tip or in the air cup - use a brush and solvent to
remove. Never use metal instruments to clean the air cup or paint nozzle. These parts are carefully machined and any damage to them will
cause a faulty spray. If either the air cup or paint nozzle is damaged, the part must be replaced before a perfect spay can be obtained.
6
. TROUBLESHOOTING
NOTE: It is our policy to continually improve products and as such we reserve the right to alter data, specifications and component parts without prior notice.
IMPORTANT: No liability is accepted for incorrect use of this product.
WARRANTY: Guarantee is 12 months from purchase date, proof of which will be required for any claim.
INFORMATION: For a copy of our latest catalogue and promotions call us on 01284 757525 and leave your full name and address, including postcode.
01284 757500
01284 703534
sales@sealey.co.uk
Sole UK Distributor, Sealey Group,
Kempson Way, Suffolk Business Park,
Bury St. Edmunds, Suffolk,
IP32 7AR
www.sealey.co.uk
Web
email
Original Language Version SSG401.V2 Issue: 2 - 18/01/10

Other Sealey Paint Sprayer manuals

Sealey SAC2420E.V3 User manual

Sealey

Sealey SAC2420E.V3 User manual

Sealey S701G User manual

Sealey

Sealey S701G User manual

Sealey SG1.3G User manual

Sealey

Sealey SG1.3G User manual

Sealey SCSG05 User manual

Sealey

Sealey SCSG05 User manual

Sealey S713G Manual

Sealey

Sealey S713G Manual

Sealey HVLP746 User manual

Sealey

Sealey HVLP746 User manual

Sealey POWER PRODUCTS SG139.V2 User manual

Sealey

Sealey POWER PRODUCTS SG139.V2 User manual

Sealey SS2 User manual

Sealey

Sealey SS2 User manual

Sealey HVLP-79/P1.V3 User manual

Sealey

Sealey HVLP-79/P1.V3 User manual

Sealey SCSG05 User manual

Sealey

Sealey SCSG05 User manual

Sealey POWER PRODUCTS SG14.V3 User manual

Sealey

Sealey POWER PRODUCTS SG14.V3 User manual

Sealey SG4 User manual

Sealey

Sealey SG4 User manual

Sealey S701.V3 User manual

Sealey

Sealey S701.V3 User manual

Sealey SS37 User manual

Sealey

Sealey SS37 User manual

Sealey SG1.7S User manual

Sealey

Sealey SG1.7S User manual

Sealey HVLP2000.V2 User manual

Sealey

Sealey HVLP2000.V2 User manual

Sealey SSG501.V4 User manual

Sealey

Sealey SSG501.V4 User manual

Sealey HVLP732 User manual

Sealey

Sealey HVLP732 User manual

Sealey SS4.V3 User manual

Sealey

Sealey SS4.V3 User manual

Sealey CP20VGBS User manual

Sealey

Sealey CP20VGBS User manual

Sealey SSG1P.V2 User manual

Sealey

Sealey SSG1P.V2 User manual

Sealey SG14.V3 User manual

Sealey

Sealey SG14.V3 User manual

Sealey HVLP3000 User manual

Sealey

Sealey HVLP3000 User manual

Sealey DT53 User manual

Sealey

Sealey DT53 User manual

Popular Paint Sprayer manuals by other brands

Graco 16N664 owner's manual

Graco

Graco 16N664 owner's manual

Graco T-MAX 506 Operation - repair - parts

Graco

Graco T-MAX 506 Operation - repair - parts

Earlex spraystation hv1900kr Operating instructions manual

Earlex

Earlex spraystation hv1900kr Operating instructions manual

Anest Iwata PCA12.0 Operating instructions manual

Anest Iwata

Anest Iwata PCA12.0 Operating instructions manual

Graco GH 311796B Operation manual

Graco

Graco GH 311796B Operation manual

Green Gorilla GG01 owner's guide

Green Gorilla

Green Gorilla GG01 owner's guide

Truper PIPI-411 manual

Truper

Truper PIPI-411 manual

Solo 478-EN Operator's manual & parts list

Solo

Solo 478-EN Operator's manual & parts list

Tan.Easy TAN.LITE 32000 Operation manual

Tan.Easy

Tan.Easy TAN.LITE 32000 Operation manual

Graco ST Repair instructions

Graco

Graco ST Repair instructions

Niagara 56645 Owner's manual & safety instructions

Niagara

Niagara 56645 Owner's manual & safety instructions

MaxiMist SprayMate Plus manual

MaxiMist

MaxiMist SprayMate Plus manual

Fibre Glast 134 Usage instructions

Fibre Glast

Fibre Glast 134 Usage instructions

Anvil FDM-19F02 Use and care guide

Anvil

Anvil FDM-19F02 Use and care guide

Goizper Group iK ALK9 instruction sheet

Goizper Group

Goizper Group iK ALK9 instruction sheet

Patriot Pathfinder owner's manual

Patriot

Patriot Pathfinder owner's manual

Graco ULTRA MAX 695 manual

Graco

Graco ULTRA MAX 695 manual

Carlisle BINKS 0811-7500-1 Service manual

Carlisle

Carlisle BINKS 0811-7500-1 Service manual

manuals.online logo
manuals.online logoBrands
  • About & Mission
  • Contact us
  • Privacy Policy
  • Terms and Conditions

Copyright 2025 Manuals.Online. All Rights Reserved.