Sealey SMS2101 User manual

Ø200MM SHARPENER WITH HONING WHEEL
MODEL NO: SMS2101
Thank you for purchasing a Sealey product. Manufactured to a high standard, this product will, if used according to these instructions,
and properly maintained, give you years of trouble free performance.
IMPORTANT: PLEASE READ THESE INSTRUCTIONS CAREFULLY. NOTE THE SAFE OPERATIONAL REQUIREMENTS, WARNINGS & CAUTIONS. USE
THE PRODUCT CORRECTLY AND WITH CARE FOR THE PURPOSE FOR WHICH IT IS INTENDED. FAILURE TO DO SO MAY CAUSE DAMAGE AND/OR
PERSONAL INJURY AND WILL INVALIDATE THE WARRANTY. KEEP THESE INSTRUCTIONS SAFE FOR FUTURE USE.
1. SAFETY ELECTRICAL SAFETY
1.1. ELECTRICAL SAFETY
WARNING! It is the user’s responsibility to check the following:
Check all electrical equipment and appliances to ensure that they are safe before using. Inspect power supply leads, plugs and
all electrical connections for wear and damage. Sealey recommend that an RCD (Residual Current Device) is used with all electrical
products. You may obtain an RCD by contacting your local Sealey stockist.
If the sharpener is used in the course of business duties, it must be maintained in a safe condition and routinely PAT (Portable
Appliance Test) tested.
1.1.1. Electrical safety information, it is important that the following information is read and understood. Ensure that the insulation on all
cables and on the appliance is safe before connecting it to the power supply.
1.1.2. Regularly inspect power supply cables and plugs for wear or damage and check all connections to ensure that they are secure
1.1.3. Important: Ensure that the voltage rating on the appliance suits the power supply to be used and that the plug is tted with the
correct fuse - see fuse rating in these instructions.
8DO NOT pull or carry the appliance by the power cable.
8DO NOT pull the plug from the socket by the cable.
8DO NOT use worn or damaged cables, plugs or connectors. Ensure that any faulty item is repaired or
replaced immediately by a qualied electrician.
1.1.4. This product is tted with a BS1363/A 13 Amp 3 pin plug.
If the cable or plug is damaged during use, switch the electricity supply and remove from use.
Ensure that repairs are carried out by a qualied electrician.
Replace a damaged plug with a BS1363/A 5 Amp 3 pin plug. If in doubt contact a qualied electrician.
A) Connect the GREEN/YELLOW earth wire to the earth terminal ‘E’.
B) Connect the BROWN live wire to the live terminal ‘L’.
C) Connect the BLUE neutral wire to the neutral terminal ‘N’.
Ensure that the cable outer sheath extends inside the cable restraint and that the restraint is tight.
Sealey recommend that repairs are carried out by a qualied electrician
1.2. GENERAL SAFETY AL
WARNING! Disconnect the sharpener from the mains power before changing accessories, servicing or performing any maintenance.
9Maintain aluminium oxide wet stone and cow hide honing wheel in good condition. Check moving parts and alignment. If necessary use
an authorised service agent.
9Replace or repair damaged parts. Use genuine parts only. Unapproved parts may be dangerous and will invalidate the warranty.
9The sharpening wheel must only be changed by persons holding an appropriate grinding wheel certificate.
9Wear approved safety goggles.
9Remove ill fitting clothing. Remove ties, watches, rings, and other loose jewellery, and contain long hair.
9 Use sharpener in a suitable work area, keep area clean, tidy and free from unrelated materials, and ensure adequate lighting.
9Maintain correct balance and footing. DO NOT over-reach and ensure the floor is not slippery. Wear non slip shoes.
9 Use only approved stone, never use the side of the stone.
9 Check sharpening stone/honing wheel to ensure they are not split, cracked or damaged in anyway, if in doubt DO NOT use.
9 Sharpening stone/ honing wheel must be securely attached before use, but not over tightened.
9Keep non essential persons away from the working area.
8DO NOT operate the sharpener if any parts are missing or the sharpener is damaged.
8DO NOT use the sharpener for a task it was not designed to perform.
8DO NOT operate sharpener where there are flammable liquids or gasses.
WARNING! DO NOT sharpen any materials containing asbestos.
8DO NOT switch the sharpener on whilst the stone is in contact with the work piece.
8DO NOT cover the sharpeners air vents situated beneath the motor. To do so will overheat the machine.
8DO NOT touch the work piece immediately after sharpening as it will be hot.
8DO NOT touch the sharpening stone/honing wheel whilst operating or whilst connected to the mains.
Recommended fuse rating
5 Amp
SMS2101 Issue 3 (2,3,F) 11/05/21
Original Language Version
© Jack Sealey Limited
Refer to
instruction
manual
Wear eye
protection

8DO NOT leave the sharpener running unattended.
8DO NOT operate the sharpener when you are tired or under the influence of alcohol, drugs or intoxicating medication.
9 When not in use switch grinder off, remove plug from power supply.
2. INTRODUCTION
Wet stone sharpening system with aluminium oxide particle stone and detachable water trough, suitable for HSS tools. Supplied with leather honing
wheel, grinding jig and angle guide.
3. SPECIFICATION
Model No:.............................................................. SMS2101
Motor Power:.................................................................180W
Electrical Supply .................................................. 230V-50Hz
Wheel Diameter ...............................................Ø200 x 40mm
Axle Diameter ........................................................... Ø12mm
No load Speed .............................................................95rpm
Grinding Stone .................................................Ø200 x 40mm
Leather Honing Wheel .....................................Ø200 x 30mm
Sharpening Wheel............................................SMS2101.SW
Leather Honing Wheel .....................................SMS2101.HW
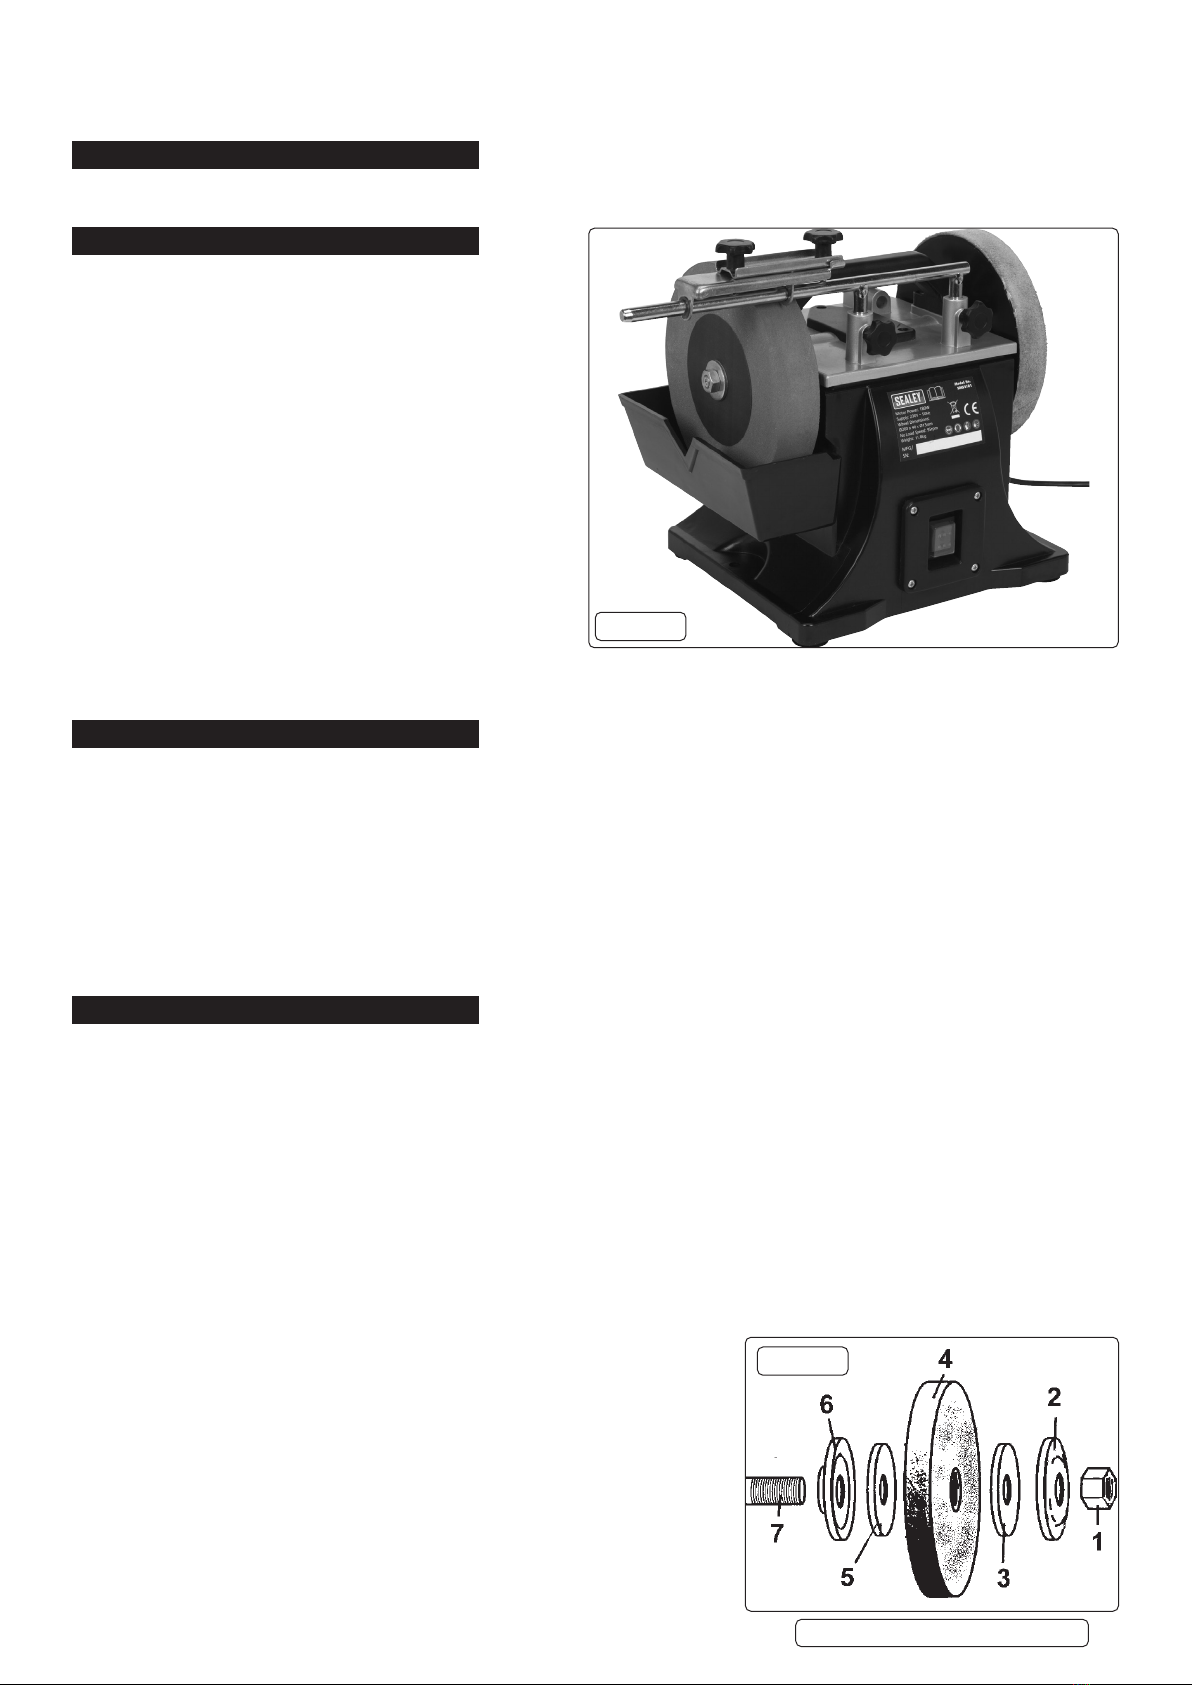
SEE FIG.1
A.........................................................................Power Cable
B...................................................................... On/Off Switch
C....................................................Detachable Water Trough
D........................................................................... Wet Stone
E..................................................... Cow Hide Honing Wheel
F...................................................................Tool Rest/Clamp
G..............................Adjustable Support for Tool Rest/Clamp
H...................................................................... Lifting Handle
4. ASSEMBLY
WARNING! Before assembly check to ensure grinder is unplugged from mains. Position on a at surface with sufcient
illumination.
4.1. TOOL REST
4.1.1. Fit adjustable support for tool rest fig.1G by unscrewing knobs and sliding rods into guides clamp in required position.
4.1.2. Side tool rest clamp fig.1F onto support.
4.2. WATER RESERVOIR
4.2.1. Position water reservoir fig.1C by hooking on to main body of sharpener.
4.2.2. Ensure water reservoir is clear of rotating wheel.
4.2.3. It is recommended to install the sharpener by mounting on a fireproof bench. Use the mounting holes to secure to work surface.
NOTE:- the machine has no front or rear side so you can grind with or against the direction of wheel rotation. When positioning
please consider access to On/Off switch fig.1B. G
5. GRINDING WHEELS
5.1. MANDATORY SAFETY INSTRUCTIONS. (The following instructions must be observed together with those in Section 1).
▲DANGER! Use of a damaged wheel (stone) is dangerous and may cause damage and/or personal injury.
5.1.1. WARNING! Ensure grinder is unplugged from mains supply before attempting to change grinding wheel (stone). Only persons
qualified under the “Abrasive Wheels Regulations” and holding a current grinding wheel certificate are authorised to change and dress
grinding wheels (stones).
5.1.2. Grinding wheels used with this machine must be of an adequate speed rating and suitable for the material to be ground.
5.1.3. Ensure the maximum speed specification of the wheel is higher than that indicated on the machine data plate.
5.1.4. Check that grinding wheels are secure and that wheels are not worn or damaged, that there are no fissures or cracks. If damaged
replace immediately.
5.1.5. Ensure replacement wheel is not damaged in any way such as cracks, deformations or splinters etc. Also check the mounting flanges
for deformation, burrs or chips. Damaged flanges must not be used as they may produce high stresses in the wheel causing it to
break. DO NOT over tighten a wheel. Never tamper with a wheel in order to adapt it to a different size shaft.
5.1.6. Install a new wheel as in 5.2. Once mounted on the grinder test the wheel before use by facing the grinder in a safe direction (point it
away from yourself, others and vulnerable items) and run for a short time. Dress the wheel if necessary.
5.2. WHEEL CHANGING PROCEDURE
WARNING! Unplug sharpener from the mains power supply before changing
wheel.
5.2.1. Hold grinding wheel firmly - protect your hands with a cloth, or wear gloves.
5.2.2. Unscrew retaining nut fig.2.1.
Note: The nut has standard right-hand thread (undo anti-clockwise).and must be
loosened by turning anticlockwise. It may be necessary to strike the wrench sharply
in the loosening direction, with a soft-faced hammer, to loosen the nut.
5.2.3. Remove grinding wheel washer in order shown in fig.2 Carefully inspect the new
wheel before installing to ensure there are no fissures, chips, or cracks.
WARNING! DO NOT USE A DAMAGED WHEEL.
5.2.4. Inspect the blotters - if they are damaged, replace them. The grinder must never be
used without genuine wheel blotters.
5.2.5. Install the new wheel by reversing steps above.
Original Language Version
© Jack Sealey Limited
Fig.1
A
B
C
DE
F
G
H
SMS2101 Issue 3 (2,3,F) 11/05/21
Fig.2

5.2.6.
Hold wheel steady and secure locking nut. DO NOT over-tighten as this may crack the wheel.
5.2.7.
To remove hide honing wheel. Hold wheel firmly and unscrew retaining knob, remove washer, remove wheel by sliding off shaft and key.
5.2.8.
To refit repeat above in reverse order.
6. OPERATION
6.2.1.
6.1. PRE-USE INSPECTION
WARNING! INSPECT THE SHARPENER BEFORE USE. ENSURE THE SHARPENER IS UNPLUGGED FROM THE MAINS POWER
BEFORE COMMENCING THE INSPECTION.
6.1.1.
Check the tool rests are securely fixed and can not come in contact with the grinding wheel.
6.1.2.
Turn the grinding wheel/honing wheel by hand and check for any damage. Check they do not touch the tool rests and are correctly
aligned.
6.1.3.
If any of the above checks fail, replace, repair, or adjust as necessary before starting the sharpener.
6.2. WHEEL USE
6.2.1.
Fill water reservoir to point of “V” notch the stone will become saturated with water, refill water as required. DO NOT grind without water.
At the end of grinding process empty water from reservoir and clean out.
6.3. USING THE SHARPENER
6.3.1.
Plug sharpener into the mains power supply.
6.3.2.
Clamp the tool into the tool rest/clamp fig.3 / fig.4.
6.3.3.
Measure the grinding bezel by using the notches on the edges of the angle measurer fig.5. Place Angle measurer on wheel as shown
fig.6 to obtain correct sharpening angle, adjustment can be made by adjusting tool rest support fig.1G.
6.3.4.
Remove angle measurer from wheel, lift edge of tool from wheel, ensure nothing is in contact with wheel.
6.3.5.
Start Wheel by using on/off switch fig.1 B.
6.4. DIRECTION OF GRINDING
6.4.1.
It is recommended to work against the direction of the grinding stone if you require to remove large amounts of metal, and to grind with
the direction of the wheel if finer more accurate work is required. See fig.3 / fig.4 for mounting positions to achieve this.
6.4.2.
When using the honing wheel never sharpen against the direction of the wheel, as the tool will cut into the leather.
6.5. PREPARATION OF LEATHER HONING WHEEL
6.5.1.
Before starting to use the honing wheel impregnate the leather with thin machine oil, then apply abrasive paste, turn on the wheel and
spread the paste. This process will need to be done after about five to ten sharpenings or as required and will increase the life of the
leather.
7. MAINTENANCE
WARNING! Ensure the grinder is unplugged from the mains power supply before performing any maintenance or service.
7.1. The machine motor and bearings are sealed units and require no regular maintenance. Should you require assistance, contact your
local service agent.
Fig.5
Fig.4
Fig.3
Fig.6
Original Language Version
© Jack Sealey Limited SMS2101 Issue 3 (2,3,F) 11/05/21

Original Language Version
© Jack Sealey Limited
Sealey Group, Kempson Way, Suffolk Business Park, Bury St Edmunds, Suffolk. IP32 7AR
01284 757500 01284 703534 sales@sealey.co.uk www.sealey.co.uk
SMS2101 Issue 3 (2,3,F) 11/05/21
WEEE REGULATIONS
Dispose of this product at the end of its working life in compliance with the EU Directive on Waste Electrical and Electronic Equipment
(WEEE). When the product is no longer required, it must be disposed of in an environmentally protective way. Contact your local solid
waste authority for recycling information.
ENVIRONMENT PROTECTION
Recycle unwanted materials instead of disposing of them as waste. All tools, accessories and packaging should be sorted, taken to
a recycling centre and disposed of in a manner which is compatible with the environment. When the product becomes completely
unserviceable and requires disposal, drain any fluids (if applicable) into approved containers and dispose of the product and fluids
according to local regulations.
Note: It is our policy to continually improve products and as such we reserve the right to alter data, specifications and component parts without prior
notice.
Important: No Liability is accepted for incorrect use of this product.
Warranty: Guarantee is 12 months from purchase date, proof of which is required for any claim.
Table of contents
Other Sealey Power Tools manuals

Sealey
Sealey STW101 User manual

Sealey
Sealey VS020.V2 User manual

Sealey
Sealey VSE200.V3 User manual

Sealey
Sealey HS102.V2 User manual

Sealey
Sealey CP1202 User manual

Sealey
Sealey YK759F.V3 User manual

Sealey
Sealey CP2450 User manual

Sealey
Sealey VS704.V2 User manual

Sealey
Sealey POWER TOOLS HS100CE User manual

Sealey
Sealey PPFSG1 User manual

Sealey
Sealey AK624B User manual

Sealey
Sealey SA2003KIT User manual

Sealey
Sealey SSG8E.V3 User manual

Sealey
Sealey SA38.V2 User manual

Sealey
Sealey SA393 User manual

Sealey
Sealey YK15.V3 User manual

Sealey
Sealey SMS01 User manual

Sealey
Sealey STW701 User manual

Sealey
Sealey YK30ECF User manual

Sealey
Sealey STW704 User manual