manuals.online logo
Brands
  1. Home
  2. •
  3. Brands
  4. •
  5. Sealey
  6. •
  7. Power Tools
  8. •
  9. Sealey YK15.V3 User manual

Sealey YK15.V3 User manual

Thank you for purchasing a Sealey product. Manufactured to a high standard this product will, if used according to these instructions and
properly maintained, give you years of trouble free performance.
IMPORTANT: PLEASE READ THESE INSTRUCTIONS CAREFULLY. NOTE THE SAFE OPERATIONAL REQUIREMENTS, WARNINGS AND
CAUTIONS. USE THIS PRODUCT CORRECTLY AND WITH CARE FOR THE PURPOSE FOR WHICH IT IS INTENDED. FAILURE TO DO SO MAY
CAUSE DAMAGE OR PERSONAL INJURY, AND WILL INVALIDATE THE WARRANTY. PLEASE KEEP INSTRUCTIONS SAFE FOR FUTURE USE.
2. INTRODUCTION & SPECIFICATIONS
FLOOR Models: YK15.V3, YK15FM.V3, YK30.V3, YK30FM.V3, YK50FM.V3.
BENCH Models: YK10BM.V3, YK15BM.V3.
1. SAFETY INSTRUCTIONS
2.1 GENERAL INFORMATION
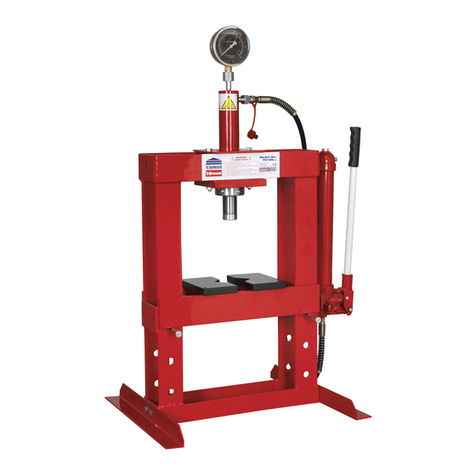
The Sealey range of heavy duty floor and bench hydraulic presses are ideal for a variety of workshop applications and are particularly suited
to agricultural or industrial use. Jobs such as straightening, bending, folding, punching, removing bolts and bearings etc are some of tasks that
may be accomplished by your press. All models are fitted with pressure gauge and work-table V-blocks except where stated. The “BM” and “FM”
range of press units feature integrally mounted rams giving more vertical clearance between the table and ram head enabling larger items
to be fitted on the working table.
 WARNING! All models are purpose designed to withstand greater loads than the hydraulic units can develop. For safety reasons, always
ensure the workpiece is secured on table and loads that flex will not suddenly “give” causing danger to operator or damage to component.
1.1 GENERAL SAFETY
Familiarise yourself with this products application and limitations, as well as the specific potential hazards peculiar to the press.
 Maintain the press in good condition (use an authorised service agent).
Replace or repair damaged parts. Use recommended parts only. Unauthorised parts may be dangerous and will invalidate the warranty.
Keep the press clean for best and safest performance.
Locate the press in an adequate working area for its function, keep area clean and tidy and free from unrelated materials, and ensure
there is adequate lighting.
Ensure the workpiece is correctly secured before operating the press.
WARNING! Always wear approved eye or face protection when operating the press.
Remove ill fitting clothing. Remove ties, watches, rings, loose jewellery and contain long hair.
Keep hands and body clear of the work table when operating the press.
 Maintain correct balance and footing. Ensure the floor is not slippery and wear non-slip shoes.
Keep children and unauthorised persons away from the working area.
 DO NOT operate the press if any parts are missing as this may cause failure and/or possible personal injury.
 DO NOT force the press to achieve a task it was not designed to perform.
 DO NOT adjust or tamper with the safety valve.
 DO NOT exceed the rated capacity of the press.
 DO NOT apply off centre loads.
 DO NOT allow the workpiece or the arbor plates to fall from the press working bench.
 DO NOT get the press wet or use in damp or wet locations or areas where there is condensation.
 DO NOT operate the press when you are tired, under the influence of alcohol, drugs or intoxicating medication.
When not in use release pressure from the pump and clean the press. Stand or store the arbors in a safe location.
WARNING! When moving the table position please observe safe handling practices.
WARNING! Always position the press against a wall. If the press is situated in the open workshop, it is essential that a guard be
placed at the rear of the unit. This will prevent injury to bystanders in the event of the work piece ejecting suddenly.
 DANGER! The press is top heavy. If it requires moving after assembly or for relocation, use suitable slings around the top crossbeam, or
lift direct with a forklift with the forks located under the top crossbeam. DO NOT use a pallet truck.
Unpack product and check contents against list below. Should there be any damaged or missing parts contact your supplier immediately.
Take care to ensure safety when removing main frame from packing as the unit is very heavy. Retain pressure gauge in carton until required,
and do not remove white tape from gauge mount or masking tape from the angle arm.
Contents:
Frame Legs x2 Worktable x1 Worktable pins x2 V-blocks x2 Pump handle x1 Pressure gauge + Adaptor x1
Gauge angle arm connector x1 Winch Handle (50ton models only).
3. ASSEMBLY & INSTALLATION
INSTRUCTIONS FOR:
HYDRAULIC BENCH & FLOOR PRESS
YK10BM.V3, YK15.V3, YK15BM.V3, YK15FM.V3, YK30.V3, YK30FM.V3, YK50FM.V3 Issue No: 1 - 02/12/08
Model: YK10BM.V3 YK15BM.V3 YK15.V3 YK15FM.V3 YK30.V3 YK30FM.V3 YK50FM.V3
Capacity 10T 15T 15T 15T 30T 30T 50T
Ram Stroke 135mm 95mm 150mm 95mm 150mm 120mm 120mm
Extension Screw n/a 75mm 75mm 75mm 75mm 75mm 75mm
Max Ht-Ram to Table 460mm 450mm 660mm 660mm 680mm 690mm 715mm
Min Ht-Ram to Table 160mm 150mm 150mm 150mm 150mm 155mm 155mm
Table Aperture 140mm 140mm 140mm 140mm 170mm 170mm 170mm
Work Table Depth 155mm 155mm 155mm 155mm 190mm 190mm 190mm
Work Table Width 500mm 500mm 500mm 500mm 550mm 550mm 550mm
Overall Height 1125mm 1050mm 1775mm 1750mm 1850mm 1915mm 1910mm
Gauge Included yes yes yes yes yes yes yes
Weight 71kg 74kg 81kg 86kg 158kg 135kg 214kg
Note: Maintenance and repair must only be carried out by qualified person. Contact your Sealey dealer for details.
5.1 Lubricate all moving parts at regular intervals.
5.2 Always keep the press clean, dry, and protected from harsh conditions.
5.3 Should you need to replace oil ensure piston is fully retracted. An excess of oil will render press inoperative. Use only appropriate
Sealey hydraulic oil. DO NOT use brake fluid. Contact your local Sealey dealer for details. Purge the system to remove any air.
5.4 Check your model parts information for spares. Repair kits are also available.
5. MAINTENANCE
Declaration of Conformity We, the sole importer into the UK, declare that the products listed below are in conformity with the following
standards and directives.
The construction files for these products are held by the Manufacturer and
may be inspected by a national authority upon request to Jack Sealey Ltd
For Jack Sealey Ltd. Sole importer into the UK of Sealey Quality Machinery
Hydraulic Press Models
YK10BM.V3, YK15.V3, YK15BM.V3,
YK15FM.V3, YK30.V3, YK30FM.V3,
YK50FM.V3.
2006/42/EC Machinery Directive
93/68/EEC CE Marking Directive
Signed by Mark Sweetman Date 2nd December 2008
 DANGER! Models are purpose designed to withstand greater loads than the hydraulic units can develop. For safety reasons,
always ensure the workpiece is secured on table and loads that flex will not suddenly “give” causing danger to operator or
damage to component. Also ensure you have read and understood chapter 1 safety instructions.
4.1 OPERATING INSTRUCTIONS.
4.1.1 Using press adjustable table support pins place the press working table at the required operating height.
WARNING! Observe ‘safe handling practices’ by using two people to position the table.
4.1.2 Check that the hydraulic unit is fully closed ready for operating.
4.1.3 Place workpiece onto the work table or the two arbors appropriately positioned. Position the head of the hydraulic unit on the centre
of the workpiece using appropriate extension. Note: Care must be taken to ensure an arbor does not fall from the press worktable.
4.1.4 DO NOT exceed the stroke indicated on the label or the red mark on the piston.
4.1.5 DO NOT apply off centre loads.
4.1.6 When work is complete release the pressure and the piston and the ram head will retract automatically.
Note: Always keep the piston, extension screw and pump piston retracted after use.
4. OPERATION
3.1 PRESS ASSEMBLY (refer to the appropriate parts diagram as a guide to assembly)
3.1.1 Identify and lay out parts. Handle the main frame with care and lay horizontally allowing the cross legs to be bolted on to the bottom
of the pre-assembled main frame. Note: Care must be taken when handling the main frame to ensure stability. DO NOT allow to fall.
3.1.2 Locate the pressure gauge inlet hole in the head of the press hydraulic system and remove the dust plug with a hex key, (this may
be very tightly secured).
Screw the gauge adaptor tightly into this hole, now screw the gauge into the adaptor, ensuring that the gauge comes to rest in an
upright position for ease of reading.
3.1.3 Securely attach the press to a flat, firm, level surface taking into account clearance for working pieces. Should you wish to mount
a bench press on a workbench or surface, ensure the bench is flat and level and is strong enough to support the press and any
workpiece during operation.
 DANGER! The press is top heavy. If it requires moving after assembly or for relocation, use suitable slings around the top
crossbeam, or lift direct with a forklift with the forks located under the top crossbeam. DO NOT use a pallet truck.
3.1.4 Once installed, screw the pump handle into the pump arm.
3.1.5 Insert the work table pins through holes in the main frame and carefully place the work table between the frame uprights, lowering it
onto the pins accordingly.
WARNING! Observe ‘safe handling practices’ by using two people to position the table.
WARNING! Take care not to allow the working table to drop onto the pins and ensure your hands and fingers are clear of the working
table when lowered.
3.1.6 Place v-blocks on work table ready for use. Take care to ensure the v-blocks do not fall from the work table.
3.1.7 Purge hydraulic system.
Before operating the press, purge the hydraulic system in order to eliminate any air that may have built up during transit. Open the
release valve and pump the handle several times. Should the system malfunction at any time, repeating this process may resolve the
problem.
IMPORTANT: NO RESPONSIBILITY IS ACCEPTED FOR INCORRECT USE OF THE MACHINE.
Hydraulic products are only repaired by local service agents. We have service/repair agents in all parts of the UK.
DO NOT RETURN PRODUCT TO US. Please telephone us on 01284 757500 to obtain the address and phone number of your local agent.
If product is under guarantee please contact your dealer.
De-commissioning Product
Should the product become completely unserviceable and require disposal, draw off the oil into an approved container and dispose
of the product and the oil according to local regulations.
NOTE: It is our policy to continually improve products and as such we reserve the right to alter data, specifications and component parts without prior notice.
IMPORTANT: No liability is accepted for incorrect use of this product.
WARRANTY: Guarantee is 12 months from purchase date, proof of which will be required for any claim.
INFORMATION: Call 01284 757525 for our catalogue & promotions. Leave your full name, address & postcode.
01284 757500
sales@sealey.co.uk
www.sealey.co.uk
01284 703534
Sole U.K. Distributor
Sealey Group
Bury St. Edmunds
Suffolk.
Web
YK10BM.V3, YK15.V3, YK15BM.V3, YK15FM.V3, YK30.V3, YK30FM.V3, YK50FM.V3 Issue No: 1 - 02/12/08
  
  
  
  
  
  
  
  
  
  
  
  
  
     
  
  
   
  
  
  
    
     
  
  
  
  
  
  
  
   
   
  
  
  
  
 
 
 
 
 
 
 
   
  
 
 

This manual suits for next models

6

Other Sealey Power Tools manuals

Sealey SA6021 User manual

Sealey

Sealey SA6021 User manual

Sealey SM2502 User manual

Sealey

Sealey SM2502 User manual

Sealey SA28.V2 User manual

Sealey

Sealey SA28.V2 User manual

Sealey HS103K User manual

Sealey

Sealey HS103K User manual

Sealey SA1005 User manual

Sealey

Sealey SA1005 User manual

Sealey YK30F.V2 User manual

Sealey

Sealey YK30F.V2 User manual

Sealey GSA634.V2 User manual

Sealey

Sealey GSA634.V2 User manual

Sealey Vs9201.v2 User manual

Sealey

Sealey Vs9201.v2 User manual

Sealey YK509F.V3 User manual

Sealey

Sealey YK509F.V3 User manual

Sealey Siegen Tools S01047 User manual

Sealey

Sealey Siegen Tools S01047 User manual

Sealey SA390 User manual

Sealey

Sealey SA390 User manual

Sealey STW806 User manual

Sealey

Sealey STW806 User manual

Sealey SA608.V2 User manual

Sealey

Sealey SA608.V2 User manual

Sealey PS982.V2 User manual

Sealey

Sealey PS982.V2 User manual

Sealey CP1812 User manual

Sealey

Sealey CP1812 User manual

Sealey SA312 User manual

Sealey

Sealey SA312 User manual

Sealey AK6290 User manual

Sealey

Sealey AK6290 User manual

Sealey SB951.V6 User manual

Sealey

Sealey SB951.V6 User manual

Sealey YK20F.V5 User manual

Sealey

Sealey YK20F.V5 User manual

Sealey SLC2 User manual

Sealey

Sealey SLC2 User manual

Sealey SB997 User manual

Sealey

Sealey SB997 User manual

Sealey CP3001.V2 User manual

Sealey

Sealey CP3001.V2 User manual

Sealey YK209F.V3 User manual

Sealey

Sealey YK209F.V3 User manual

Sealey SMS2008 User manual

Sealey

Sealey SMS2008 User manual

Popular Power Tools manuals by other brands

Hitachi CV 350V Handling instructions

Hitachi

Hitachi CV 350V Handling instructions

BURT ZQJ4116Q instruction manual

BURT

BURT ZQJ4116Q instruction manual

Edge Craft Chef'sChoice 110 instructions

Edge Craft

Edge Craft Chef'sChoice 110 instructions

Durapac HP-10 instruction manual

Durapac

Durapac HP-10 instruction manual

Westfalia 83 63 25 instruction manual

Westfalia

Westfalia 83 63 25 instruction manual

Bosch GST 700 Original instructions

Bosch

Bosch GST 700 Original instructions

Clarke 6505512 Operation & maintenance instructions

Clarke

Clarke 6505512 Operation & maintenance instructions

Hilti TE 50 manual

Hilti

Hilti TE 50 manual

Triton 2000 Series quick start guide

Triton

Triton 2000 Series quick start guide

Sturtevant Richmont SLTCR-FM 2.4GHz 3000I operating instructions

Sturtevant Richmont

Sturtevant Richmont SLTCR-FM 2.4GHz 3000I operating instructions

Weller WX smart WXMPS MS Translation of the original instructions

Weller

Weller WX smart WXMPS MS Translation of the original instructions

Bosch GST 85 P Operator's manual

Bosch

Bosch GST 85 P Operator's manual

General RIP-R-STRIPPER FCS10 Operator's manual

General

General RIP-R-STRIPPER FCS10 Operator's manual

Metabo MAG 32 operating instructions

Metabo

Metabo MAG 32 operating instructions

Galax Pro 78221 Owner's manual & safety instructions

Galax Pro

Galax Pro 78221 Owner's manual & safety instructions

Makita AN942 instruction manual

Makita

Makita AN942 instruction manual

Grizzly G0610 Parts Breakdown

Grizzly

Grizzly G0610 Parts Breakdown

Blaupunkt HG2010 Original instruction manual

Blaupunkt

Blaupunkt HG2010 Original instruction manual

manuals.online logo
manuals.online logoBrands
  • About & Mission
  • Contact us
  • Privacy Policy
  • Terms and Conditions

Copyright 2025 Manuals.Online. All Rights Reserved.