Please Follow These Installation Instructions
You will need a pencil, tape measure, drill, screw driver, pair of pliers,
and the appropriate fasteners. (see page 4)
Step 1
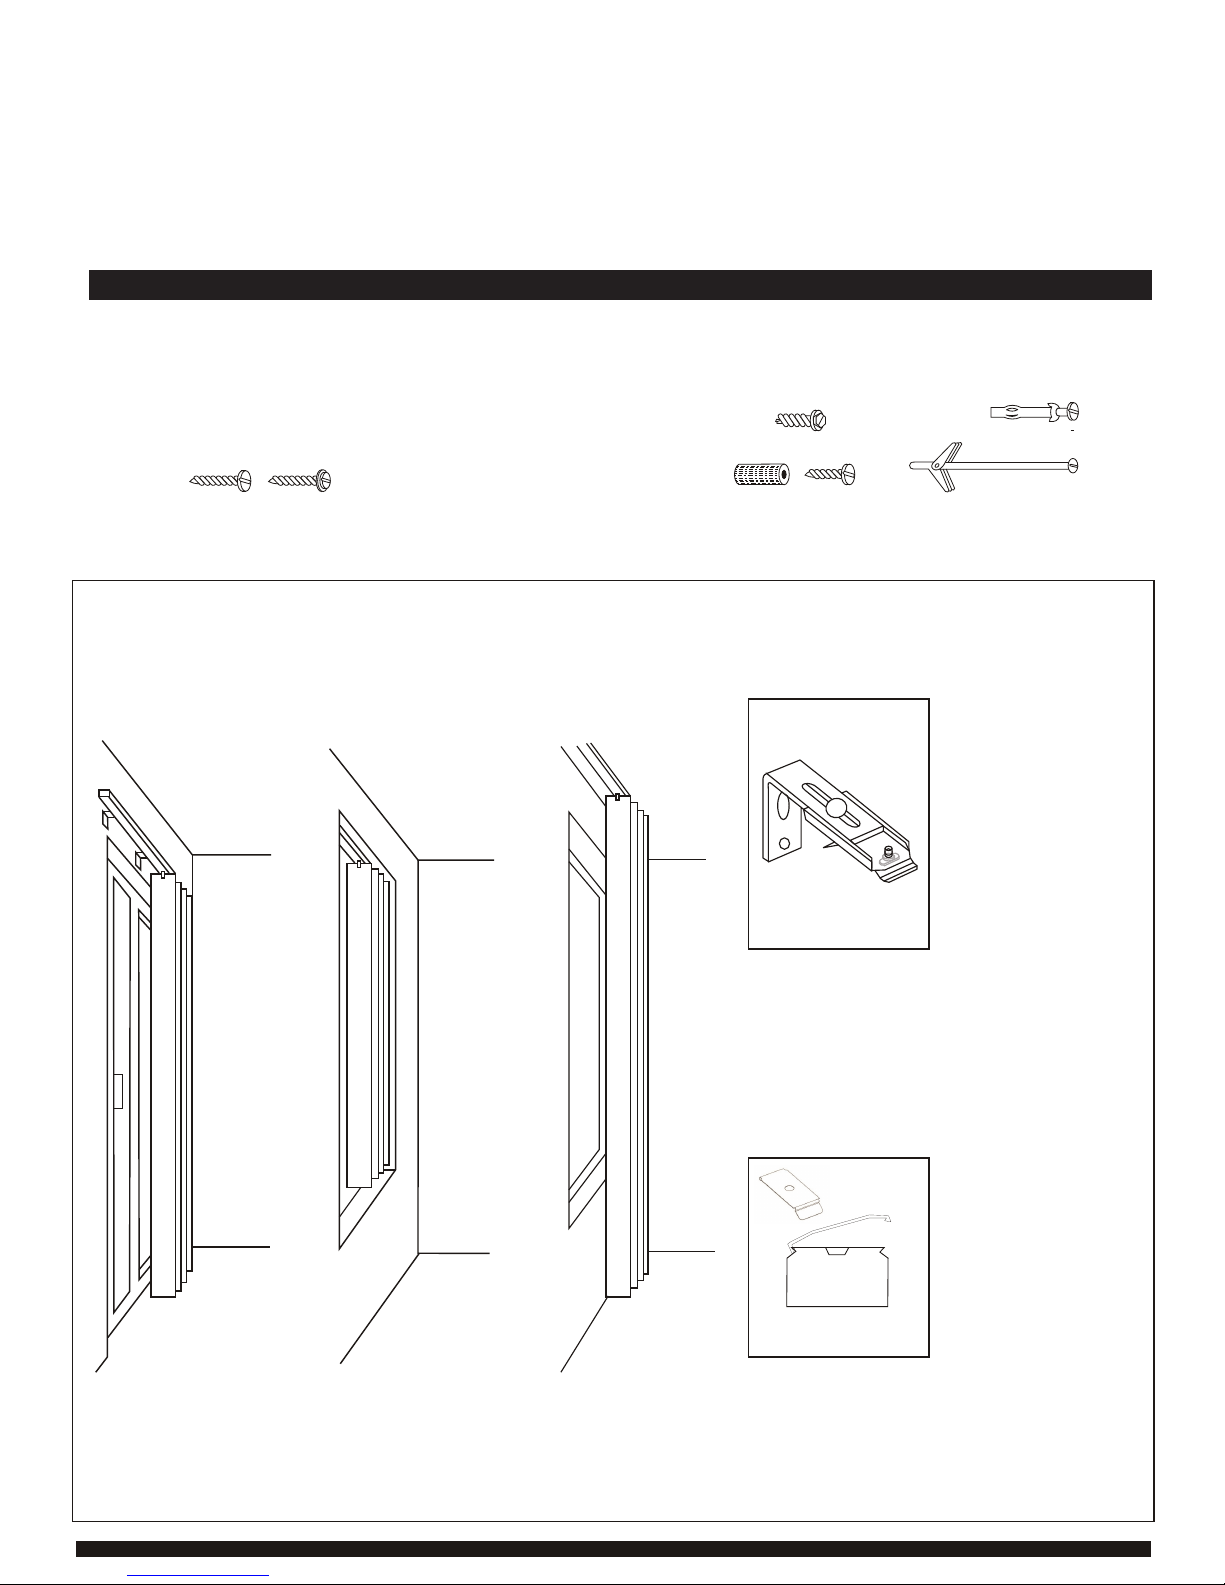
Outside Mount (gure 1)
The standard bracket
is adjustable between
1/2" and 1-1/2" wall
clearance.
Find the height for
the top of the bracket
(as measured from the
oor) by adding 1/2" to
the blind height as pro-
vided on the headrail.
When installed, louvers
will clear the oor by 1/2".
Place the rst bracket directly over the corner of the
window with a max. of 30" between brackets. Adjust
the length of the bracket so that the louvers clear all
obstructions.
Inside or Ceiling Mount
(Figure 2&3) (for valance, see inside)
Figure 1 Figure 2 Figure 3
Use clip brackets mounted
directly to ceiling or head.
The center of the clip
bracket equals the center
of the louver hook. Locate
the screw a minimum of
2-1/4" in front of the
window frame or any
projection.
Locate clip #3 from each of the track with a maxi-
mum of 30" between clips. Allow a minimum of 1/2"
clearance above sill or carpet
Please Follow These Installation Instructions
You will need a pencil, tape measure, drill, screwdriver, pliers and appropriate fasteners.
Step 2
Outside Mount(Figure 1)
Step 1 Choose the Correct Fastener
Inside or Ceiling Mount
(Figures 2 or 3)
Place the first bracket directly over the corner of
the window with a maximum space of 30” between
brackets. Adjust the bracket so louvers clear all
obstructions.
Set mounting clips with a maximum space of 30”
apart from each other. Allow a minimum of 1/2”
clearance above sill or carpet.
Standard wall brackets
are adjustable and provide
1/2” and 1 1/2” wall
clearance.
Determine the height for
the top of the bracket
(measured from the floor) by
adding 1/2” to the blind
height including the head-
rail. When installed, lou-
vers will clear the floor
by 1/2”.
Use mounting clips to
secure headrail on ceiling
or inside mounts.
The center of the mount-
ing clip aligns with the
center of the louver carrier
stem. Position the screws
a minimum of 2 1/4” in
front of the window frame
or any projection.
wall bracket
mounting clips
Packing List
If
Applicable:
1. Headrail with Bead Chain
and Cord
2. Wall Brackets
3. Mounting Clips
4. Cord Weight
5. Tension Pulley
6. PVC Louvers
7. Valance
8. Valance Returns
9. Valance Clips
10. Valance Corners
CAUTION! If you have purchased PVC louvers, store them on a at, level surface until they are installed.
2
9
6
7
4
5
1
8
3
Choose the Correct
Fastener Removing a
Louver
L ocate which side of the
carrier had the actual hook.
Insert thumb between louver
andthat side, as shown,
and pull down
the louver.
Self drilling hex head for aluminum
R awl plug and sheet metal screw for concrete
No. 8 sheet metal screws for wood and aluminum
Molly bolt for dry wall
Toggle bolt for lathe and plaster or drywall
10
Packing List
If
Applicable:
1. Headrail with Bead Chain
and Cord
2. Wall Brackets
3. Mounting Clips
4. Cord Weight
5. Tension Pulley
6. PVC Louvers
7. Valance
8. Valance Returns
9. Valance Clips
10. Valance Corners
CAUTION! If you have purchased PVC louvers, store them on a at, level surface until they are installed.
2
9
6
7
4
5
1
8
3
Choose the Correct
Fastener Removing a
Louver
Locate which side of the
carrier had the actual hook.
Insert thumb between louver
andthat side, as shown,
and pull down
the louver.
Self drilling hex head for aluminum
Rawl plug and sheet metal screw for concrete
No. 8 sheet metal screws for wood and aluminum
Molly bolt for dry wall
Toggle bolt for lathe and plaster or drywall
10
Packing List
If
Applicable:
1. Headrail with Bead Chain
and Cord
2. Wall Brackets
3. Mounting Clips
4. Cord Weight
5. Tension Pulley
6. PVC Louvers
7. Valance
8. Valance Returns
9. Valance Clips
10. Valance Corners
CAUTION! If you havepurchased PVC louvers, store them on a at, level surface until they are installed.
2
9
6
7
4
5
1
8
3
Rev. 4/04
Choose the Correct
Fastener Removing a
Louver
L ocate which side of the
carrier had the actual hook.
Insert thumb between louver
and that side, as shown,
and pull down
the louver.
Self drilling hex head for aluminum
Rawl plug and sheet metal screw for concrete
No. 8 sheet metal screws for wood and aluminum
Molly bolt for dry wall
Toggle bolt for lathe and plaster or drywall
10
Packing List
CAUTION! If you have purchased PVC louvers, store them on a at, level surface until they are installed.
2
9
6
4
5
1
8
3
Choose the Correct
Fastener Removing a
Louver
L
c
Insert thumb between louver
and that side, as shown,
and pull down
t
Self drilling hex head for aluminum
Rawl plug and sheet metal screw for concrete
No. 8 sheet metal screws for wood and aluminum
Molly bolt for dry wall
Toggle bolt for lathe and plaster or drywall
Included Fasteners Alternate Fasteners (not included)
Vertical Blinds
Installation
Instructions
Outside Mount Inside Mount Ceiling Mount
Heavy Duty Track


