Selta NETFON 100 Service manual

Administrator Guide
NETfon 100/300/500 SIP

Seltatel® è un marchio registrato di Selta SpA
Seltatel® is a registered trademark of Selta SpA
Selta S.p.A.
Via Emilia, 231
Selta S.p.A
Via Nazionale, km 404,500
Selta Espana, S.A.
C/ Puerto Guadarrama, 50
29010 Cadeo (PC) 64018 Tortoreto (TE) Pol.Ind. Las Nieves
Tel. +39 052350161 Tel. +39 0861772511 28935 Mostoles (Madrid)
fax +39 05235016333 fax +39 0861772555 Tel. +34 916160825
web site: www.selta.es
SELTA RESERVES THE RIGHT TO MODIFY THE CONTENTS OF THIS
MANUAL WITHOUT NOTICE AND DECLINES ALL RESPONSIBILITY FOR
ANY ERROR OR OMISSION WITHIN
code 723142009-A0-GB ed.1.0
April 2010

Index
NETfon SIP - Administrator Guide 723142009-A0-GB
I
ENGLISH NETfon 100/300/500 SIP
Administrator Guide
1. Preface ................................................................................................................................................................................................................... 1
2. Installation ......................................................................................................................................................................................................... 2
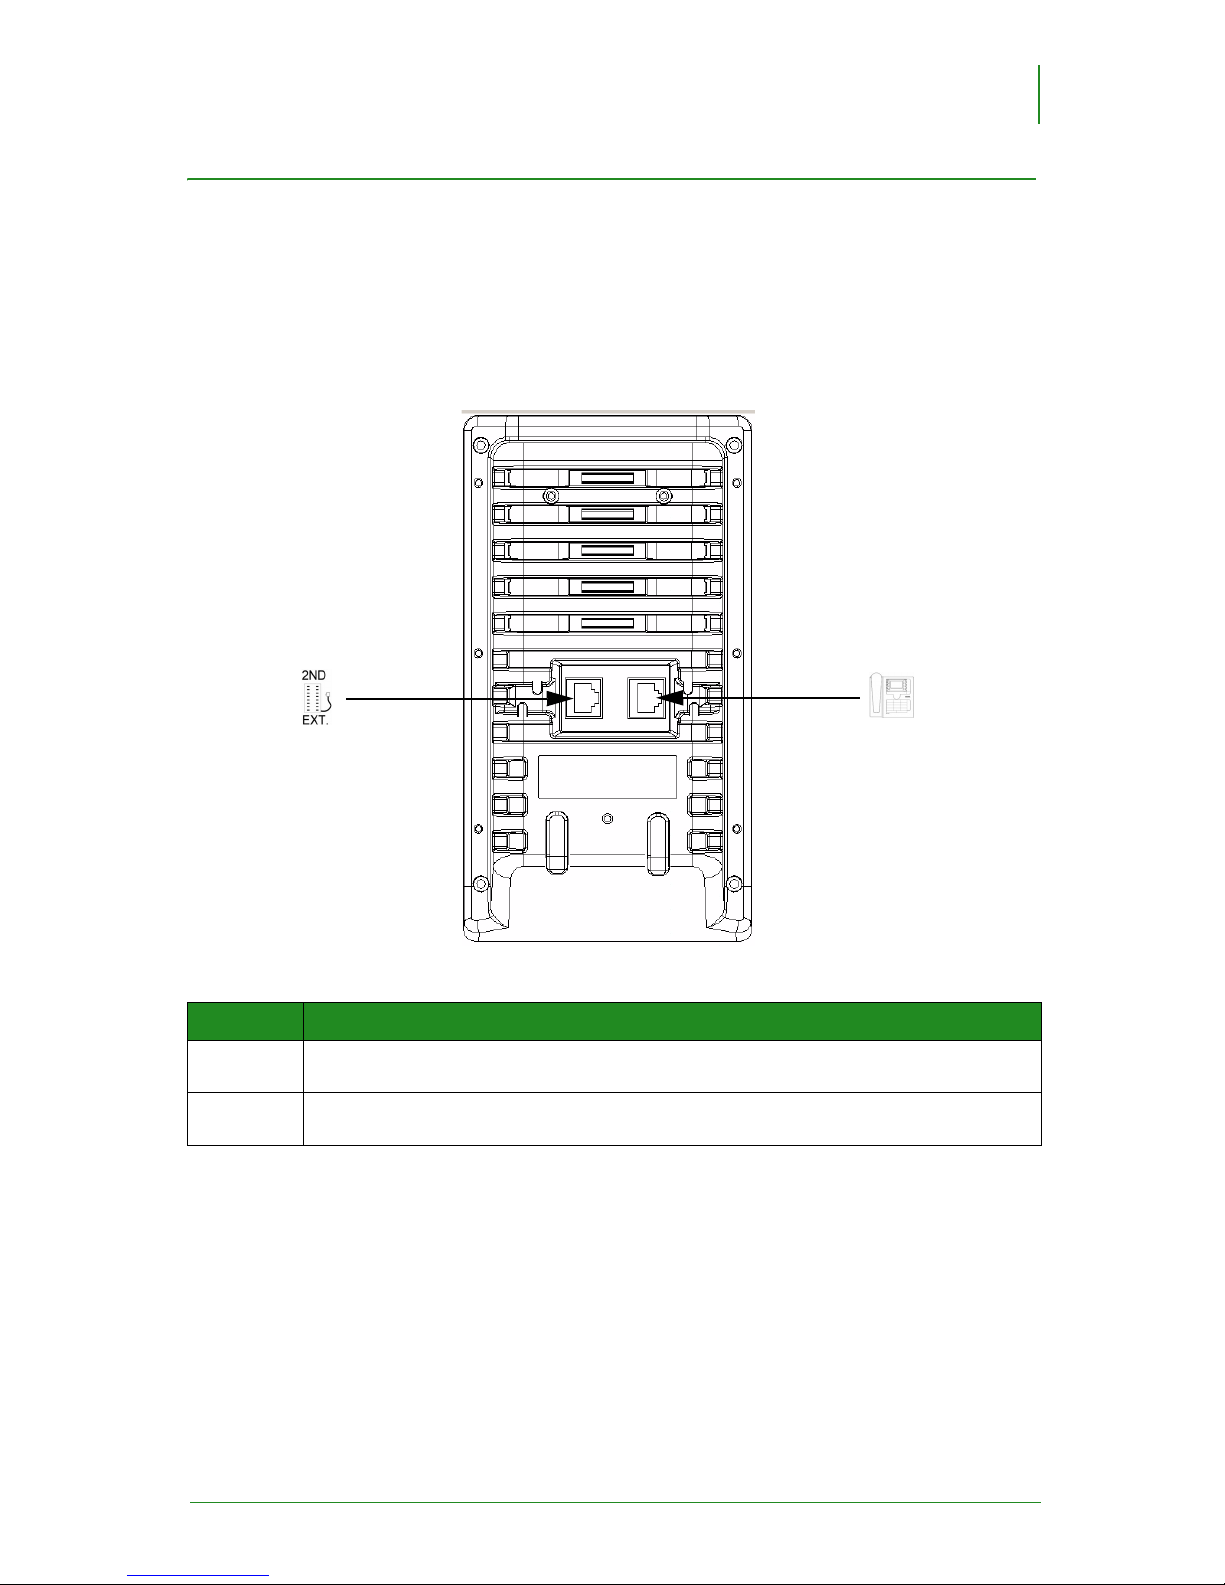
2.1. Connecting the phone .......................................................................................................................................... 2
2.2. Connecting the DSS module ................................................................................................................................ 3
3. Basic network settings................................................................................................................................................................................ 4
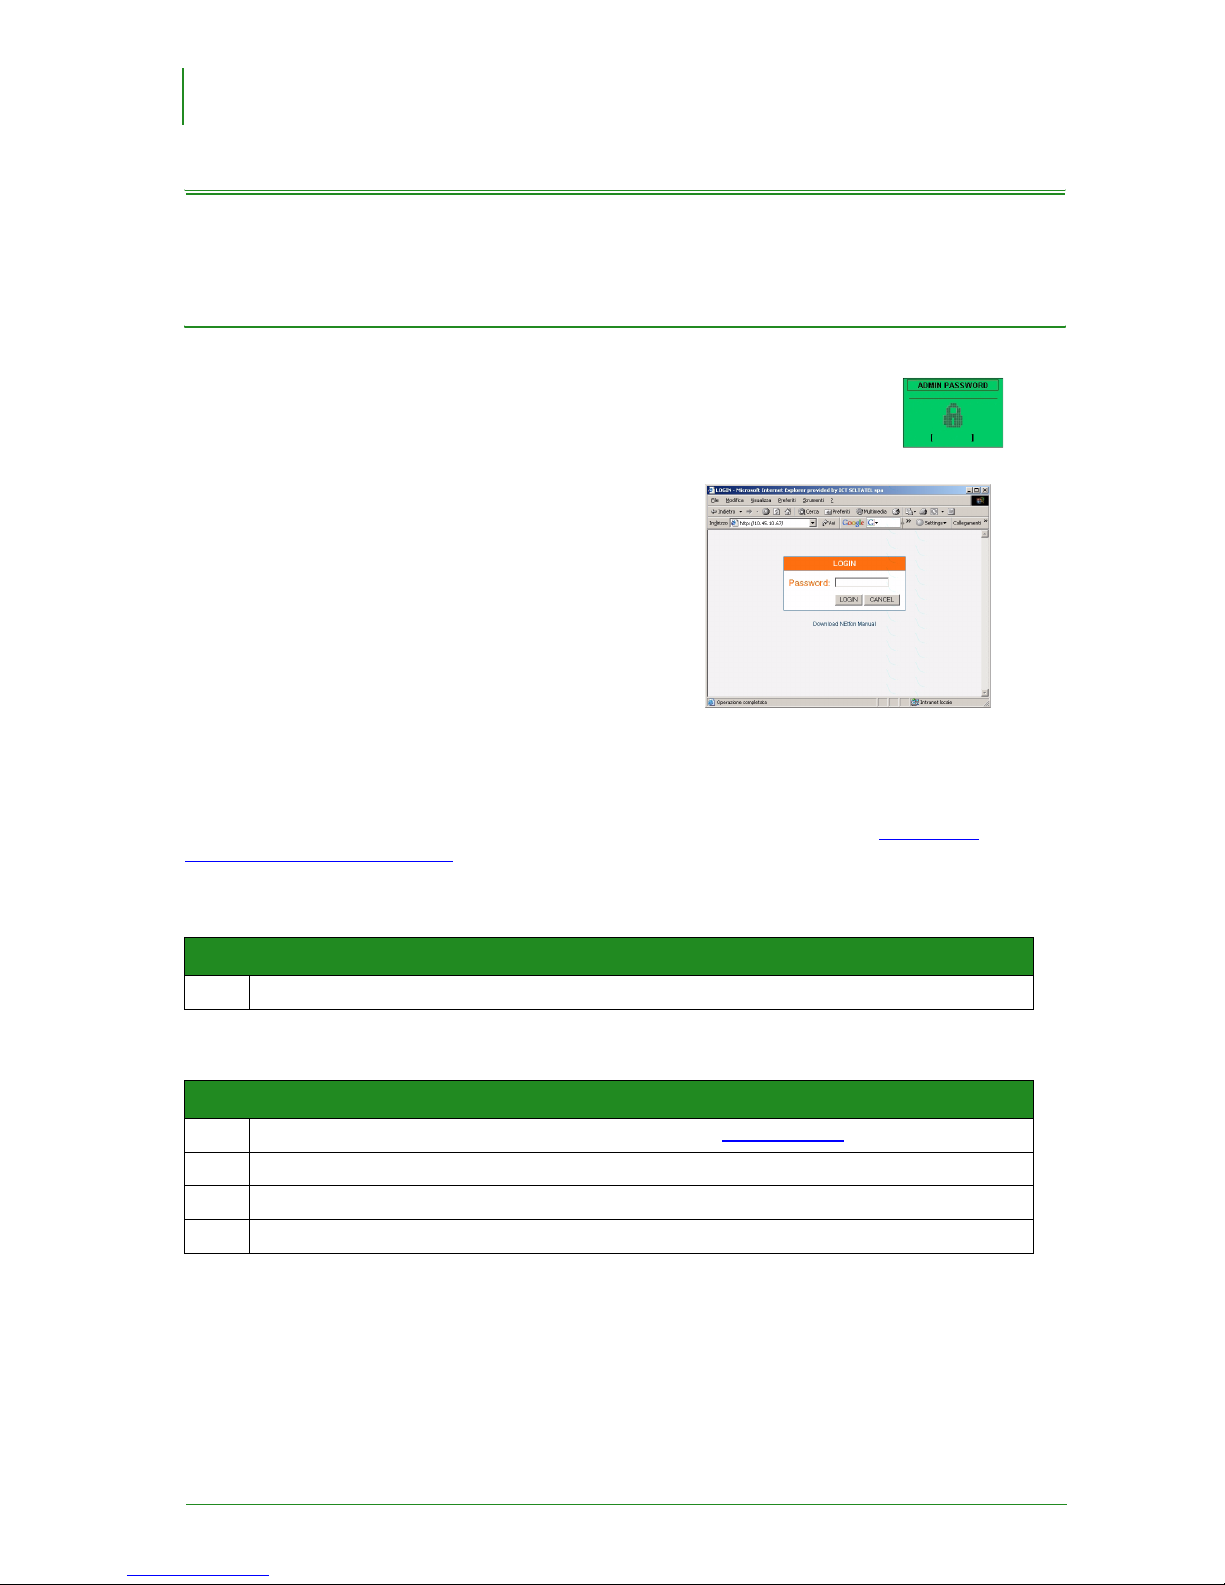
3.1. Administrator’s password setting.......................................................................................................................... 4
3.2. DHCP ................................................................................................................................................................... 5
3.2.1. Enable/disable DHCP ............................................................................................................................ 5
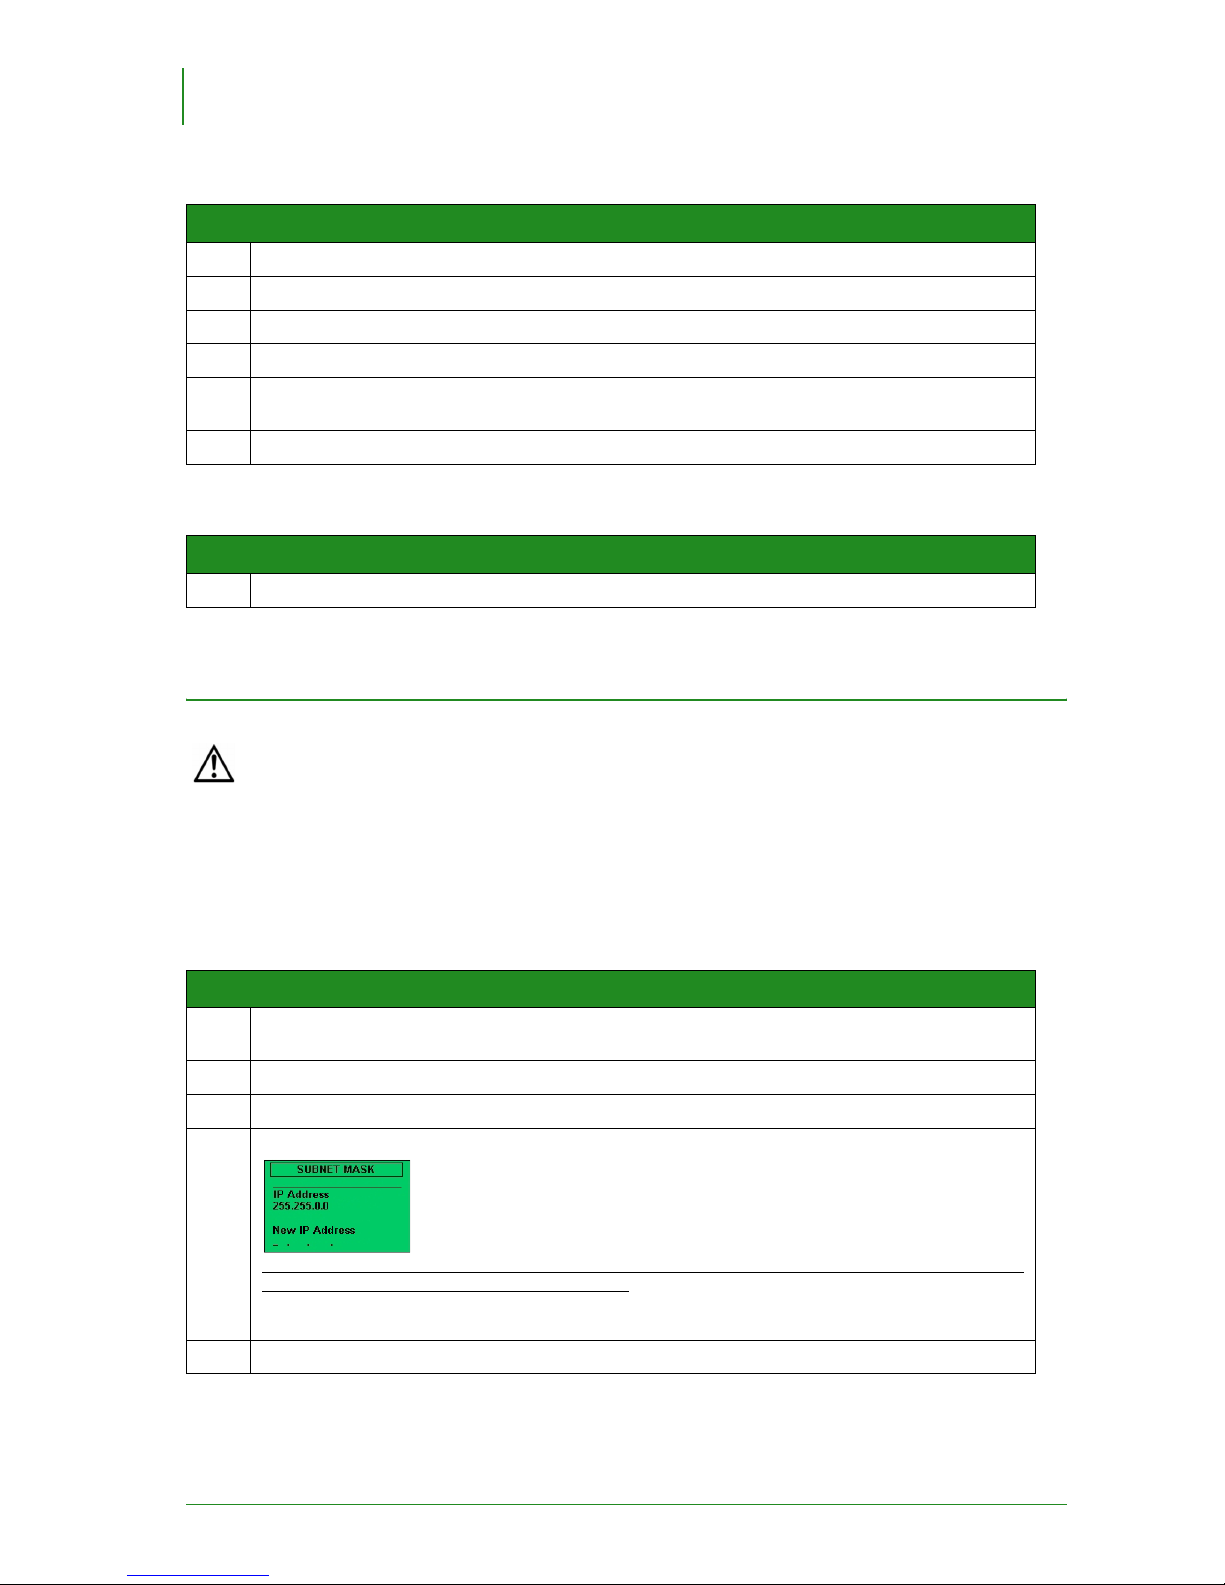
3.2.2. IP settings .............................................................................................................................................. 6
4. Basic SIP settings ........................................................................................................................................................................................... 9
4.1. Account settings ................................................................................................................................................... 9
5. Firmware upgrade ......................................................................................................................................................................................... 11
5.1. Automatic upgrade ............................................................................................................................................. 11
5.2. Manual upgrade ................................................................................................................................................. 12
6. Understanding startup process and configuration ................................................................................................................... 13
6.1. Configuration ...................................................................................................................................................... 13
6.2. Centralized administrator’s password setting..................................................................................................... 14
7. Advanced settings......................................................................................................................................................................................... 15
8. Appendix A - Parameters list of phone’s local menu................................................................................................................... 17
8.1. <SETTINGS> menu ........................................................................................................................................... 17
8.2. <SIP SETTINGS> menu .................................................................................................................................... 18
9. Appendix B - Parameters list of embedded WEB server........................................................................................................... 19
9.1. General (Address Book Settings)....................................................................................................................... 19
9.1.1. Settings ................................................................................................................................................ 20
9.1.2. Saving local telephone book ................................................................................................................ 21
9.2. SIP Parameter WEB pages................................................................................................................................ 22
9.2.1. Parameter ............................................................................................................................................ 22
9.2.2. Codec Priority ...................................................................................................................................... 23
9.2.3. Codec Disabled.................................................................................................................................... 23
9.2.4. Parameters Updates ............................................................................................................................ 24
10. Appendix C - Parameters list of configuration file.................................................................................................................... 25
10.1. Description of functions .................................................................................................................................... 33
10.2. Login/Logout configuration (User mobility)....................................................................................................... 35
10.3. Call Recording configuration ............................................................................................................................ 36
11. Appendix D - Sample of configuration file...................................................................................................................................... 37
12. Appendix E - Advanced network settings........................................................................................................................................ 41
12.1. Virtual LAN ....................................................................................................................................................... 41
12.1.1. Basic settings..................................................................................................................................... 41
12.1.2. Advanced settings.............................................................................................................................. 42
12.1.3. A practical example to configure VLAN encapsulation ...................................................................... 45
12.2. Quality of Service (DSCP parameter) .............................................................................................................. 46
12.3. Network Time Protocol (NTP) .......................................................................................................................... 48
12.4. Advanced firmware upgrade ............................................................................................................................ 48

Index
NETfon SIP - Administrator Guide 723142009-A0-GB
II

Preface
NETfon SIP - Administrator Guide 723142009-A0-GB
1
ENGLISH NETfon 100/300/500 SIP
Administrator Guide
1. Preface
This guide provides information about configuration and maintenance of Multifunction IP NETfon 100,
NETfon 300 and NETfon 500 on a SIP standard protocol network.
Any programming differences due to the different models of phones, will be highlighted where required.
Because of its high technical content, this guide is dedicated specifically to network and system
administrators whose competence is to manage NETfon phones on a SIP standard protocol network.
Any other information concerning the use of such devices by users and any operation to handle the
features offered, is treated in the following documents, published by SELTA spa:
• NETfon 100 SIP - User Guide code 723142005-A0-LM
• NETfon 300 SIP - User Guide code 723142006-A0-LM
• NETfon 500 SIP - User Guide code 723142007-A0-LM
To properly configuring NETfon phone, following the logical sequence of operations described in this
guide is recommended, starting from installation and then moving on configuration and firmware
upgrade.
The administrator can use three ways to configure the phone:
• from local menu (some menu items under administrator’s password)
• from embedded web server (all pages under administrator’s password)
• from configuration file located on TFTP server.
WARNING!
The functionality of the services described in this guide is dependent on SIP communication system
where NETfon 100/300/500 SIP are connected to, so there is no guarantee that all services can work
properly on all SIP communication systems.

Installation
NETfon SIP - Administrator Guide 723142009-A0-GB
2
2. Installation
2.1. Connecting the phone
To correcly connect the phone, see the image below and the description of connectors.
No. Description
1 LAN connector
Connect a termination of the network cable to the Ethernet interface of the telephone and the other termination to the
LAN network box.
2 PC Connector (through LAN)
The NETfon telephone shares the access to the network with a PC. The telephone must be directly connected to the
network, while the PC must be connected to the Ethernet interface of the telephone.
Connect a termination of the network cable to the Ethernet interface of the telephone and the other termination in the
network port of the PC.
3 External power supply connector (optional)
If the Ethernet switch doesn’t supply power, the telephone must be connected to the main power by an external power
supply (output 6Vdc-1A).
Connect the power supply exit to the special jack on the back of the telephone and the plug to a 230V a.c. 50Hz socket.
4 Handset cable connector
Connect the termination of the spiral connecting cable with longer flat cable, to the appropriate connector on the back of
the telephone and the other termination with shorter flat cable to the handset.
5 Headset cable connector (NETfon 300/500 only)
Connect the cable of the headset to the appropriate connector on the back of the telephone.
Correct use is guaranteed with the headset: code 136800008.
12345

Installation
NETfon SIP - Administrator Guide 723142009-A0-GB
3
2.2. Connecting the DSS module
The DSS module provides 24 programmable buttons (besides the ones already present in the base
phone) that when pressed, depending on configuration, the features for which they are set up, start.
To correcly connect the DSS module, see the image below and the connectors’ description.
The maximum number of optional DSS modules is 2 (48 programmable buttons in total).
No. Description
1 DSS expansion module connector
Connect the DSS module to another one (max two expansion modules each NETfon).
2 Telephone connector
Connect the DSS module to the NETfon.
12

Basic network settings
NETfon SIP - Administrator Guide 723142009-A0-GB
4
3. Basic network settings
This paragraph explains the basic configuration of a NETfon installed on a IP network.
3.1. Administrator’s password setting
The administrator’s password allows the access to:
• some locked menu item of phone, the screen displays the following image ;
• embedded web server pages, see the home page: .
This paragraph gives information about procedure of administrator’s password setting.
Alternatively, you can also customize administrator’s password in one operation, simultaneously valid for
all telephones equipment involved in the procedure. The procedure is described in “Centralized
administrator’s password setting” paragraph. Two customizations to meet the different needs of users, the
administrator will decide to apply the procedure that best meets their needs.
Sequence of operations from the phone menu
NOT APPLICABLE
Sequence of operations from WEB pages
1 Perform a login to embedded WEB server from browser, entering the IP Netfon Address
2 Enter the administrator’s password (default “1234”) and click LOGIN button
3 Click on the link <System>
4 Click on the link <Admin settings>

Basic network settings
NETfon SIP - Administrator Guide 723142009-A0-GB
5
3.2. DHCP
The default setting of NETfon has the DHCP enabled, then just connect the phone to the network and
wait for it to run configuration of the network settings listed below, automatically:
• Subnet Mask
• Gateway IP Address
• NETfon IP Address
• TFTP Server Address(*)
(*) In order to automatically assign the IP address of the TFTP server, the DHCP server must support
Option 66, otherwise, the administrator must manually provide to the configuration.
Consult the paragraph <SETTINGS> menu for description of the network settings listed above.
3.2.1. Enable/disable DHCP
5 Enter the current password, the new password (max 4 digits) and retype new password.
6 To send the customization, click on Apply button.
7 To exit the WEB Server, click on Logout button
Sequence of operations from configuration file
See “Appendix C - Parameters list of configuration file” -> “ table “General Options”,
parameter: --password-admin
Sequence of operations from the phone menu
1 Press menu/enter button to enter the programming local menu, scroll the menu up to SETTINGS and press menu/
enter button to confirm
2 Scroll the menu items up to DHCP and press menu/enter button to confirm
3 Enter the administrator’s password (default “1234”) and press menu/enter button to confirm
4 Select “YES” to enable or “NO” to disable and press menu/enter button to confirm
5 To exit the menu press the button dedicated
6 <Save the changes?> press menu/enter button to confirm or cancel the changes by pressing the button dedicated
to exit the menu.
The change causes the restart of the phone

Basic network settings
NETfon SIP - Administrator Guide 723142009-A0-GB
6
3.2.2. IP settings
WARNING!
If DHCP is disabled, the administrator must manually provide to the configuration of the following data as
explained below:
• Subnet Mask
• Gateway IP Address
• NETfon IP Address
• TFTP Server Address
Sequence of operations from WEB pages
1 Perform a login to embedded WEB server from browser, entering the IP address of the phone
2 Enter the administrator’s password (default “1234”) and click LOGIN button
3 Click on the link <Advanced setup>
4 Click on the link <WAN> and enable/disable the radio button “Dinamic IP Address”
5 To send the customization, click on Apply button.
The change causes the restart of the phone
6 To exit the WEB Server, click on Logout button.
Sequence of operations from configuration file
NOT APPLICABLE
Sequence of operations from the phone menu
1 Press menu/enter button to enter the programming local menu, scroll the menu up to SETTINGS and press menu/
enter button to confirm
2 Scroll the menu items up to SUBNET MASK and press menu/enter button to confirm
3 Enter the administrator’s password (default “1234”) and press menu/enter button to confirm
4 Enter new IP address. The screen displays the following data:
Pay attention! The cursor is positioned at the start of New Value and if you press menu/enter now, you will confirm
the empty value; in this case treat it as any other value.
To switch from the first block of numbers to second and so on until the fourth, press menu / enter and then return to
the Settings menu.
5 Scroll the menu items up to GATEWAY IP ADDRESS and press menu/enter button to confirm

Basic network settings
NETfon SIP - Administrator Guide 723142009-A0-GB
7
6 Enter new IP address. The screen displays the following data:
Pay attention! The cursor is positioned at the start of New Value and if you press menu/enter now, you will confirm
the empty value; in this case treat it as any other value.
To switch from the first block of numbers to second and so on until the fourth, press menu / enter and then return to
the Settings menu.
7 Scroll the menu items up to NETFON IP ADDRESS and press menu/enter button to confirm
8 Enter new IP address. The screen displays the following data:
Pay attention! The cursor is positioned at the start of New Value and if you press menu/enter now, you will confirm
the empty value; in this case treat it as any other value.
To switch from the first block of numbers to second and so on until the fourth, press menu / enter and then return to
the Settings menu.
9 Scroll the menu items up to TFTP SERVER ADDRESS and press menu/enter button to confirm
10 Enter new IP address. The screen displays the following data:
Pay attention! The cursor is positioned at the start of New Value and if you press menu/enter now, you will confirm
the empty value; in this case treat it as any other value.
To switch from the first block of numbers to second and so on until the fourth, press menu / enter and then return to
the Settings menu.
11 To exit the menu press the button dedicated
12 <Save the changes?> press menu/enter button to confirm or cancel the changes by pressing the button dedicated
to exit the menu
The change causes the restart of the phone
Sequence of operations from WEB pages
1 Perform a login to embedded WEB server from browser, entering the IP address of the phone
2 Enter the administrator’s password (default “1234”) and click LOGIN button
3 Click on the link <Advanced setup>
4 Click on the link <WAN>
5 Click on the link <IP SETTINGS>

Basic network settings
NETfon SIP - Administrator Guide 723142009-A0-GB
8
6 Enter the static IP address of NETfon, the Subnet Mask IP address and the Gateway IP address in the opened
web page.
WARNING! The TFTP SERVER address cannot be set from WEB server, only from telephone’s local menu (see TFTP server
Address parameter).
7 To send the customization, click on Apply button.
The change causes the restart of the phone
8 To exit the WEB Server, click on Logout button
Sequence of operations from configuration file
NOT APPLICABLE

Basic SIP settings
NETfon SIP - Administrator Guide 723142009-A0-GB
9
4. Basic SIP settings
Now you have to register the accounts on REGISTAR SERVER and the configuration of each account
provides the setting of the following parameters (consult the paragraph <SIP SETTINGS> menu ).
WARNING!
It is possible to configure 2 accounts from telephone’s local menu, 2 accounts from embedded web
server, 8 accounts from configuration file located on TFTP server.
4.1. Account settings
Sequence of operations from the phone menu
1 Press menu/enter button to enter the programming local menu, scroll the menu up to SETTINGS SIP and press
menu/enter button to confirm
2 Enter the administrator’s password (default “1234”) and press menu/enter button to confirm
3 Scroll the menu items up to ACCOUNTS and press menu/enter button to confirm
4 Select Account1/Account 2 and press menu/enter button to confirm. Repeat from step 4 to step 10 to configure
each user account.
5 Scroll the menu items up to SIP SERVER and press menu/enter button to confirm
6 Enter new IP address of SIP Server. The screen displays the following data:
Pay attention! The cursor is positioned at the start of New Value and if you press menu/enter now, you will confirm
the empty value; in this case treat it as any other value.
To switch from the first block of numbers to second and so on until the fourth, press menu / enter and then return to
previous menu.
7 Scroll the menu items up to USERNAME and press menu/enter button to confirm
8 Enter the username (max 6 digits) registered on SIP Proxy. The screen displays the following data:
Pay attention! The cursor is positioned at the start of New Value and if you press menu/enter now, you will confirm
the empty value; in this case treat it as any other value.
Press menu / enter and return to previous menu
9 Scroll the menu items up to PASSWORD and press menu/enter button to confirm
10 Enter the password (max 6 digits) registered on SIP Proxy (default = equal to username). The screen displays the
following data:
Pay attention! The cursor is positioned at the start of New Value and if you press menu/enter now, you will confirm
the empty value; in this case treat it as any other value.
Press menu / enter and return to previous menu
11 To exit the menu press the button dedicated

Basic SIP settings
NETfon SIP - Administrator Guide 723142009-A0-GB
10
12 <Save the changes?> press menu/enter button to confirm or cancel the changes by pressing the button dedicated
to exit the menu
NETFON SCREEN
If the registration was made properly, the screen displays the following data (among others):
If the registration has failed, the screen displays the following data (among others):
Sequence of operations from WEB pages
1 Perform a login to embedded WEB server from browser, entering the IP address of the phone
2 Enter the administrator’s password (default “1234”) and click LOGIN button
3 Select the link <Advanced setup>
4 Select the link <Accounts>
5 Select the link <Account 1> / <Account 2>
6 Enter the IP address of SIP Server, the Username (max 6 digits) registered on SIP Proxy and the Password (max
6 digits) registered on SIP Proxy (default = equal to username)
7 To send the customization, click on Apply button.
8 To exit the WEB Server, click on Logout button.
Sequence of operations from configuration file
See “Appendix C - Parameters list of configuration file” -> “ table “SIP Account Options”
R+ = ALL ACCOUNT REGISTERED
102 = USERNAME
R- = AT LEAST ONE ACCOUNT NOT REGISTERED
102 = USERNAME
R upside down = NONE ACCOUNT REGISTERED

Firmware upgrade
NETfon SIP - Administrator Guide 723142009-A0-GB
11
5. Firmware upgrade
The phone uses the TFTP server to download the firmware files from IP Address configured in TFTP
server Address local parameter.
The firmware upgrade can be performed automatically (at a specific time, once a day) or manually;
both methods are explained in the following tables.
WARNING!
The procedure described below doesn’t cause loss of the telephone configuration.
5.1. Automatic upgrade
Sequence of operations from the phone menu
NOT APPLICABLE
Sequence of operations from WEB pages
NOT APPLICABLE
Sequence of operations from configuration file
1 It is possible to upgrade only the Firmware sotfware component, automatically.
Configuring --ora-controllo-sw parameter of configuration file, every day, at the time specified (00...23 plus a
random offset from 0 to 45 minutes), the phone automatically will verify the presence of VersNETfonSIP file on
TFTP server.
VersNETfonSIP file must contain the firmware version, present on TFTP server, of each model of telephone, for
example:
#<< NETfonSIP100
ver_100="X.YZ"
#>> NETfonSIP100
#<< NETfonSIP300
ver_300="X.YZ"
#>> NETfonSIP300
#<< NETfonSIP500
ver_500="X.YZ"
#>> NETfonSIP500
If the firmware version is different from the one running on the phone, the upgrade procedure (download and
upgrade) starts immediatelly.

Firmware upgrade
NETfon SIP - Administrator Guide 723142009-A0-GB
12
5.2. Manual upgrade
Sequence of operations from the phone menu
1 Press menu/enter button to enter the programming local menu, scroll the menu up to SETTINGS and press menu/
enter button to confirm
2 Scroll the menu items up to Software Loading and press menu/enter button to confirm
3 Enter the administrator’s password (default “1234”) and press menu/enter button to confirm
4 Select “Firmware” from TFTP server and press menu/enter button to confirm.
5 The process will take several minutes.
The upgrade causes the restart of the phone.
Sequence of operations from WEB pages
1 Perform a login to embedded WEB server from browser, entering the IP Netfon Address
2 Enter the administrator’s password (default “1234”) and click LOGIN button
3 Click on the link <System>
4 Click on the link <Firmware upgrade>
5 Select the Firmware component from “Update method” and the default filename of the component will be suggested
in “Update filename”, the IP address of configured TFTP Server appears in “Update Server”.
6 To send the file, click on Apply button.
7 The process will take several minutes.
The upgrade causes the restart of the phone.
8 To exit the WEB Server, click on Logout button.
Sequence of operations from configuration file
NOT APPLICABLE

Understanding startup process and configuration
NETfon SIP - Administrator Guide 723142009-A0-GB
13
6. Understanding startup process and configuration
When you first supply power to the phone, the firmware executes a series of operations.
The startup process of the SIP phone is described in the following table.
6.1. Configuration
NETfon is provided with two methods of provisioning:
•LOCAL CONFIGURATION (without TFTP server): configuration is stored locally on the
phone, it can be changed from the phone’s local menu (see Appendix A - Parameters list of
phone’s local menu) or embedded web pages (see Appendix B - Parameters list of
embedded WEB server) and can be imported and exported (see Parameters Updates).
•CENTRALIZED CONFIGURATION (with TFTP server): configuration is stored on the
TFTP server. The file (<first account number>.cfg file, e.g. 1191.cfg) can be changed by
opening, modifing with a text editor and saving it and then restarting the phone. The local
configuration will be used just if file is not available or TFTP server cannot be reached.
Using “SIP SETTINGS-> Save config.” of phone’s local menu, it is possible to save file
settings in local configuration. Every change from local menu or embedded web interface
will be applied to local configuration.
Step Description
1 The firmware of the phone applies the VLAN settings
2 The firmware of the phone applies the network settings
3 • If DHCP is ON (default), the discovery of DHCP server(*) begins and automatically
ip address, subnet mask, gateway and tftp server are configured;
• if DHCP is OFF, the firmware uses the local configuration.
(*) In order to automatically assign the IP address of the TFTP server, the DHCP
server must support Option 66, otherwise, the administrator must manually provide to
the configuration.
4 SIP application starts reading the local configuration values stored in the file system,
within a file.
5 SIP application reads (from local configuration) its first account number and use it to
find a match with a filename on TFTP server (<first account number>.cfg file)
6 • If TFTP server can be reached and the <first account number>.cfg file is present, the
phone downloads it and the SIP application starts by using it (remote file) in place of
the local configuration file;
• If TFTP server cannot be reached or the <first account number>.cfg file is not
present, the SIP application starts by using the local configuration file.

Understanding startup process and configuration
NETfon SIP - Administrator Guide 723142009-A0-GB
14
6.2. Centralized administrator’s password setting
This feature allows to set an administrator password on the SIP server using a special SIP account. This
feature is only available by using the configuration files, with centralized configuration method.
Every time the change of administrator’s password will be required, you just have to change, from SIP
server, the password of the account that has been created only for this purpose.
Step Description
1 On SIP server, add an account that will be used to set the administrator’s password of
all telephones simultaneously and also to verify it.
2Provide<first account number>.cfg configuration files with an account (for CHECK
PASSWORD ADMIN) without “--password” parameter.
See below an extract of configuration file where an example of account for CHECK
PASSWORD ADMIN is pointed out.
With this configuration, each time you enter the administrator’s password, the phone
password entered.
.
.
#
# Account for CHECK PASSWORD ADMIN
#
--id sip:[email protected]
--registrar sip:26.2.213.84
--reg-timeout 60
--realm *
--username 247900
.
.

Advanced settings
NETfon SIP - Administrator Guide 723142009-A0-GB
15
7. Advanced settings
Previuos chapters of this guide provide the instructions for basic Network and SIP settings of your
NETfon.
Complete and advanced options are described in the next appendix sessions, in detail they dial with:
•Appendix A - Parameters list of phone’s local menu = provides a complete description of
settings, available from local programming menu
•Appendix B - Parameters list of embedded WEB server = provides a complete description of
option settings, available from embedded WEB server
•Appendix C - Parameters list of configuration file = provides a complete description of option
settings, available from remote configuration file
•Appendix E - Advanced network settings = provides a complete description of advanced
network settings, available from embedded WEB server
The following table summarizes advanced settings and features provided by NETfon and indicates
which support to use (local menu, web pages or remote configuration file) to configure them.
The operations to realize such settings and features are described in the next appendix sessions.
Settings/Features Configuration from
phone’s local menu
See “Appendix A”
Configuration from
WEB pages
See “Appendix B” and
“Appendix E”
Configuration from
configuration file
See “Appendix C”
Account 1-2 xxx
Codec xxx
Call waiting xxx
Vlan base xx
Vlan advanced x
Account 3...8 x
Conference x
DND (Do Not Disturb) x
Redial x
Mute x
BLF (Busy Lamp Field) x
Queue x
Park x
Sequence x
User mobility (Login/Logout) x
Call Recording x
Call Pick-up x
Other advanced settings x

Advanced settings
NETfon SIP - Administrator Guide 723142009-A0-GB
16
Other manuals for NETFON 100
2
This manual suits for next models
2
Table of contents
Other Selta IP Phone manuals

Selta
Selta Zenyth 650 User manual

Selta
Selta NETFON 100 SIP User manual

Selta
Selta NETfon 500 SIP User manual

Selta
Selta NETFON 100 User manual

Selta
Selta NETFON 330 SIP User manual

Selta
Selta SAEfon User manual

Selta
Selta NETFON 100 User manual

Selta
Selta NETfon 330 User manual

Selta
Selta Netfon 350 User manual

Selta
Selta NETFON 130 SIP User manual