Siamp Monaco INTRA User manual

RÉSERVOIR POUR MEUBLE OU À ENCASTRER
CISTERN FOR FURNITURE AND BACK TO WALL
INTRA
NOTICE DE MONTAGE / ASSEMBLY INSTRUCTION
Pour cuvette suspendue
Wall hung pan model
Pour cuvette posée au sol
Ground xed pan model
2
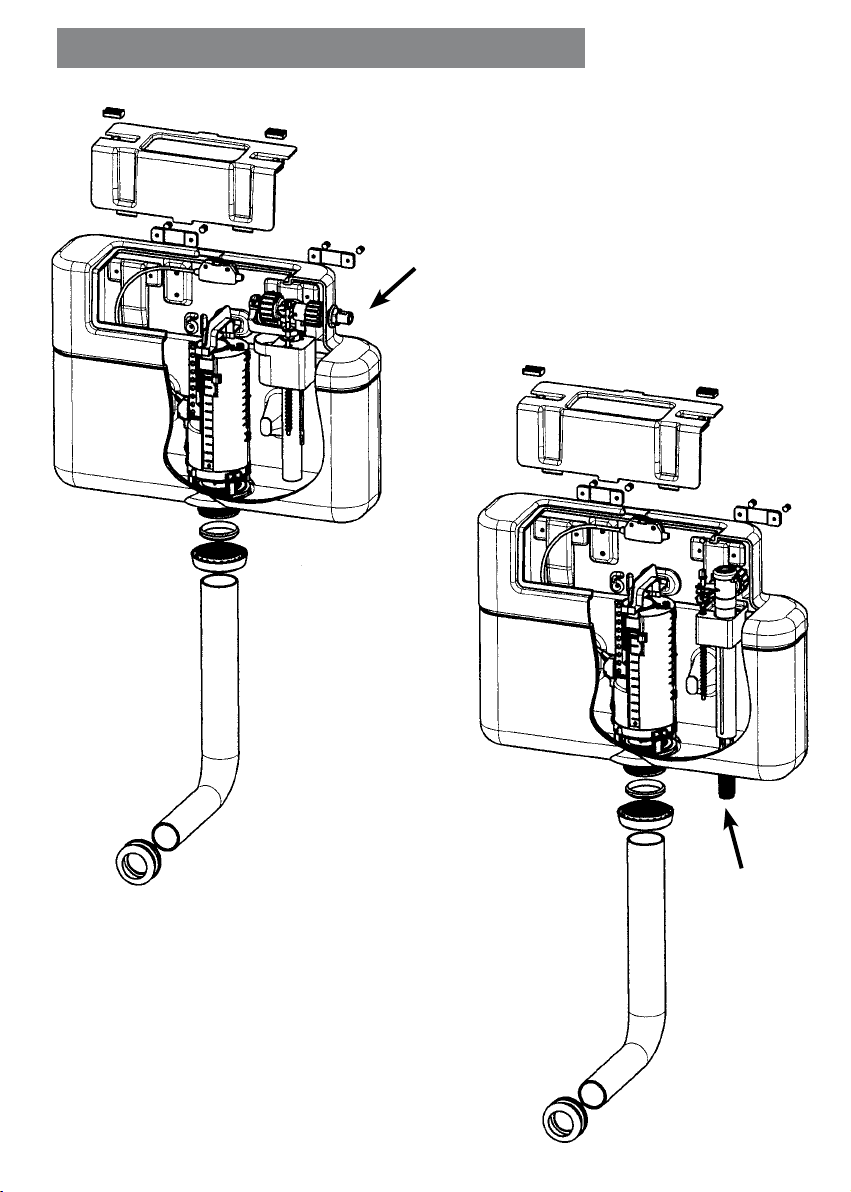
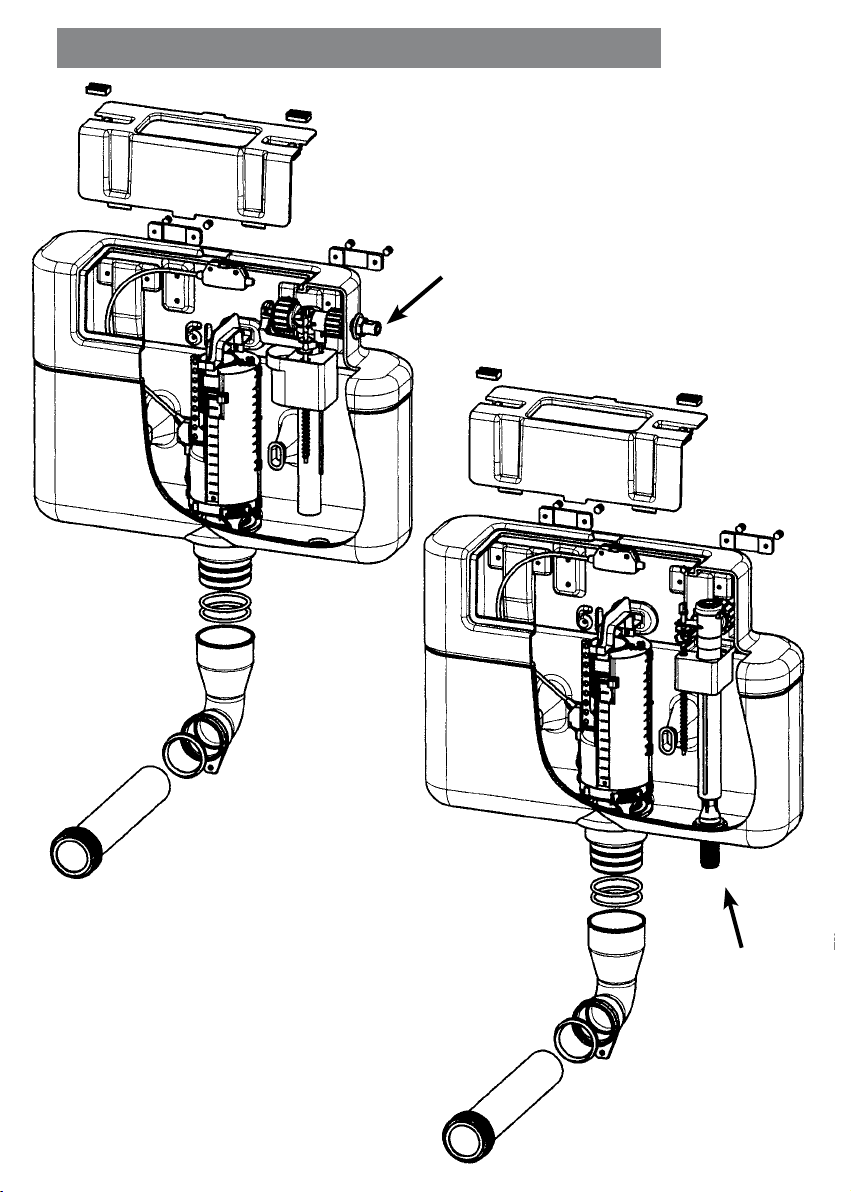
POUR CUVETTE SOL / GROUND FIXED PAN MODEL
Alimentation latérale
Side entry
Alimentation
par le fond
Bottom entry
N.B. :
Effectuer l’étanchéité du raccordement au réservoir avec
le joint bre, à l’exclusion de toute pâte à joint corrosive.
For supply connecting
Ensure tightness of connection
to cistern with lter gasket.
WARNINGS:
1 - Do not overtight in any case.
2 - Do not use any sealing paste and/or compound in any case
3 - Do not use connector handling the internal part of the inlet valve.
SIAMP will be not responsible in case these warnings are not
respected.
3
Alimentation
par le fond
Bottom entry
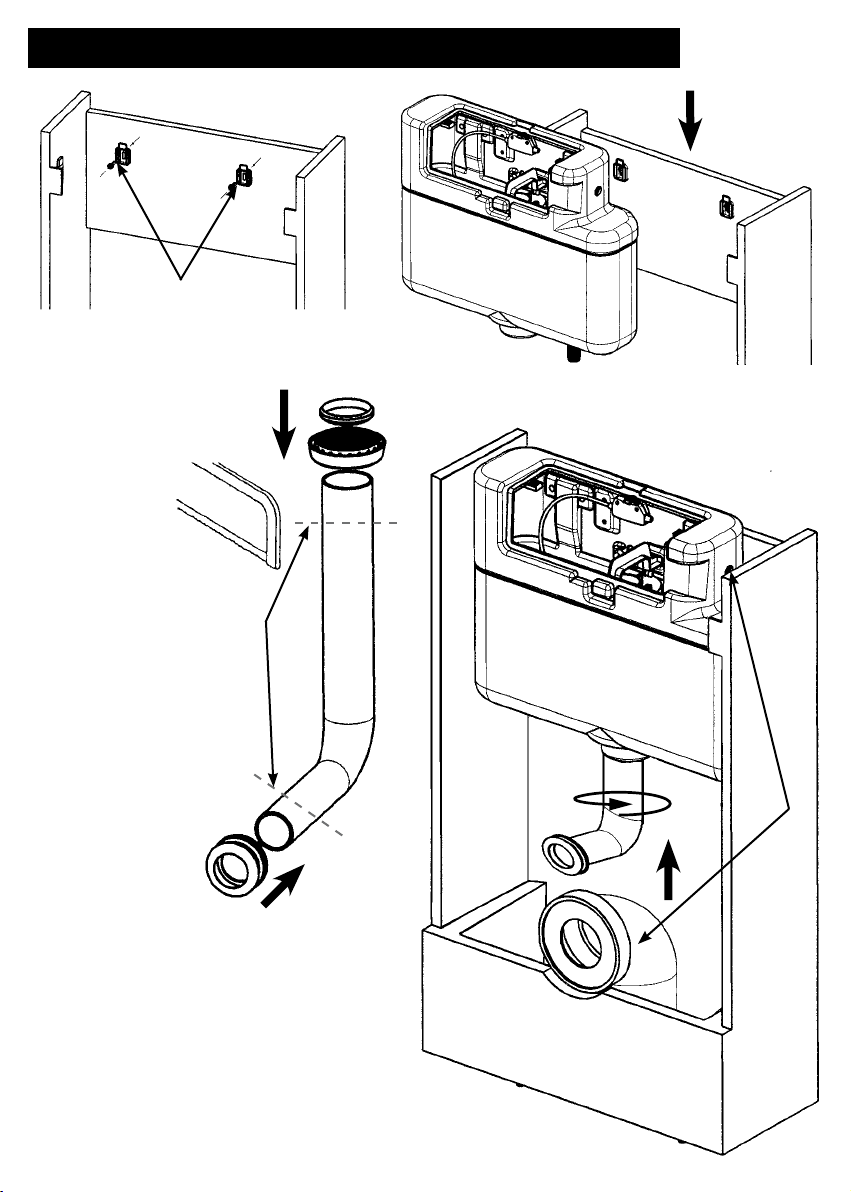
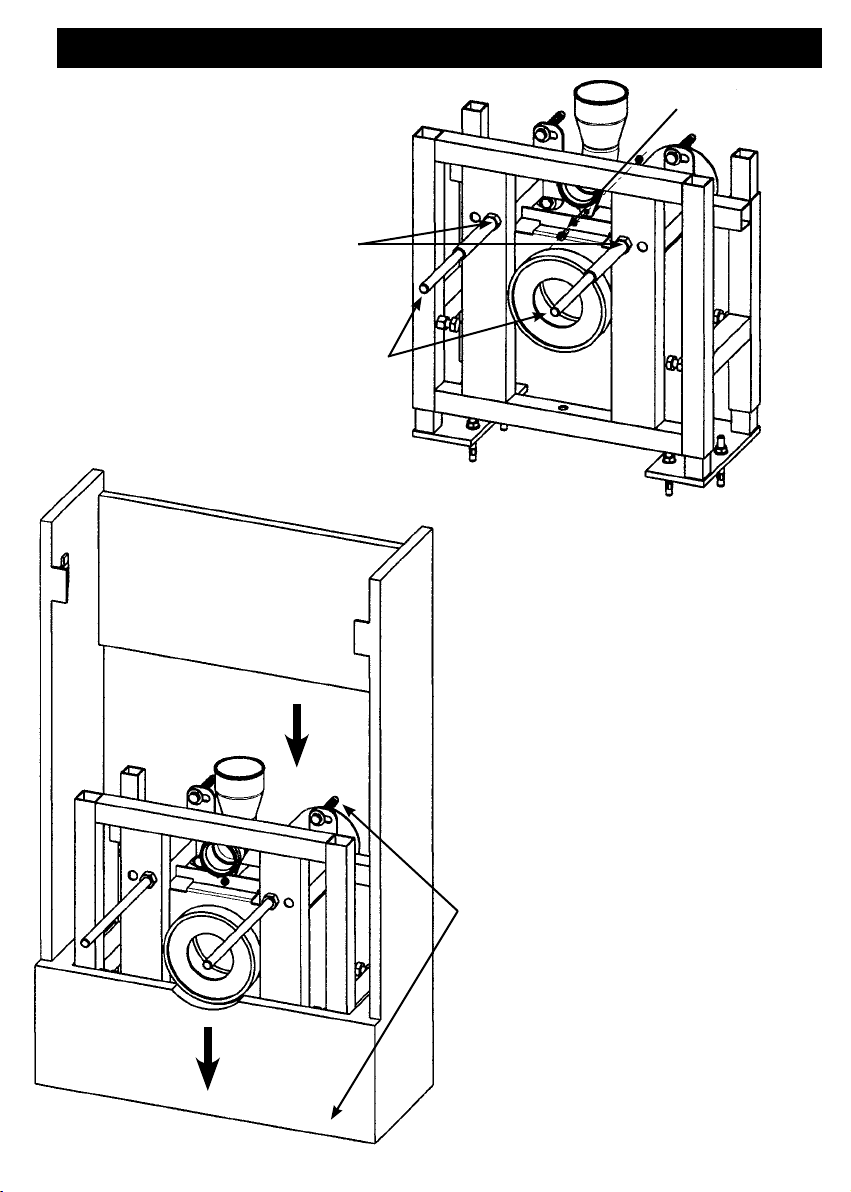
I - FIXER LE RÉSERVOIR / ATTACHING THE CISTERN
➊ Fixer les pattes de xations
Attach the cistern attachment lugs
➋ Mettre en place le réservoir
Position the cistern
➊
➋
➌
➍
➎➏
➐
➑
➌Ajuster le coude
d’alimention à
la position de la
cuvette (hauteur et
profondeur)
Adjust the supply
sleeve to the posi-
tion of the toilet
bowl (height and
length)
➍Mettre l’écrou et le
joint sur le coude
Fit the supply
sleeve nut and the
seal
➎Positionner le joint de cuvette
Position the toilet bowl seal
➏Inserer le coude d’alimentation dans le réservoir
Insert the supply sleeve in the cistern
➐Serrer l’écrou
Tighten the supply sleeve nut
➑ Connecter l’alimentation en eau et la pipe d’évacua-
tion et poser la cuvette.
Connect the supply sleeve and the drain sleeve, reins-
tall the front of the cabinet and position the toilet bowl.
4
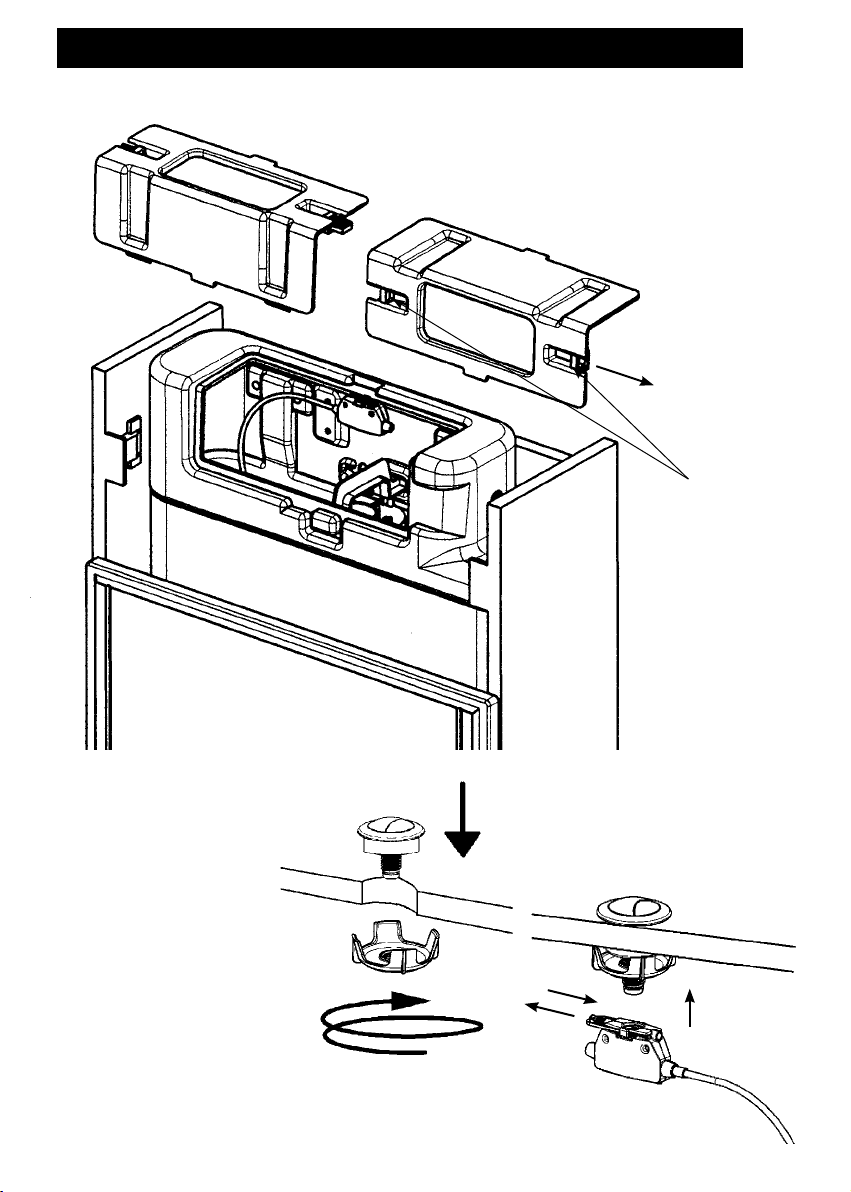
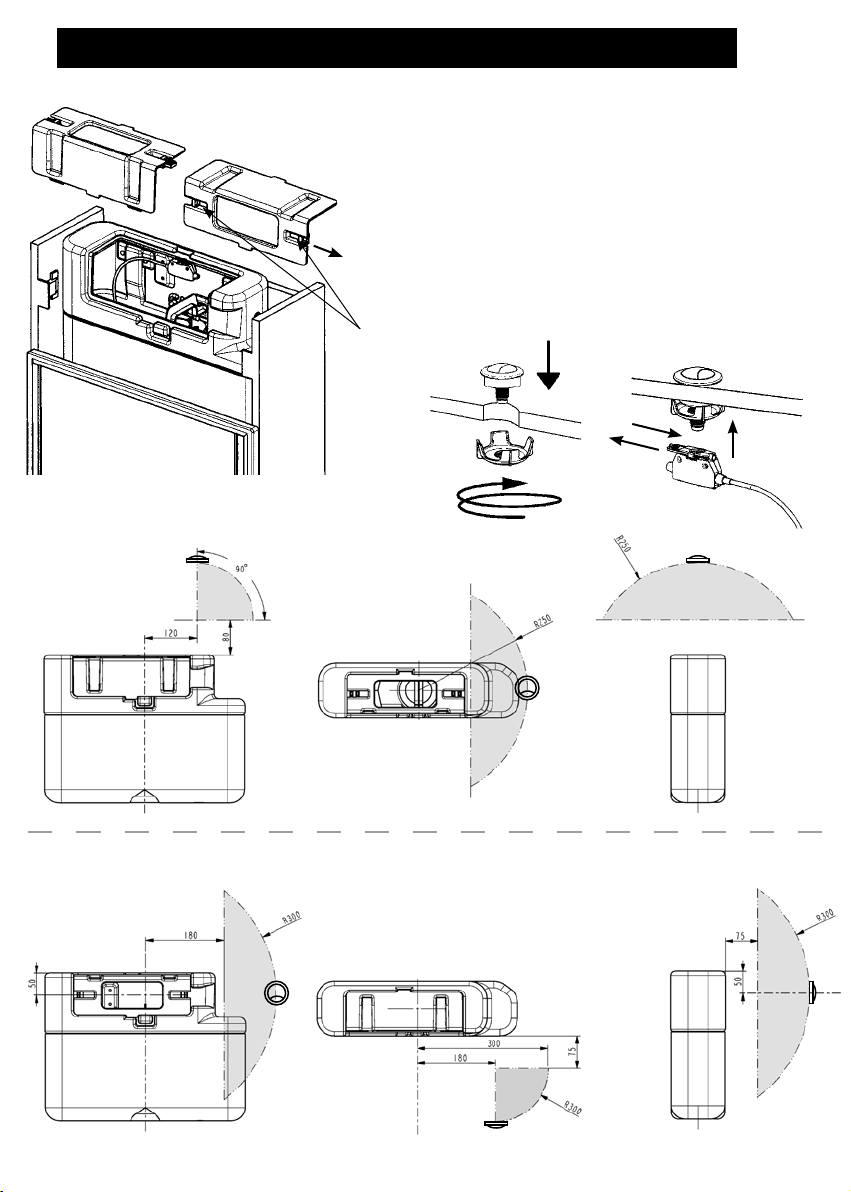
II - MISE EN PLACE DU BOUTON / FLUSH BUTTON INSTALLATION
➊ Positionner la plaque de fermeture
selon le type de commande (par
le dessus (A) ou frontal (B))
Position the closing plate according
to the type of control (top control
(A) or front control (B))
➋ Fixer la plaque à l’aide des verrous
Attach the plate with the bolts
➌ Positionner le bouton et le xer à
l’aide de l’écrou, cliper le câble
sur le bouton
Position the button:
- place button on panel and
screw button nut
- clip cable case
- Place panel back on top or
front of furniture
➍ Refermer le meuble ou le
panneau d’habillage
Close the furniture or panel
A
B
➋
Verrous
Bolts
b
c
a
➊
➌
5
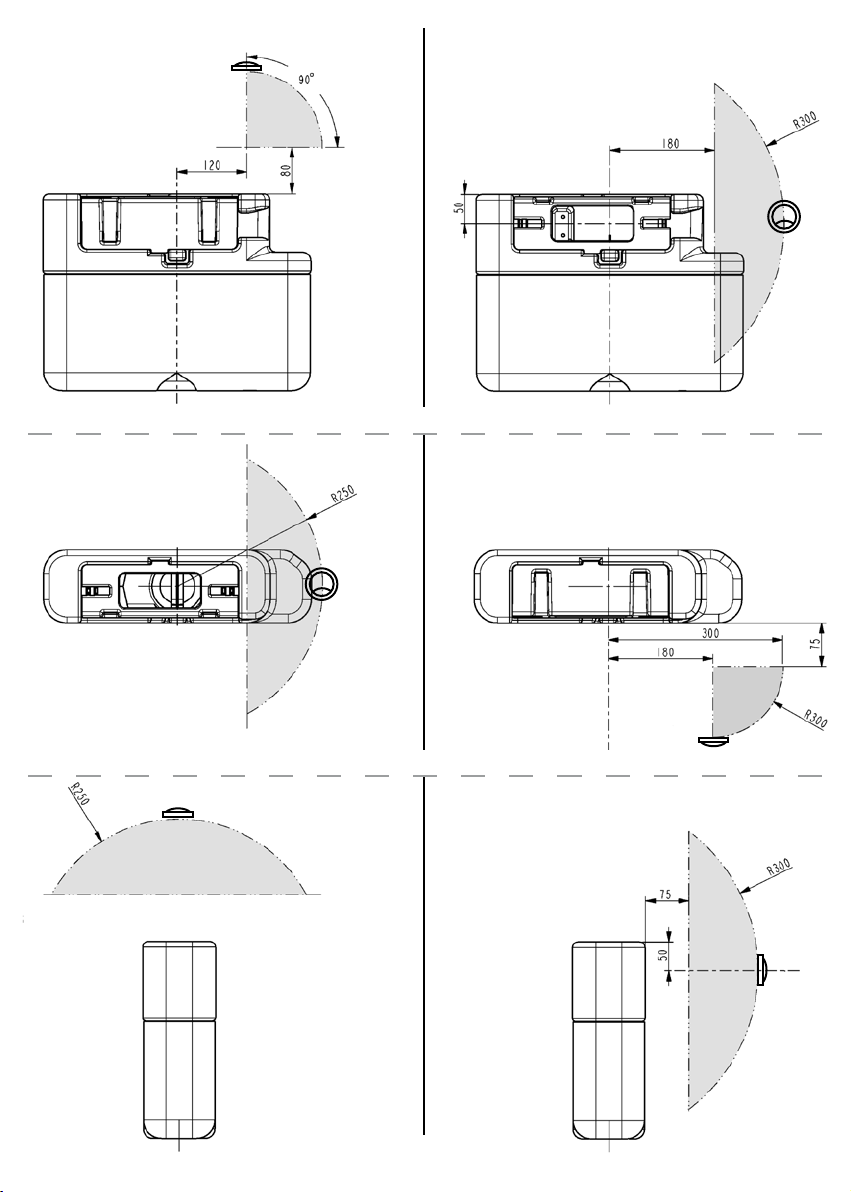
Vue de profil - Cistern top view
Plage d’installation
bouton par le dessus
Installation range
top xation
Plage d’installation
bouton par le devant
Installation range
front xation
Vue de face - Cistern front view
Vue de dessus - Cistern top view
6
POUR CUVETTE SUSPENDUE / WALL HUNG PAN MODEL
Alimentation latérale
Side entry
Alimentation
par le fond
Bottom entry
N.B. :
Effectuer l’étanchéité du raccordement au réservoir avec le
joint bre, à l’exclusion de toute pâte à joint corrosive.
For supply connecting
Ensure tightness of connection
to cistern with lter gasket.
WARNINGS:
1 - Do not overtight in any case.
2 - Do not use any sealing paste and/or compound in
any case
3 - Do not use connector handling the internal part of
the inlet valve.
SIAMP will be not responsible in case these warnings
are not respected.
7
I -
INSTALLER LE SUPPORT CUVETTE / INSTALLING THE TOILET BOWL FRAME
➊ Mesurer l’entraxe des trous de xation de la
cuvette et introduire les tiges de xation de la
cuvette dans les trous correspondants du sup-
port cuvette
Measure the centre distance of the toilet bowl
and insert the toilet bowl attachment rods in the
holes in the frame corresponding to the centre
distance
➋ Fixer les tiges à l’aide des écrous
Lock the rods with the nuts
➌ Fixer le coude d’alimentation
Attach the supply sleeve
➍ Positionner le support cuvette
Position the toilet bowl frame in the furniture or
duct
➎ Connecter la pipe d’évacuation
Connect the drain sleeve
➏ Fixer le support cuvette au mur et au sol.
Attach the toilet bowl frame to the oor and to
the wall.
➊
➋
➌
➍
➎
Alimentation
par le fond
Bottom entry

8
II - FIXER LE RÉSERVOIR / ATTACHING THE CISTERN
➊ Poser provisoirement le réservoir sur le
coude d’alimentation
Position the cistern temporarily on the sup-
ply sleeve
➋ Reperer l’emplacement des pattes de xa-
tion du réservoir
Mark the position of the cistern attachment
lugs on the furniture
➌Retirer le réservoir
Remove the cistern
➍ Fixer les pattes de xation en vériant le
niveau
Attach the cistern attachment lugs and
insure they are level
➋
➍
➎
➎ Poser dénitivement le réservoir
Position the cistern permanently.

9
III - RACCORDEMENT DE LA CUVETTE / TOILET BOWL CONNECTION
➊ A l’aide d’une règle placée comme sur le dessin ci-dessus,
faire une marque coté cuvette sur les 2 manchons
Using a rule placed as shown in the above drawing,
draw a mark on the toilet bowl side, on the two sleeves.
➋Retirer les manchons de la cuvette et
emboîter les dans le bati. A l’aide d’une règle
placée comme sur le dessin ci-dessus, faire
une marque côté mur sur les 2 manchons
Remove the sleeves from the toilet bowl and t them to
the frame. Using a rule placed as shown in the drawing
above, make a mark on the wall side, on the two sleeves
➌Pour chacun des manchons mesurer la
cote (L) entre les deux marques
For each of the sleeves, measure the
dimension (L) between the two marks
➍ Reporter cette cote (L) en l’augmentant
de 3 mm à l’extrémité (coté
bati) de chacun des manchons.
Ex : Si L = 50 mm, raccourcir le
manchon de 53 mm
Transfer this dimension (L) by increasing
by 3 mm at the end (frame side) the size
obtained on each sleeve. For instance, if
L = 50 mm, shorten the sleeve by 53 mm.
➎ Couper les manchons à l’aide
d’une scie à métaux
Cut the sleeves using a hack saw.
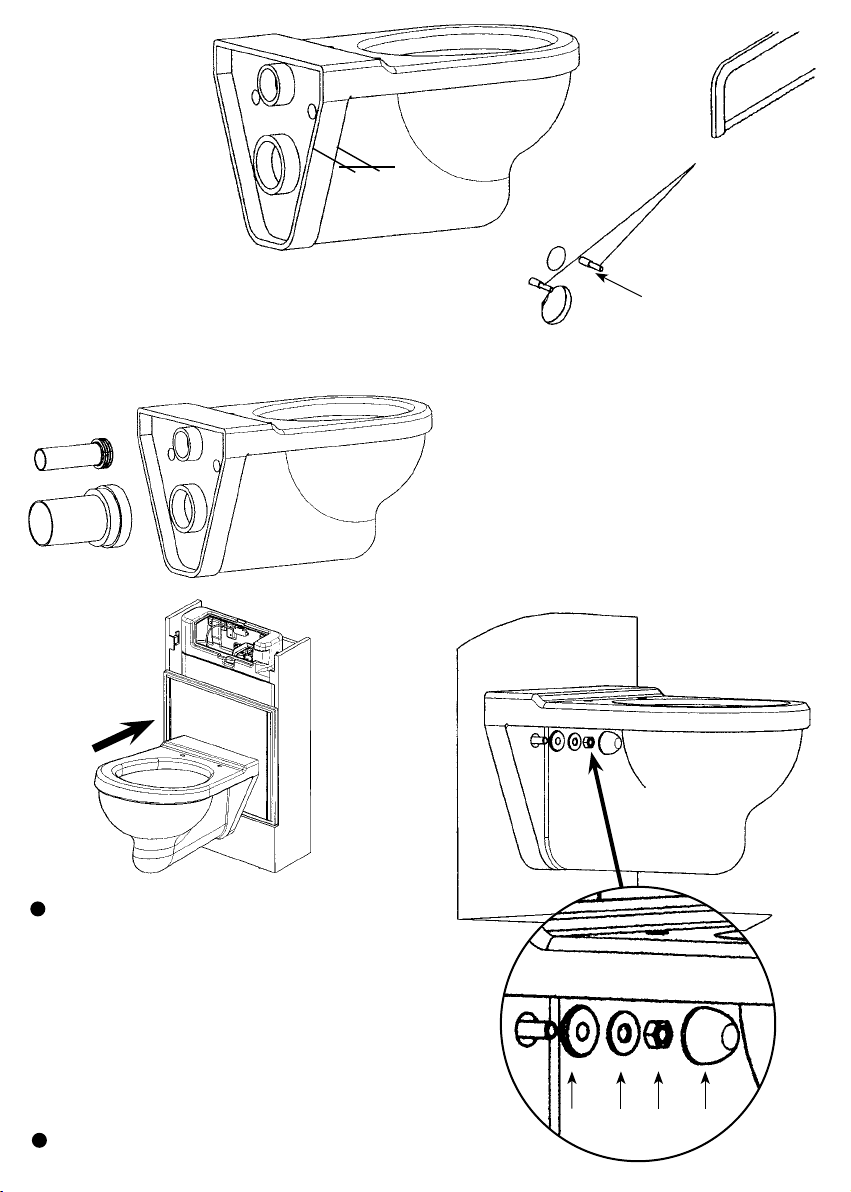
Une fois la cuvette correctement
positionnée, la fixer à l’aide du kit (i) en
respectant l’ordre d’empilage des pièces :
i = rondelle de centrage
ii = rondelle métallique
iii = écrou
iv = cache
When the toilet bowl is correctly positioned,
attach it using the toilet bowl fixing kit
complying with the part stacking order:
i = centering washer
ii = metal washer
iii = nut
iv = cover
Raccorder l’arriver d’eau
Connect the supply sleeve
Mesurer l’épaisseur de
l’arrière de la cuvette (B)
Measure the thickness at
the rear of the toilet bowl
(B)
Recouper si nécessaire
les tiges de xation (l) de
telle façon que la partie
dépassant du mur soit
égale à (B) + 20 mm
If necessary, cut the
attaching rods (I) so that
the part protruding from
the wall measures (B)
+ 20 mm
Raccourcir les gaines souples (j) de façon
à ce que la partie dépassant du mur soit égale (B) - 15 mm
Shorten the exible sheaths (j) so that the part protruding from
the wall measures (B) - 15 mm
➓ Emboîter le manchon d’alimentation
(h) et le manchon d’évacuation dans
la cuvette.
Puis positionner la cuvette sur les
deux tiges de xation.
Fit the supply sleeve (h) and the
drain sleeve onto the toilet bowl.
Then position the toilet bowl on the two attaching
rods.
Pour faciliter l’emboîtement du manchon
d’évacuation sur la cuvette et sur la
pipe utiliser de l’eau savonneuse.
To facilitate the tting of the drain sleeve onto
the bowl and the pipe, use soapy water.
11
12
iii iii iv
10
B
l
B + 20 mm
11
IV - MISE EN PLACE DU BOUTON / FLUSH BUTTON INSTALLATION
➊ Positionner la plaque de fermeture selon
le type de commande (par le dessus (A) ou frontal (B))
Position the closing plate according to the type of control (top
control (A) or front control (B))
➋ Fixer la plaque à l’aide des verrous
Attach the plate with the bolts
➌ Positionner le bouton et le xer à l’aide de l’écrou, cliper le
câble sur le bouton
Position the button:
- place button on panel and screw button nut
- clip cable case
- Place panel back on top or front of furniture
➍ Refermer le meuble ou le panneau d’habillage
Close the furniture or panel
A
B
➋
Verrous
Bolts
b
a
c
➊
➌
Plage d’installation bouton par le dessus
Installation range top xation
Plage d’installation bouton par le devant
Installation range front xation
Vue de face - Cistern front view Vue de dessus - Cistern top view Vue de profil - Cistern side view
Vue de face - Cistern front view Vue de dessus - Cistern top view Vue de profil - Cistern side view

Vous venez d’installer un réservoir INTRA de SIAMP et nous vous remercions de
la conance que vous nous témoignez ainsi.
Spécialiste des équipements techniques et accessoires du WC, SIAMP a apporté
tout le soin nécessaire à la conception et la production de ce produit et le garantit
10 ans hors pièces caoutchouc et main d’œuvre.
Pour tout renseignement complémentaire ou réclamation adressez-vous à votre
revendeur.
You have just installed a concealed cistern for furniture and back to wall INTRA
by SIAMP and we would like to thank you for your condence in our products.
As expert in technical equipment and accessories for the toilet, SIAMP has taken
every possible measure to apply all the necessary care to the design and production
of this product, offering a ten-year guarantee except for rubber parts and manpower.
For any complementary information, or indicated claim, please contact your dealer.
Ou directement à :
Or contact directly :
4, quai Antoine 1er - BP 219 - MC 98007 MONACO Cedex
Tél. 00 377 93 15 53 75 - Fax : 00 377 92 05 71 04
E-mail: [email protected]
Site Internet : http//: www.siamp.com
Réf. 51 5754
Other Siamp Plumbing Product manuals

Siamp
Siamp SEGMENT User manual

Siamp
Siamp Monaco OPTIMA 49 User manual

Siamp
Siamp Monaco User manual

Siamp
Siamp BCU 790 Quick guide

Siamp
Siamp SCC 80 Quick guide

Siamp
Siamp VERSO BCM 350 Quick guide

Siamp
Siamp Optima 49 User manual

Siamp
Siamp OPTIMA 50 User manual

Siamp
Siamp Quieto OD User manual

Siamp
Siamp SCU 350 User manual


