manuals.online logo
Brands
  1. Home
  2. •
  3. Brands
  4. •
  5. Siccom
  6. •
  7. Water Pump
  8. •
  9. Siccom FLOWITA EVO User manual

Siccom FLOWITA EVO User manual

FLOWITA EVO
SICCOM
2 rue Gustave Madiot 91070 Bondoue (FRANCE)
Tel: +33 (0)1 60 86 81 48 - Email: [email protected]
www.siccom.com
77J1175 ind A - 04/05/2021
Pour condensats de / For condensates from / Para condensados de / Per condensa de / Para condensados de /
Для конденсата из / Yoğuşma suyu kaynağı /      
Climatiseurs / Air conditioner / Climatizador / Climatizzatore / Ar condicionado /
Кондиционер / Klima ünitesi /   
≤ 10 kW / 36 000 BTU / 2.9 tons
Caractéristiques électriques / Electrical features / Características eléctricas / Caratteristiche elettriche /
Características eléctricas / Электрические характеристики / Elektriksel özellikler /   220-240V 50-60Hz / 19W
Classe / Class / Clase / Classe / Classe / Класс / Sınıf /  II
Facteur de marche / Operating cycle / Factor de marcha / Fattore di servizio / Fattore de arranque /
Относительная продолжительность работы / Çalışma döngüsü /   100% (S1)
Protection IP / Protection rating / Protección IP / Grado di protezione / Protecção IP / Пылевлагозащита /
Koruma derecesi /   IP24
Protection thermique / Thermal protection / Protección térmica / Protezione termica / Protecção térmica /
Термозащита (защита от перегрева) / Termal koruma /   r
Alarme / Alarm / Alarma / Allarme / Alarme / Аварийная схема / Alarm /  En option / Optional / Opcional / Opzionale / Opcional /
Опционно / Opsiyonel / 
Niveau sonore / Noise level / Nivel sonoro / Livello sonoro / Nível sonoro / Уровень шума / Ses seviyesi /  - 
2 3 4
1
Conditions de garantie • Warranty conditions
• Condiciones de la garantía • Condizioni di
garanzia • Condições de garantia • Условия гарантии •
Garanti şartları •    :
www.siccom.com/garantie
x2
x2
±15%
DE05LCC440
106 mm
57 mm
135 mm
• Cet appareil peut être utilisé par des enfants âgés d’au moins 8 ans et par des personnes ayant des
capacités physiques, sensorielles ou mentales réduites ou dénuées d’expérience ou de connaissance, s’ils
(si elles) sont correctement surveillé(e)s ou si des instructions relatives à l’utilisation de l’appareil en toute sécurité
leur ont été données et si les risques encourus ont été appréhendés. Les enfants ne doivent pas jouer avec
l’appareil. Le nettoyage et l’entretien par l’usager ne doivent pas être effectués par des enfants sans surveillance.
• Le raccordement du câble d’alimentation électrique doit être effectué par un professionnel qualié,
conformément aux normes en vigueur (France : NF C 15-100), en prévoyant un moyen de déconnexion dans
les canalisations xes.
• Si le câble d’alimentation est endommagé, il doit être remplacé par le fabricant, son service après vente ou
des personnes de qualication similaire an d’éviter un danger.
A. INSTALLATION
Danger d’électrocution : Déconnecter toute alimentation secteur avant d’intervenir sur le câble électrique
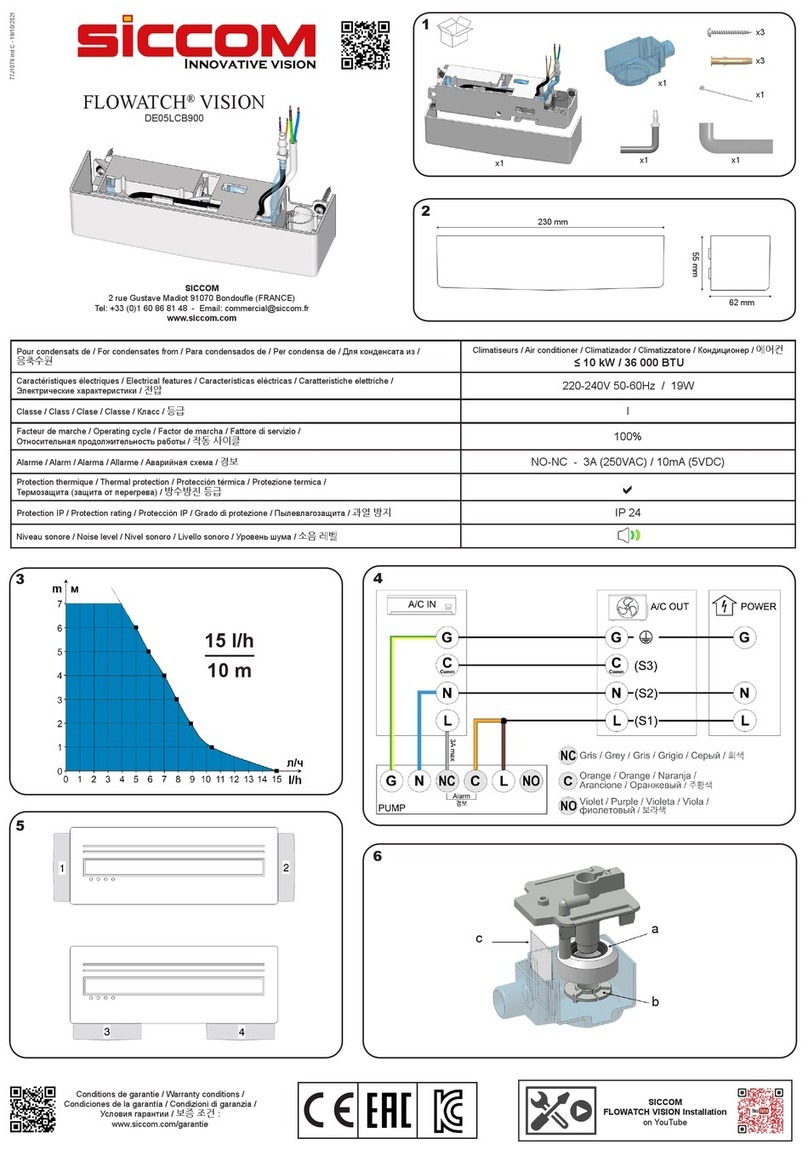
Première étape - Fixation sous le climatiseur (schéma 3) : Déboiter le capot, ôter le tube d'aspiration en haut, tirer puis ôter le réservoir en évitant le otteur. Présenter le corps du produit sous la trappe du climatiseur ayant
été libérée. Le xer au mur à l’aide des 2 vis et chevilles incluses, en prenant soin de laisser 5 à 8 mm entre le bord haut du corps de pompe et le climatiseur.
Deuxième étape - Connexions hydrauliques et électriques (schéma 4) : Effectuer ensuite les connexions hydrauliques (arrivée des condensats avec un tube Øext. 22 mm non fourni ; évacuation des condensats avec un
tube Øint. 6mm non fourni, à sécuriser avec un collier de serrage fourni) et électriques (branchement des ls phase et neutre au bornier du climatiseur).
Troisième étape - Remontage et test : Recliper le réservoir, connecter le tube d'aspiration, mettre sous tension. Remplir le réservoir d'eau et vérier le bon fonctionnement de la pompe. Remettre en place le capot.
B. ENTRETIEN
Lorsque la maintenance est nécessaire : Démonter le réservoir et nettoyer l’intérieur à l’aide d’une solution anti-bactériologique. Rincer abondamment après toute utilisation d’un produit de nettoyage. Nettoyer délicatement
le otteur, sans tirer dessus. Remettre en place le réservoir.
La date de production du produit se trouve sur l'étiquette située sur le côté gauche du corps du produit (format : semaine / année)
FR
i
i
5-8 mm
t
Ø 6/9 mm
Ø 22 mm
t
x1
• This appliance can be used by children form 8 years and above and people with reduced physical,
sensory or mental capabilities or lack of experience and knowledge if they have been given supervision
or instruction concerning the use of the appliance in a safe way and understand the hazards involved. Children
must not play with the appliance. Cleaning and maintenance by the user must not be performed by children.
• The connection of the power supply cable must be carried out by a qualied professional, in accordance with
the standards in force (UK: BS7671), providing a means of disconnection in the xed pipes.
• If the power cable is damaged, it must be replaced by the manufacturer, his service department or similarly
qualied persons to avoid danger.
A. INSTALLATION
Danger of electric shock: Disconnect the power supply before working on the power cable.
First step - Fixing under the air conditioner (g. 3): Take the cover apart, remove the suction tube at the top, pull and remove the tank avoiding the oat. Present the product body under the air conditioner opening that
has been cleared. Fix it to the wall using the 2 supplied screws and plugs, taking care to keep a 5 to 8 mm clearant between the top edge of the pump body and the air conditioner.
Second step - Hydraulic and electrical connections (diagram 4): Make the hydraulic connections (condensate inlet with a Øext. 22 mm tube not supplied; condensate outlet with a Øint. 6mm tube not supplied, to be
secured with a clamp supplied) and electrical connections (phase and neutral wires connected to the air conditioner terminal block).
Third step - Reassembly and test: Put the tank back into place, connect the suction tube, turn on the power. Fill the tank with water and check that the pump is working properly. Replace the cover.
B. MAINTENANCE
When maintenance is required: Remove the tank and clean the inside with an anti-bacterial solution. Rinse thoroughly after using any cleaning product. Gently clean the oat, without pulling on it. Replace the tank.
The date of production of the product can be found on the label located on the left side of the product body (format: week / year)
• Este aparato puede ser utilizado por niños de 8 años o más y por personas con capacidades físicas,
sensoriales o mentales reducidas o sin experiencia o conocimientos, si se les supervisa adecuadamente o si
se les han dado instrucciones sobre cómo utilizar el aparato de forma segura y si se comprenden los riesgos que
conlleva. Los niños no deben jugar con el aparato. La limpieza y el mantenimiento por parte del usuario no debe
ser llevada a cabo por niños sin supervisión.
• La conexión del cable de alimentación debe ser realizada por un profesional cualicado, de acuerdo con las
normas vigentes, proporcionando un medio de desconexión en las tuberías jas.
• Si el cable de alimentación está dañado, debe ser reemplazado por un cable o conjunto especial disponible
en el fabricante o su departamento de servicio.
A. INSTALACIÓN
Desconectar de toda alimentación eléctrica durante la instalación.
Primera etapa - Fijación bajo el climatizador (g. 3): Retirar la tapa, desconectar el tubo de aspiración en la parte superior, tirar y retirar el depósito evitando el otador. Presentar el cuerpo del producto bajo la abertura
del climatizador que ha sido liberada. Fíjarlo a la pared con los 2 tornillos y tacos suministrados, teniendo cuidado de dejar de 5 a 8 mm entre el borde superior del cuerpo de la bomba y el climatizador.
Segunda etapa - Conexiones hidráulicas y eléctricas (esquema 4): Realizar las conexiones hidráulicas (entrada de condensado con un tubo de Øext. 22 mm no suministrado; salida de condensados con un tubo Øint.
6mm no suministrado, que debe asegurarse con una abrazadera suministrada) y las conexiones eléctricas (cables de fase y neutro conectados al bloque de terminales del climatizador).
Tercera etapa - Montaje y prueba: Recolocar el depósito, conectar el tubo de aspiración, conectar la alimentación. Llenar el depósito con agua y comprobar que la bomba funciona correctamente. Recolocar la tapa.
B. MANTENIMIENTO
Cuando sea necesario el mantenimiento: Quitar el depósito y limpiar el interior con una solución antibacteriana. Enjuagar bien después de usar cualquier producto de limpieza. Limpiar suavemente el otador, sin tirar de
él. Recolocar el depósito.
La fecha de fabricación del producto se encuentra en la etiqueta situada en el lado izquierdo del cuerpo del producto (formato: semana / año)
EN
ES
• Questo apparecchio può essere utilizzato da bambini dagli 8 anni in su e da persone con capacità siche,
sensoriali o mentali ridotte o senza esperienza o conoscenza, se sono adeguatamente sorvegliati o se
sono state date loro istruzioni su come utilizzare l'apparecchio in modo sicuro e se i rischi che ne derivano sono
compresi. I bambini non devono giocare con l'apparecchio. La pulizia e la manutenzione da parte dell'utente non
deve essere effettuata da bambini senza sorveglianza.
• Il collegamento del cavo di alimentazione deve essere eseguito da un professionista qualicato, in conformità
alle norme nazionali, fornendo un mezzo di scollegamento nelle tubazioni sse.
• Se il cavo di alimentazione è danneggiato, deve essere sostituito con un cavo o un gruppo speciale
disponibile presso il produttore o il suo servizio di assistenza.
A. INSTALLAZIONE
Scollegare l’alimentazione elettrica durante l’installazione.
Primo passo - Montaggio sotto il climatizzatore (Fig. 3): Rimuovere il coperchio, rimuovere il tubo di aspirazione nella parte superiore, tirare e rimuovere il serbatoio evitando il galleggiante. Presentare il corpo del
prodotto sotto lo sportello del climatizzatore che è stato rilasciato. Fissarla al muro con le 2 viti e i tasselli forniti, avendo cura di lasciare da 5 a 8 mm tra il bordo superiore del corpo della pompa e il climatizzatore.
Secondo passo - Collegamenti idraulici ed elettrici (schema 4): Eseguire quindi i collegamenti idraulici (ingresso condensa con un tubo Øext. 22 mm non fornito; uscita condensa con un tubo Øint. 6mm non fornito, da
ssare con un fascetta di serraggio fornita) e i collegamenti elettrici (li di fase e neutro collegati alla morsettiera del climatizzatore).
Terzo passo - Riassemblaggio e test: Rimontare il serbatoio, collegare il tubo di aspirazione, accendere la corrente. Riempire il serbatoio d'acqua e controllare che la pompa funzioni correttamente. Riposizionare il coperchio.
B. MANUTENZIONE
Quando è necessaria la manutenzione: smontare il serbatoio e pulire l’interno con una soluzione antibatterica. Risciacquare accuratamente dopo aver usato qualsiasi prodotto di pulizia. Pulire delicatamente il
galleggiante, senza tirarlo. Sostituire il serbatoio.
La data di produzione del prodotto si trova sull’etichetta sul lato sinistro del corpo del prodotto (formato: settimana/anno).
IT
• A máquina pode ser utilizada por crianças a partir de 8 anos de idade, desde que sejam vigiados de
perto. Este aparelho pode ser utilizado por pessoas com capacidades físicas, sensoriais ou
mentais reduzidas, ou sem experiência ou conhecimento necessário, desde que sob supervisão, ou
após terem sido instruídas sobre o uso seguro do aparelho e sobre os perigos relacionados com
o mesmo. Crianças não devem brincar com o aparelho. A limpeza e a manutenção por parte do utilizador
não podem ser executadas por crianças, a menos que tenham mais de 8 anos de idade e sejam vigiadas.
• A ligação do cabo de alimentação deve ser efectuada por um prossional qualicado, de acordo com as
normas em vigor, proporcionando um meio de desconexão nas condutas xas.
• Se o cabo de alimentação estiver danicado, deve ser substituído pelo fabricante ou pelo seu
serviço de assistência técnica, de forma a evitar riscos.
A. INSTALAÇÃO
Perigo de choque: Desconecte toda a alimentação do terminal antes de instalar os componentes.
Primeira etapa - Montagem sob o ar condicionado (g. 3): Retirar a tampa, retirar o tubo de aspiração no topo, retirar o tanque evitando o utuador. Apresentar o corpo do produto sob a porta do ar condicionado que foi
aberta. Fixá-lo à parede com 2 parafusos e tampas fornecidos, tendo o cuidado de deixar 5 a 8mm entre o bordo superior do corpo da bomba e o ar condicionado.
Segunda etapa - Ligações hidráulicas e eléctricas (g. 4): Em seguida, fazer as ligações hidráulicas (entrada de condensado com um tubo Øext. 22mm não fornecido; saída de condensado com um tubo Øint. 6mm não
fornecido, a ser assegurada com um abraçadeira fornecida) e ligações eléctricas (os fase e neutro ligados ao bloco terminal do ar condicionado).
Terceira etapa - Remontagem e teste: Voltar a colocar o tanque, ligar o tubo de sucção, ligar a corrente. Encher o tanque com água e vericar se a bomba está a funcionar correctamente. Substituir a capa.
B. MANUTENÇÃO
Quando é necessária manutenção: Desmontar o tanque e limpar o interior com uma solução anti-bacteriana. Enxaguar cuidadosamente após a utilização de qualquer produto de limpeza. Limpar suavemente o utuador,
sem puxar por ele. Colocar o tanque de volta.
A data de produção do produto pode ser encontrada no rótulo do lado esquerdo do corpo do produto (formato: semana / ano)
PT
• Bu cihaz, güvenli kullanım için gözetim altında olmaları veya kendilerine talimat verilmiş olması ve ilgili
tehlikeleri anlamış olmaları halinde 8 yaş ve üzeri çocuklar ve ziksel, duyusal veya zihinsel yetenekleri
azalmış veya deneyim ve bilgi eksikliği olan kişiler tarafından kullanılabilir. Çocuklar cihazla oynamamalıdır.
Kullanıcıya ait temizlik ve bakım işlemleri çocuklar tarafından yapılmamalıdır.
• Güç besleme kablosunun bağlantısı, geçerli standartlara uygun olarak kaliye bir profesyonel tarafından, sabit
borularda ve devreden ayırma olanağı sağlayarak yapılmalıdır.
• Güç kablosu hasar görmüşse değiştirme işlemi, tehlikeyi önlemek için üretici, servis departmanı veya benzer
uzmanlıktaki kişiler tarafından yapılmalıdır.
A. KURULUM
Elektrik şoku tehlikesi: Güç kablosu üzerinde çalışma yapmadan önce güç kaynağının bağlantısını kesin.
İlk adım - Klima cihazı altındaki bağlantılar (şekil 3): Önce kapağı, ardından tankı çıkarın (emme borusu önceden ayrılmalıdır). Gövde parçasını açık olan klima boşluğunun altına yerleştirin. Destek için uygun 2 vida (ve
gerekirse dübeller) yardımıyla parçayı duvara sabitleyin. Pompa gövdesinin üst kenarıyla klima cihazı arasında 5 - 8 mm boşluk kalmasına dikkat edin.
İkinci adım - Hidrolik ve elektrik bağlantıları (şema 4): Hidrolik bağlantılarını (yoğuşma suyu girişi dış çapı 22 mm, boru birlikte verilmez; yoğuşma suyu çıkışı iç çapı 6mm, boru birlikte verilmez) ve elektrik bağlantılarını
(faz ve nötr kabloları klima cihazının terminal bloğuna bağlanır) yapın.
Üçüncü adım - Montaj ve test: Tankı yerine geri yerleştirin, emme borusunu bağlayın, gücü açın. Tankı suyla doldurun ve pompanın düzgün çalıştığını kontrol edin. Kapağı tekrar yerine yerleştirin.
B. BAKIM
Bakım gerektiği zaman: Tankı yerinden çıkarın ve içini antibakteriyel bir solüsyonla temizleyin. Tüm temizlik ürünlerinin kullanılması sonrasında tank iyice durulanmalıdır. Şamandırayı yerinden çekmeden nazikçe
temizleyin. Tankı yerine yerleştirin.
Ürünün üretim tarihi, ürün gövdesinin sol tarafındaki etikette bulunur. (tarih biçimi: hafta / yıl)
TR
• Устройство может использоваться детьми в возрасте от 8 лет и старше, а также лицами с
ограниченными физическими, сенсорными или умственными способностями или без надлежащего
опыта и знаний, если они находятся под присмотром или проинструктированы о том, как безопасно
пользоваться устройством и понимают связанную с этим опасность. Дети не должны играть с
устройством. Очистка и техническое обслуживание не должны выполняться детьми без присмотра.
• Кабель питания должен подключаться квалифицированным специалистом с соблюдением всех
действующих в стране норм и стандартов.
• В случае повреждения кабеля питания его необходимо заменить специальным кабелем, который
можно приобрести у производителя или в сервисной службе.
A. УСТАНОВКА
Опасность поражения электрическим током: Перед началом работы с кабелем отключите питание.
Этап 1 - Монтаж под кондиционером (рис. 3): Сначала снимите крышку насоса, затем резервуар (сначала снимите всасывающую трубку). Поместите корпус изделия под открытой нижней крышкой
кондиционера. Прикрепите его к стене с помощью 2 винтов (и дюбелей, если необходимо), адаптированных к опоре. Между верхним краем корпуса насоса и кондиционером должно оставаться 5-8 мм.
Этап 2 - Гидравлические и электрические соединения (рис. 4): Затем выполните гидравлические соединения (ввод конденсата через трубку с внешним Ø 22 мм (не входит в комплект); вывод конденсата
через трубку внутренним Ø. 6 мм (не входит в комплект). Выполните электрические соединения (подключите фазовый и нейтральный провода к клеммной колодке кондиционера).
Этап 3 - Сборка и тест: закрепите резервуар, подсоедините всасывающую трубку, включите питание. Заполните резервуар водой и проверьте работоспособность насоса. Поместите крышку на место.
B. ОБСЛУЖИВАНИЕ
При необходимости технического обслуживания: снимите резервуар и очистите его антибактериальным раствором. Тщательно промойте после использования любого чистящего средства. Аккуратно
очистить поплавок поплавок, но не тяните за него. Поместите резервуар не место.
Дата изготовления изделия указана на этикетке слева на корпусе изделия (формат: неделя/год).
RU
•     8         ,  
              ,  
                
                   
    ,          
•                 
 ,          
•      ,        ,    
         
A. 
    :            
  -        ( 3):  ,     (     )
               2 
 (    )    
       ,                  5  8
mm    
  -     ( 4):   (Øext. 22mm      
   ; Øint. 6mm          ;)    (   
         ) 
  -    :       ,     ,        
             
B. 
   :     -              
        -  ,            
                 (:  / )
HI

This manual suits for next models

1

Other Siccom Water Pump manuals

Siccom FLOWATCH DESIGN DE05LCF300 User manual

Siccom

Siccom FLOWATCH DESIGN DE05LCF300 User manual

Siccom ECO FLOWATCH User manual

Siccom

Siccom ECO FLOWATCH User manual

Siccom mini FLOWATCH 2 User manual

Siccom

Siccom mini FLOWATCH 2 User manual

Siccom FLOWATCH VISION DUO User manual

Siccom

Siccom FLOWATCH VISION DUO User manual

Siccom SUNNY FLOWATCH DUO DE05NCC090 User manual

Siccom

Siccom SUNNY FLOWATCH DUO DE05NCC090 User manual

Siccom ECO TANK 1.2 L User manual

Siccom

Siccom ECO TANK 1.2 L User manual

Siccom ECO FLOWATCH DE05LCC190 User manual

Siccom

Siccom ECO FLOWATCH DE05LCC190 User manual

Siccom mini FLOWATCH 1 EVO User manual

Siccom

Siccom mini FLOWATCH 1 EVO User manual

Siccom SUNNY FLOWATCH DE05NCA050 User manual

Siccom

Siccom SUNNY FLOWATCH DE05NCA050 User manual

Siccom ECOTANK+ User manual

Siccom

Siccom ECOTANK+ User manual

Siccom FLOWATCH TANK User manual

Siccom

Siccom FLOWATCH TANK User manual

Siccom mini FLOWATCH 3 WiFi User manual

Siccom

Siccom mini FLOWATCH 3 WiFi User manual

Siccom mini FLOWATCH 2 COMFORT User manual

Siccom

Siccom mini FLOWATCH 2 COMFORT User manual

Siccom mini FLOWATCH 2 User manual

Siccom

Siccom mini FLOWATCH 2 User manual

Siccom FLOWATCH VISION User manual

Siccom

Siccom FLOWATCH VISION User manual

Siccom FLOWATCH VISION User manual

Siccom

Siccom FLOWATCH VISION User manual

Siccom SUNNY FLOWATCH CLIM DE05RCC060 User manual

Siccom

Siccom SUNNY FLOWATCH CLIM DE05RCC060 User manual

Siccom Mini FLOWATCH 2 User manual

Siccom

Siccom Mini FLOWATCH 2 User manual

Popular Water Pump manuals by other brands

Grundfos SB Series Installation and operating instructions

Grundfos

Grundfos SB Series Installation and operating instructions

WAGNER Wildcat 10-70 Translation of the original operating manual

WAGNER

WAGNER Wildcat 10-70 Translation of the original operating manual

Predator 63405 user manual

Predator

Predator 63405 user manual

DAB BHP Instruction for installation and maintenance

DAB

DAB BHP Instruction for installation and maintenance

Graco 015.050-DP User information

Graco

Graco 015.050-DP User information

EINHELL GP JET 900/1 NIRO operating instructions

EINHELL

EINHELL GP JET 900/1 NIRO operating instructions

Edson 220E Installation and operation manual

Edson

Edson 220E Installation and operation manual

Advantage Manufacturing PC34 instruction manual

Advantage Manufacturing

Advantage Manufacturing PC34 instruction manual

Metabo P 6000 Inox Original instructions

Metabo

Metabo P 6000 Inox Original instructions

SKF FB Assembly instructions

SKF

SKF FB Assembly instructions

Dynaset HSP 2600 user manual

Dynaset

Dynaset HSP 2600 user manual

KNF NF 1.100 EX Operating and installation instructions

KNF

KNF NF 1.100 EX Operating and installation instructions

Wacker Neuson PT 2 Operator's manual

Wacker Neuson

Wacker Neuson PT 2 Operator's manual

BUSCH COBRA DS 2610 E Installation and maintenance instructions

BUSCH

BUSCH COBRA DS 2610 E Installation and maintenance instructions

Tuthill C2E Installation and service instructions

Tuthill

Tuthill C2E Installation and service instructions

Samoa Larius Vega 13:1 Operating and maintenance manual

Samoa

Samoa Larius Vega 13:1 Operating and maintenance manual

Summit Medical ambIT Clinician manual

Summit Medical

Summit Medical ambIT Clinician manual

yellow jacket 10875 Operator's manual

yellow jacket

yellow jacket 10875 Operator's manual

manuals.online logo
manuals.online logoBrands
  • About & Mission
  • Contact us
  • Privacy Policy
  • Terms and Conditions

Copyright 2025 Manuals.Online. All Rights Reserved.