SICK PL240DG-H User manual

8018773/YP71/2015-09-15 • Subject to change without notice • Irrtümer und Änderungen vorbehalten • © SICK AG • Germany • www.sick.com 1
Beheizte Reektoren
PL240DG-H, PL560DG-H
Montageanleitung
1 Bestimmungsgemäße Verwendung
Die beheizten Reektoren PL240DG-H und PL560DG-H sind Zu-
behör für die SICK Distanzsensoren. Die Reektoren sind zum Re-
ektieren des Laserstrahls vom Distanzsensor bestimmt. Darüber
hinaus sind die nachfolgenden Hinweise und technischen Daten
einzuhalten bzw. zu beachten.
Fehlanwendung
Eine andere oder darüber hinausgehende Benutzung gilt als nicht
bestimmungsgemäß. Für hieraus resultierende Personen- und
Sachschäden haftet die SICK AG nicht.
Zu diesem Dokument und mitgeltende Dokumente
Die Montageanleitung beschreibt die Montage und den elekt-
rischen Anschluss der beheizten Reektoren PL240DG-H und
PL560DG-H. - Für allen Arbeiten mit dem Distanzsensor siehe
jeweilige &Betriebsanleitung des Distanzsensors.
2 Sicherheit
2.1 Zu Ihrer Sicherheit
■Diese Anleitung aufmerksam vor allen Arbeiten durchlesen. Die
Anleitung als Bestandteil des Reektors in unmittelbarer Nähe
des Reektors jederzeit zugänglich aufbewahren.
■Betriebsanleitung des Distanzsensors und insbesondere die
darin aufgeführten Sicherheits- und Warnhinweise beachten.
■Nur Elektrofachkräfte dürfen den Reektor montieren, elektrisch
anschließen und in Betrieb nehmen.
■Bei allen Arbeiten die Versorgungsspannung des Reektors
ausschalten.
■Nur unbeschädigte Reektoren montieren und in Betrieb neh-
men. Isolierung des Heizelements und der Anschlussleitung vor
der Montage und vor dem elektrischen Anschluss prüfen.
2.2 Zur Sicherheit des Reektors
■Reektor vor mechanischer Beanspruchung wie z. B. Schlag,
Schock und Vibrationen schützen.
■Reektor keinen aggressiven Medien wie z. B. Lösungsmitteln
aussetzen oder chemischen Beanspruchung aussetzen.
■Die Installation in korrosionsfördernden Umgebungen ist verbo-
ten.
3 Transport und Lagerung
■Reektor in der Originalverpackung transportieren und lagern.
■Reektor trocken, staubfrei und erschütterungsfrei lagern.
■Lagerungstemperatur: –40 °C bis +55 °C
4 Lieferumfang
Im Lieferumfang sind der Reektor, 4 Distanzhülsen und diese
Montageanleitung enthalten.
Heated reectors
PL240DG-H, PL560DG-H
Mounting instructions
1 Correct use
The heated reectors PL240DG-H and PL560DG-H are accessories
for SICK distance sensors. The reectors are intended for reecting
the laser beam from a distance sensor. In addition, observe the
following instructions and technical specications.
Misuse
Different or additional use is considered to be improper use.
SICK AG shall not be held liable for personal injury and damage to
property resulting from this.
About this document and other relevant documents
The mounting instructions describe the installation and electrical
connection of the heated reectors PL240DG-H and PL560DG-H.
- For all work involving the distance sensor, refer to the respective
&distance sensor operating instructions.
2 Safety
2.1 Safety information
■Carefully read through this instruction manual before performing
any work. The instructions are considered a part of the reector
and must be kept in an accessible location in the immediate
vicinity of the reector at all times.
■Observe the distance sensor operating instructions, with
particular attention on the safety notices and warnings listed.
■Only electrically qualied personnel may mount the reector,
establish the electrical connections or put the reector into
operation.
■Switch off the supply voltage for the reector during all work.
■Only mount and operate undamaged reectors. Check the insu-
lation of the heating element and the connecting cable before
installation and before establishing any electrical connections.
2.2 Reector safety
■Protect the reector from mechanical stress such as impacts
and vibrations.
■Do not expose the reector to any chemical stress or corrosive
media such as solvents.
■Installation in a corrosive environment is prohibited.
3 Transport and storage
■The reector must be transported and stored in its original
packaging.
■Store the reector in a dry, dust-free location free of vibrations.
■Storage temperature: –40 °C to +55 °C
4 Scope of delivery
The scope of delivery includes the reector, 4 spacer sleeves and
these mounting instructions.

28018773/YP71/2015-09-15 • Subject to change without notice • Irrtümer und Änderungen vorbehalten • © SICK AG • Germany • www.sick.com
5 Auspacken, Ausrichten und Montage
5.1 Montageanforderungen
aVORSICHT
Herunterfallender Reektor!
Ein unsachgemäß montierter Reektor kann herunterfallen und
zu Verletzungen führen.
>Reektor an einem erschütterungs- und schwingungsfreien
Ort montieren.
>Montageort und Montagematerial müssen für die Montage
des Reektors geeignet sein.
>Der Montageort muss für das Gewicht des Reektors ausge-
legt sein.
■Vorgegebene Abstände, Neigung gegenüber der Strahlachse des
Laserstrahls und Montageposition zum Distanzsensor beachten.
- Siehe jeweilige &Betriebsanleitung des Distanzsensors.
■Rückseite des Reektors vor direkten Sonnenstrahlen schützen.
■Zwischen Unterlage und Schutzisolation des Reektors einen
lichten Abstand von mindestens 2 mm einhalten.
■Die Rückseite des Reektors vor Eingriff und vor mechanischer
Beschädigung schützen.
5.2 Reektor montieren
1. Reektor vorsichtig auspacken.
2. Reektor vorsichtig montieren.
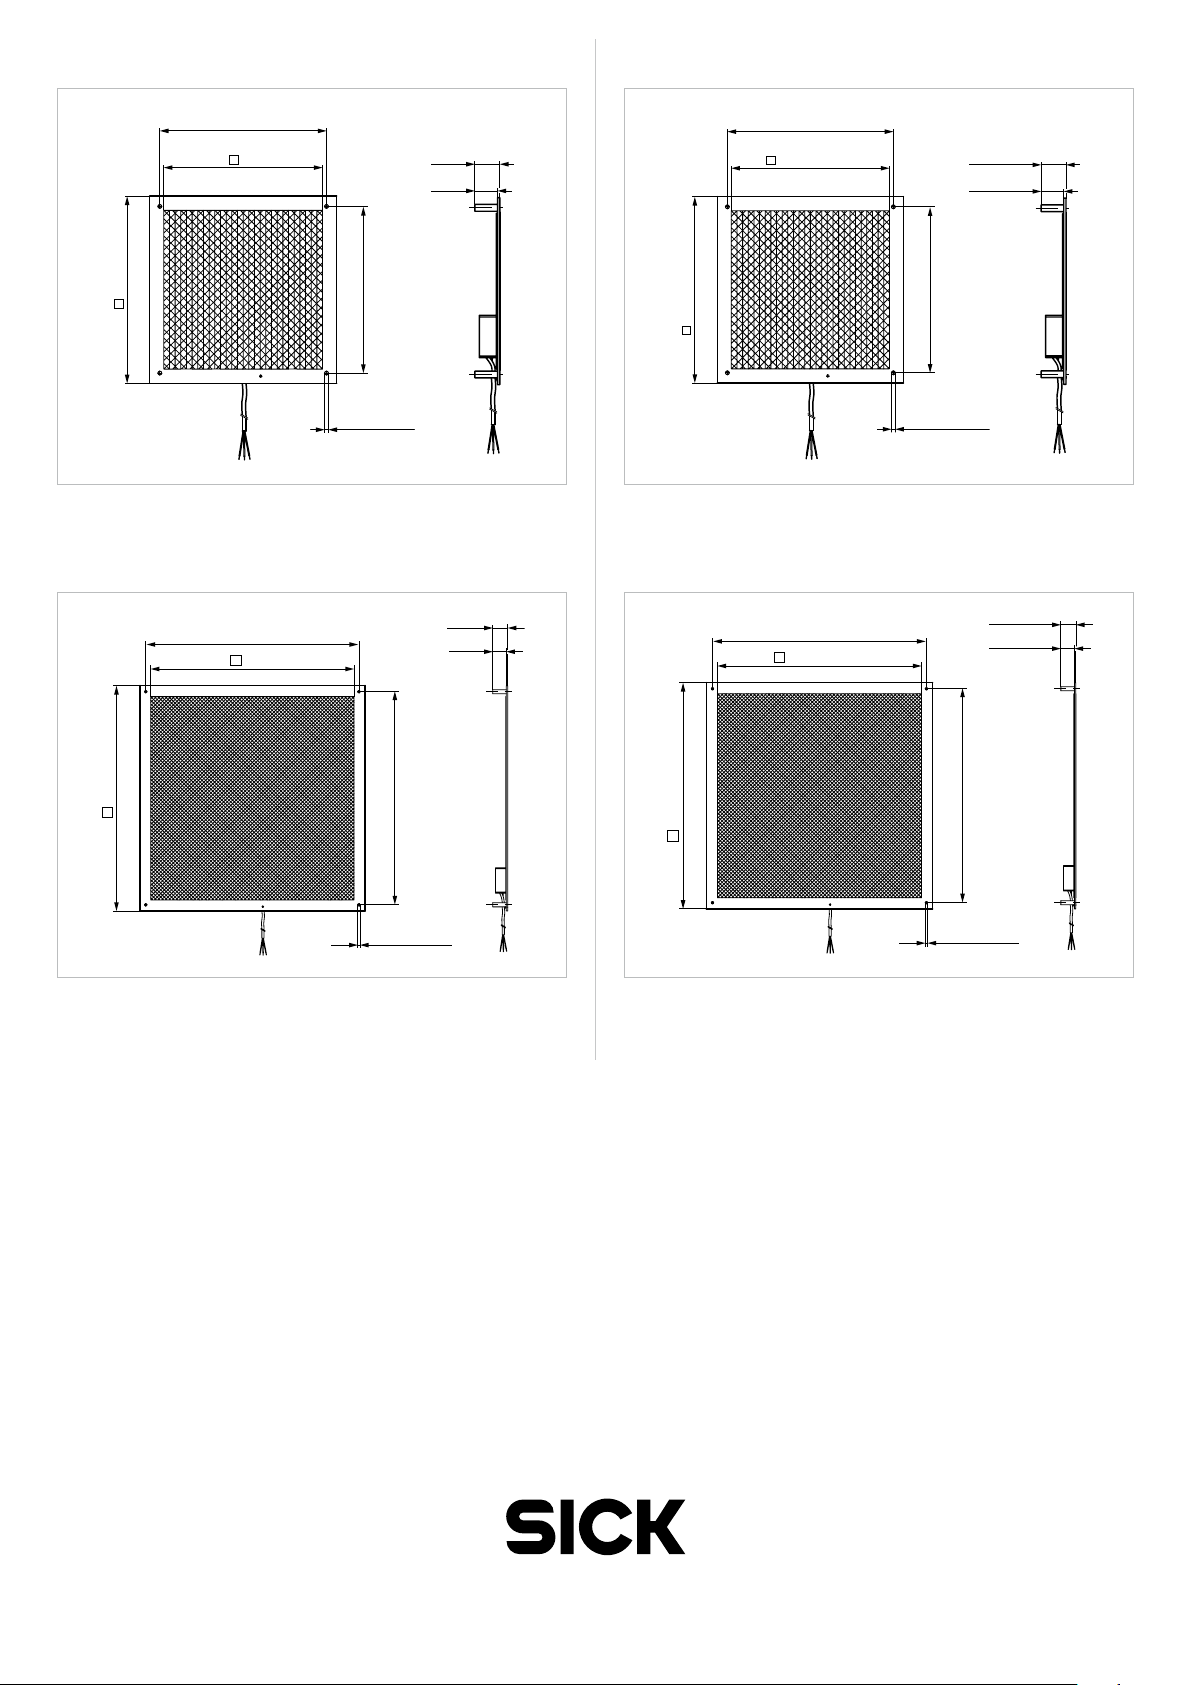
• Abmessungen beachten. - Siehe Kapitel 10.1 „Abmessun-
gen“ auf Seite 4.
• Mitgelieferte Distanzhülsen als Abstandshalter zum Monta-
geort verwenden.
• Neigung mittels Unterlegscheiben realisieren.
6 Elektrische Installation
aWARNUNG
Elektrische Spannung!
Elektrische Spannung kann zu gefährlichen Verletzungen oder
zum Tod führen.
>Nur Elektrofachkräfte dürfen Arbeiten an elektrischen Anlagen
durchführen.
>Reektor nur bei ausgeschalteter Versorgungsspannung
anschließen. Spannungsfreiheit sicherstellen.
>Reektor und Versorgungsleitung separat absichern.
>Nur unbeschädigte Reektoren elektrisch anschließen.
Isolierung des Heizelements und der Anschlussleitung vor der
Montage und vor dem elektrischen Anschluss prüfen.
>Nationale und örtliche Vorschriften beachten.
>Sicherheitsvorschriften für Arbeiten an elektrischen Anlagen
beachten.
6.1 Elektrischen Anschluss durchführen
1. Anschlussleitung fest verlegen und zugentlasten. Dabei be-
achten, dass die Anschlussleitung vor mechanischer Bean-
spruchung wie z. B. vor Zug, Druck, übermäßiger Biegung und
Wechselbiegung geschützt ist.
2. Anschlussleitung an die Versorgungsspannung anschließen.
7 Inbetriebnahme
- Für die Inbetriebnahme siehe jeweilige &Betriebsanleitung des
Distanzsensors.
5 Unpacking, alignment and mounting
5.1 Mounting requirements
aCAUTION
Falling reector!
An improperly mounted reector can fall and cause injuries.
>Mount the reector at a location free of shocks and vibrations.
>The mounting location and mounting material must be suit-
able for mounting the reector.
>The mounting location has to be designed for the weight of
the reector.
■Observe the specied distances, pitch in relation to the laser
beam axis and mounting position relative to the distance sen-
sor. - See the relevant &distance sensor operating instruc-
tions.
■Protect the rear side of the reector from direct sunlight.
■Maintain a minimum clearance of at least 2 mm between
support and protecting insulation of the reector.
■Protect the rear side of the reector against ingress and
mechanical damage.
5.2 Mounting the reector
1. Carefully unpack the reector.
2. Carefully mount the reector.
• Observe the dimensions. - See Chapter 10.1 „Dimensions“
on Page 4.
• Use the spacer sleeves provided as spacers for the
mounting location.
• Set the pitch using washers.
6 Electrical installation
aWARNING
Electrical voltage!
Electrical voltage can cause severe injury or death.
>Work on electrical systems must only be performed by quali-
ed electricians.
>Only connect the reector while the supply voltage is switched
off. Ensure power supply is not connected.
>Provide separate fuse protection for the reector and supply
cable.
>Only establish the electrical connections if the reector is
undamaged. Check the insulation of the heating element and
the connecting cable before installation and before establish-
ing any electrical connections.
>National and regional regulations must be complied with.
>Safety requirements relating to work on electrical systems
must be complied with.
6.1 Establishing the electrical connections
1. Route the connecting cable securely in place and provide strain
relief. While doing so, ensure that the connecting cable is pro-
tected from mechanical stress such as tension, compression,
excessive bending or repeated bending.
2. Connect the connecting cable to the supply voltage.
7 Commissioning
- For commissioning, refer to the relevant &distance sensor
operating instructions.
8 Maintenance and care
Proper functionality of the distance sensor requires keeping the
reector clean.

8018773/YP71/2015-09-15 • Subject to change without notice • Irrtümer und Änderungen vorbehalten • © SICK AG • Germany • www.sick.com 3
8 Wartung und Pege
Für eine ordnungsgemäße Funktion des Distanzsensors ist es not-
wendig, den Reektor in einem sauberen Zustand zu halten.
HINWEIS
Mögliche Beschädigung des Reektors!
Durch eine unsachgemäße Reinigung ist eine Beschädigung des
Reektors möglich.
>Keine Reinigungsmittel verwenden, die aggressiv sind oder
eine schleifende Wirkung haben.
>Keine Farbverdünner verwenden.
>Nicht mit Hochdruckreiniger oder Dampfstrahler reinigen.
8.1 Reektor reinigen
1. Reektor in regelmäßigen Abständen mit einem fusselfreiem
und weichem Tuch oder Schwamm reinigen. Als Reinigungsmit-
tel handelsübliches Spülmittel in vorgeschriebener Konzentra-
tion verwenden.
2. Reektor mit klarem Wasser abspülen.
3. Oberäche trocknen.
9 Demontage und Entsorgung
Reektor umweltgerecht gemäß den jeweils gültigen länderspezi-
schen Abfallbeseitigungsvorschriften entsorgen.
Die SICK AG nimmt derzeit keine unbrauchbar gewordenen Geräte
zurück.
10 Technische Daten
- Für die Technischen Daten des Distanzsensors siehe jeweilige
&Betriebsanleitung.
PL240DG-H PL560DG-H
Artikelnummer 1022926 1023888
Reektorfolie Diamond Grade
Reexionsäche 280 mm x 280 mm 605 mm x 605 mm
Material Grundplatte Eloxiertes Aluminium
Abmessungen 330 mm x 330 mm 665 mm x 665 mm
Gewicht Ca. 2 kg Ca. 7,3 kg
Versorgungsspannung AC 90 V … 280 V
Heizleistung bei
230 V AC
185 W 900 W
Elektrischer Anschluss
(Anschlussleitung)
Silikonleitung 2 m, 3 x 0,75 mm2, exible Lei-
tung, offenes Ende mit Aderendhülsen
Minimaler Biegeradius 51 mm bei Raumtemperatur
Externe Absicherung 6 A, kundenseitig
Elektrische
Schutzklasse
I
Schutzart IP X4 nach EN 60529
Umgebungstempe-
ratur
• Lagerung: –40 °C … +55 °C
• Betrieb: –40 °C … +55 °C
Tab. 1: Technische Daten
NOTE
Potential damage to the reector!
Improper cleaning can damage the reector.
>Do not use any corrosive cleaning agents or cleaning agents
containing abrasives.
>Do not use paint thinner.
>Do not clean with a high-pressure washer or steam cleaner.
8.1 Cleaning the reector
1. Clean the reector at regular intervals using a soft, lint-free
cloth or sponge. Use conventional dishwashing detergent at the
specied concentration as the cleaning agent.
2. Rinse the reector with clean water.
3. Dry the surface.
9 Disassembly and disposal
The reector should be disposed of in an environmentally-friendly
way in accordance with applicable national regulations governing
waste disposal.
SICK AG is not currently able to take back devices that can no
longer be used.
10 Technical data
- For the technical data for the distance sensor, refer to the
relevant &operating instructions.
PL240DG-H PL560DG-H
Part number 1022926 1023888
Reector lm Diamond grade
Reection area 280 mm x 280 mm 605 mm x 605 mm
Baseplate material Anodized aluminum
Dimensions 330 mm x 330 mm 665 mm x 665 mm
Weight Approx. 2 kg Approx. 7.3 kg
Supply voltage 90 V to 280 V AC
Heat output at
230 V AC
185 W 900 W
Electrical connection
(connecting cable)
2 m silicone cable, 3 x 0.75 mm2, exible cable,
open end with ferrules
Minimum bend radius 51 mm at room temperature
External fuse
protection
6 A, provided by customer
Electrical protection
class
I
Enclosure rating IP X4 acc. to EN 60529
Ambient temperature • Storage: –40 °C to +55 °C
• Operation: –40 °C to +55 °C
Tab. 1: Technical data

48018773/YP71/2015-09-15 • Subject to change without notice • Irrtümer und Änderungen vorbehalten • © SICK AG • Germany • www.sick.com
8018773/2015-09-15 • 8M_TM AK ITL • Printed in Germany • PL560DG-H •All rights reserved
SICK AG • Waldkirch • Germany • www.sick.com
10.1 Abmessungen
PL240DG-H
40
44
294
280
294
330
∅ 6,5 (4 x)
Abb. 1: Abmessungen PL240DG-H (alle Maße in mm)
1. Anschlussleitung
2. Distanzhülse (4 Stück)
PL560DG-H
629
∅ 6,5 (4 x)
600
665
629
40
44
Abb. 2: Abmessungen PL560DG-H (alle Maße in mm)
1. Anschlussleitung
2. Distanzhülse (4 Stück)
10.1 Dimensions
PL240DG-H
40 (1.57)
44 (1.73)
294 (11.57)
280 (11.02)
330 (12.99)
∅ 6.5 (4 x)
294 (11.57)
(∅ 0.26 (4 x))
Fig. 1: PL240DG-H dimensions (all dimensions in mm (inch))
1. Connecting cable
2. Spacer sleeve (4 pieces)
PL560DG-H
629 (24.76)
∅ 6.5 (4 x)
600 (23.62)
665 (26.18)
40 (1.57)
44 (1.73)
(∅ 0.26 (4 x))
629 (24.76)
Fig. 2: PL560DG-H dimensions (all dimensions in mm (inch))
1. Connecting cable
2. Spacer sleeve (4 pieces)
This manual suits for next models
1
Other SICK Accessories manuals

SICK
SICK DL100 Pro User manual

SICK
SICK PS30 User manual

SICK
SICK WS24-2 Series User manual

SICK
SICK GLS621 User manual

SICK
SICK TiM8 DistanceGuard Series User manual

SICK
SICK GLS611 User manual

SICK
SICK KTL180 User manual

SICK
SICK GSE20 User manual

SICK
SICK MPS-G50 Series User manual

SICK
SICK DL100 Pro User manual