Skil PWRCORE 20 LT4820E-00 User manual

WARNING: To reduce the risk of injury, the user must read and understand the
Owner’s Manual before using this product. Save these instructions for future reference.
For Customer Service
Cordless Line Trimmer
Model: LT4820E-00
TM
1300-017-545 OR www.skil.com.au

2
1
Cutting guard
Edging wheel Line feed
button
Spool holder Spool
holder
Guide handle
Ventilation slots
Edging button
Handle adjustment knob
Locking sleeve
Telescopic
tube
Spool
cover
Spool
Line slots
Battery level indicator
Spool hole
Trigger switch
Safety switch Main handle
Pivoting button
Flower guard
Storage rail Storage adapter
Line cutting blade
2
Rated Voltage 20V max d.c.
Weight 2.3kg (with 2.5 Ah battery pack attached)
Weight 2.6kg (with 5.0 Ah battery pack attached)
No-Load Speed 7100/min
Cutting diameter 30cm
Trimmer line length 5m
Trimmer Line diameter 1.6mm

3
1
2
Cutting guard
q
9
Battery level
indicator
9
9
9
a
a
b
c
XXdB
4
6 7 8
5
3

4
1
2
2
1
1
3
2
Trigger switch
Safety switch
Guide handle
w
e
Handle adjustment knob
Flower guard
qb

5
r
t
y
10-30°
2
1
2
12
3
4
5
12
3
4
5
Locking
sleeve
Edging
button
Pivoting button
1 2 3 4 5
1
2
3

6
1
2
3
u
o p
a
10-30°
1
2
10-30°
1
2
Flower
guard
Line feed
button
i

7
1
2
2
1
1
s
Spool
cover Spool
Line slots Line slots
Spool hole

8
• Do not cut grass which is not on the ground (e.g. on walls
or rocks)
• Do not cross roads or gravel paths with the tool still
running
• Do not get distracted and always concentrate on what
you are doing
• Always switch o the tool and remove the battery
-whenever leaving the tool unattended
-before clearing jammed material
-before checking, cleaning or working on the tool
-after striking a foreign object
-whenever the tool starts vibrating abnormally
• Always ensure that the ventilation openings are kept
clear of debris
AFTER USE
• Store the tool indoors in a dry and locked-up place, out
of reach of children
-store the battery pack separately from the tool
Only use the following batteries and chargers with this
tool
-SKIL battery: BY5197E-03 BY5196E-03
-SKIL charger: SC5358E-01 QC5360E-01 QC5359E-00
• Do not use the battery when damaged; it should be
replaced
• Do not disassemble the battery
• Do not expose tool/battery to rain
• Permitted ambient temperature (tool/charger/battery):
-when charging 4...40°C
-during operation –20...+50°C
-during storage –20...+50°C
3Read the instruction manual before use
4
debris (keep bystanders a safe distance away from work
area)
5Wear protective glasses and hearing protection
6Do not expose tool to rain
7Do not dispose of electric tools and batteries together
with household waste material
8Guaranteed sound power level
USE
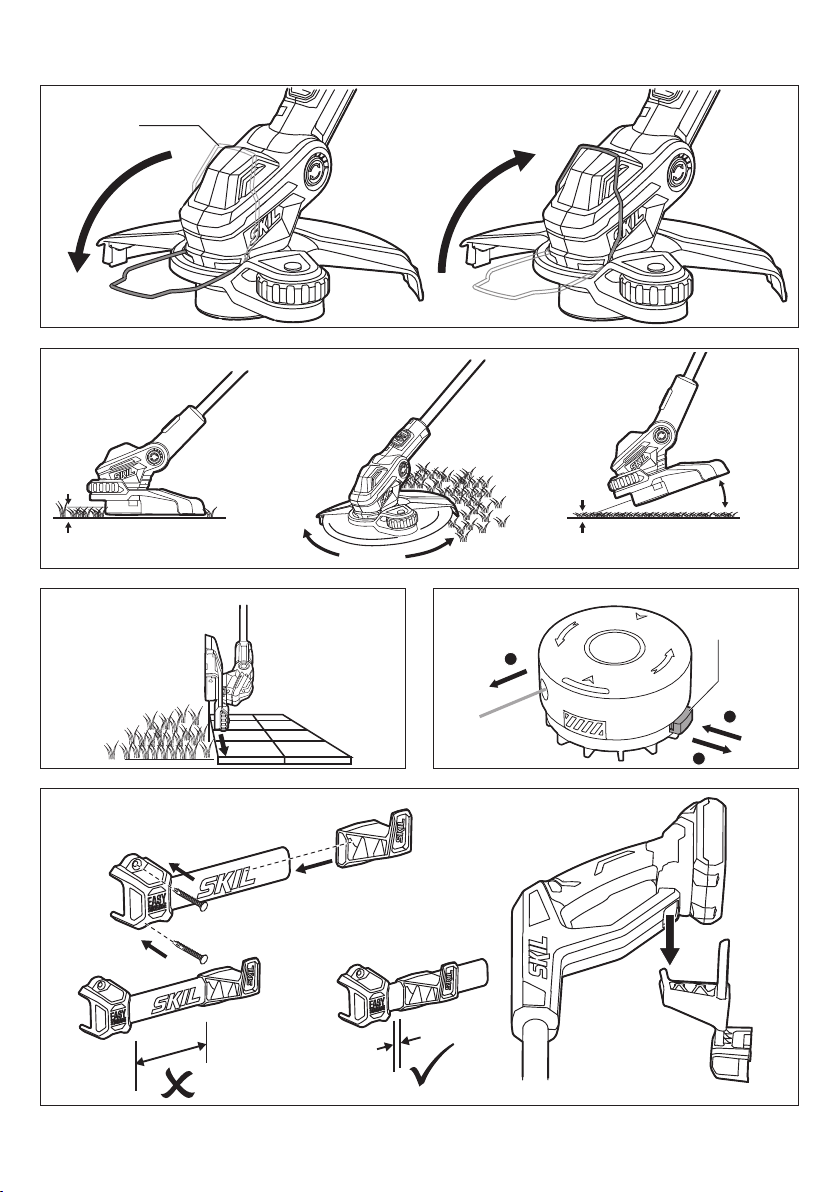
• Assembly instructions
-mount cutting guard as illustrated with 2 screws qa
! never use the tool without cutting guard
-Mount ower guard qb
-mount the guide handle as illustrated e
• Charging battery
! read the safety warnings and instructions
provided with the charger
• Removing/installing the battery 1
• On/o w
-switch on tool by rst pressing knob (= safety switch
which cannot be locked) and then pulling trigger
-switch o tool by releasing trigger switch
!
continues to rotate for a few seconds
-allow the cutting line to stop rotating before switching
on again
!
INTRODUCTION
• This tool is intended for the cutting of grass and weeds
under bushes as well as on slopes and edges that can
not be reached with a lawn mower
• This tool is not intended for professional use
• Check whether the packaging contains all parts as
illustrated in drawing 1
• When parts are missing or damaged, please contact your
dealer
• Read this instruction manual carefully before use
and save it for future reference 3
• Pay special attention to the safety instructions
and warnings; failure to follow these may result in
serious injury
• Never allow children, persons with reduced physical,
sensory or mental capabilities or lack of experience and
knowledge or people unfamiliar with these instructions to
use the machine.
• Store idle power tools out of reach of children and do not
allow persons unfamiliar with the line trimmer or these
instructions to operate the line trimmer.
• Be familiar with the controls and the proper use of the
tool
• The user is responsible for accidents or hazards
occurring to other people or their property
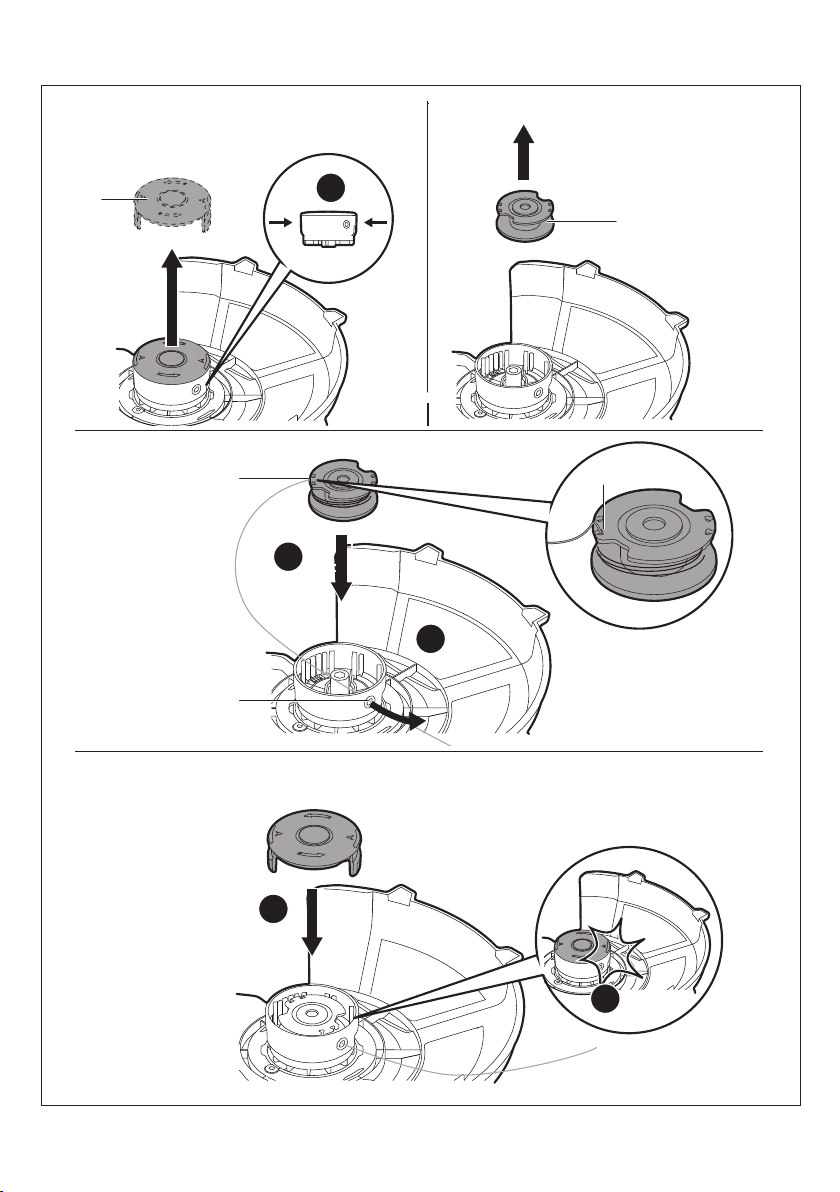
• Use only accessories and replacement parts
recommended by SKIL
• Never mount metal cutting elements onto this tool
• Keep hands and feet away from the cutting line while
trimming, especially when switching on the tool
• Always wear eye protection, long trousers and sturdy
shoes when operating the tool
• Never operate the tool in the direct vicinity of persons;
stop using the tool when persons (especially children) or
pets are nearby
• Never operate the tool when you are tired, sick or under
the inuence of alcohol or other drugs
• Only use the tool in daylight or with appropriate articial
lighting
• Never operate the tool with a damaged cutting guard or
without the cutting guard mounted
• Check the functioning of the tool before each use and
after any impact; in case of a defect, have it repaired
immediately by a qualied person (never open the tool
yourself)
• Before use, thoroughly inspect the cutting area and
remove any object that the tool may sling during cutting
(such as stones, loose pieces of wood, etc.)
DURING USE
• Avoid using the tool in bad weather conditions, especially
when there is a risk of lightning
• Do not use the tool on wet lawns
• Keep proper balance and footing at all times; do not
overreach
• Operate the tool at a walking pace only (do not run)
• The cutting line continues to rotate for a short time

9
-keep the tool away from solid objects in order to protect
the cutting line against excessive wear
-be aware of the kickback forces that occur when solid
objects are touched
• Holding and guiding the tool io
-for cutting long grass slowly swing the tool from right to
left and vice versa
-for cutting shorter grass tilt the tool as illustrated
-hold tool rmly with both hands, so you will have full
control of the tool at all times
-maintain a stable working position
-always hold the tool well away from your body
-for edging let the tool be supported by the edging
wheel o
• Line feeding
The line is automatically fed when the tool is switched
on or o
-the cutting line will be released and cut o to the correct
length by line cutting blade
! take care against injury from line cutting blade
• Feeding the line manually p
-switch o the tool and remove the battery
-pull the line and keep pulling, then press and release
the line feed button
-after line feeding always return the tool to its normal
operating position before switching on
-feed the line regularly to maintain full cutting circle
-when the motor runs without load and no grass is cut,
the cutting line is stuck, worn or broken; rewind the
spool or replace the spool system
• Rewinding spool s
In case the cutting line fails to protrude from spool hole
!
-remove spool cover and take out spool from spool
holder
-tightly rewind the cutting line evenly in layers in arrow
direction
-insert the cutting line into spool slot and ensure that it is
securely in place (leave sucient length of line)
-thread the cutting line through spool hole L before
placing the rewound spool into spool holder
! ensure that the spool is located securely in place,
then pull the cutting line from slot
-mount spool cover
• Replacing spool s
!
-remove old spool and mount new spool as illustrated
-only use SKIL spool STS1200 with this tool (damage
due to using other spools will be excluded from
the warranty)
-after replacing the spool test-run the tool for at least
one minute without load to ensure that the tool is
operating properly
!
battery
• Battery protection
The tool is suddenly being switched o or prevented from
being switched on, when
-the load is too high --> remove load and restart
-the battery temperature is not within the allowable
--> 2
levels of the battery level indicator start ashing when
pressing button 9c; wait until battery has returned
within the allowable operating temperature range
-the battery is nearly empty (to protect against
deep discharge) --> a low battery level or ashing low
battery level 9b is shown by the battery level indicator
when pressing button; charge battery
!
damaged
• Setting the guide handle position e
-release guide handle adjustment knob
-adjust guide handle position
-fasten guide handle adjustment knob
• Setting the tube length r
• Setting the main handle orientation t
1. downwards for trimming
2. sidewards for edging
• Setting the pivot function y
-set tube angle according
1. free standing storage
2. trimming in narrow spaces
3. regular trimming
4. trimming under low objects
5. edging function
• Using the ower guard u
Use the ower guard to protect precious plants from
unintentional pruning
-fold ower guard downwards
Disengage ower guard for edging function or for
trimming near hard obstacles
-fold ower guard upwards
• Setting up the tool for trimming
-set tube length r
-set main handle orientation in trimming position t
-use pivot position 2, 3 or 4 y
-use ower guard u
• Setting up the tool for edging
-set tube length r
-set main handle orientation in edging position t
-use pivot position 5 y
-disengage ower guard u
-for edging, support the tool by the edging wheel o
• Trimming
! ensure that the cutting area is free of stones,
debris and other foreign objects
! start trimming only when tool runs at full speed
-cut long grass in layers (always start from the top)
-only trim with the tip of the cutting line
-do not cut damp or wet grass
-prevent the cut grass from clogging the spool (do not
make heavy cuts)
-do not overload the tool
-carefully cut around trees and bushes, so that they do
not come into contact with the cutting line

10
• Do not dispose of electric tools,
batteries,accessories and packaging together
with household waste material. The electric tools,
accessories and packaging should be sorted for
environmental-friendly recycling.
! prior to disposal protect battery terminals with
heavy tape to prevent short-circuit
#alleen_spaans#
• This tool is not intended for professional use
• Always switch o the tool, remove battery pack, and
ensure that all moving parts have come to a complete
standstill
• Always keep tool clean (especially ventilation slots 1)
-clean the tool with a damp cloth (do not use cleaning
agents or solvents)
-clean line cutting blade 1and cutting guard 1after
each use
-clean ventilation slots 1regularly with a brush or
compressed air
• Regularly check the condition of the cutting head and the
tightness of nuts, bolts and screws
• Regularly check for worn or damaged components and
have them repaired/replaced when necessary
• Storage
Storage method 1 a
-securely mount storage rail on the wall with 2 screws
(not supplied) and horizontally leveled
-attach the storage adapter and move it against the
mounting base of the storage rail
-store the tool with the storage hole in the handle over
the tip of the storage adapter
Storage method 2 y
-use pivot position 1 and let the tool stand by itself on
the ground
• The following listing shows problem symptoms, possible
causes and corrective actions (if these do not identify
and correct the problem, contact your dealer or service
station)
! in case of electrical or mechanical malfunction,
Tool does not operate
-empty battery -> charge battery
-hot battery -> let battery cool down
-internal fault -> contact dealer/service station
Tool operates intermittently
-internal wiring defective -> contact dealer/service
station
-on/o switch defective -> contact dealer/service station
Tool vibrates abnormally
-grass too high -> cut in stages
Tool does not cut
-line too short/broken o -> feed the line manually
Line cannot be fed
-spool empty -> replace spool
-line entangled inside spool -> inspect spool; rewind if
necessary
Line is not cut o to correct length -> remove cover from
cutting blade
Line keeps breaking
-line entangled inside spool -> inspect spool; rewind if
necessary
-trimmer incorrectly used -> only trim with the tip of the
line; avoid stones, walls and other hard objects; feed
the line regularly

11
For all SKIL warranty & enquiries, please contact 1300 01
SKIL (1300 01 7545) Monday to Friday 9:00am to 5:00pm
EST
Chervon Australia Pty Ltd ABN 36 165 077 501 (“Chervon”)
warrants to the original domestic purchaser that this product
will be free from defects in materials and workmanship for
5 years from date of purchase, and any battery or charger
will be free from defects in materials and workmanship for 3
years from date of purchase. Consumables will be covered
by a 3-month warranty and a complete list can be found
inside the manual.
Notwithstanding the foregoing, if a SKIL consumer Power
Tool is used for industrial, professional or commercial
purposes, the foregoing warranty will apply for a duration
of ninety days from the date of purchase.This ninety-day
commercial warranty pertains to the SKIL Power Tool range
only.
This SKIL product warranty is only applicable to purchases
from authorised SKIL retailers.This warranty will not apply to
SKIL products that are purchased from Amazon, eBay and
any other non-authorised online retailer. This SKIL product
warranty does not apply to any parallel imported product and
does not apply to any SKIL products that are not purchased
from an authorised SKIL retailer.To make a claim, return
the faulty item together with proof of purchase directly to
your closest service agent or to the place of purchase. Any
handling and transportation costs (and other expenses
incurred in claiming this warranty) are not covered by this
warranty and will not be borne by Chervon. The replacement
product or part or repaired product will be made available
for your collection at an address nominated by Chervon.
Where a valid warranty claim is made, Chervon will replace
the defective product or repair the fault. Where the product is
repaired, Chervon may use refurbished parts. This warranty
does not cover normal wear and tear, misuse or abuse. This
warranty may also be further limited or voided as specically
detailed in the product manual. Chervon has no other liability
under this warranty. The benets to you given by this warranty
are in addition to other rights and remedies imposed by State
and Federal legislation that cannot be excluded. Our goods
come with guarantees that cannot be excluded under the
Australian Consumer Law.You are entitled to a replacement
or refund for a major failure and compensation for any other
reasonably foreseeable loss or damage.You are also entitled
to have the goods repaired or replaced if the goods fail to
be of acceptable quality and the failure does not amount to
a major failure. Chervon Australia Pty Ltd, Unit 14, 5 Kelletts
Road, Rowville, VIC. 3178.
Ph; 1300 01 SKIL (1300 01 7545).
Email: [email protected]
The following accessories and consumables have a 3-month
warranty period:
Chucks Allen keys
Brushes Angle grinder anges
Collets Dust canisters
Industry leading battery
technology wraps each
cell with cooling material
to keep the battery
powering on for 25%
longer run time compare
to general battery
technology.
SKIL’s patented technology
extends the battery life 2X
longer compare to general
battery technology.
LONGER
RUN TIME
PWRCORE 20™
LITHIUM
*
2X
BATTERY LIFE
PWRCORE 20™
LITHIUM
*
*

Table of contents
Other Skil Trimmer manuals