Skil 730 User manual

GB
F
D
NL
S
DK
N
FIN
E
P
I
H
CZ
TR
PL
RU
UA
GR
RO
BG
SK
HR
SRB
SLO
EST
LV
LT
AR
FA
GB
F
D
NL
S
DK
N
FIN
E
P
I
H
CZ
TR
PL
RU
UA
GR
RO
BG
SK
HR
SRB
SLO
EST
LV
LT
AR
FA
www.skileurope.com
LINE TRIMMER
0730 (F0150730..)
ME77
ORIGINAL INSTRUCTIONS 6
NOTICE ORIGINALE 9
ORIGINALBETRIEBSANLEITUNG 12
ORIGINELE GEBRUIKSAANWIJZING 15
BRUKSANVISNING I ORIGINAL 19
ORIGINAL BRUGSANVISNING 22
ORIGINAL BRUKSANVISNING 25
ALKUPERÄISET OHJEET 28
MANUAL ORIGINAL 31
MANUAL ORIGINAL 34
ISTRUZIONI ORIGINALI 38
EREDETI HASZNÁLATI UTASÍTÁS 41
PŮVODNÍM NÁVODEM K POUŽÍVÁNÍ 44
ORİJİNAL İŞLETME TALİMATI 48
INSTRUKCJA ORYGINALNA 51
ПОДЛИННИК РУКОВОДСТВА
ПО ЭКСПЛУАТАЦИИ 54
ОРИГІНАЛЬНА ІНСТРУКЦІЯ
З ЕКСПЛУАТАЦІЇ 58
ΠΡΩΤΤΥΠ ∆ΗΓΙΩΝ ΡΗΣΗΣ 62
INSTRUCŢIUNI DE FOLOSIRE
ORIGINALE 66
ОРИГИНАЛНО РЪКОВОДСТВО
ЗА ЕКСПЛОАТАЦИЯ 69
PÔVODNÝ NÁVOD NA POUŽITIE 73
ORIGINALNE UPUTE ZA RAD 76
ORIGINALNO UPUTSTVO ZA RAD 79
IZVIRNA NAVODILA 82
ALGUPÄRANE KASUTUSJUHEND 85
ORIĢINĀLĀ LIETOŠANAS PAMĀCĪBA 88
ORIGINALI INSTRUKCIJA 91
AR
FA
99
AR
FA
97
SKIL Europe BV - Konijnenberg 60 10/10 2610Z00521
4825 BD Breda - The Netherlands

2
4x
1x
A
BC
D
E
F
HK
J
G
M
N
L
P
2
5 m
250
Watt 2,6 kg
EPTA 01/2003
12000 25 cm 1,2 mm
10730
3
4
5

3
9
A
0
76 8
4x
B
!
C
@

4
F
$
10-30º
%
#

5
H
J
^ *
K
X
Y
Y
X
&
M
(
ACCESSORIES SKIL Nr.
2610Z01354

6
GB
Line trimmer 0730
INTRODUCTION
• Thistoolisintendedforthecuttingofgrassandweeds
under bushes as well as on slopes and edges that can
not be reached with a lawn mower
• Thistoolisnotintendedforprofessionaluse
• Checkwhetherthepackagingcontainsallpartsas
illustrated in drawing 2
• Whenpartsaremissingordamaged,pleasecontact
your dealer
• Readthisinstructionmanualcarefullybeforeuse
andsaveitforfuturereference3
• Payspecialattentiontothesafetyinstructionsand
warnings;failuretofollowthesemayresultin
seriousinjury
TECHNICALSPECIFICATIONS1
TOOL ELEMENTS 2
ACutting guard
BGuide handle
CCord restraint
DLocking sleeve
ETelescopic tube
FTrigger switch
GCutting blade cover
H Buttonforlinefeeding
JLine cutting blade
KSpool cap
LVentilation slots
MStorage rail (screwsnotsupplied)
NStorage hook
PNameplate
SAFETY
SPECIFICSAFETYINSTRUCTIONSFORLINE
TRIMMERS
GENERAL
• Befamiliarwiththecontrolsandtheproperuseofthe
tool
• Theuserisresponsibleforaccidentsorhazards
occurring to other people or their property
• Onlyusethetoolwhentheambienttemperatureis
between 0°C and 40°C
• Nevermountmetalcuttingelementsontothistool
PERSONALSAFETY
• Thistoolisnotintendedforusebypersons
(includingchildren)withreducedphysical,sensory
ormentalcapabilities,orlackofexperienceand
knowledge,unlesstheyhavebeengivensupervision
orinstructionconcerninguseofthetoolbyaperson
responsiblefortheirsafety
• Ensurethatchildrendonotplaywiththetool
• Neverallowchildrenorpeoplewhoarenotfamiliarwith
the operating instructions to use the tool
• Keepyourfingersawayfromthelinecuttingblade
integratedinthecuttingguard
• Keephandsandfeetawayfromthecuttinglineswhile
trimming,especiallywhenswitchingonthetool
• Alwaysweareyeprotection,longtrousersandsturdy
shoes when operating the tool
• Neveroperatethetoolinthedirectvicinityofpersons;
stop using the tool while persons (especially children) or
pets are nearby
• Neveroperatethetoolwhenyouaretired,sickorunder
theinuenceofalcoholorotherdrugs
ELECTRICALSAFETY
• Alwayscheckthatthesupplyvoltageisthesameasthe
voltageindicatedonthenameplateofthecharger
(chargerswitharatingof230Vor240Vcanalsobe
connected to a 220V supply)
• Inspectthecordperiodicallyandhaveitreplacedbya
qualiedperson,ifdamaged
• Inspecttheextensioncordperiodicallyandreplaceit,if
damaged (inadequateextensioncordscanbe
dangerous)
• Onlyuseanextensioncordwhichisintendedfor
outdoor use and equipped with a watertight plug and
coupling-socket
• Usecompletelyunrolledandsafeextensioncordswith
acapacityof16Amps(U.K.13Amps)
• Whenoperatingthetoolusearesidualcurrentdevice
(RCD)withatriggeringcurrentof30mAmaximum
• Donotrunover,crushorpullthe(extension)cord
• Protectthe(extension)cordfromheat,oilandsharp
edges
• Keepthe(extension)cordawayfromtherotating
cuttinglines
• Alwaysswitchofftoolanddisconnectplugfrompower
sourceifthepowersupplycordortheextensioncordis
cut,damagedorentangled(donottouchthecord
beforedisconnectingtheplug)
BEFOREUSE
• Onlyusethetoolindaylightorwithappropriatearticial
lighting
• Checkthefunctioningofthetoolbeforeeachuseand
afteranyimpact;incaseofadefect,haveitrepaired
immediately by a qualified person (never open the tool
yourself)
• Beforeuse,thoroughlyinspectthecuttingareaand
remove any object that the tool may sling during cutting
(suchasstones,loosepiecesofwood,etc.)
DURING USE
• Neverusethetoolwhencordisdamaged;haveit
replaced by a qualified person
• Neveroperatethetoolwithadamagedcuttingguardor
without the cutting guard mounted
• Thecuttinglinescontinuetorotateforashorttime
afterthetoolisswitchedoff
• Donotcutgrasswhichisnotontheground(e.g.on
walls or rocks)
• Donotcrossroadsorgravelpathswiththetoolstill
running
• Donotgetdistractedandalwaysconcentrateonwhat
you are doing
• Alwaysdisconnectplugfrompowersource
- whenever leaving the tool unattended

7
- beforeclearingjammedmaterial
- beforechecking,cleaningorworkingonthetool
- afterstrikingaforeignobject
- whenever the tool starts vibrating abnormally
• Alwaysensurethattheventilationopeningsarekept
clearofdebris
AFTERUSE
• Alwaysswitchofftoolanddisconnectplugfrom
powersourcebeforemakingadjustments,changing
spools,cleaningorleavingthetoolunattendedfor
anyperiod
• Storethetoolindoorsinadryandlocked-upplace,out
ofreachofchildren
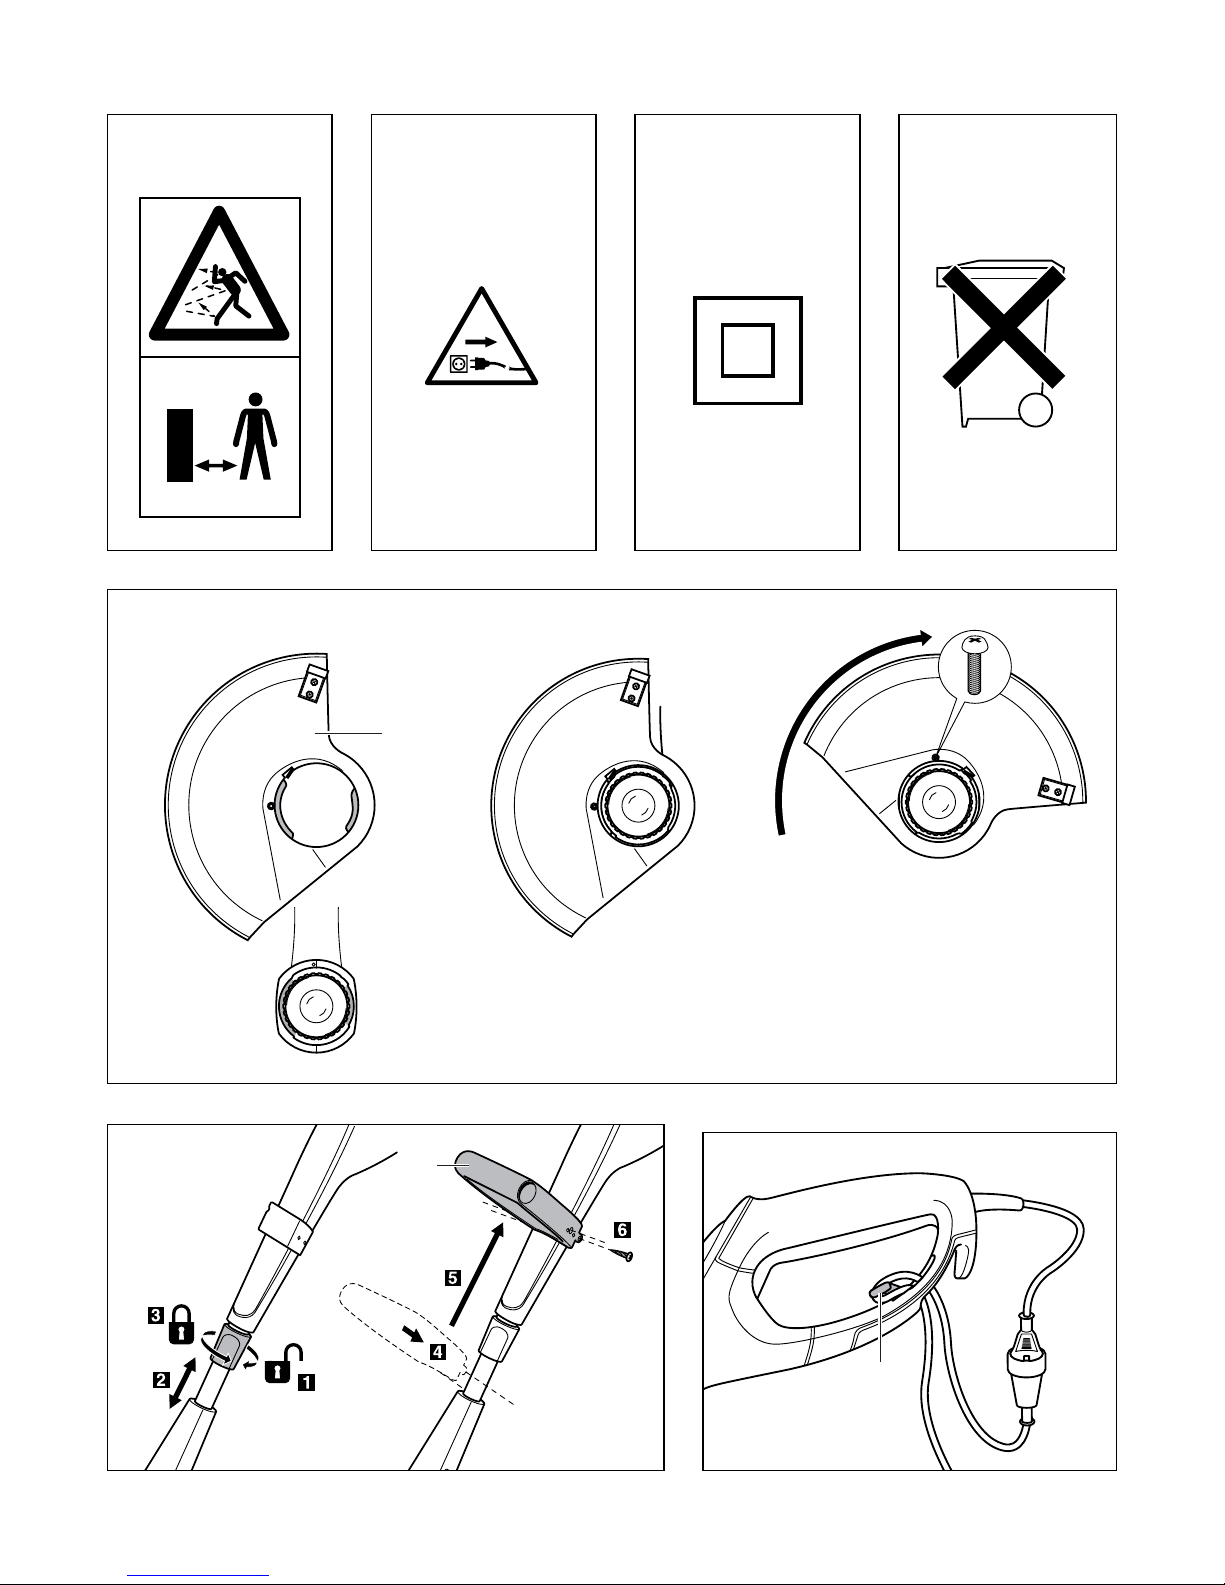
EXPLANATIONOFSYMBOLSONTOOL
3Warning! Read the instruction manual
4Donotexposetooltorain
5Wear protective glasses
6Payattentiontotheriskofinjurycausedbyflying
debris(keepbystandersasafedistanceawayfrom
work area)
7Immediatelydisconnecttheplugifthe(extension)cord
is damaged or cut through while working
8Double insulation (no earth wire required)
WHEN CONNECTING NEW 3-PIN PLUG (U.K. ONLY):
• Ifforanyreasontheoldplugiscutoffthecordofthis
tool,itmustbedisposedofsafelyandnotleft
unattended
• Donotconnecttheblue(=neutral)orbrown(=live)wire
inthecordofthistooltotheearthterminaloftheplug
USE
• Cuttingguard0
- mount cutting guard A as illustrated with round head
screw supplied
! neverusethetoolwithoutcuttingguardA
• Mounting/adjustingguidehandle!
- mount guide handle B as illustrated with 4 screws
supplied
! firmlytightenall4screws
• Cordrestraint@
- hooktheloopintheextensioncordoverrestraintC
as illustrated
- pulltighttosecuretheextensioncord
• Heightadjustment#
Foradjustingthetoolheightsothatyourfrontarmis
straight when trimming
- loosen locking sleeve D 2by turning it clockwise
- extendtubeE2to the desired height
- tighten locking sleeve D 2by turning it counter-
clockwise
• On/off$
- switch on tool by pressing trigger switch F
- switchofftoolbyreleasingtriggerswitchF
! afterswitchingoffthetoolthecuttinglines
continuetorotateforafewseconds
- allowthecuttinglinestostoprotatingbefore
switching on again
! donotrapidlyswitchonandoff
• Trimming
! ensurethattheredcoverG2isremovedfrom
thelinecuttingbladebeforeusingthetool
! ensurethatthecuttingareaisfreeofstones,
debrisandotherforeignobjects
! starttrimmingonlywhentoolrunsatfullspeed
- start trimming near the mains socket and move away
while working
- cutlonggrassinlayers(alwaysstartfromthetop)
- onlytrimwiththetipofthecuttingline
- do not cut damp or wet grass
- preventthecutgrassfromcloggingthespool(donot
make heavy cuts)
- do not overload the tool
- carefullycutaroundtreesandbushes,sothatthey
do not come into contact with the cutting lines
- keepthetoolawayfromsolidobjectsinorderto
protectthecuttinglinesagainstexcessivewear
- beawareofthekickbackforcesthatoccurwhen
solid objects are touched
• Holdingandguidingthetool%
- forcuttinglonggrassslowlyswingthetoolfromright
toleftandviceversa
- forcuttingshortergrasstiltthetoolasillustrated
- turnthetool180°fortrimmingedges
- holdtoolrmlywithbothhands,soyouwillhavefull
controlofthetoolatalltimes
- maintain a stable working position
- alwaysholdthetoolwellawayfromyourbody
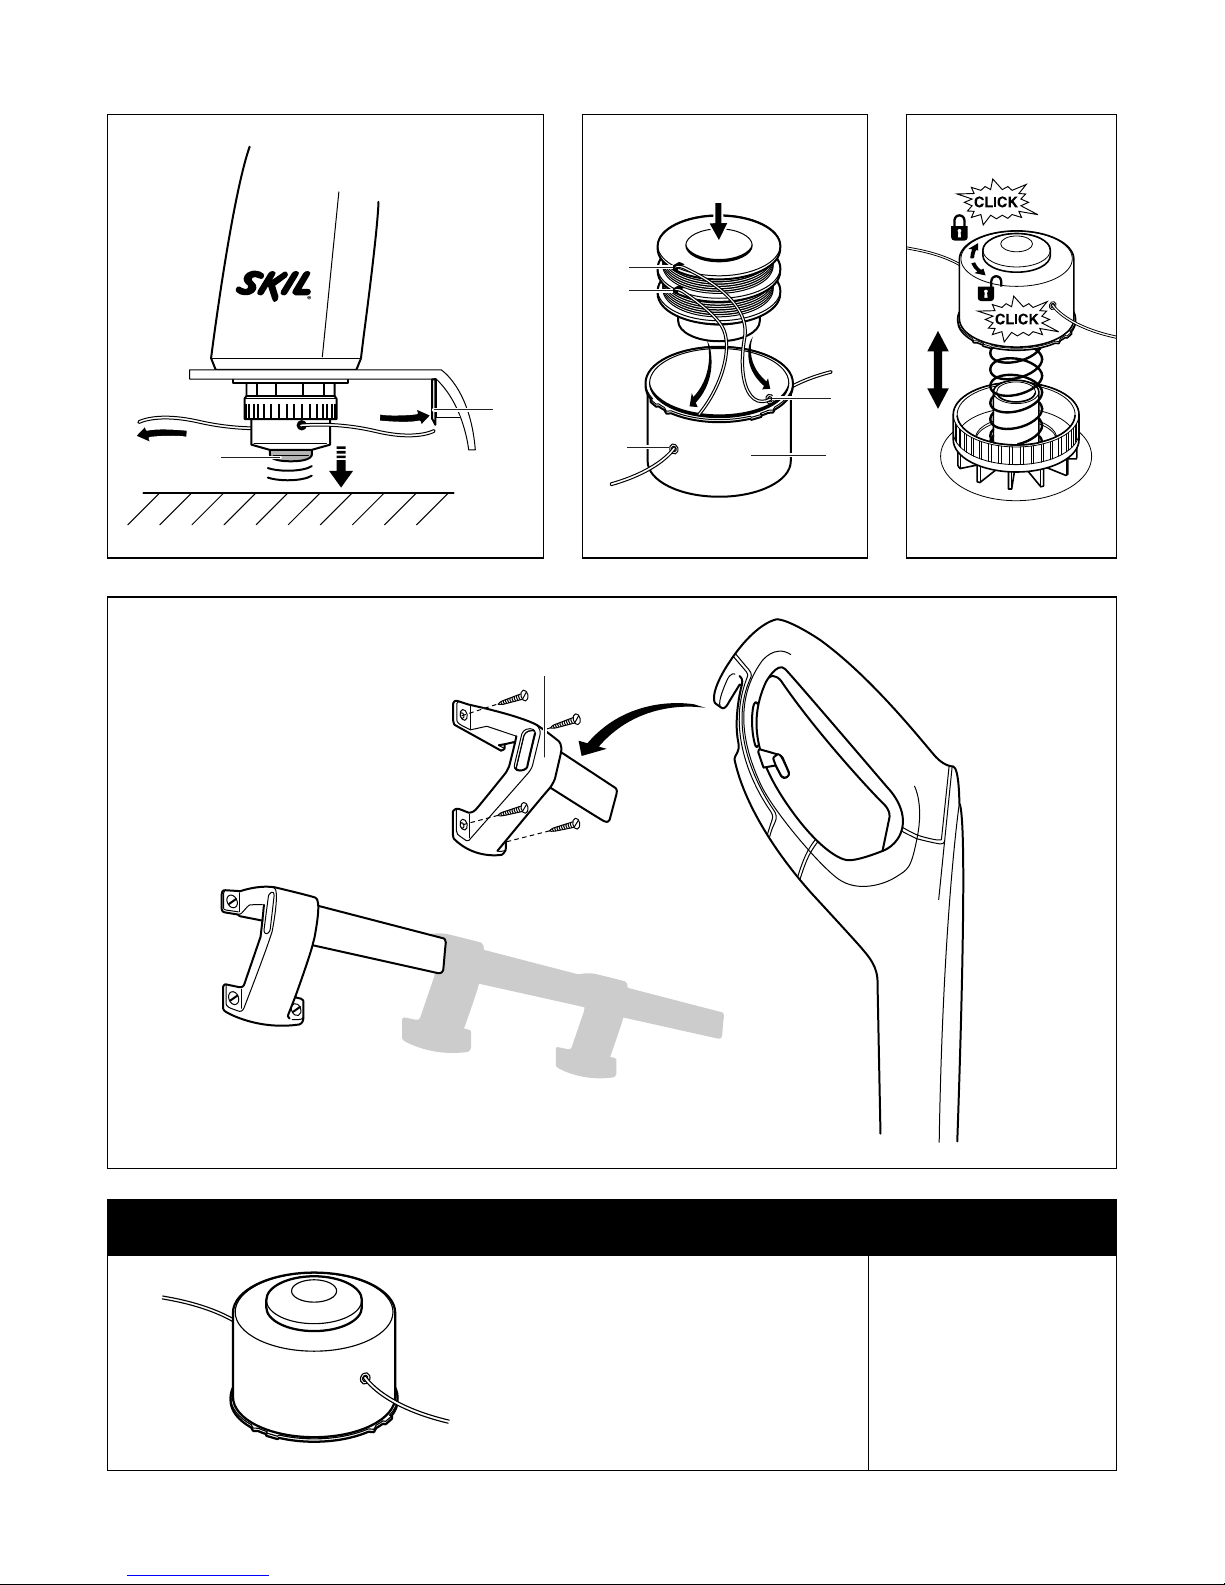
• Linefeeding^
- tapbuttonHlightlyontheground(preferablyona
solidsurface)whilethemotorisrunning
- twocuttinglineswillbereleasedandcutofftothe
correct length by line cutting blade J
! ensurethattheredcoverG2isremovedfrom
thelinecuttingbladebeforeusingthetool
! takecareagainstinjuryfromlinecuttingbladeJ
- afterlinefeedingalwaysreturnthetooltoitsnormal
operatingpositionbeforeswitchingon
- feedthelinesregularlytomaintainfullcuttingcircle
- when the motor runs without load and no grass is
cut,thecuttinglinesarewornorbroken;rewindthe
spool or replace the spool system
• Rewindingspool&
IncasethecuttinglinesfailtoprotrudefromspoolcapK
! switchoffthetoolanddisconnecttheplug
- removespoolsystemfromtoolandtakeoutspool
fromspoolcapK
- tightly rewind both cutting lines evenly in layers in
arrow direction
- insert both lines into spool slots X and ensure that
theyaresecurelyinplace(leavesufcientlengthof
line)
- threadbothlinesthroughspoolholesYbefore
placing the rewound spool into spool cap K
! ensurethatthespoolislocatedsecurelyinplace,
thenreleasebothlinesfromslotsXbypulling
themfirmly
- mount spool system onto tool (turnspoolclockwise
untilitclicksintoplace) *
• Replacingspoolsystem*
! switchoffthetoolanddisconnecttheplug
- simply remove/mount old/new spool system as
illustrated

8
- only use SKIL spool system 2610Z01354 with this
tool (damageduetousingotherspoolsystems
willbeexcludedfromthewarranty)
- afterreplacingthespoolsystemtest-runthetoolfor
at least one minute without load to ensure that the
tool is operating properly
MAINTENANCE / SERVICE
• Thistoolisnotintendedforprofessionaluse
• Alwaysdisconnectplugfrompowersourcebefore
cleaningand/ormaintenance
• Alwayskeeptoolandcordclean(especiallythe
ventilation slots)
- clean the tool with a damp cloth (do not use cleaning
agents or solvents)
- clean line cutting blade J 2andcuttingguardAafter
each use
- clean ventilation slots L 2regularly with a brush or
compressed air
• Regularlychecktheconditionofthecuttingheadand
thetightnessofnuts,boltsandscrews
• Regularlycheckforwornordamagedcomponentsand
have them repaired/replaced when necessary
• Storage(
- store the tool indoorsinadryandlocked-upplace,
outofreachofchildren
- securely mount storage rail M on the wall with
4 screws (notsupplied)andhorizontallyleveled
• Ifthetoolshouldfaildespitethecaretakenin
manufacturingandtestingprocedures,repairshouldbe
carriedoutbyanafter-salesservicecentreforSKIL
power tools
- send the tool undismantledtogetherwithproofof
purchase to your dealer or the nearest SKIL service
station(addressesaswellastheservicediagramof
the tool are listed on www.skileurope.com)
TROUBLESHOOTING
• Thefollowinglistingshowsproblemsymptoms,
possiblecausesandcorrectiveactions(ifthesedonot
identifyandcorrecttheproblem,contactyourdealeror
service station)
! switchoffthetoolanddisconnecttheplugbefore
investigatingtheproblem
★Tool does not operate
- powersupplysocketfaulty->useanothersocket
- extensioncorddamaged->replaceextensioncord
★Tool operates intermittently
- internalwiringdefective->contactdealer/service
station
- on/offswitchdefective->contactdealer/service
station
★Tool vibrates abnormally
- grasstoohigh->cutinstages
★Tool does not cut
- linetooshort/brokenoff->feedthelinemanually
★Linecannotbefed
- spoolempty->replacespool
- lineentangledinsidespool->inspectspool;rewindif
necessary
★Lineisnotcutofftocorrectlength->removecover
fromcuttingblade
★Line keeps breaking
- lineentangledinsidespool->inspectspool;rewindif
necessary
- trimmerincorrectlyused->onlytrimwiththetipof
theline;avoidstones,wallesandotherhardobjects;
feedthelineregularly
ENVIRONMENT
• Donotdisposeofelectrictools,accessoriesand
packagingtogetherwithhouseholdwastematerial
(onlyforEUcountries)
- inobservanceofEuropeanDirective2002/96/ECon
wasteofelectricandelectronicequipmentandits
implementationinaccordancewithnationallaw,
electrictoolsthathavereachedtheendoftheirlife
must be collected separately and returned to an
environmentallycompatiblerecyclingfacility
- symbol 9willremindyouofthiswhentheneedfor
disposing occurs
DECLARATIONOFCONFORMITY
• Wedeclareunderoursoleresponsibilitythatthis
productisinconformitywiththefollowingstandardsor
standardizeddocuments:EN60335inaccordancewith
theprovisionsofthedirectives2006/95/EC,
2004/108/EC,2006/42/EC
• Technicalfileat:SKILEuropeBV(PT-SEU/PJE),
4825BDBreda,NL
Arno van der Kloot
Vice President
Operations & Engineering
SKIL Europe BV, 4825 BD Breda, NL
Jan Trommelen
Approval Manager
01.10.2010
NOISE/VIBRATION
• MeasuredinaccordancewithEN60335thesound
pressurelevelofthistoolis70dB(A)andthesound
powerlevel90dB(A)(standarddeviation:3dB),and
thevibration<2.5m/s²(hand-armmethod;uncertainty
K=1.5m/s²)
• Measuredinaccordancewith2000/14/EC
(EN/ISO 5349) the guaranteed sound power level LWA
islowerthan93dB(A)(conformityassessment
procedureaccordingtoAnnexVI)
Notiedbody:KEMA,Arnhem,NL
Notified body identification number: 0344
• Thevibrationemissionlevelhasbeenmeasuredin
accordancewithastandardisedtestgiveninEN60335;
it may be used to compare one tool with another and as
apreliminaryassessmentofexposuretovibrationwhen
usingthetoolfortheapplicationsmentioned
- usingthetoolfordifferentapplications,orwith
differentorpoorlymaintaintedaccessories,may
significantly increasetheexposurelevel
- thetimeswhenthetoolisswitchedofforwhenitis
runningbutnotactuallydoingthejob,may
significantly reducetheexposurelevel

9
! protectyourselfagainsttheeffectsofvibrationby
maintainingthetoolanditsaccessories,keeping
yourhandswarm,andorganizingyourwork
patterns
F
Coupe-bordures 0730
INTRODUCTION
• Cetoutilestdestinéàcouperlesherbesetmauvaises
herbes sous les buissons ainsi que sur les pentes et les
bordures qui ne peuvent être atteintes avec une
tondeuse
• Cetoutiln’estconçupourunusageprofessionnel
• Vériezqueleconditionnementcontienttoutesles
piècesprésentéesdansleschéma2
• Lorsquedespiècesmanquentousontendommagées,
veuillezcontactervotredistributeur
• Lisezattentivementcemanueld’instructionavant
d’utiliserl’appareiletconservez-lepourpouvoir
vousyréférerultérieurement3
• Prêtezattentionauxconsignesdesécuritéetaux
avertissements;nepassuivrecesinstructionspeut
entraînerdesgravesblessures
SPECIFICATIONSTECHNIQUES1
ELEMENTSDEL’OUTIL2
AProtection de coupe
B Poignéedeguide
C Dispositifd’immobilisationducordond’alimentation
DDouille de verrouillage
E Tubetélescopique
FGâchette
GCache-lame de coupe
H Boutonpourl’alimentationdul
JLame de coupe du fil
KFlasque de la bobine
LFentes de ventilation
MRail de rangement (visnonfournies)
NCrochet de rangement
P Plaqued’identication
SECURITE
CONSIGNESDESÉCURITÉSPÉCIFIQUESPOURLES
COUPE-BORDURES
GENERALITES
• Familiarisez-vousaveclescommandesetlebon
fonctionnementdel’outil
• L’utilisateurestresponsabledesaccidentsoudangers
qu’encourentd’autrespersonnesouleursbiens
• Utilisezuniquementl’outillorsquelatempérature
ambianteestsituéeentre0°Cet40°C
• Nemontezjamaisd’élémentsdecoupemétalliquessur
cet outil
SECURITEDESPERSONNES
• Cetoutiln’apasétéconçupourêtreutilisépardes
personnes(ycomprisdesenfants)dontles
capacitésphysiques,sensoriellesoumentalessont
réduites,oumanquantd’expérienceoude
connaissances,exceptésiellesontfaitl’objetd’une
surveillanceouontreçudesinstructionsconcernant
l’utilisationdel’outilparunepersonneresponsable
deleursécurité
• Veillezàcequelesenfantsnejouentpasavecl’outil
• Nelaissezjamaisd’enfantsoudepersonnesne
connaissantpaslesinstructionsdefonctionnement
employerl’outil
• Tenezvosdoigtshorsdeportéedelalamede
coupedufilintégréedanslaprotectiondecoupe
• Maintenezenpermanencelesmainsetlespiedsà
distancedeslsdecoupelorsdelataille,surtout
lorsquevousmettezl’outilenmarche
• Porteztoujoursdeslunettesdeprotection,delong
pantalons et des chaussures robustes lorsque vous
utilisezl’outil
• Nefaitesjamaisfonctionnerl’outilàproximité
immédiatedepersonnes;arrêtezdel’utiliserlorsque
despersonnes(surtoutdesenfants)oudesanimauxse
trouventàproximité
• N’utilisezpascetoutilsivousêtesfatigué,malade,
sousl’inuencedel’alcooloud’autresdrogues.
SECURITERELATIVEAUSYSTEMEELECTRIQUE
• Contrôleztoujourssilatensionsecteurcorrespondàla
tensionindiquéesurlaplaquettesignalétiquedu
chargeur(leschargeursconçuspourunetensionde
230Vou240Vpeuventégalementêtrebranchéssur
220V)
• Contrôlezrégulièrementl’étatducâbleetfaites-le
remplacerparuntechnicienqualiéaubesoin
• Vériezdetempsentempslarallongeetremplacez-la
sielleestendommagée(desallongesinappropriées
peuventêtredangereuses)
• Utilisezuniquementunerallongespécialepour
l’extérieuretéquipéed’unecheetd’uneprisede
raccordementétanches
• Utilisezuncâbledeprolongementcomplètement
dérouléetdebonnequalitéd’unecapacitéde16A
• Lorsdel’utilisationdel’outildansdesenvironnements
humides,utilisezuninterrupteurdifférentielavecun
courantderéactionde30mAmaximum
• N’écrasezpas,necoincezpasetnetirezpassurle
câble/la rallonge
• Protégezlecâble/larallongedelachaleur,del’huileet
des arêtes vives
• Maintenezlecâble(derallonge)àdistancedesfils
decoupequitournent
• Eteigneztoujoursl’outiletdébranchezlachede
l’alimentationsilecâbled’alimentationoularallonge
estcoupé,endommagéouentremêlé(netouchezpas
lecâbleavantdedébrancherlafiche)
AVANTL’USAGE
• N’utilisezl’outilqu’àlalumièredujourousousune
lumièrearticielleappropriée
Other manuals for 730
1
Table of contents
Other Skil Trimmer manuals