Snom 300 Original operating instructions
snom 300
VoIP Business Phone
Quick Installation
Kurzanleitung
© 2006 snom technology AG
All rights reserved.
Version 1.00 www.snom.com

snom technology AG
Gradestr. 46
12347 Berlin, Germany
Note to the reader
This is a quick guide to the installation and operation of the snom 300.
The full manual is available on our web page, www.snom.com/wiki.
© 2006 snom technology Aktiengesellschaft.
All Rights Reserved. This document is supplied by snom technology AG. No
part of this document may be reproduced, republished or retransmitted
in any form or by any means whatsoever, whether electronically or
mechanically, including, but not limited to, by way of photocopying,
recording, information recording or through retrieval systems, without
the express written permission of snom technology AG.
snom technology AG reserves the right to revise this document and make
changes at any time and without the obligation to notify any person and/
or entity of such revisions and/or changes.
Product specifications contained in this document are subject to change
without notice.

snom technology AG • 3
Table of Content
Note to the reader ...................................................................... 2
Installation ................................................................5
Delivery Content ........................................................................ 5
Safety Information...................................................................... 5
Power supply ............................................................................. 5
Setting up the Phone................................................................... 6
Wall Mounting ........................................................................... 7
Cleaning .................................................................................... 9
Connecting the phone ..............................................11
Keypad .....................................................................13
Initialization.............................................................17
Booting ................................................................................... 17
Selecting the language ............................................................. 17
DHCP Configuration................................................................... 17
Setting the IP Address............................................................... 18
Setting the Netmask ................................................................. 18
Setting the IP Gateway.............................................................. 18
Setting the DNS Server ............................................................. 19
Selecting the Tone Scheme ........................................................ 19
Selecting the Timezone ............................................................. 19
Logging on the first account ....................................................... 20
Index .......................................................................23
English

4 •
English

snom technology AG • 5
1
English
Installation
Delivery Content
Please check whether the delivery contains the following parts:
•Base unit with display and keypad
• Handset
• Handset cable
• Power supply
• Paper template
Safety Information
Please read the following safety notices before installing or using
your snom phone. They are crucial for the safe and reliable operation
of the device.
Power supply
The snom 300 is powered by the external 5-V power supply included
in the package. Other power supplies may cause damage to the
phone, affect its behavior or induce noise.
6 • Installation
[ SNOM 300 QUICK INSTALLATION V1.00 ]
1
English
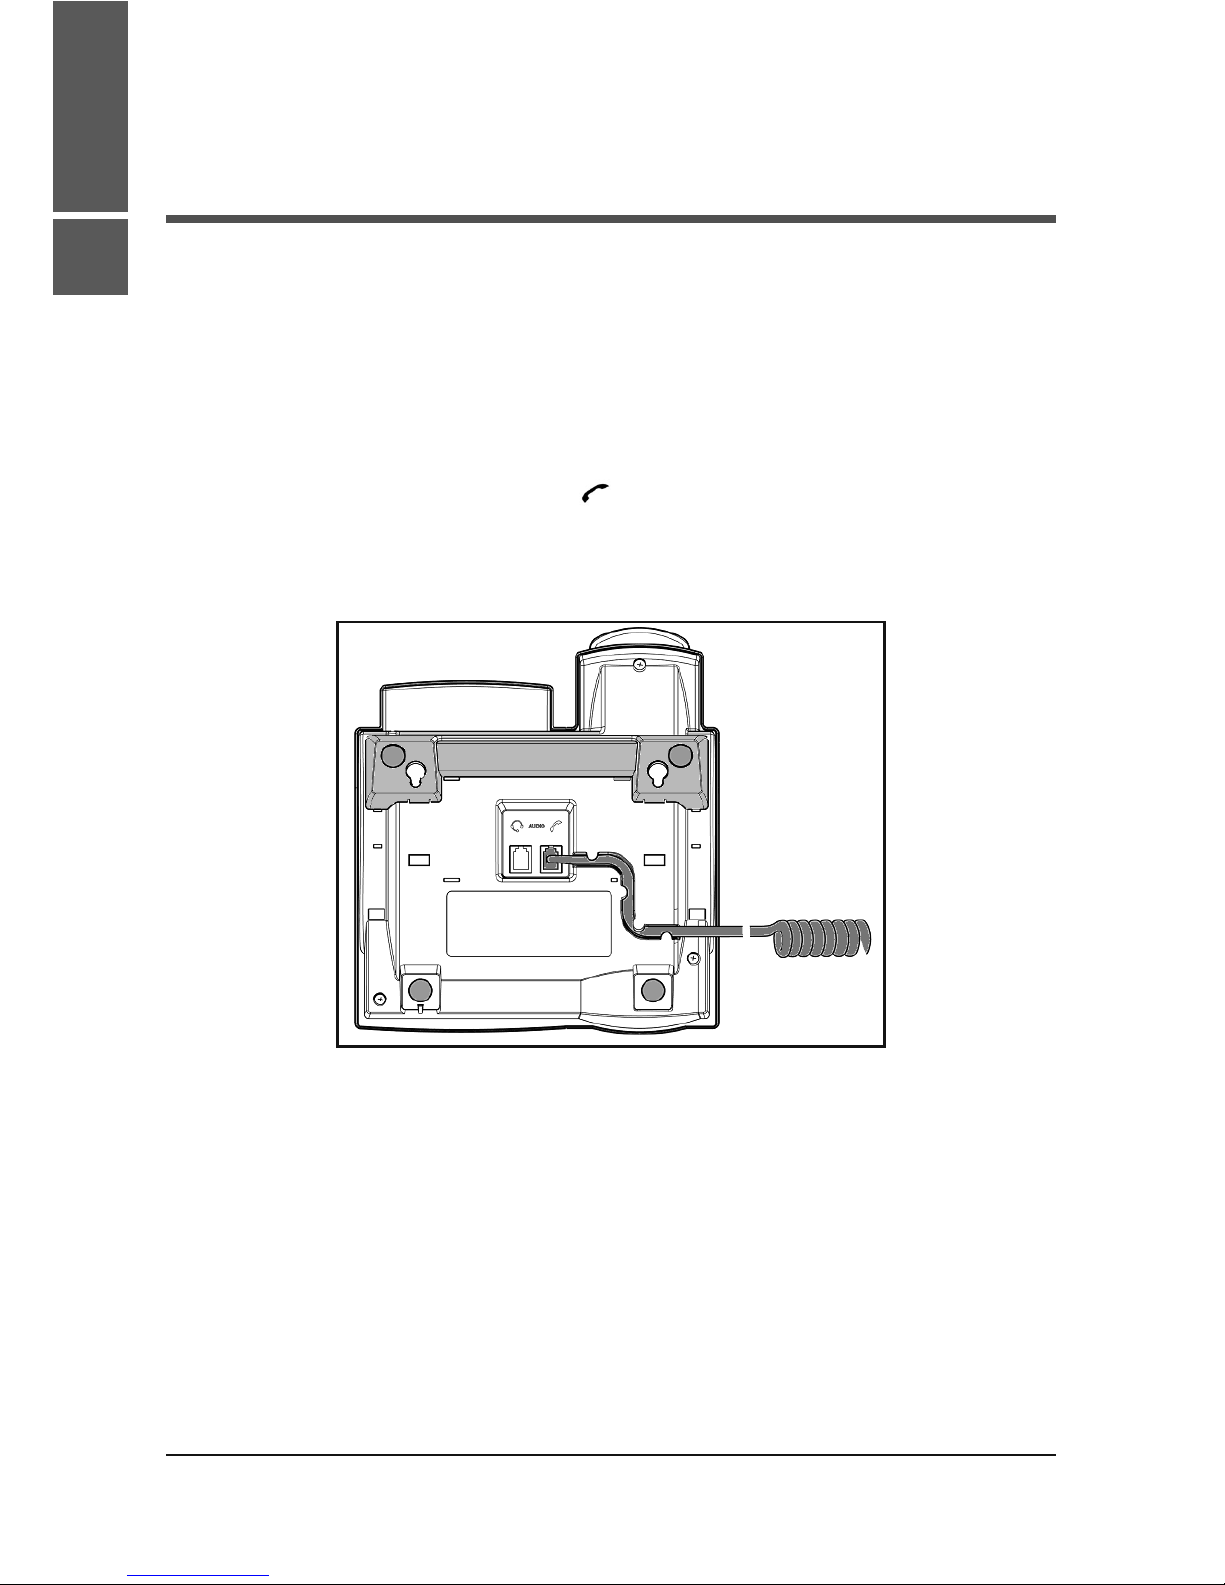
Setting up the Phone
Your snom 300 is delivered with the footstand (shaded light gray
in Fig. 1) attached to the phone’s bottom shell in the position for
desktop placement. Place the snom 300 on an even, horizontal
surface that gives the rubber pads a secure grip. Do not place it
on carpets or other materials containing fibers that could block the
air vents and cause overheating.
Connect one end of the handset cable to the handset and the
other end to the jack labeled “ ” on the phone’s bottom shell.
Clip the handset cord into the groove on the bottom shell of the
phone, as shown in Fig. 1.
Fig. 1
snom technology AG • 7
[ SNOM 300 QUICK INSTALLATION V1.00 ]
1
English
Wall Mounting
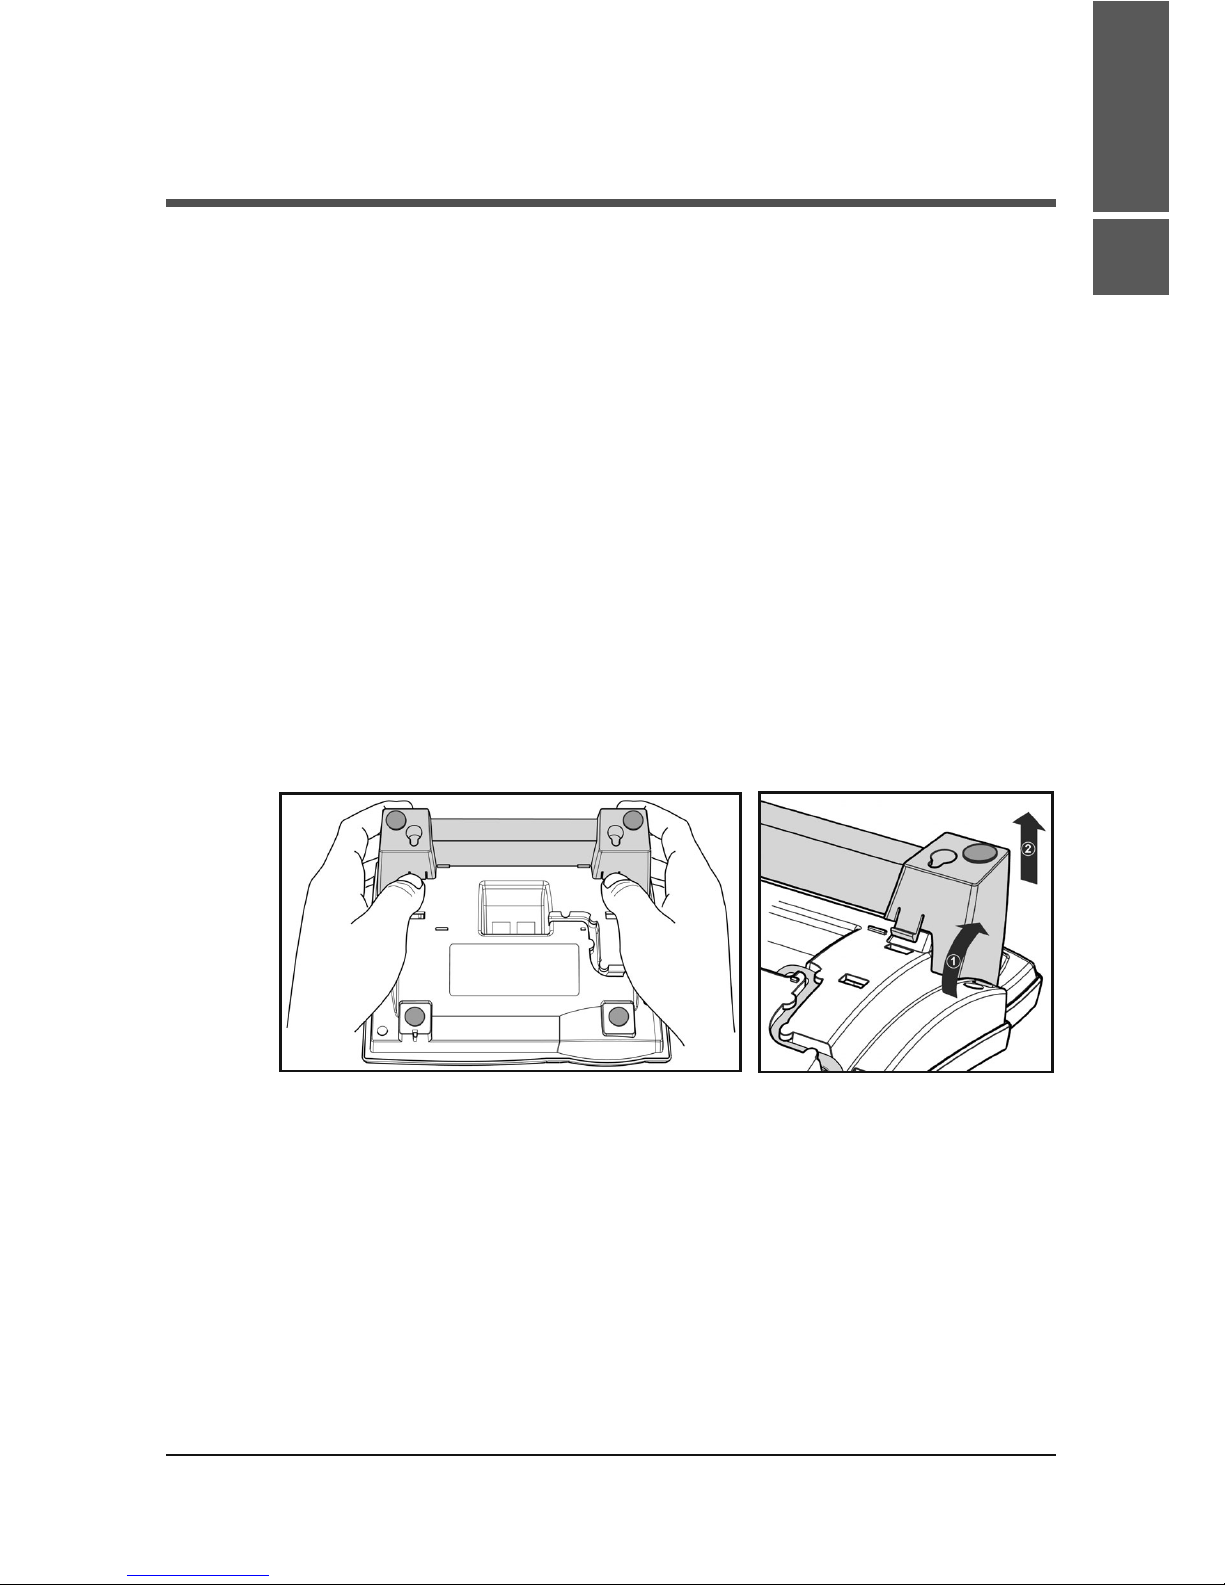
It is also possible to mount the snom 300 on the wall. In order to
do this, detach the footstand from the bottom shell and attach it in
the appropriate position for wall mounting, as described in steps 1
through 4, below.
Make sure that the handset cord has been clipped correctly into
the groove on the bottom shell of the phone, as shown in Fig. 1.
Failure to clip the cord into the groove may result in damage to
the cord when the footstand is attached in the position for wall
mounting.
1Turn the phone upside down (Fig. 2). Please, ensure that
you do not damage the display and that you do not drop
the receiver. You may want to hold the phone in your lap
or have a second person hold it.
Fig. 2 Fig. 3
2Lightly press the snap-fits of the footstand inwards
and, at the same time, tilt the footstand backwards
and lift it from its anchorage in the mounting holes
(Fig. 3).

8 • Installation
[ SNOM 300 QUICK INSTALLATION V1.00 ]
1
English
3Rotate the footstand 180° around its vertical axis.
4Insert the outside, rear snap-fits into the mounting
holes on the bottom shell (Fig. 4, arrow no. 1). Tilt
the footstand forward and downward until the snap-
fits snap into place in the mounting holes (arrow no.
2). Please, make sure that the four snap-fits have
securely snapped into the holes before mounting
the phone on the wall.
Fig. 4
The delivery includes a template to be used for marking the position
of the holes to be drilled in the wall.
Use wall plugs, if necessary, and screws with half-round head
profiles (diameters of screws dmax= 4.5 mm (0.177”), diameters
of heads dmax=8 mm (0.315”)).
The screws must protrude approx. 0.5 cm (0.197”) from the wall
for easy wall mounting of the phone.
snom technology AG • 9
[ SNOM 300 QUICK INSTALLATION V1.00 ]
1
English
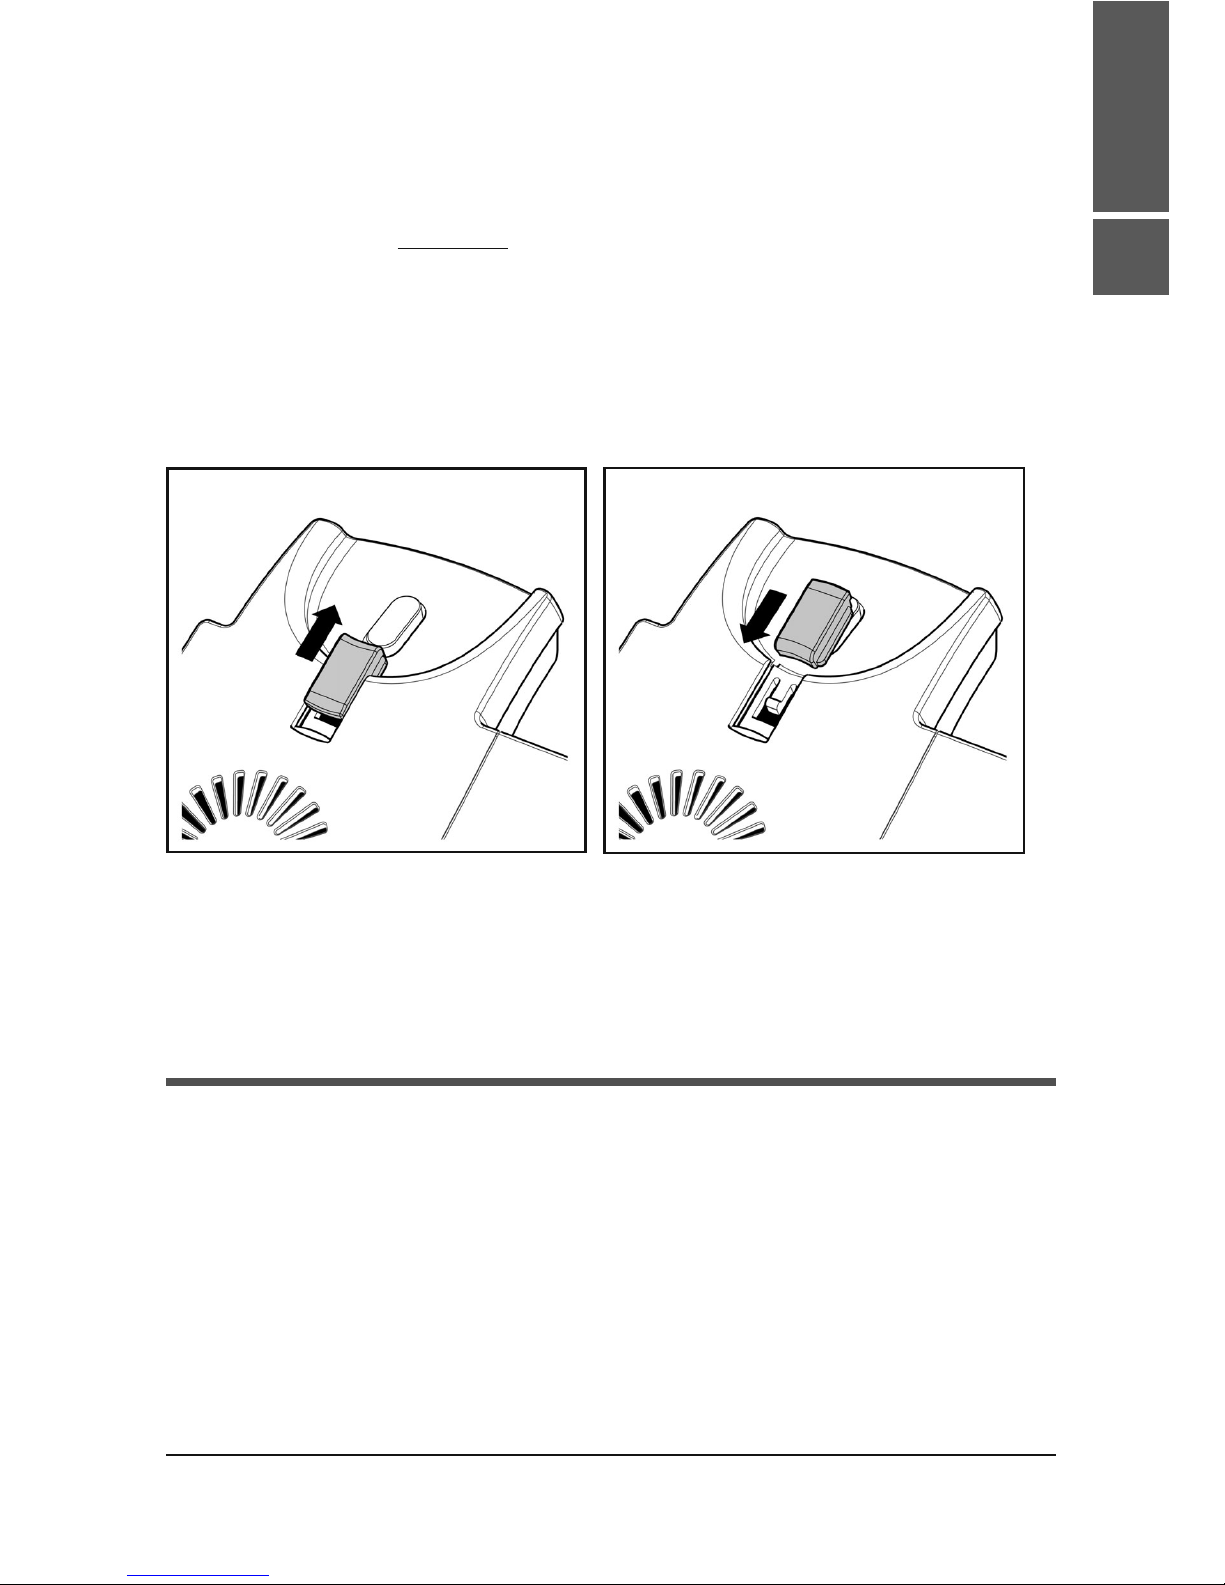
Adjusting the Handset Rest for Wall Mounting
The speaker of the handset has a small, rectangular indentation
that fits over the rounded end of the plastic tab inserted into a slot
on the top shell of the phone. When the phone is mounted on the
wall, the handset must be placed on this rounded end to ensure
that it will not fall off.
Slide the tab out of the slot, as shown in Fig. 5, rotate it 180°, and
slide it back into the slot, as shown in Fig. 6.
Fig. 5 Fig. 6
Cleaning
To clean the snom 300, use an anti-static cloth. Please avoid
cleaning liquids as they might damage the surface or the internal
electronics of the phone.

10 • Installation
[ SNOM 300 QUICK INSTALLATION V1.00 ]
1
English
Other manuals for 300
22
Table of contents
Other Snom IP Phone manuals


