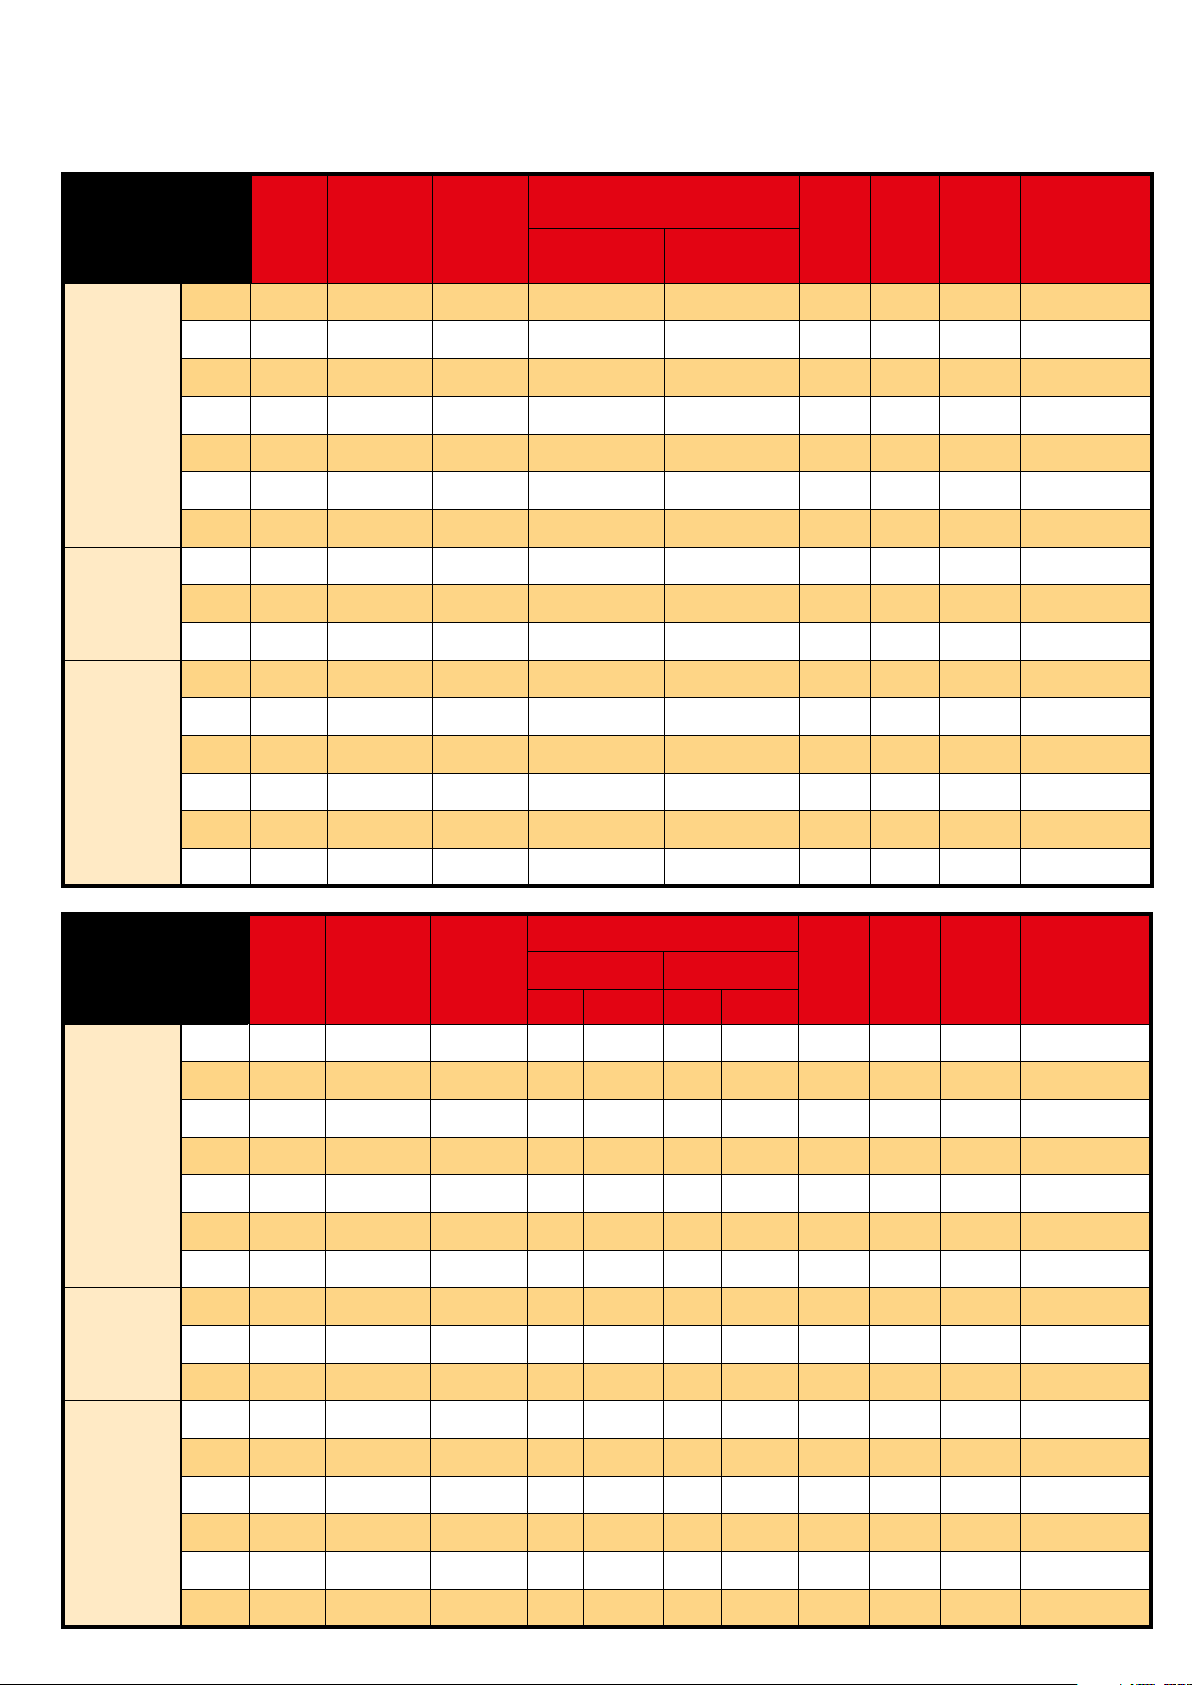
3- TECHNICAL CHARACTERISTICS
TRISEM-2110
TYPE OF MACHINE
WOR-
KING
WIDTH
(m)
TRANSPORT
WIDTH (m)
SPACING
ROW (cm)
HOPPER CAPACITY (Liters) TARE
(Kg.)
TARE
HIGH
HOPPER
(Kg.)
MÍN.
POWER
(HP)
TYRES
NORMAL HIGH
TINE
COULTER
300/22 33,28 13,6 1.270 1.565 970 1.000 110 10.0/75-15.3 12PR
300/25 33,28 12 1.270 1.565 1.000 1.030 110 10.0/75-15.3 12PR
350/25 3,5 3,77 14 1.270 1.565 1.070 1.100 120 10.0/75-15.3 12PR
350/28 3,5 3,77 12,5 1.270 1.565 1.100 1.140 120 10.0/75-15.3 12PR
400/28 44,26 14,3 1.270 1.565 1.140 1.190 130 10.0/75-15.3 12PR
400/31 44,26 12,9 1.270 1.565 1.180 1.230 130 10.0/75-15.3 12PR
400/33 44,26 12,1 1.270 1.565 1.200 1.250 130 10.0/75-15.3 12PR
SUFFOLK
COULTERS
300/25 33,28 12 1.270 1.565 110 10.0/75-15.3 12PR
350/28 3,5 3,77 12,5 1.270 1.565 120 10.0/75-15.3 12PR
400/33 44,26 12,1 1.270 1.565 130 10.0/75-15.3 12PR
DOUBLE
DISC
300/19 33,28 15,8 1.270 1.565 110 10.0/75-15.3 12PR
300/21 33,28 14,3 1.270 1..565 110 10.0/75-15.3 12PR
350/21 3,5 3,77 16,7 1.270 1.565 120 10.0/75-15.3 12PR
350/25 3,5 3,77 14 1.270 1.565 120 10.0/75-15.3 12PR
400/25 44,26 16 1.270 1.565 130 10.0/75-15.3 12PR
400/29 44,26 13,8 1.270 1.565 130 10.0/75-15.3 12PR
TRICOMBI-2110
TYPE OF MACHINE
WOR-
KING
WIDTH
(m)
TRANSPORT
WIDTH (m)
SPACING
ROW (cm)
HOPPER CAPACITY (Liters)
TARE
(Kg.)
TARE
HIGH
HOPPER
(Kg.)
MÍN.
POWER
(HP)
TYRES
NORMAL HIGH
SEED FERTILIZER SEED FERTILIZER
TINE
COULTER
300/22 33,28 13,6 713 583 - - 10.0/75-15.3 12PR
300/25 33,28 12 713 583 - - 10.0/75-15.3 12PR
350/25 3,5 3,77 14 846 692 - - 10.0/75-15.3 12PR
350/28 3,5 3,77 12,5 846 692 - - 10.0/75-15.3 12PR
400/28 44,26 14,3 978 800 - - 10.0/75-15.3 12PR
400/31 44,26 12,9 978 800 - - 10.0/75-15.3 12PR
400/33 44,26 12,1 978 800 - - 10.0/75-15.3 12PR
SUFFOLK
COULTERS
300/25 33,28 12 713 583 - - 10.0/75-15.3 12PR
350/28 3,5 3,77 12,5 846 692 - - 10.0/75-15.3 12PR
400/33 44,26 12,1 978 800 - - 10.0/75-15.3 12PR
DOUBLE
DISC
300/19 33,28 15,8 713 583 - - 10.0/75-15.3 12PR
300/21 33,28 14,3 713 583 - - 10.0/75-15.3 12PR
350/21 3,5 3,77 16,7 846 692 - - 10.0/75-15.3 12PR
350/25 3,5 3,77 14 846 692 - - 10.0/75-15.3 12PR
400/25 44,26 16 978 800 - - 10.0/75-15.3 12PR
400/29 44,26 13,8 978 800 - - 10.0/75-15.3 12PR