SOLAC ET8924 User manual

Solac is a registered Trade Mark
INSTRUCCIONES DE USO
INSTRUCTIONS FOR USE
MODE D’EMPLOI
GEBRAUCHSANLEITUNG
INSTRUÇÕES DE USO
ISTRUZIONI PER L’USO
GEBRUIKSAANWIJZING
NÁVOD K POUZITÍ
INSTRUCJA OBSLUGI
NÁVOD NA POUZITIU
HASNÁLATI UTASÍTÁS
инсрукция за употреба
UPUTE ZA UPOTREBU
INSTRUCŢIUNI DE UTILIZARE
Emisores térmicos
Heat emitters
Émetteurs thermiques
Heizstrahler
Emissores térmicos
Asciugacapelli
Haardroger
Fén
Suszarka
Sušičvlasov
Hajszárító
Сешоар
Sušilo za kosu
Uscător de păr
Mod. ET8924, ET8926,
ET8928, ET8930,
ET8932
06/07
ET8924.book Page 1 Friday, June 22, 2007 11:18 AM

ESPAÑOL es
ENGLISH en
FRANÇAIS fr
DEUTSCH de
PORTUGUÊS pt
5-10 •
11-16 •
17-22 •
23-28 •
29-34 •
ET8924.book Page 2 Friday, June 22, 2007 11:18 AM
ELECTRODOMESTICOS SOLAC S.A Artapadura,11 - 01013 VITORIA (SPAIN)

ET8924.book Page 3 Friday, June 22, 2007 11:18 AM

ET8924.book Page 4 Friday, June 22, 2007 11:18 AM

Atención
es
5
ESPAÑOL es
1 Atención
• El aparato en ningún caso debe ser cubierto por ropa, recipiente o
cualquier otro objeto ni ser colocado debajo de un armario o cualquier
otro obstáculo a la circulación de aire caliente.
• El aparato debe alejarse de todo objeto inflamable y no se deben dejar
niños cerca del emisor sin ser vigilados.
• No utilice el emisor térmico para secar ropa.
• La colocación del emisor térmico debe ser elegida correctamente y ha
de realizarse según las reglas y conforme a las normas.
• No instalar el aparato bajo una toma de corriente.
• El aparato no debe ser instalado en lugares en los que exista riesgo de
salpicaduras de agua como bañeras, lavabos, ducha, piscina, etc…
• No haga funcionar el aparato con el cable enrollado.
• En caso de que el cable de alimentación esté dañado no ponga el
aparato en funcionamiento, este cable sólo se podrá sustituir por el
Servicio de Asistencia Técnica con el fin de evitar riesgos.
• El aparato debe instalarse de forma que los interruptores, termostato,
toma móvil de conexión, no puedan ser tocados directa o indirectamente
por una persona que se encuentre en la bañera o ducha.
• Con el fin de evitar el olor a nuevo del aparato en su primer uso encienda
el emisor y déjelo funcionando durante 2 horas en la temperatura más
alta.
bAtención! Cuando desee desprenderse del aparato NUNCA lo
deposite en la basura sino que acuda al punto limpio o de recogida
de residuos más cercano a su domicilio para su posterior tratamiento.
De esta manera esta contribuyendo al cuidado del medio ambiente.
cEn orden a evitar un sobrecalentamiento no cubrir el aparato de
calefacción.
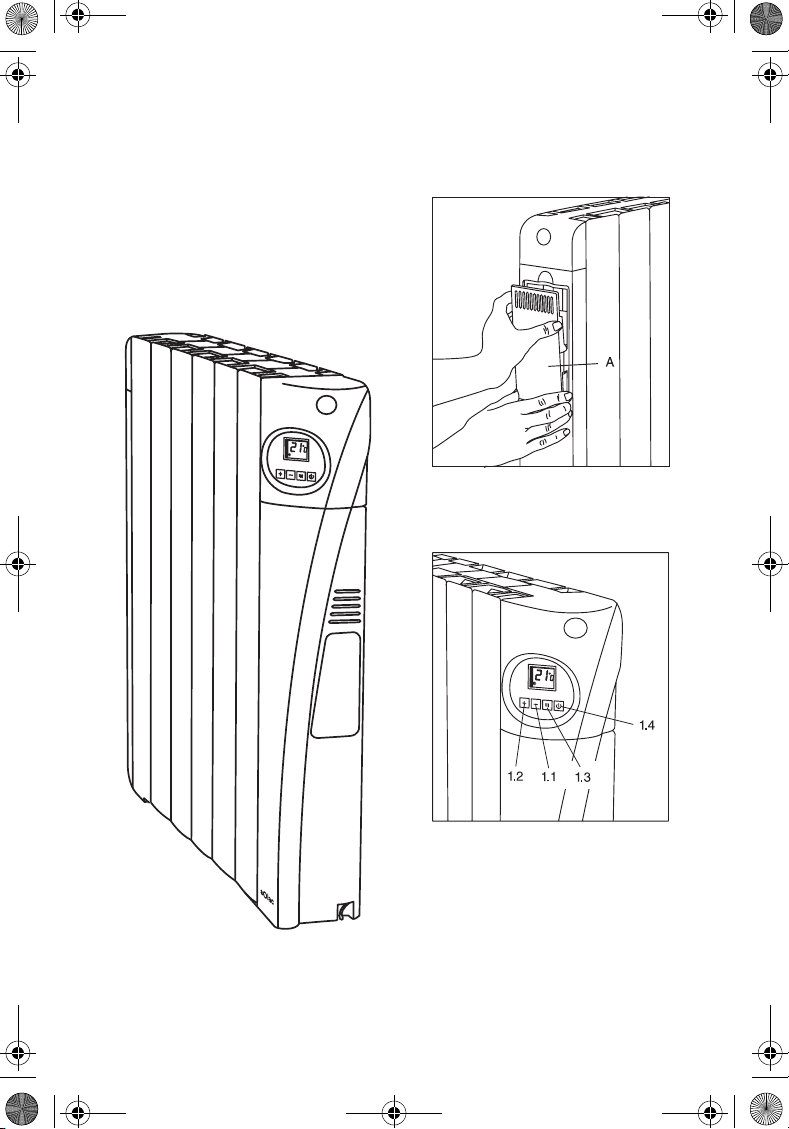
2 Instrucciones de Montaje
En la medida de lo posible instalar el emisor en un muro debajo de una
ventana pero de ningún modo en una zona de ventilación. Respetar las
distancias de seguridad para la instalación.
ET8924.book Page 5 Friday, June 22, 2007 11:18 AM

6Modo de funcionamiento (modelos: ET8924, ET8926, ET8928,
Montaje en la pared
1 Presentar el soporte mural en el suelo en la posición que se ve en la
figura (fig. 1) y marcar en la pared el agujero superior del tornillo en el
soporte a ambos lados (fig. 1).
2 Taladrar en las marcas y colocar el taco (fig. 2).
3 Colocar el soporte haciendo coincidir los agujeros inferiores para los
tornillos del mismo y atornillar (fig. 3).
4 Con el soporte sujeto por la parte inferior repetir el proceso del punto 2
(fig. 3).
5 Por último, atornillar para dejar el soporte correctamente fijado (fig. 4).
6 Verificar que el soporte quede anclado de modo que aguante el doble
de peso del aparato.
En caso de soporte dañado, no reutilizar.
Para el montaje a una pared de ladrillo recubierta de yeso utilizar los
siguientes medios: Tornillos 4.2 x 25 DIN 7981 y taco 6 76 NY, para
otros tipos de superficie dirigirse al vendedor experto.
Distancias de seguridad
• El radiador debe instalarse a 150 mm de todo obstáculo, muro, etc.
• La distancia del aparato al suelo debe ser de 220 mm pudiendo ser
menor en ciertos casos pero sin bajar de 150 mm.
Montaje de los pies (accesorio no incluido)
• Introduzca los extremos de la parte inferior del radiador en los pies tal y
como se indica en la figura 5, se escuchará un click indicando que el
montaje se ha hecho correctamente.
3 Modo de funcionamiento (modelos: ET8924, ET8926,
ET8928, ET8930, ET8932. Termostato digital)
Componentes
1 Teclado
1.1 Tecla disminuir selección
1.2 Tecla aumentar la selección
1.3 Tecla Modo / OK
1.4 Tecla ON / OFF / PROG
A Humidificador
ET8924.book Page 6 Friday, June 22, 2007 11:18 AM

Modo de funcionamiento (modelos: ET8924, ET8926, ET8928,
es
7
1 Una vez que el aparato se encuentra fijado y correctamente
conexionado pulse el interruptor ON/OFF/PROG para poner el emisor
térmico bajo tensión.
2 Al encender el emisor térmico el microprocesador lee la memoria interna
del aparato para cargar el último modo seleccionado por el usuario. En
la primera conexión, la memoria esta vacía por lo que la pantalla
parpadeará constantemente hasta que se presione cualquier tecla.
3 Durante el funcionamiento del aparato la pantalla indica la temperatura
y el modo de funcionamiento seleccionado: confort, económico,
antihielo, off y programación.
•ElsímboloHestá encendido mientras la resistencia esté en
funcionamiento.
Ajuste de la temperatura de confort
1 Al presionar las teclas (+) y (-) se selecciona la temperatura de confort
que deseamos. La temperatura varía a razón de 1º C cada pulsación.
Mediante una pulsación prolongada sobre esta tecla la temperatura
varía automáticamente a razón de 1º C cada 0.25 seg.
2 Una vez asignada la temperatura y tras un periodo sin ninguna
pulsación éste memoriza la temperatura seleccionada.
Selección de modo
1 Al presionar la tecla (M/OK) seleccionamos el modo de funcionamiento.
Por cada pulsación mayor de 0.1 seg. el termostato pasa de uno a otro
modo Confort-Económico- Confort…
2 Para acceder al modo “antihielo” la pulsación sobre la tecla (M/OK) será
de una duración prolongada hasta que se muestre en la pantalla el icono
correspondiente N.
CONFORT ECONÓMICO ANTIHIELO OFF PROGRAMACIÓN
sl NG PROG
MODO TEMPERATURA
CONFORT Selección con las teclas (+), (-)
ECONÓMICO Temperatura de confort menos 3 ºC
ANTIHIELO 7 ºC
ET8924.book Page 7 Friday, June 22, 2007 11:18 AM

8Programación
Posibles fallos del termostato
• Si la sonda se encuentra por debajo de -15ºC en la pantalla se
visualizará el mensaje OC.
• Si la sonda se encuentra por encima de 50ºC en la pantalla se
visualizará el mensaje SC.
4 Programación
1 Asegúrese de que el termostato esté en posición PARADA o pulse el
botón ON/OFF/PROG para pasar a la posición parada.
2 Impulso largo (mínimo 5 s) sobre el botón ON/OFF/PROG para pasar al
modo Programación Manual.
3 Seleccione el modo de funcionamiento hora por hora pulsando el botón
"+" y luego "Modo/OK".
• Segmento superior: Confort
• Segmento inferior: Ahorro
• Nada: Antihielo
4 Repetir la operación para cada hora de cada día de la semana.
• Al final de la programación del día nº 7 el termostato guarda
automáticamente los parámetros y cambia a modo ajuste de la hora con
el fin de asegurarse de que la hora es válida. Modificar la hora si fuera
necesario o validar para volver a la posición PARADA.
5 Para movernos por el horario de programación utilizamos el botón "- ",
este botón nos permite desplazarnos por los usos horarios sin modificar
la programación. Una pulsación prolongada acelera el proceso.
5 Puesta en hora del reloj
1 Asegúrese de que el termostato esté en posición PARADA o pulse el
botón ON/OFF/PROG para pasar a la posición de PARADA.
2 Impulso largo (min 5 s) sobre el botón ON/OFF/PROG para pasar al
modo Programación Manual.
3 Impulso corto sobre el botón ON/OFF/PROG.
OFF Apagado
MODO TEMPERATURA
ET8924.book Page 8 Friday, June 22, 2007 11:18 AM

Técnica de compensación
es
9
4 Seleccione el día pulsando los botones "+" y "-" y pulsar el botón "Modo
/ OK para validar.
5 Ajustar la hora pulsando los botones "+" y "-" y pulsar el botón "Modo /
OK" para validar.
• La validación provoca un retorno a posición PARADA.
6 Técnica de compensación
Debido a las características del aparato la medición de la temperatura
se realiza en la parte inferior del aparato, estando perfectamente
ajustada en relación con la temperatura seleccionada por el usuario. No
obstante, existe la posibilidad de ajustar manualmente este valor
mediante la "Compensación térmica".
1 Colocar el termostato en la posición apagado pulsando la tecla ON/OFF/
PROG.
2 Pulsando la tecla M/OK (pulsación larga), accedemos a este menú en el
que la pantalla muestra 0.0.
3 Pulsar los botones +/- para realizar el ajuste por pasos de 0.1ºC.
4 Pulsar el botón M/OK (pulsación corta) para volver a la posición de
apagado.
5 Encender de nuevo el emisor.
Ejemplo
Medimos con un termómetro 22ºC en una habitación cuando el valor de
la temperatura de confort seleccionada en el termostato es de 20ºC.
• El valor de la compensación es 22 - 20 = +2ºC.
• En el menú compensación el usuario deberá introducir +2ºC.
7 Bloqueo de teclado
El usuario puede asegurarse de que nadie modifique la programación
realizada bloqueando la botonera de control. Esta función es muy útil
para edificios públicos o para limitar el acceso de los más pequeños. Se
realiza pulsando simultáneamente y de forma prolongada los botones
"+" y "-". El desbloqueo se realiza del mismo modo.
8 Uso del humidificador (válido para todos los modelos)
• Si desea utilizar el humidificador – ambientador para mantener la tasa
de humedad ambiental durante el funcionamiento del emisor, abra el
ET8924.book Page 9 Friday, June 22, 2007 11:18 AM

10 Limpieza y Mantenimiento
depósito y llene el interior con agua (Fig. A) . Si además quiere usarlo
para ambientar o perfumar, añada unas gotas de la esencia que prefiera
(floral, eucalipto, etc.) al agua. Cierre el depósito.
9 Limpieza y Mantenimiento
• Asegúrese de que el emisor esté desconectado de la red y deje enfriar
su superficie en caso de haberlo usado anteriormente.
• Para la limpieza del emisor utilice un paño suave y húmedo. No utilice
disolventes o detergentes abrasivos. Cuando sea necesario utilice un
aspirador para eliminar el polvo del emisor.
ET8924.book Page 10 Friday, June 22, 2007 11:18 AM

11
en
Important
ENGLISH en
1 Important
• The appliance should never be covered with clothes, containers or any
other objects, nor should it be placed under a wardrobe or anything else
that could be an obstacle to the circulation of hot air.
• The appliance must be kept away from inflammable objects and
unsupervised children should not be allowed near the emitter.
• Do not use the heat emitter to dry clothes.
• The place where the heat emitter is installed must be chosen carefully
according to the instructions and in compliance with the standards.
• Do not install the appliance under a mains socket.
• The appliance should not be installed in places where there is a risk of it
being splashed with water, such as from bathtubs, sinks, showers,
swimming pools, etc.
• Do not operate the appliance with the cable wound up.
• If the power cable is damaged, do not switch on the appliance. This
cable should only be replaced by the Technical Assistance Service in
order to prevent any risks.
• The appliance must be installed so that the switches, thermostat and
mobile power socket cannot be touched directly or indirectly by a person
in the bath or shower.
• To avoid the new smell of the appliance when using it for the first time,
switch on the emitter and leave it working for 2 hours at the highest
temperature.
bCaution! When you wish to dispose of the appliance, NEVER throw it
in the rubbish. Instead, take it to your nearest clean point or waste
collection point, where it will receive subsequent treatment. You will
thus be helping to take care of the environment.
cDo not cover the heating appliance in order to prevent it from
overheating.
2 Installation instructions
When possible, install the emitter on a wall under a window, but never in
a ventilation area. Respect the installation safety distances.
ET8924.book Page 11 Friday, June 22, 2007 11:18 AM

12 Operating mode (models: ET8924, ET8926, ET8928, ET8930,
Wall mounting
1 Place the wall support on the floor in the position shown in the figure
(fig. 1) and mark the top screw holes on either side of the support on the
wall (fig. 1).
2 Drill the marked holes and insert the plug (fig. 2).
3 Install the support, aligning the bottom screw holes with the matching
screws, and tighten the screws (fig. 3).
4 Holding the support from below, repeat the process in step 2 (fig. 3).
5 Lastly, tighten the screws to securely attach the support (fig. 4).
6 Check that the support is anchored in such a way that it can withstand
twice the weight of the appliance.
If the support is damaged, do not reuse it.
For installation on a plastered brick wall, use the following: 4.2 x 25 DIN
7981 screws and 6 76 NY wall plugs. For other surfaces, consult the
expert salesperson.
Safety distances
• The radiator must be installed at 150 mm from any obstacles, walls, etc.
• The distance from the appliance to the floor should be 220 mm. It may
be less in certain cases, but never less than 150 mm.
Installing the feet (not included accessory)
• Insert the edges of the bottom of the radiator into the feet as shown in
figure 5. You will hear a click to indicate that the installation was a
success.
3 Operating mode (models: ET8924, ET8926, ET8928,
ET8930, ET8932. Digital thermostat)
Components
1 Keypad
1.1 Reduce selection key
1.2 Increase selection key
1.3 Mode/OK key
1.4 ON/OFF/PROG switch key
A Humidifier
1 Once the appliance is installed and correctly connected, press the ON/
OFF/PROG key to switch on the heat emitter.
ET8924.book Page 12 Friday, June 22, 2007 11:18 AM

13
en
Operating mode (models: ET8924, ET8926, ET8928, ET8930,
2 When the heat emitter is switched on, the microprocessor reads the
internal memory of the appliance and loads the last mode selected by
the user. On connection for the first time, the memory is empty.
Therefore, the screen will blink on and off until one of the keys is
pressed.
3 While the appliance is working, the screen shows the temperature and
the operating mode selected: comfort, saving, anti-frost, off and
programming.
•TheHsymbol remains on while the element is working.
Comfort temperature adjustment
1 By pressing the (+) and (-) keys you can select the desired room
temperature. The temperature changes by 1º C every time you press a
key. If you hold the key pressed, the temperature changes automatically
by 1º C every 0.25 seconds.
2 Once the temperature is assigned and after a certain period without
pressing any keys, the appliance memorises the selected temperature.
Selecting the mode
1 Press the (M/OK) key to select the operating mode. Every time this key
is pressed for more than 0.1 sec., the thermostat changes from one
mode to the next: Comfort – Saving – Comfort, etc.
2 To access the “anti-frost” mode, press the (M/OK) key until the Nicon
appears on the screen.
COMFORT SAVING ANTI-FROST OFF PROGRAMMING
sl NG PROG
MODE TEMPERATURE
COMFORT Selected with the (+), (-) keys
SAVING Comfort temperature minus 3 ºC
ANTI-FROST 7 ºC
OFF Off
ET8924.book Page 13 Friday, June 22, 2007 11:18 AM

14 Programming
Possible errors of the thermostat
• If the probe is at less than -15ºC, the screen will display the message
OC.
• If the probe is at more than 50ºC, the screen will display the message
SC.
4 Programming
1 Make sure that the thermostat is in the OFF position or press the ON/
OFF/PROG button to go to the off position.
2 Press the ON/OFF/PROG button for at least 5 seconds to go to Manual
Programming.
3 Select the hour-by-hour operating mode by pressing the "+" button and
then "Mode/OK".
• Top segment: Comfort
• Low segment: Save
• Nothing: Anti-frost.
4 Repeat the operation for each hour of each day of the week.
• When you finish programming day No. 7 on the thermostat, the
parameters are saved automatically and the program changes to the
hour adjustment mode in order to ensure that the time is correct. Modify
the time if necessary or validate to return to the OFF position.
5 Use the "-" button to move through the program schedule. This button
moves through the time zones without modifying the program. Press
continuously to accelerate the process.
5 Setting the clock time
1 Make sure that the thermostat is in the OFF position or press the ON/
OFF/PROG button to go to the OFF position.
2 Press the ON/OFF/PROG button for at least 5 seconds to go to Manual
Programming.
3 Press the ON/OFF/PROG button once.
4 Select the day by pressing the "+" and "-" buttons and then the "Mode/
OK" button to validate.
5 Select the time by pressing the "+" and "-" buttons and then the "Mode/
OK" button to validate.
ET8924.book Page 14 Friday, June 22, 2007 11:18 AM

15
en
Compensation technique
• Once validated, the program will return to the OFF position.
6 Compensation technique
Due to the characteristics of this appliance, temperature is measured at
the bottom of the appliance and adjusts perfectly to the temperature
selected by the user. However, this value can be adjusted manually
using "Heat Compensation".
1 Press the ON/OFF/PROG key to turn off the thermostat.
2 Press the M/OK key (long press) to access the menu showing 0.0 on the
screen.
3 Press the +/- buttons to adjust the temperature by 0.1ºC.
4 Press the M/OK button (short press) to return to the OFF position.
5 Switch the emitter on again.
Example:
We measure 22ºC with a thermostat in a room when the comfort
temperature selected on the thermostat is 20ºC.
• The compensation value is 22 - 20 = +2ºC .
• The user should enter +2ºC in the compensation menu.
7 Blocking the keypad
The user can ensure that nobody modifies the set program by blocking
the control keypad. This function is very useful in public buildings or to
limit access by children. To block the keypad, press the "+" and "-"
buttons simultaneously for at least 5 seconds. Do the same to unblock
the keypad.
8 Use of the humidifier (valid for all the models)
• If you want to use the humidifier – an air-freshening system that keeps a
steady humidity rate during the operation of the emitter – open the tank
and fill it with water (Fig. A). If you also want to use it to freshen or
perfume the air, add a few drops of your favourite essence (flower,
eucalypt, etc.) to the water. Close the tank.
ET8924.book Page 15 Friday, June 22, 2007 11:18 AM

16 Cleaning and maintenance
9 Cleaning and maintenance
• Make sure the emitter is not connected to the mains, and let its surface
cool if you were using it previously.
• Use a damp, soft cloth to clean the emitter. Do not use solvents or
abrasive detergents. When necessary, use a vacuum cleaner to remove
the dust from the emitter.
ET8924.book Page 16 Friday, June 22, 2007 11:18 AM

17
fr
Attention
FRANÇAIS fr
1 Attention
• L’appareil ne doit en aucun cas être couvert par des vêtements, récipient
ou tout autre objet ni être placé sous une armoire ou tout autre obstacle
à la circulation de l’air chaud.
• L’appareil doit être éloigné de tout objet inflammable et il ne faut pas
laisser d’enfants sans surveillance à proximité de l’émetteur.
• N’utilisez pas l’émetteur thermique pour sécher des vêtements.
• La pose de l’émetteur thermique doit être choisie correctement et être
réalisée conformément aux normes.
• Ne pas installer l’appareil au-dessous d’une prise de courant.
• L’appareil ne doit pas être installé dans des lieux où il existe un risque
d’éclaboussures (à proximité de baignoires, lavabos, douches, piscines,
etc.).
• Ne faites pas fonctionner l’appareil avec le cordon d’alimentation
enroulé.
• Si le cordon d’alimentation est endommagé, ne mettez pas l’appareil en
fonctionnement. Afin d’éviter des risques, seul le Service d’Assistance
Technique pourra remplacer ce cordon.
• L’appareil doit être installé de sorte que les interrupteurs, thermostats,
prise de branchement mobile ne puissent pas être touchés directement
ou indirectement par une personne qui se trouve dans la baignoire ou
sous la douche.
• Afin d’éviter l’odeur de neuf de l’appareil, lors de sa première utilisation
allumez l’émetteur et laissez-le fonctionner à la température la plus
élevée pendant 2 heures.
bAttention ! Lorsque vous souhaitez vous débarrasser de l’appareil, ne
le jetez JAMAIS à la poubelle, mais rendez-vous à un POINT
PROPRE ou de récupération de déchets le plus proche de votre
domicile pour son traitement postérieur. Vous contribuerez ainsi à la
protection de l’environnement.
cAfin d’éviter une surchauffe, ne pas couvrir l’appareil de chauffage.
ET8924.book Page 17 Friday, June 22, 2007 11:18 AM

18 Instructions de montage
2 Instructions de montage
Dans la mesure du possible, installer l’émetteur sur un mur près d’une
fenêtre mais en aucun cas dans une zone de ventilation. Respecter les
distances de sécurité pour l’installation.
Montage au mur
1 Présenter le support mural au sol dans la position indiquée sur la figure
(fig. 1) et repérer au mur le trou supérieur de la vis sur le support des
deux côtés (fig. 1).
2 Percer au niveau des repères et poser la cheville correspondante (fig. 2).
3 Placer le support en faisant coïncider les trous inférieurs pour les vis de
celui-ci et visser (fig. 3).
4 Avec le support maintenu par la partie inférieure, répéter le processus
du point 2 (fig. 3).
5 Pour terminer, visser afin de terminer la fixation correcte du support
(fig. 4).
6 Vérifiez que le support est bien fixé et peut supporter deux fois le poids
de l'appareil.
Si le support est endommagé, ne pas le réutiliser.
Pour le montage sur un mur de briques recouvert de plâtre, utiliser les
pièces suivantes : vis 4.2 x 25 DIN 7981 et cheville 6 76 NY ; pour
d'autres types de mur, adressez-vous à votre vendeur.
Distances de sécurité
• Le radiateur doit être installé à 150 mm de tout obstacle, mur, etc.
• La distance de l’appareil au sol doit être de 220 mm voire inférieure dans
certains cas mais jamais en dessous de 150 mm.
Montage des pieds (accessoire non fourni)
• Introduisez les extrémités de la partie inférieure du radiateur dans les
pieds comme indiqué sur la figure 5, vous entendrez un déclic indiquant
que le montage a été réalisé correctement.
ET8924.book Page 18 Friday, June 22, 2007 11:18 AM

19
fr
Mode de fonctionnement (modèles : ET8924, ET8926, ET8928,
3 Mode de fonctionnement (modèles : ET8924, ET8926,
ET8928, ET8930, ET8932. Thermostat numérique)
Composants
1 Clavier
1.1 Touche diminuer la sélection
1.2 Touche augmenter la sélection
1.3 Touche mode/OK
1.4 Touche interrupteur MARCHE/ARRÊT/PROG
A Humidificateur
1 Une fois l’appareil fixé et correctement branché, appuyez sur
l’interrupteur MARCHE/ARRÊT/PROG pour mettre l’émetteur thermique
sous tension.
2 À l’allumage de l’émetteur thermique, le microprocesseur lit la mémoire
interne de l’appareil pour charger de dernier mode sélectionné par
l’utilisateur. Lorsque l'appareil est branché pour la première fois, la
mémoire est vide, ce pourquoi l'écran clignotera constamment jusqu'à
ce que vous appuyiez sur n'importe quelle touche.
3 Durant le fonctionnement de l’appareil, l’écran indique la température et
le mode de fonctionnement sélectionné : confort, économique, antigel,
éteint et programmation.
• Le symbole Hest allumé lorsque la résistance est en
fonctionnement.
Réglage de la température de confort
1 En appuyant sur les touches (+) et (-), on sélectionne la température de
confort que nous souhaitons. La température varie par incréments de 1
ºC à chaque pulsation. En appuyant de manière prolongée sur cette
touche, la température varie automatiquement à raison de 1 ºC toutes
les 0,25 sec.
2 Une fois la température assignée et après une période sans aucune
pulsation, l’appareil mémorise la température sélectionnée.
CONFORT ÉCONOMIQUE ANTIGEL ÉTEINT PROGRAMMATION
sl NG
PROG
ET8924.book Page 19 Friday, June 22, 2007 11:18 AM

20 Programmation
Sélection de mode
1 En appuyant sur la touche (M/OK), nous sélectionnons le mode de
fonctionnement. Pour chaque pulsation supérieure à 0,1 sec, le
thermostat passe d’un mode à l’autre : Confort - Économique - Confort,
etc.
2 Pour accéder au mode « antigel », la pulsation sur la touche (M/OK) sera
d’une durée prolongée jusqu’à ce que l’icône correspondante .
apparaisse sur l’écran.
Défauts possibles du thermostat
• Si la sonde se trouve en dessous de -15 ºC, l’écran affichera le message
OC.
• Si la sonde se trouve au dessus de 50 ºC, l’écran affichera le message
SC.
4 Programmation
1 Assurez-vous que le thermostat est en position ARRÊT ou appuyez sur
le bouton MARCHE/ARRÊT/PROG pour passer à la position arrêt.
2 Appuyez de façon prolongée (au minimum 5 secondes) sur le bouton
MARCHE/ARRÊT/PROG pour passer au mode programmation
manuelle.
3 Sélectionner le mode de fonctionnement heure par heure en appuyant
sur le bouton " + " et ensuite " Mode/OK ".
• Segment supérieur : confort
• Segment inférieur : économique
• Rien : antigel.
4 Répétez l'opération pour chaque heure de chaque jour de la semaine.
• À la fin de la programmation du septième jour, le thermostat enregistre
automatiquement les paramètres et passe au mode ajustement de
MODE TEMPÉRATURE
CONFORT Sélection avec les touches (+), (-)
ÉCONOMIQUE Température de confort moins 3 ºC
ANTIGEL 7 ºC
OFF Éteint
ET8924.book Page 20 Friday, June 22, 2007 11:18 AM
This manual suits for next models
4
Table of contents
Languages:
Other SOLAC Heater manuals
Popular Heater manuals by other brands

Space-Ray
Space-Ray FUSION Series Installation & operation instructions

Lasko
Lasko 5538 operating manual

Zehnder Rittling
Zehnder Rittling Fare LCD manual

HeatStar
HeatStar HSU200NG Operating instructions and owner's manual

Prem-I-Air
Prem-I-Air EH1524 User and installation guide

Bestron
Bestron AWH2000 instruction manual

flowair
flowair ELIS G E-150 manual

Infratech
Infratech SL 1612 Installation, use & care manual

HDT
HDT Camfire CV125CG Operation manual

cecotec
cecotec Ready Warm 7400 Quartz Sky Smart instruction manual

Stanley
Stanley ST-300A-120 User's manual & operating instructions

Bio Green
Bio Green ARKANSAS operating instructions